
A Look Inside Your Power Mirror


Thread Starter
Administrator


Joined: Nov 2004
Posts: 4,084
Likes: 235
From: Southern California
Part-1
Here we will take a look inside your Power Mirror,
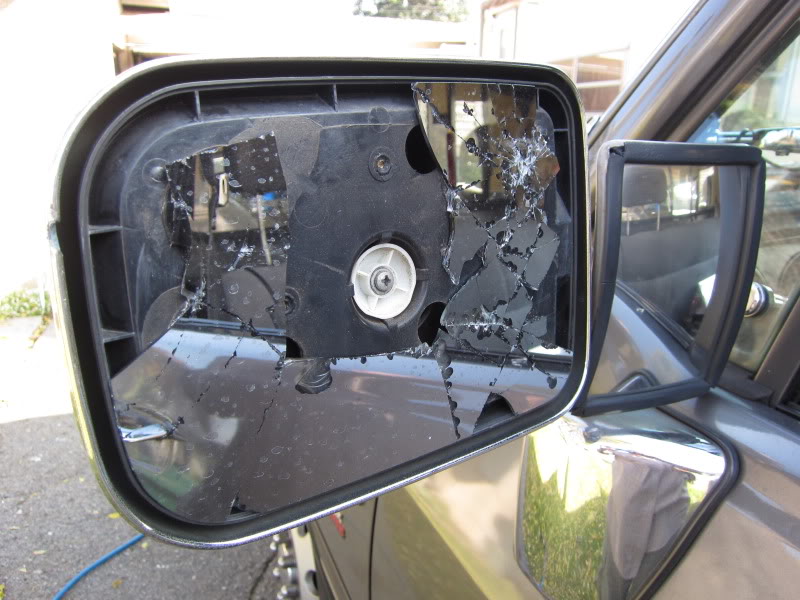
As far as I know there is no way that you can remove the mirror glass to gain access to the inside without breaking the glass.
If the glass was not recessed into the plastic frame you could try and slip a piece of fine wire secured to 2 handles fashioned like a garrote and then possible slice the pads of silicone as you draw the wire behind the mirror glass but the glass appears to be recessed in the back pretty tight.
Luckily or unluckily for me my mirror was broken when my truck was sideswiped by a delivery truck back in December 2010
Before you do anything first put on a pair of heavy gloves and put on your eye protection.
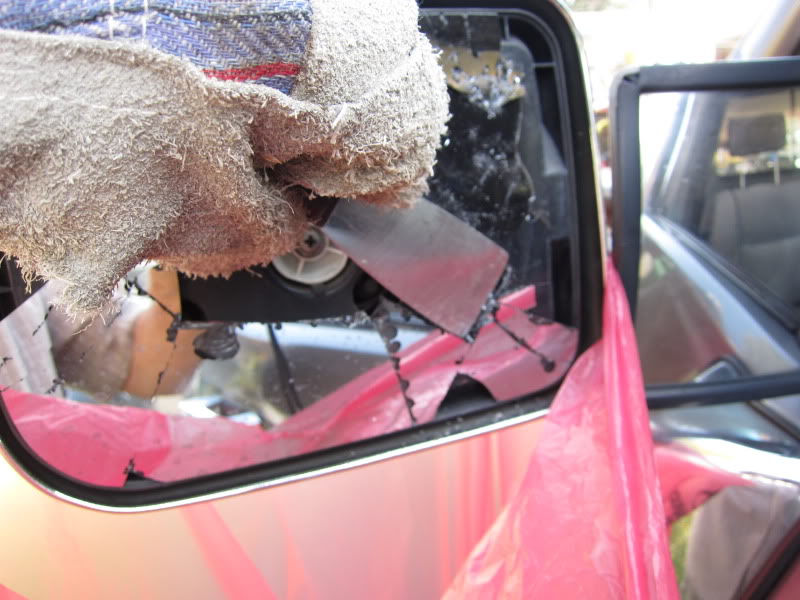
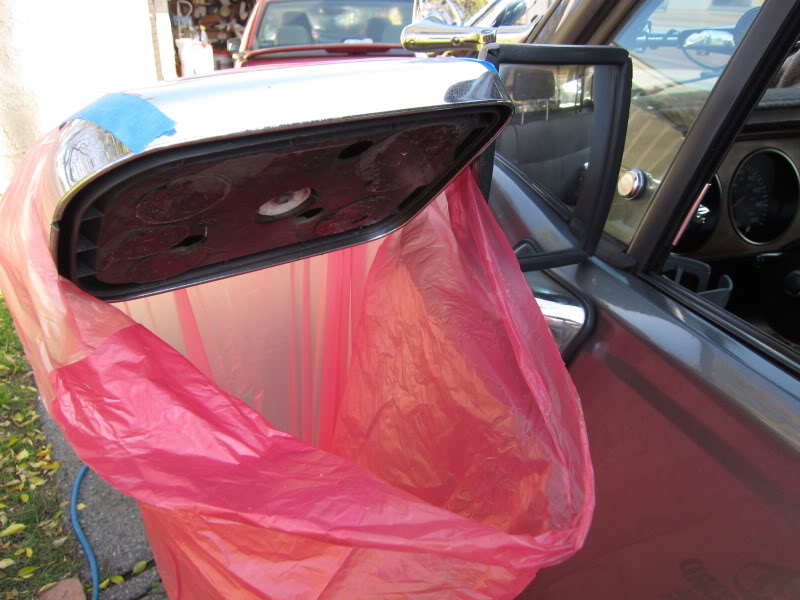
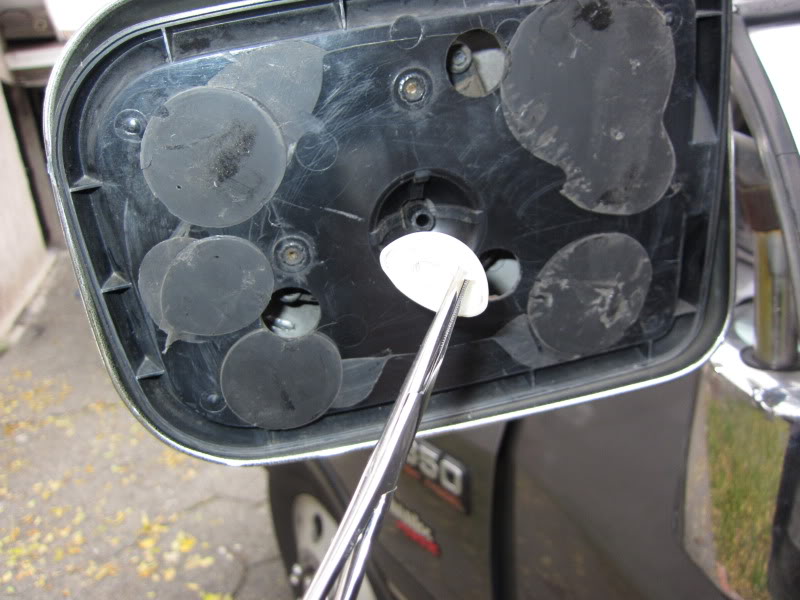
So the first task is to remove all of the broken pieces of glass, I used a thin sharpened putty knife to carefully pry out the pieces of glass and let them drop directly into a trash bag that I had taped to the mirror head.
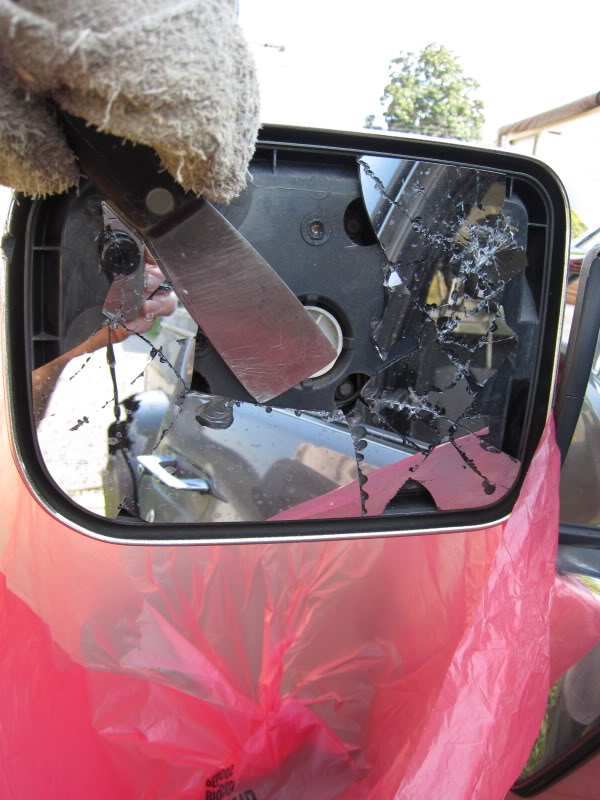
The blade was razor sharp so I was able to slice though the silicone, you could also use a razor blade holder or a paint scraper.
Remember these are very sharp tools you are using, Use them only if you are comfortable using them and use them at your own risk.
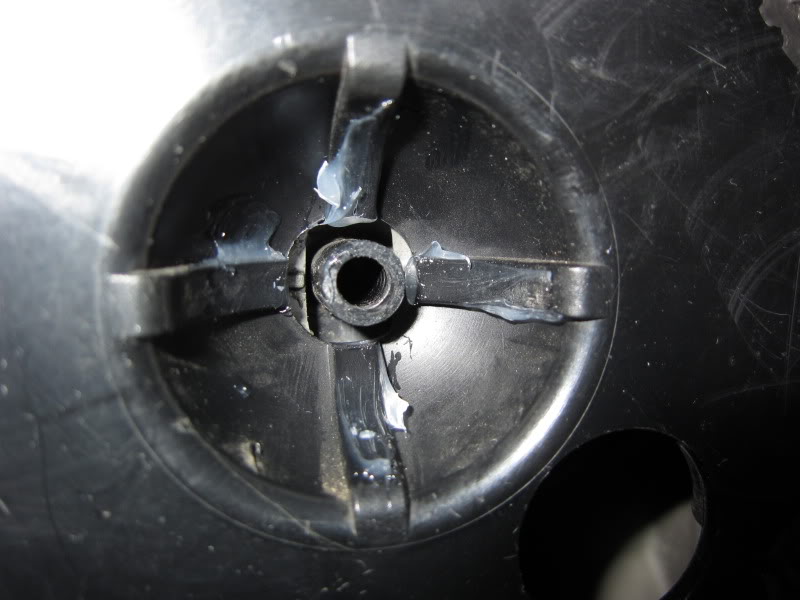
Now you can see how well the glass was stuck on there, they really did not want it to fall off, not like the cheap ones that use double sided foam tape.
Also now you can see how the mirror pivots in the head, and why you cannot just pop it off, I have heard from different people that you can just pop the glass out, it a ball and socket but no-no you would for sure break it trying to pop it out.
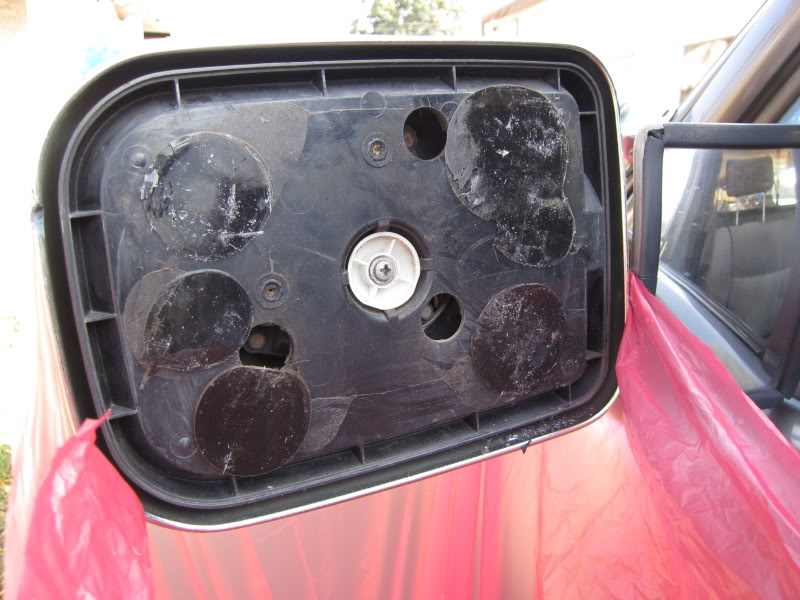
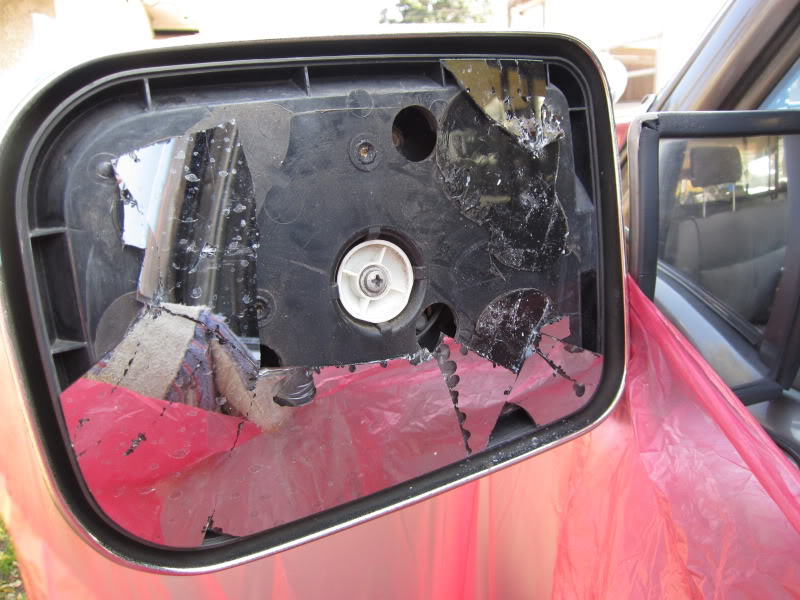
After I got all of the glass out I tilted the head downward and gave it a few taps to make sure there was nothing remaining inside the housing.
Another view of the mirror without the glass.
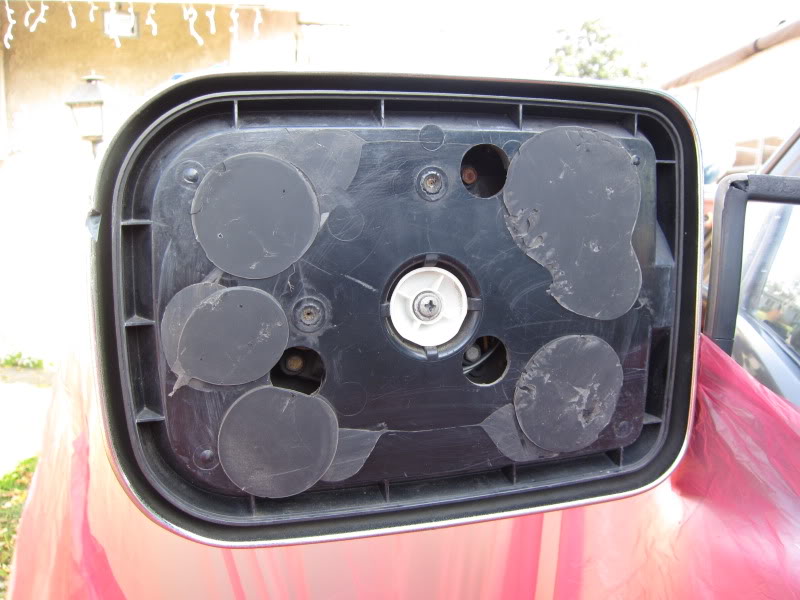
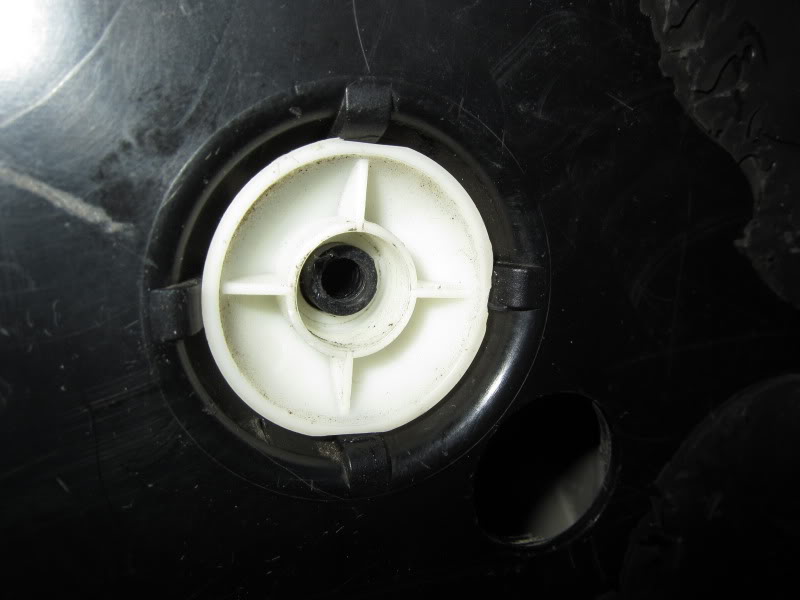
Next we will be removing the pivot and the mechanism that tilts the mirror.

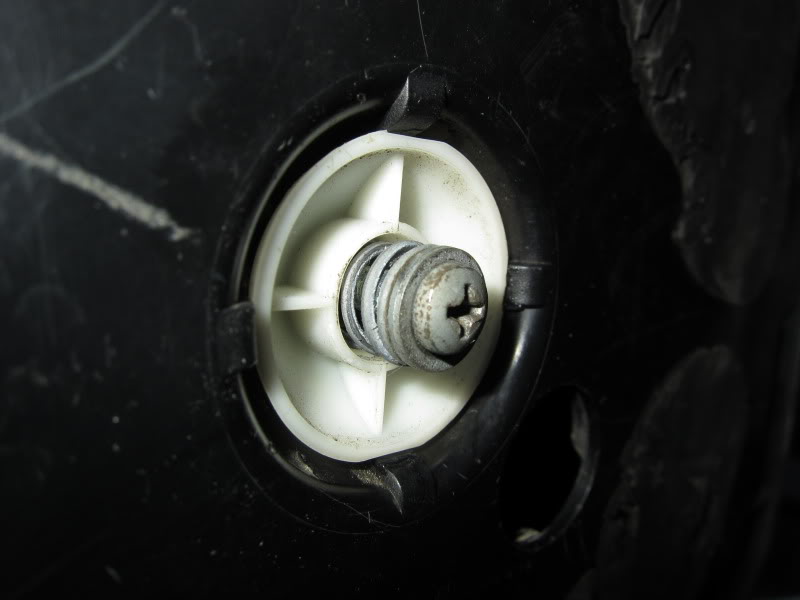
Using a Phillips screwdriver, remove the screw, washer and spring from the center of the pivot
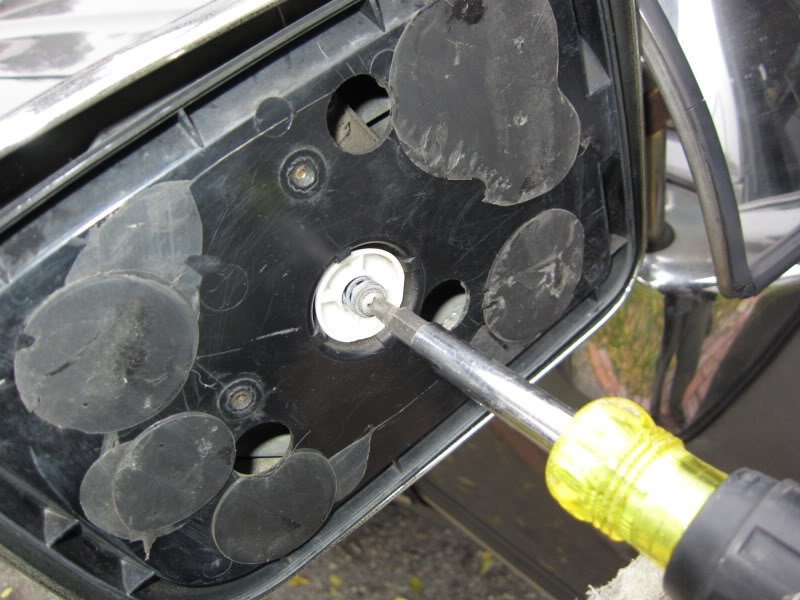
Then remove the pivot and set it aside where you will be able to find it.
Here we will take a look inside your Power Mirror,
As far as I know there is no way that you can remove the mirror glass to gain access to the inside without breaking the glass.
If the glass was not recessed into the plastic frame you could try and slip a piece of fine wire secured to 2 handles fashioned like a garrote and then possible slice the pads of silicone as you draw the wire behind the mirror glass but the glass appears to be recessed in the back pretty tight.
Luckily or unluckily for me my mirror was broken when my truck was sideswiped by a delivery truck back in December 2010
Before you do anything first put on a pair of heavy gloves and put on your eye protection.
So the first task is to remove all of the broken pieces of glass, I used a thin sharpened putty knife to carefully pry out the pieces of glass and let them drop directly into a trash bag that I had taped to the mirror head.
The blade was razor sharp so I was able to slice though the silicone, you could also use a razor blade holder or a paint scraper.
Remember these are very sharp tools you are using, Use them only if you are comfortable using them and use them at your own risk.
Now you can see how well the glass was stuck on there, they really did not want it to fall off, not like the cheap ones that use double sided foam tape.
Also now you can see how the mirror pivots in the head, and why you cannot just pop it off, I have heard from different people that you can just pop the glass out, it a ball and socket but no-no you would for sure break it trying to pop it out.
After I got all of the glass out I tilted the head downward and gave it a few taps to make sure there was nothing remaining inside the housing.
Another view of the mirror without the glass.
Next we will be removing the pivot and the mechanism that tilts the mirror.
Using a Phillips screwdriver, remove the screw, washer and spring from the center of the pivot
Then remove the pivot and set it aside where you will be able to find it.
Thread Starter
Administrator
Joined: Nov 2004
Posts: 4,084
Likes: 235
From: Southern California
Part-2
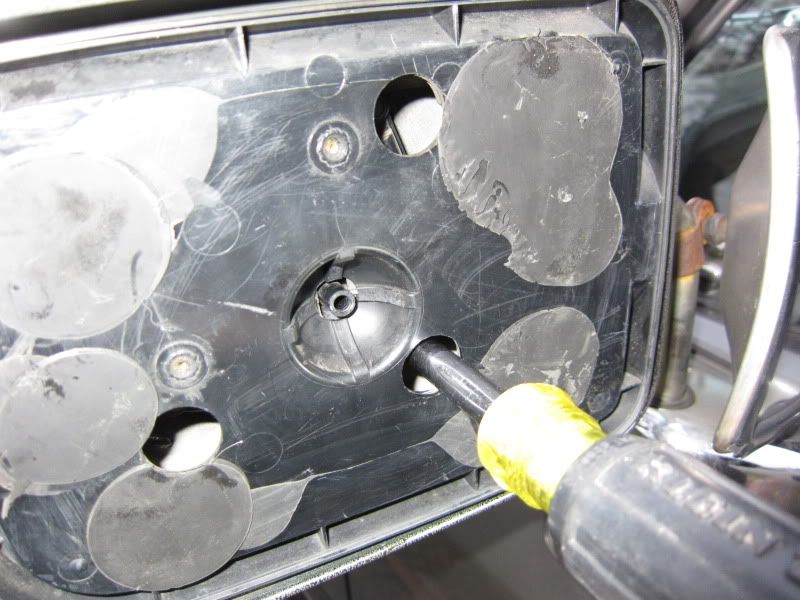
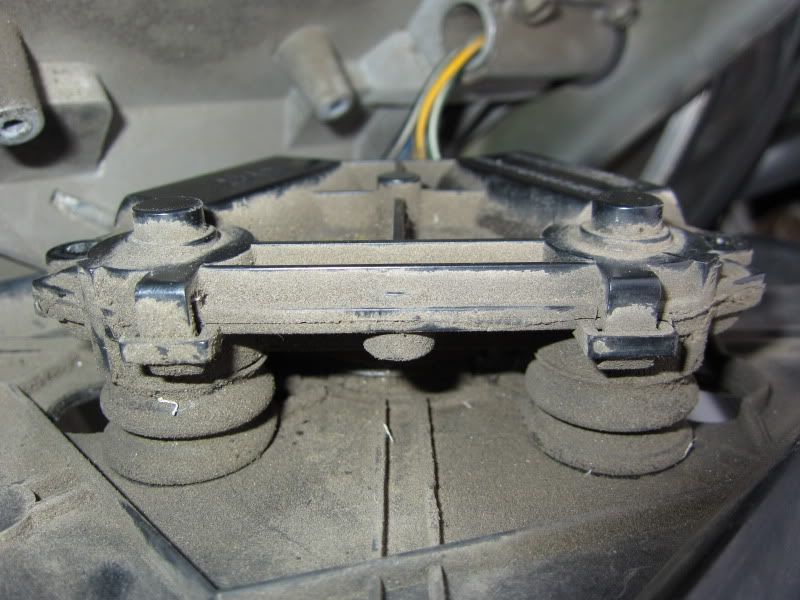
Then using a 5/16� socket wrench remove the 3 screws in the back of the housing by reaching through the 3 holes.

Then carefully tilt the assembly forwards and out, it will still be connected by the wiring that runs through your door.
You might be able to pull a small amount of slack from the wire but no much as it is fastened inside the door.
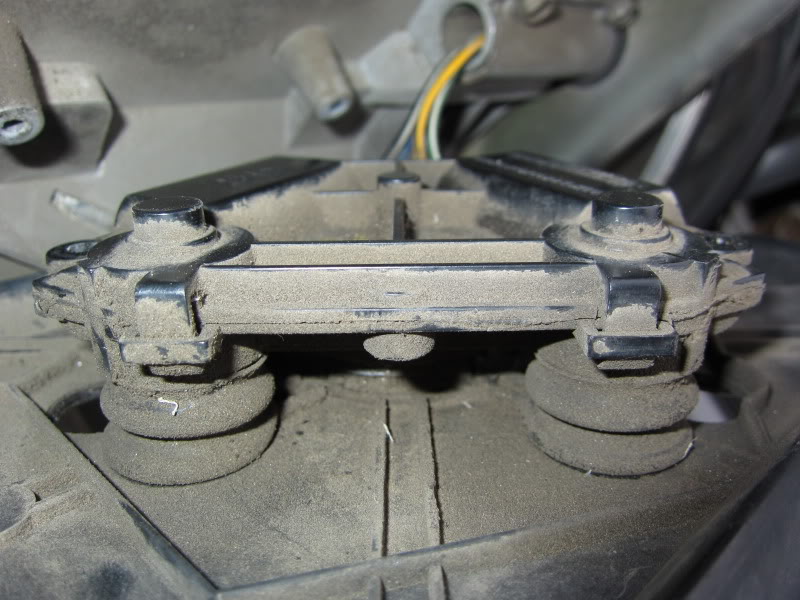
Once the adjusting motors are free from the base it can be carefully opened by releasing the clips on either end, should be 4 of them and then the housing can be carefully separated, just be careful, they are plastic.
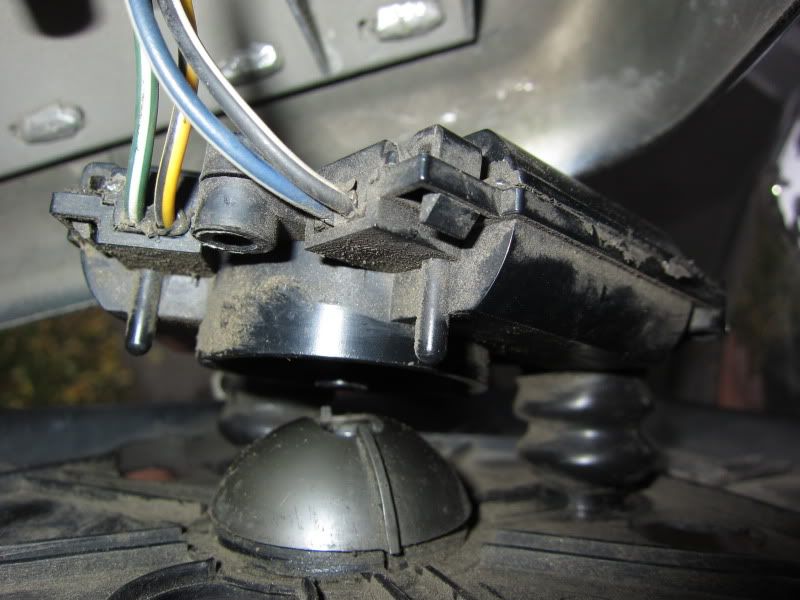
At this time you can add a small amount of white grease, (remember to use thin grease if it gets cold where you live)
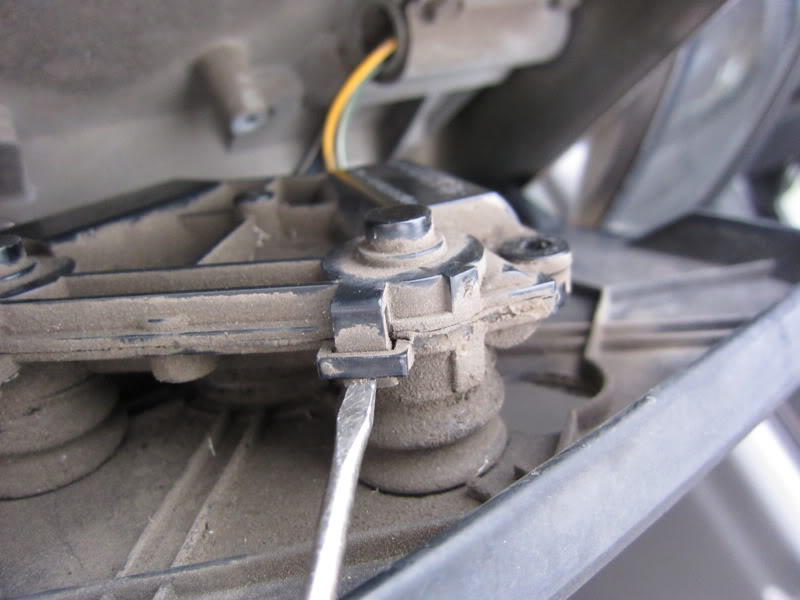
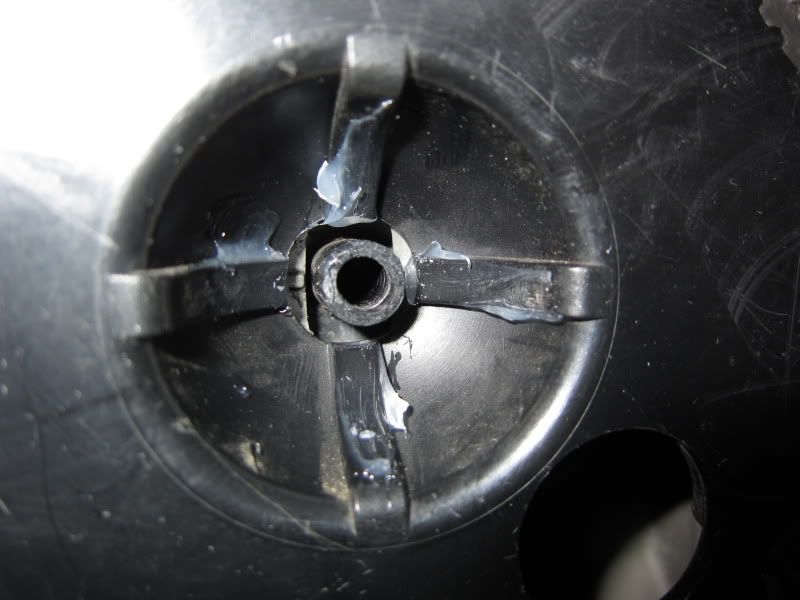
Here you can see the inside of the socket where the mirror platform pivots against the motor housing.
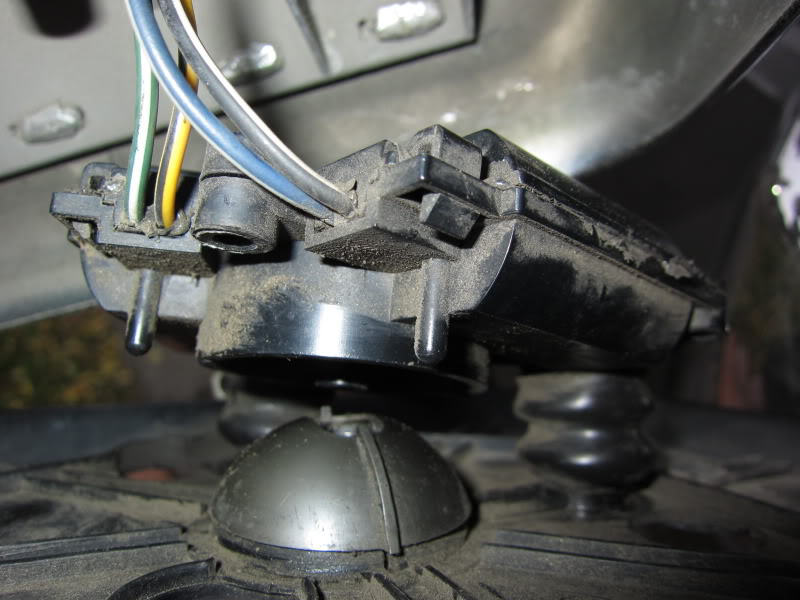
Here you can see the 2 small permanate magnet motors that are coupled to a threaded gear that in turn drive a jack screw in and out of the housing that are covered inside the 2 black bellows.
The 2 jack screws push or pull the housing against the pivot to adjust the attached mirror.

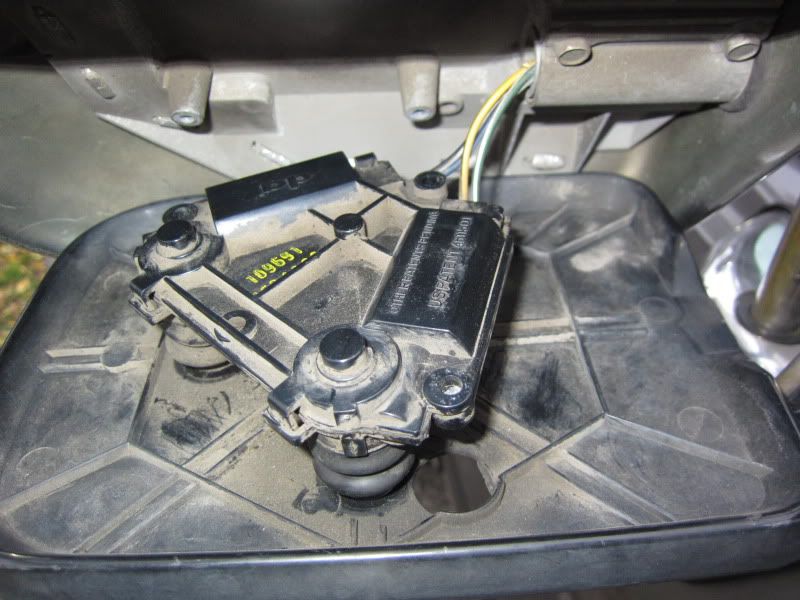
Now that the motors operate satisfactorily reassemble is in the reverse order securing the motor to the housing using the previously removed 3 screws.
I added a small amount of silicone grease to the socket.
Reinstalled the pivot.
And then replaced the screw, washer and spring.
Now all that is left to do is to install a piece of replacement glass.
Because of the small lip on the housing I was not able to find an exact fit replacement glass at any of the auto parts although they claimed they were for the truck, the new glass would have to be siliconed to the top of the lip.
A good glass shop should be able to cut a piece of mirror to fit it they cannot order the exact one.
Since this was only going to be a temporary fix for mine until the entire mirror was going to be replaced I found a mirror that was plastic that could be cut using good scissors.
I hope this little tour inside your mirror was helpful, it was not really meant to repair anything but just to show you how to get inside and have a look around.
Let me know if you have any questions.
Jim
Then using a 5/16� socket wrench remove the 3 screws in the back of the housing by reaching through the 3 holes.
Then carefully tilt the assembly forwards and out, it will still be connected by the wiring that runs through your door.
You might be able to pull a small amount of slack from the wire but no much as it is fastened inside the door.
Once the adjusting motors are free from the base it can be carefully opened by releasing the clips on either end, should be 4 of them and then the housing can be carefully separated, just be careful, they are plastic.
At this time you can add a small amount of white grease, (remember to use thin grease if it gets cold where you live)
Here you can see the inside of the socket where the mirror platform pivots against the motor housing.
Here you can see the 2 small permanate magnet motors that are coupled to a threaded gear that in turn drive a jack screw in and out of the housing that are covered inside the 2 black bellows.
The 2 jack screws push or pull the housing against the pivot to adjust the attached mirror.
Now that the motors operate satisfactorily reassemble is in the reverse order securing the motor to the housing using the previously removed 3 screws.
I added a small amount of silicone grease to the socket.
Reinstalled the pivot.
And then replaced the screw, washer and spring.
Now all that is left to do is to install a piece of replacement glass.
Because of the small lip on the housing I was not able to find an exact fit replacement glass at any of the auto parts although they claimed they were for the truck, the new glass would have to be siliconed to the top of the lip.
A good glass shop should be able to cut a piece of mirror to fit it they cannot order the exact one.
Since this was only going to be a temporary fix for mine until the entire mirror was going to be replaced I found a mirror that was plastic that could be cut using good scissors.
I hope this little tour inside your mirror was helpful, it was not really meant to repair anything but just to show you how to get inside and have a look around.
Let me know if you have any questions.
Jim

Registered User
Joined: Oct 2016
Posts: 3
Likes: 0
Part-2
Then using a 5/16� socket wrench remove the 3 screws in the back of the housing by reaching through the 3 holes.
Then carefully tilt the assembly forwards and out, it will still be connected by the wiring that runs through your door.
You might be able to pull a small amount of slack from the wire but no much as it is fastened inside the door.
Once the adjusting motors are free from the base it can be carefully opened by releasing the clips on either end, should be 4 of them and then the housing can be carefully separated, just be careful, they are plastic.
At this time you can add a small amount of white grease, (remember to use thin grease if it gets cold where you live)

Here you can see the inside of the socket where the mirror platform pivots against the motor housing.
Here you can see the 2 small permanate magnet motors that are coupled to a threaded gear that in turn drive a jack screw in and out of the housing that are covered inside the 2 black bellows.
The 2 jack screws push or pull the housing against the pivot to adjust the attached mirror.
Now that the motors operate satisfactorily reassemble is in the reverse order securing the motor to the housing using the previously removed 3 screws.
I added a small amount of silicone grease to the socket.
Reinstalled the pivot.

And then replaced the screw, washer and spring.

Now all that is left to do is to install a piece of replacement glass.
Because of the small lip on the housing I was not able to find an exact fit replacement glass at any of the auto parts although they claimed they were for the truck, the new glass would have to be siliconed to the top of the lip.
A good glass shop should be able to cut a piece of mirror to fit it they cannot order the exact one.
Since this was only going to be a temporary fix for mine until the entire mirror was going to be replaced I found a mirror that was plastic that could be cut using good scissors.
I hope this little tour inside your mirror was helpful, it was not really meant to repair anything but just to show you how to get inside and have a look around.
Let me know if you have any questions.
Jim
Then using a 5/16� socket wrench remove the 3 screws in the back of the housing by reaching through the 3 holes.
Then carefully tilt the assembly forwards and out, it will still be connected by the wiring that runs through your door.
You might be able to pull a small amount of slack from the wire but no much as it is fastened inside the door.
Once the adjusting motors are free from the base it can be carefully opened by releasing the clips on either end, should be 4 of them and then the housing can be carefully separated, just be careful, they are plastic.
At this time you can add a small amount of white grease, (remember to use thin grease if it gets cold where you live)
Here you can see the inside of the socket where the mirror platform pivots against the motor housing.
Here you can see the 2 small permanate magnet motors that are coupled to a threaded gear that in turn drive a jack screw in and out of the housing that are covered inside the 2 black bellows.
The 2 jack screws push or pull the housing against the pivot to adjust the attached mirror.
Now that the motors operate satisfactorily reassemble is in the reverse order securing the motor to the housing using the previously removed 3 screws.
I added a small amount of silicone grease to the socket.
Reinstalled the pivot.
And then replaced the screw, washer and spring.
Now all that is left to do is to install a piece of replacement glass.
Because of the small lip on the housing I was not able to find an exact fit replacement glass at any of the auto parts although they claimed they were for the truck, the new glass would have to be siliconed to the top of the lip.
A good glass shop should be able to cut a piece of mirror to fit it they cannot order the exact one.
Since this was only going to be a temporary fix for mine until the entire mirror was going to be replaced I found a mirror that was plastic that could be cut using good scissors.
I hope this little tour inside your mirror was helpful, it was not really meant to repair anything but just to show you how to get inside and have a look around.
Let me know if you have any questions.
Jim

Registered User


Joined: Mar 2010
Posts: 7,265
Likes: 1,346
From: Prince George, BC
Interesting thought....4 stainless screws would work. And most replacement mirrors are not glass now days, just a plastic with a reflective film over them.

Thread
Thread Starter
Forum
Replies
Last Post
JKM
Other
10
Dec 12, 2012 12:09 AM
SOhappy
General Diesel Discussion
8
Nov 14, 2011 07:04 AM