

Marinco block heater socket installation tech article

Thread Starter
Administrator
Joined: Nov 2003
Posts: 4,569
Likes: 40
From: League City, TX
Here is the article I promised to write from back in my Chased by the orange snake in my driveway thread. I installed these sockets on my 2nd gen, but you can fit these on anything from a 1st gen to a 4th gen. This is a fairly easy project that can be accomplished in a couple hours (3-4 hours).
Objective : Installation of Marinco sockets for block heater power (never open the hood to plug in again !)
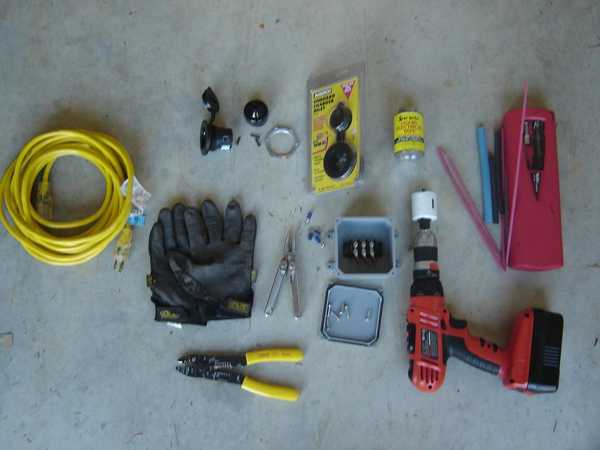
Parts needed :
2 (or 1 if you only want one) Marinoco 115 Volt AC charging sockets (Marinco part # 150BBI)
Drill with a 1 7/8" hole saw
25' sacrificial extension cord (I recommend a cord with at least 12 guage wire), get a longer cord if you have a long bed. My 25' cord was just enough for my short bed.
1 4" x 4" junction box, I recommend a sturdy plastic one (it won't corrode, you won't need this if you are only installing one plug)
3 point terminal block
Basic hand tools
Star Brite brand liquid electrical tape. Great for use as weather/water sealant. You can also use RTV or any other non-conductive sealant
Electrical pliers
Eye terminals
Basic hand tools
Electrical multimeter
Optional items :
Heat shrink
Soldering iron and rosin core solder
Electrical multimeter
Pop rivets
Objective : Installation of Marinco sockets for block heater power (never open the hood to plug in again !)
Parts needed :
2 (or 1 if you only want one) Marinoco 115 Volt AC charging sockets (Marinco part # 150BBI)
Drill with a 1 7/8" hole saw
25' sacrificial extension cord (I recommend a cord with at least 12 guage wire), get a longer cord if you have a long bed. My 25' cord was just enough for my short bed.
1 4" x 4" junction box, I recommend a sturdy plastic one (it won't corrode, you won't need this if you are only installing one plug)
3 point terminal block
Basic hand tools
Star Brite brand liquid electrical tape. Great for use as weather/water sealant. You can also use RTV or any other non-conductive sealant
Electrical pliers
Eye terminals
Basic hand tools
Electrical multimeter
Optional items :
Heat shrink
Soldering iron and rosin core solder
Electrical multimeter
Pop rivets
Thread Starter
Administrator
Joined: Nov 2003
Posts: 4,569
Likes: 40
From: League City, TX
Getting started
Safety : Be careful when using the hole saw. I highly reccomend you wear gloves and safety glasses (metallic splinters aren't fun and don't feel good)
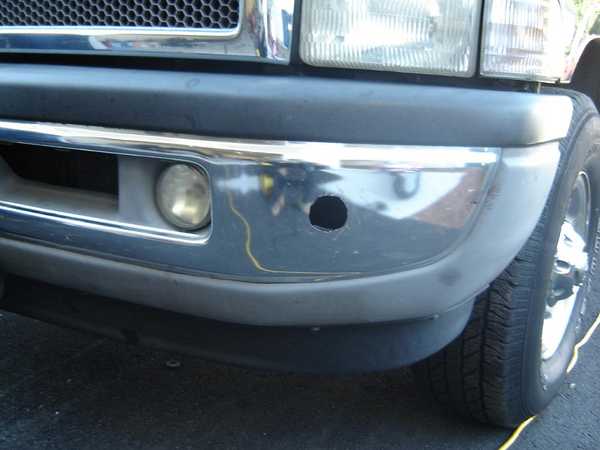
To get started select the location where you would like the hole.
**If you are only using 1 Marinco socket, I strongly reccomend you mount it on the right side of the front bumper. This will make it way easier to route the cord later since the block heater is on the right (passenger) side. **
Drill the hole with the hole saw and clean up the edges when finished with a file or Dremel tool. Test fit the Marinco socket now and make adjustments to the hole as needed.
**When I was shopping for a hole saw I could only find a 1 3/4" saw. The Marinco instructions call for a 1 7/8" hole. Get the 1 7/8" saw if you can. It will save a lot of time and effort. I had to use my dremel and widen the hole when I did it. The hole wasn't a perfect circle afterward, but it worked. **
Front Bumper hole
Rear bumper hole
Image coming soon, I forgot to upload it.
Thread Starter
Administrator
Joined: Nov 2003
Posts: 4,569
Likes: 40
From: League City, TX
Junction box
These steps are if you are using a junction box for 2 sockets.
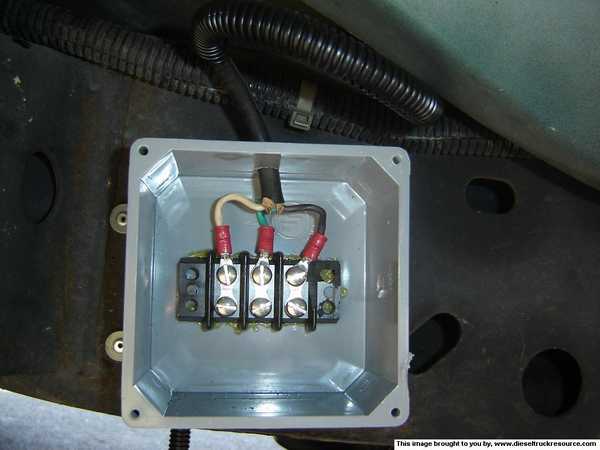
This was a tricky part for me. I used this junction box since it is made of sturdy plastic (I think it's ABS plastic), had a nice foam seal on the lid, and was ideal for this purpose IMO. Plastic is also nonconductive, so if anything bad were to happen to the wiring in the box, my frame rails won't be charged with 115 Volts AC.
I mounted a terminal strip (look for these at a elctrical parts shop, Lowes and Home Depot did not have these at all) in mine with a poly-urethane based glue/adhesive (I used Elmer's ultimate glue, Gorilla glue is the same thing). I installed the terminal strip 2 days in advance before I installed it. This allows plenty of time for the glue to set/cure. If you use the glue like I did you will need a C clamp to hold the terminal strip in place while the glue cures. I used glue (instead of a screw) so as not to compromise the box's watertight integrity. (Water + electricity = never anything good )
)
Drill the holes for the cords (one for the block heater, two for the the extension cords). Drill the holes before you mount the box. The block heater cord hole I drilled on the top of the box. The extension cord holes I drilled on the left and right side of the box.
To mount it I marked and drilled 4 holes in the driver's side frame rail. I put the box on the outboard side of the rail (away from the driveline and exhaust pipe), you can put it on the passenger side rail too, just make sure it is within reach of the block heater cord.
The frame rail is made of very strong steel. I initially tried to use sheet metal screws to mount the box. The frame steel is very hard and the screws were not able to 'bite' into it. I even broke one screw off in the frame which made me abandon that idea (my Dremel took care of the broken screw). If the frame was a C channel frame you could use bolts/nuts to mount the box. but this is not the case on my 2nd gen (box frame). You could tap and thread the holes to bolt the box on (I don't have a tap and die set). I ended up using pop rivets. The pop rivets actually worked out good. Holds the box securely to the frame.
This was a tricky part for me. I used this junction box since it is made of sturdy plastic (I think it's ABS plastic), had a nice foam seal on the lid, and was ideal for this purpose IMO. Plastic is also nonconductive, so if anything bad were to happen to the wiring in the box, my frame rails won't be charged with 115 Volts AC.
I mounted a terminal strip (look for these at a elctrical parts shop, Lowes and Home Depot did not have these at all) in mine with a poly-urethane based glue/adhesive (I used Elmer's ultimate glue, Gorilla glue is the same thing). I installed the terminal strip 2 days in advance before I installed it. This allows plenty of time for the glue to set/cure. If you use the glue like I did you will need a C clamp to hold the terminal strip in place while the glue cures. I used glue (instead of a screw) so as not to compromise the box's watertight integrity. (Water + electricity = never anything good
)Drill the holes for the cords (one for the block heater, two for the the extension cords). Drill the holes before you mount the box. The block heater cord hole I drilled on the top of the box. The extension cord holes I drilled on the left and right side of the box.
To mount it I marked and drilled 4 holes in the driver's side frame rail. I put the box on the outboard side of the rail (away from the driveline and exhaust pipe), you can put it on the passenger side rail too, just make sure it is within reach of the block heater cord.
The frame rail is made of very strong steel. I initially tried to use sheet metal screws to mount the box. The frame steel is very hard and the screws were not able to 'bite' into it. I even broke one screw off in the frame which made me abandon that idea (my Dremel took care of the broken screw). If the frame was a C channel frame you could use bolts/nuts to mount the box. but this is not the case on my 2nd gen (box frame). You could tap and thread the holes to bolt the box on (I don't have a tap and die set). I ended up using pop rivets. The pop rivets actually worked out good. Holds the box securely to the frame.
Thread Starter
Administrator
Joined: Nov 2003
Posts: 4,569
Likes: 40
From: League City, TX
Block heater cord
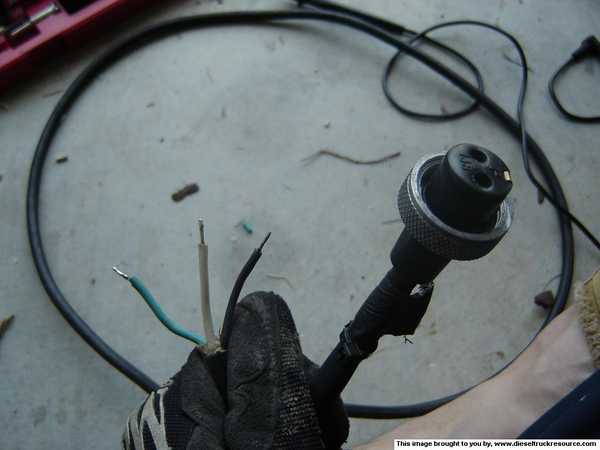
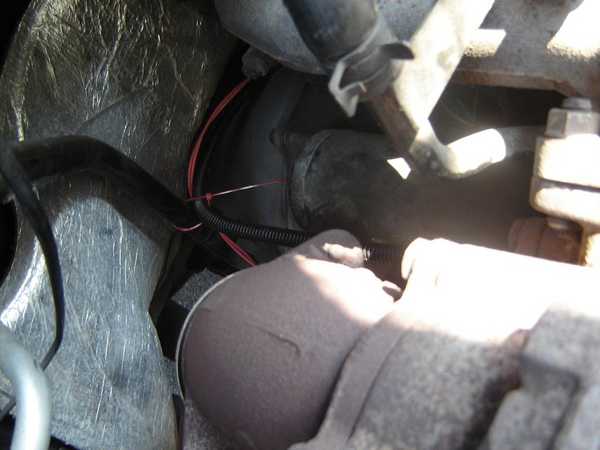
If you haven't already done so, remove the block heater cord. It just unscrews from the heater itself. Look between the turbo and oil filter to see the cord connection :

If your cord is greasy/grimy like mine was, you can clean it using a rag and isopropyl/rubbing alcohol. Now is also a good time to clean the block heater connection. Clean the ground pin and outer collar with a wire brush. You want the brass contact to be bright and shiny. Doesn't take much work to make it look nice. The pin sockets are a little more challenging. You can take a small piece of sandpaper and roll it tightly with the rough surface facing out. Roll it small enough to fit in the pin socket. Use that to clean out the pin sockets.
Now cut off the plug (not the block heater connection). Trim about 1 1/2" of the outer jacket from the cord to expose the wires. Use a knife or scissors to cut the paper filler material out from around the wires. Now use the electrical pliers to trim no more than a 1/2" of insulation from the 3 wires. As an option, if you have a soldering iron, use that and tin the wire tips. Makes for a nice clean connection.
Thread Starter
Administrator
Joined: Nov 2003
Posts: 4,569
Likes: 40
From: League City, TX
Marinco Socket installation
Now we will install the Marinco sockets.
The Marinco sockets come packaged with a large flange nut and 3 sheet metal/wood screws. The screws, they are for installing the Marinco sockets on a softer surface (fiberglass boat, wood, etc), or in the plastic chin fairing on the front bumper. Use the large flange nut for installation in the metal bumper. Put the flange nut on the cable first, then slide the protective boot on the cable. Then poke the cable through the hole in the bumper.
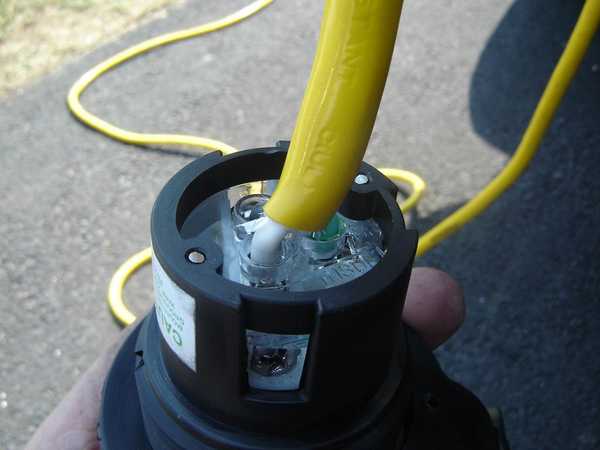
Trim your extension cord like the block heater cord if you are using an extension cord for 2 sockets. The Marinco sockets are easy to wire in. There are three holes to insert the wires into. The three holes are color coded as to what wire goes where. The color code is on the screw to tighten to crimp down on the wire. There is a green, black, and silver (for the white wire) screw.
Standard color code is -
Green - ground
White - neutral
Black - hot wire (115 Volts AC)
Just match the colors and insert the wire into the corresponding hole. Then tighten the screw. Gently tug the wire to check and see if it is firmly in place. The finished product should look similar to this (depending on how far back you trimmed the outer jacket on the cord) :
Once that is done, slide the protective boot over the socket, and make sure it is seated good. At this point you may use the Star Brite liquid electrical tape (or other sealant) to seal the boot to the socket. Just coat around the boot at the cord end and the socket end. This will ensure that your socket will not suffer water intrusion which will corrode your wiring over time or possibly short circuit the line and trip the breaker.
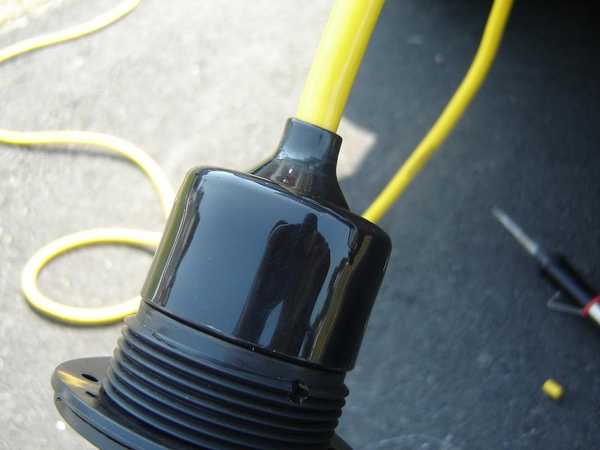
Now insert the socket into the bumper hole and orient the socket with the ground pin up (it will look upside down). If you look into the socket should should notice there is a small drain hole at the bottom. This is to drain water out should it happen to rain when you have it plugged in. Make sure this drain hole hole is at the bottom. Also make sure the rubber cap is oriented correctly too. It rotates independant of the socket and cannot move once the flange nut is tightened.
Now tighten the flange nut while holding the socket in place ( a helper is very handy here). Hand tighten as mauch as you can to make it nice and snug. Then take a large flathead screwdriver, or large set of channel lock pliers, and push up on one of the flange nut 'lugs' to further tighten it. This will make sure it is securely in place.
Here is how it should look from the back. If you look closely you can see the sealant on the cord boot.

The Marinco sockets come packaged with a large flange nut and 3 sheet metal/wood screws. The screws, they are for installing the Marinco sockets on a softer surface (fiberglass boat, wood, etc), or in the plastic chin fairing on the front bumper. Use the large flange nut for installation in the metal bumper. Put the flange nut on the cable first, then slide the protective boot on the cable. Then poke the cable through the hole in the bumper.
Trim your extension cord like the block heater cord if you are using an extension cord for 2 sockets. The Marinco sockets are easy to wire in. There are three holes to insert the wires into. The three holes are color coded as to what wire goes where. The color code is on the screw to tighten to crimp down on the wire. There is a green, black, and silver (for the white wire) screw.
Standard color code is -
Green - ground
White - neutral
Black - hot wire (115 Volts AC)
Just match the colors and insert the wire into the corresponding hole. Then tighten the screw. Gently tug the wire to check and see if it is firmly in place. The finished product should look similar to this (depending on how far back you trimmed the outer jacket on the cord) :
Once that is done, slide the protective boot over the socket, and make sure it is seated good. At this point you may use the Star Brite liquid electrical tape (or other sealant) to seal the boot to the socket. Just coat around the boot at the cord end and the socket end. This will ensure that your socket will not suffer water intrusion which will corrode your wiring over time or possibly short circuit the line and trip the breaker.
Now insert the socket into the bumper hole and orient the socket with the ground pin up (it will look upside down). If you look into the socket should should notice there is a small drain hole at the bottom. This is to drain water out should it happen to rain when you have it plugged in. Make sure this drain hole hole is at the bottom. Also make sure the rubber cap is oriented correctly too. It rotates independant of the socket and cannot move once the flange nut is tightened.
Now tighten the flange nut while holding the socket in place ( a helper is very handy here). Hand tighten as mauch as you can to make it nice and snug. Then take a large flathead screwdriver, or large set of channel lock pliers, and push up on one of the flange nut 'lugs' to further tighten it. This will make sure it is securely in place.
Here is how it should look from the back. If you look closely you can see the sealant on the cord boot.
Thread Starter
Administrator
Joined: Nov 2003
Posts: 4,569
Likes: 40
From: League City, TX
Cable routing
Cable routing will vary among the different year model Rams. These are just basic guidelines to follow when routing your cables.
- Stay away from moving parts. You do not want the cable to get mangled from it getting pinched in suspension parts, etc.
- Stay away from the exhaust as well, no sense in having a melted cable.
- Use zip ties or cable clamps to secure your cable in place so it doesn't dangle or get caught on anything.
If you are only using one socket, and put it on the passenger side front bumper, routing the cable will be easier as you don't have far to go, or much to avoid other than the front driveline (4x4) and suspension.
For the junctions boxes :
I chose the drivers side frame rail for routing my cables to the juction box. I followed the existing wiring and brake lines to run the cable from the rear bumper.
The front socket was more challenging as I had the front suspension, and the automatic transmission shifter linkage to contend with. I went up and over the front suspension following a wiring harness there. Then followed the fuel lines to get to the box. Avoid the shifter linkage, you don't want to bind up the linkage or pinch the cord.
The block heater cord itself provided another challenge, since the heater itself is on the passenger side of the engine, and my junction box was on the drivers side frame rail. For the block heater cord I routed it along the transmission cooler line and the transmission dipstick tube and then over the transmission case to get to the drivers side. I had also encased the block heater cord in split loom to protect it from engine heat.
Those of you with manual transmissions may have to be more creative to route the cord.
View from drivers side of transmission :
Thread Starter
Administrator
Joined: Nov 2003
Posts: 4,569
Likes: 40
From: League City, TX
Junction box wiring
Prior to wiring in the extension cords now would be a great time to verify that your block heater is in good working order. Connect your block heater cord to the block heater if you already haven't done so. Now we will use a multimeter to check the block heater (if you have a meter).
Ohm's Law
E = I x R or Voltage (E) = Current/amps (I) times Resistance (R).
Power (Watts) = Voltage times Current P = E x I
Our block heaters are rated at 750 Watts. Knowing that we can figure the amount of current flowing when its plugged in
750 watts = 115 Volts AC x I To get I divide 750 by 115 which equals 6.52. 6.52 amps of current flow when the block heater is plugged in.
Knowing that we can now figure out the resistance of the block heater.
115 Volts AC = 6.52 amps x R. Divide 115 by 6.52 which equals 17.63.
The block heater ideally has 17.63 ohms of resistance.
Set your multimeter to measure resistance. Put your leads on the black and white wires. You should see something around 17 ohms. (mine measured 22.3 ohms). If your meter reads it as an open circuit (OL) or short circuit, you either measured wrong (check your leads) or your block heater is bad and should be pulled and checked.
Now for the wiring. I used eye terminals for my wires. You don't have to use eye terminals, you can use whatever electrical connection you prefer, just make sure that it is safe and won't contact any other wires. Eye terminals are more secure in that if the terminal screw loosens up a wire won't come loose and possibly damage the circuit. Every wire I tinned using my soldering iron. (you don't have to solder your connections, it's just the method I personally prefer)
Using the electrical pliers strip the insulation off of the wire. Then insert the wire into the terminal and crimp it down in two places to ensure a tight crimp on the wire. If you solder, you can solder the wire again to the terminal for the ultimate electrical contact.
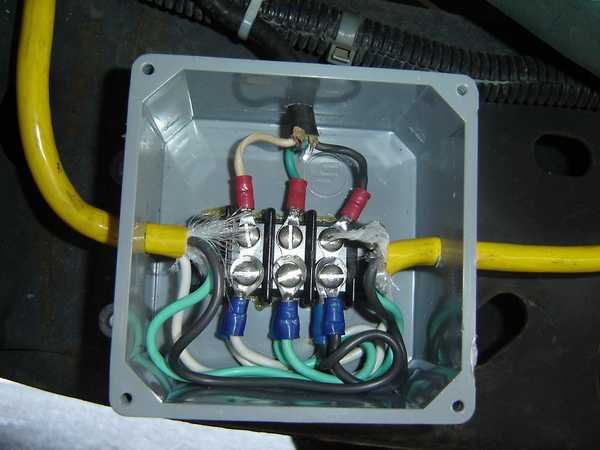
After you have all terminals installed, Now you can wire it in. The basic idea here is to match the colors. I put the block heater cord on the topside of the terminal strip. The bottom row I used for the socket lines. Remember :
Green - ground
White - neutral
Black - hot wire (115 Volts AC)
Make sure your connections are tight and secure.
If you used two sockets you will have 6 wires to deal with from the extension cords. Put a terminal on every wire like this:
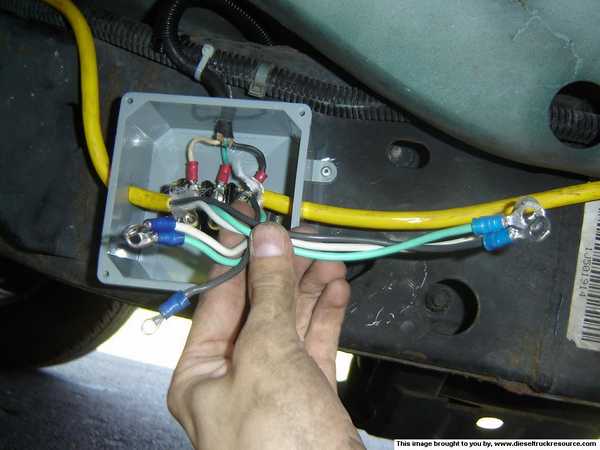
When you wire it make sure the terminals are isolated from each other to prevent short circuits (a good reason to use a terminal strip).
Here is what mine looked like when it was finished:
Ohm's Law
E = I x R or Voltage (E) = Current/amps (I) times Resistance (R).
Power (Watts) = Voltage times Current P = E x I
Our block heaters are rated at 750 Watts. Knowing that we can figure the amount of current flowing when its plugged in
750 watts = 115 Volts AC x I To get I divide 750 by 115 which equals 6.52. 6.52 amps of current flow when the block heater is plugged in.
Knowing that we can now figure out the resistance of the block heater.
115 Volts AC = 6.52 amps x R. Divide 115 by 6.52 which equals 17.63.
The block heater ideally has 17.63 ohms of resistance.
Set your multimeter to measure resistance. Put your leads on the black and white wires. You should see something around 17 ohms. (mine measured 22.3 ohms). If your meter reads it as an open circuit (OL) or short circuit, you either measured wrong (check your leads) or your block heater is bad and should be pulled and checked.
Now for the wiring. I used eye terminals for my wires. You don't have to use eye terminals, you can use whatever electrical connection you prefer, just make sure that it is safe and won't contact any other wires. Eye terminals are more secure in that if the terminal screw loosens up a wire won't come loose and possibly damage the circuit. Every wire I tinned using my soldering iron. (you don't have to solder your connections, it's just the method I personally prefer)
Using the electrical pliers strip the insulation off of the wire. Then insert the wire into the terminal and crimp it down in two places to ensure a tight crimp on the wire. If you solder, you can solder the wire again to the terminal for the ultimate electrical contact.
After you have all terminals installed, Now you can wire it in. The basic idea here is to match the colors. I put the block heater cord on the topside of the terminal strip. The bottom row I used for the socket lines. Remember :
Green - ground
White - neutral
Black - hot wire (115 Volts AC)
Make sure your connections are tight and secure.
If you used two sockets you will have 6 wires to deal with from the extension cords. Put a terminal on every wire like this:
When you wire it make sure the terminals are isolated from each other to prevent short circuits (a good reason to use a terminal strip).
Here is what mine looked like when it was finished:
Trending Topics
Thread Starter
Administrator
Joined: Nov 2003
Posts: 4,569
Likes: 40
From: League City, TX
Finishing
To finish, double check all connections. Make sure the Marinco sockets are firmly in place. Check your cable routing again to make sure it is secured snug along its route and won't get caught in any moving parts or interfere with any moving parts (like the shifter linkage).
Install the lid on the junction box, and if you want, use the liquid electrical tape again to seal the edges of the lid and coat the screw tops (to keep them from corroding in case you have to pull the lid off). Also use it to seal the cable entry holes.
The finished product should look like this :
Junction box (didn't realize I was holding the camera at a bad angle)

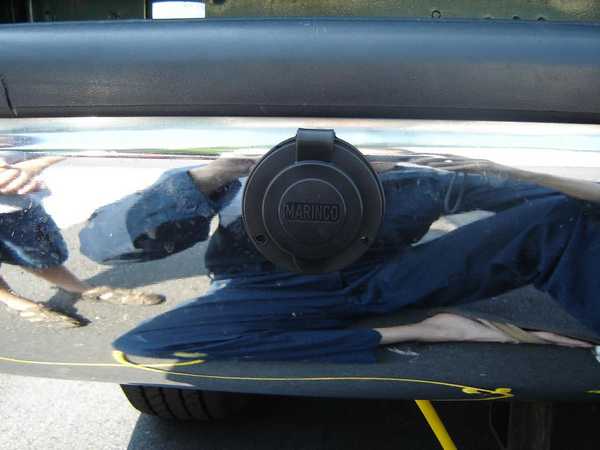
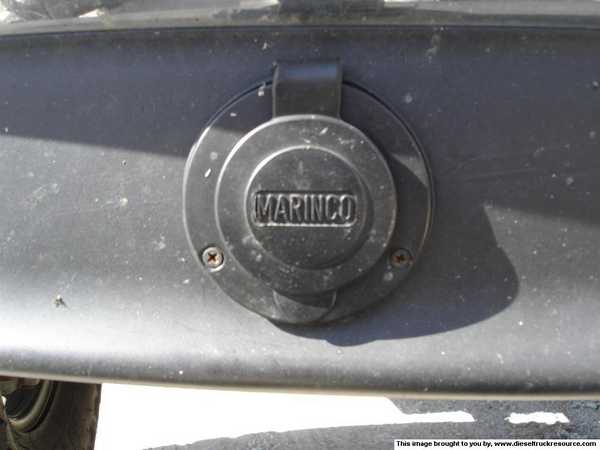
Marinco socket (this one is on the rear bumper) :
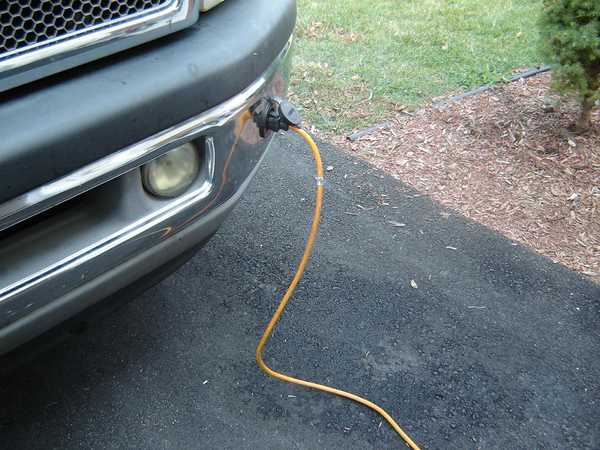
Marinco plug in use :
That's all there is to it. Grab a cold one and admire your work.
I hope this article helps you to install your Marinco sockets.
Install the lid on the junction box, and if you want, use the liquid electrical tape again to seal the edges of the lid and coat the screw tops (to keep them from corroding in case you have to pull the lid off). Also use it to seal the cable entry holes.
The finished product should look like this :
Junction box (didn't realize I was holding the camera at a bad angle)
Marinco socket (this one is on the rear bumper) :
Marinco plug in use :
That's all there is to it. Grab a cold one and admire your work.
I hope this article helps you to install your Marinco sockets.
Registered User
Joined: Nov 2005
Posts: 7,785
Likes: 3
From: Pattonville, Texas
Great Sticky, JR! 
In '05, I just put the Marinco in the "chin spoiler" :
The neat thing is, if you also run an inverter like we do (5KW), you can mount a 115VAC socket on the bumper(s) as well... just don't mix up the sockets!
In '05, I just put the Marinco in the "chin spoiler" :
The neat thing is, if you also run an inverter like we do (5KW), you can mount a 115VAC socket on the bumper(s) as well... just don't mix up the sockets!
Thread Starter
Administrator
Joined: Nov 2003
Posts: 4,569
Likes: 40
From: League City, TX
.With your's in the chin fairing (looks good BTW
), does it move around when you plug it in or pull the cord out?
 Heres what I came up with 3 winters ago was a PIA to do but it works
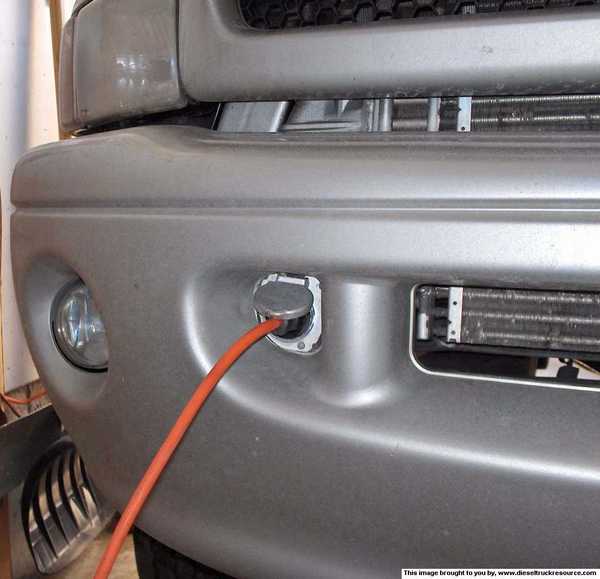
Registered User
Joined: Nov 2005
Posts: 7,785
Likes: 3
From: Pattonville, Texas
I installed it one day when the truck was shiny & new, and I felt lazy... necessity is the mother of invention.
Thread Starter
Administrator
Joined: Nov 2003
Posts: 4,569
Likes: 40
From: League City, TX
Thank you
Yours looks nice Joe. Is that a 2nd gen sport you have? Because where you have your plug, looks like where my foglights are at.
DTR's "Cooler than ice cubes 14 miles North of North Pole" member
Joined: Oct 2006
Posts: 1,797
Likes: 9
From: 14mi North of North Pole
There's always this option as well. Then you don't even have to worry about storing the cord when not in use.
http://accessarides.com/id16.htm
http://accessarides.com/id16.htm
Registered User
Joined: Sep 2002
Posts: 794
Likes: 1
From: Toronto, ON
Thx, yup its a 2nd gen sport bumper it was the best place for it, it was a PIA cause the bumper mount was there so it wasn't an easy install... but it works