
93 Ramcharger -> 12V


Registered User
Joined: Apr 2002
Posts: 685
Likes: 0
From: Waddell, AZ
Its just stuck. It could be the input, or it could be the trans to the bellhousing. Try moving it left to right(rotate) to see if it is bound up, or just stuck. Sometimes, you may need to get 2 screwdrivers on either side and get it start sliding back.
Thread Starter
Registered User
Joined: Feb 2005
Posts: 485
Likes: 1
From: Twin Cities Mn
Update & ?
I'll get some pics up soon, I've been progressing, but it's been very slow.
Everything is out. Got the X-case, transmission and clutch bellhousing all repainted. But I'm having trouble getting the motor cleaned up ...
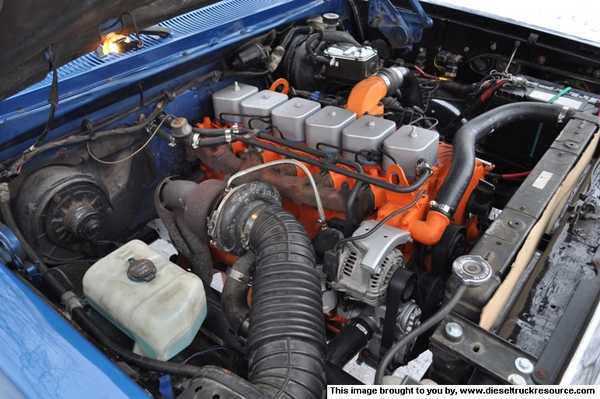
The engine is quite dirty, heavy oil deposits, rust, etc ... so my question is ...
How in the world did you guys that painted your motors actually get them clean enough to paint?
Everything is out. Got the X-case, transmission and clutch bellhousing all repainted. But I'm having trouble getting the motor cleaned up ...
The engine is quite dirty, heavy oil deposits, rust, etc ... so my question is ...
How in the world did you guys that painted your motors actually get them clean enough to paint?

Registered User

Joined: Feb 2008
Posts: 194
Likes: 1
From: Louisiana, U.S.
I'll get some pics up soon, I've been progressing, but it's been very slow.
Everything is out. Got the X-case, transmission and clutch bellhousing all repainted. But I'm having trouble getting the motor cleaned up ...
The engine is quite dirty, heavy oil deposits, rust, etc ... so my question is ...
How in the world did you guys that painted your motors actually get them clean enough to paint?
.
Thread Starter
Registered User
Joined: Feb 2005
Posts: 485
Likes: 1
From: Twin Cities Mn
Brake Problem - I'm stumped ... No Sustainable Pedal Pressure
OK here is the situation ... I'm on the very last detail of a CTD to RC swap -
I cannot get any sustainable pedal pressure while trying to bleed the brakes. I've been bleeding the brakes by myself using a 3' steel rod and a brick to hold the pedal in place while I pop the bleeder.
Here's what I've done so far.
1. All new hard lines on the frame and axle.
2. Did not take the rear drums off during conversion so they still should be in adjustment
3. New front calipers (couldn't get the bleeders to open on the old ones)
4. I'm using the 3/4 diesel master cylinder and vacuum booster
When I try to bleed the brakes (conventional pump to get pressure, hold pressure, pop the bleeders to get the air out, then shut them before the pressure drops too much to get air back in) I am able to generate pressure. I can go bleed the individual wheel cylinders and I'm quite certain i've gotten all the air out. I spent 4 hours on it one night.
However, when I let the pedal sit for a few minutes, the pressure completely disappears. It'll go straight to the floor boards again.
We (my pops and I) figured the master cylinder was dead so I replaced it last night with a new (not rebuild) one from NAPA. Re-bled the brakes two a couple of hours to ensure all the air was back out of the system.
From the poor drawings in the FSM, it appears the braking systems are slightly different from the RC to the CTD. I'm using the line schematic from the RC - w/ a CTD master cylinder and booster.
Same problem w/ the new master cylinder installed ... any ideas?

Administrator
Joined: Jan 2007
Posts: 8,372
Likes: 172
From: Streator Illinois
Just for giggles, does it have rear wheel ABS? Could be the RWABS dump valve, which is really an accumulator, you could be filling it while bleeding, and with only a small leak back, it could take some time to empty the accumulator.
Something to look at.
Something to look at.
Thread Starter
Registered User
Joined: Feb 2005
Posts: 485
Likes: 1
From: Twin Cities Mn
It's DONE!!!
Well folks I finally have a running vehicle.
Below is a run down of all the items done to the truck during the conversion.
Engine/Transmission:
1. New Water Pump - Cummins
2. New Throttle linkage, Metal - Cummins
3. New Gaskets (intake, front main, valve cover gaskets, rocker, etc) - Cummins
4. New Turbo oil supply line - Cummins
5. Eyelet wire ends for KSB and FSS
6. 1/8" Timing Bump
7. New throttle return spring (found something close @ Lowes)
8. New coolant hoses w/ SS worm clamps
9. Throttle linkage moved to inner hole
10. New FSS (not a pull cable member anymore!)
11. New pilot bearing
12. New throw-out bearing
13. New Block heater cable
14. New Motor Mounts
15. New Transmission Mounts
16. KDP and KTCB done
Fuel System:
1. New Diaphram fuel pump (chasing a problem when I got the truck)
2. New 3/8" Biodiesel compatible fuel lines (SS P-clamps)
3. BC847 (David) modified pickup and return in fuel sending unit
4. Fab'd 304-SS fuel tank straps w/ SS hardware
Steering:
1. New Red Head Steering Box
2. Borgeson Steering shaft (double U-joint)
3. New Feed line
4. Fab'd new return line
5. New Power Steering Pump
Suspension:
1. Front: Stock 3/4 ton springs w/ New U-bolts and new bushings
2. Rear: Rebuilt half tons springs
A. Polyethylene .050"x3"x6" strip in center hole
b. Poly round spring tips
c. Overload removed
d. Upgraded to 5/8" U-bolts
e. Factory 6" Diesel blocks (to match front spring height)
f. New bushings
3. Rear: New swing shackle hangers
Brakes:
1. All new hard lines from distribution block to hubs (fab'd w/ SS P-clamps)
2. New Front Calipers
3. New Master Cylinder
4. New Flex lines from body to axle
5. Rebuilt Vacuum Pump (saved $300 bucks doing that)
Body:
1. Underbody'd coated w/ Chassis Saver
2. Front fenders inner - Chassis Saver
3. Front fenders outer - Chassis Saver inside
4. Modified Gasser Core Support to use Diesel radiator and I/C
5. New turn signal and marker light connectors
Interior:
1. Monstaliner entire floor pan (from manuf. of Chassis Saver)
A. painted two coats of Chassis Saver (aluminum high fill #934)
B. rolled two coats of Monstaliner
2. Removed auto shifter stalk to clean up the look
Axles/Drivetrain:
1. New Driveshaft (35-3/4" - it's so little)
2. New Axle U-joint - Front driver's side)
3. New wheel bearing - front driver's side)
Tires:
1. New Firestone Transforce A/T's 265/75R16 - recommended by local mechanic
As soon as the mods are able to find time and approve the pics, I'll have some up.
Thread Starter
Registered User
Joined: Feb 2005
Posts: 485
Likes: 1
From: Twin Cities Mn
Here's the finished rig ...
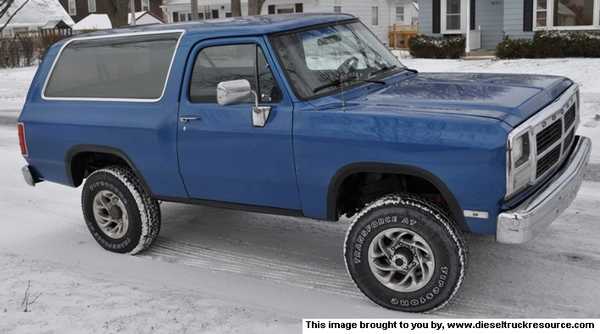
The blacked out wheel arches aren't the std fender flares, I think those things cause more rust than they prevent so I carried the chassis saver from under the truck and masked everything.
still running a stock turbo for now ... it may get upgraded to a "new" used unit next year

Don't mind the "shiny" of oil film in this shot (I'll explain below)
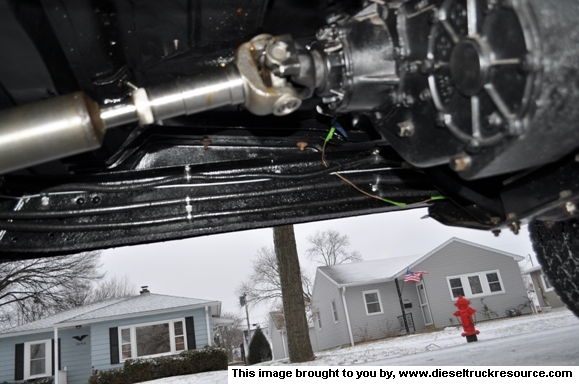
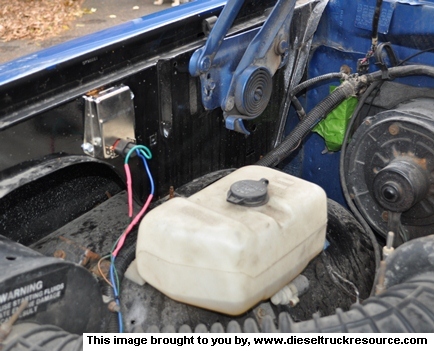
shot of the new fuel lines, brake lines and rerouted electrical with SS P-clamps. New driveshaft from a local company
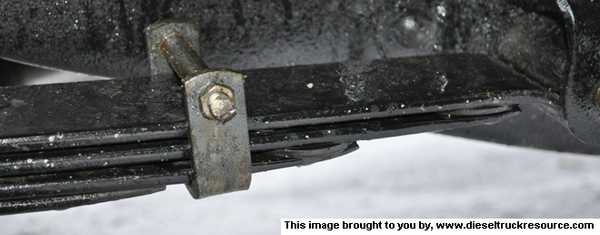
rear springs with poly tips. Luckily I didn't have to drill the springs since 1/2 leafs come with factory liners (sliders)
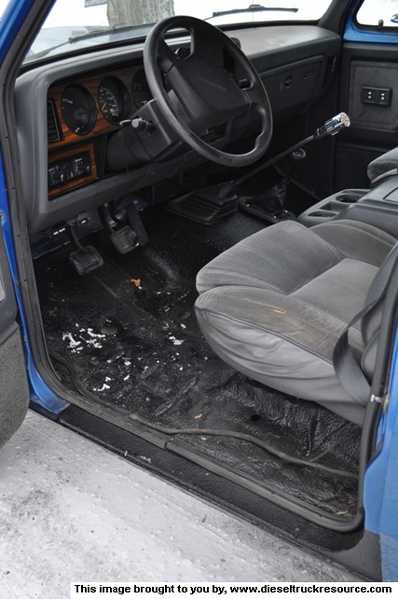
You can see the Monstaliner bedliner installed here. I carried the bedliner right up to the edge of the rocker so that when you step in, you don't scuff the paint. The six shooter shifter won't last long. The threads are stripped so I got to buy something different. Anyone know the thread count?
The blacked out wheel arches aren't the std fender flares, I think those things cause more rust than they prevent so I carried the chassis saver from under the truck and masked everything.
still running a stock turbo for now ... it may get upgraded to a "new" used unit next year
Don't mind the "shiny" of oil film in this shot (I'll explain below)
shot of the new fuel lines, brake lines and rerouted electrical with SS P-clamps. New driveshaft from a local company
rear springs with poly tips. Luckily I didn't have to drill the springs since 1/2 leafs come with factory liners (sliders)
You can see the Monstaliner bedliner installed here. I carried the bedliner right up to the edge of the rocker so that when you step in, you don't scuff the paint. The six shooter shifter won't last long. The threads are stripped so I got to buy something different. Anyone know the thread count?
Thread Starter
Registered User
Joined: Feb 2005
Posts: 485
Likes: 1
From: Twin Cities Mn
Little tips from me to you ... in no particular order.
1. There is a little triangle facing forward on the transmission crossmember so you don't put it in backwards.
2. Who knew the pushrod cover gasket was asymetrical and actually had "FRONT" labeled right on it. Well I found out when I started the truck up, drove it around block and had oil gushing everywhere. Spent 5 hours fixing that Sunday. Got very lucky I didn't have to pull the injection pump to get it done (because the first bolt doesn't completely come out with the injection pump installed).
3. If you use the diesel transmission crossmember, you may not have to slot the cross member one hole back like most folks do, mine bolted up in the factory location.
4. Don't bother to use header paint on the entire engine. It's worthless until it heats up and chemically cures. Just use good old industrial paint like everything else does on DTR.
 Thanks to all the folks on DTR. This truck wouldn't have happened without all the info and help available on this site.
1. There is a little triangle facing forward on the transmission crossmember so you don't put it in backwards.
2. Who knew the pushrod cover gasket was asymetrical and actually had "FRONT" labeled right on it. Well I found out when I started the truck up, drove it around block and had oil gushing everywhere. Spent 5 hours fixing that Sunday. Got very lucky I didn't have to pull the injection pump to get it done (because the first bolt doesn't completely come out with the injection pump installed).
3. If you use the diesel transmission crossmember, you may not have to slot the cross member one hole back like most folks do, mine bolted up in the factory location.
4. Don't bother to use header paint on the entire engine. It's worthless until it heats up and chemically cures. Just use good old industrial paint like everything else does on DTR.
Thanks to all the folks on DTR. This truck wouldn't have happened without all the info and help available on this site.
Last edited by DevilzTower; Dec 13, 2010 at 08:12 AM. Reason: more info ...
Thread Starter
Registered User
Joined: Feb 2005
Posts: 485
Likes: 1
From: Twin Cities Mn
TO DO List
Still on the list of things to do:
1. Need the vacuum line that goes from the brake booster to the HVAC unit, can't move the selector right now, so all I have is air that blows at me. Anyone have one they want to make a few bucks on? You can't see it in the engine pic, but I have it blocked off with 3/8" fuel line, a screw installed in the end and a worm clamp right now.
2. Windshield wipers only work in "high" no, intermittent (it worked before the conversion)
3. Pretty sure the shocks I swapped over from the Ramcharger (at least the one on the front passenger side) are shot. Need to buy some new ones next year.
4. Electric Fans (next year)
Registered User
Joined: Jan 2003
Posts: 321
Likes: 1
From: Acton, California
You can see the Monstaliner bedliner installed here. I carried the bedliner right up to the edge of the rocker so that when you step in, you don't scuff the paint. The six shooter shifter won't last long. The threads are stripped so I got to buy something different. Anyone know the thread count?[/QUOTE]
M10 x 1.5mm for the gear shift. The truck turned out great
M10 x 1.5mm for the gear shift. The truck turned out great
Thread Starter
Registered User
Joined: Feb 2005
Posts: 485
Likes: 1
From: Twin Cities Mn
It's been a long time since I updated and progress has been a little slow now that the RC is my daily driver (had to sell my car).
About 3 months ago, I driving home with my pups and the fuse block fell down from behind the dash, grounded itself on the metal dash, bypassed the fuse block (grounded directly to the back of it) and in the process killed the:
1. Computer
2. Cam position sensor
3. Alternator
4. I'm probably missing somthing.
So I went from a perfectly functioning truck to a doorstop in about .345 seconds. That prompted me to complete the fuse link abatement
,
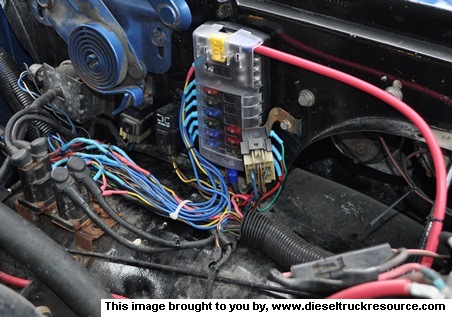
and instead of buying the cam sensor, I swapped in the external voltage regulator.
Good times. The only difference from the pictures to today is that I ran a dedicated ground back to the fuseblock (shown above) and it really made the regulator perform much smooth. It doesn't bounce nearly as much at idle and as soon as the truck comes off idle, it's perfectly calm on 14.2 volts.
About 3 months ago, I driving home with my pups and the fuse block fell down from behind the dash, grounded itself on the metal dash, bypassed the fuse block (grounded directly to the back of it) and in the process killed the:
1. Computer
2. Cam position sensor
3. Alternator
4. I'm probably missing somthing.
So I went from a perfectly functioning truck to a doorstop in about .345 seconds. That prompted me to complete the fuse link abatement
,
and instead of buying the cam sensor, I swapped in the external voltage regulator.
Good times. The only difference from the pictures to today is that I ran a dedicated ground back to the fuseblock (shown above) and it really made the regulator perform much smooth. It doesn't bounce nearly as much at idle and as soon as the truck comes off idle, it's perfectly calm on 14.2 volts.
 I am alittle bias I guess.
Thread Starter
Registered User
Joined: Feb 2005
Posts: 485
Likes: 1
From: Twin Cities Mn
