
Real Clearance Cab Lights ...


Thread Starter
Registered User
Joined: Jan 2003
Posts: 726
Likes: 0
From: Sayre, PA
Real Clearance Cab Lights ...
When the Recon clear cab lights first came out, I was one of the first guys to get them on. They were OK but I had to add my own aftermarket LED lights and I had issues with leaking until I siliconed them down good. Fast forward several years.
One of the LED lights stopped working, and frankly the light output sucked from them from the get go. I want a bold bright yellow cab light. In addition the chromed plastic base on them is now almost completely gone to expose the white plastic, they look pretty crappy. The screws through the lenses was an area of concern with moisture penetration, but I had siliconed the bases down so no water there.
So I started searching for something better recently. After much consternation that nothing that was a ready made bolt on unit was any better quality, I came across some Grote Cab lights for real trucks.
These SuperNova Aerodynamic lights I thought looked great:
http://www.grote.com/product.php?product_number=46823
They have a die cast metal base, were sleek looking and the mounting screws are under the lens cover so no water gets in through the screw holes.
Only problem was that they were quite large (like a foot long) and would look out of place on our trucks. But then I found what I hope is the answer, the Lil' brother, SuperNova Aerodynamic Small LED light:
http://www.grote.com/product.php?product_number=47183
Great looking unit, doesn't have the die-cast base as it's all ABS but no biggie. They have an optional chromed ABS base which would probably look good but probably won't last (at least in my area). I ordered 5 of them and got them yesterday. The huge plus is that it's a sealed / potted LED unit ready to wire and go. No bulbs to play with, they are designed from the ground up with the LEDs in place. It has 6 forward facing yellow LEDs and it's entirely sealed, you could probably run it with the lens off with no ill effect except getting water in your headliner. It uses a thick (1/4") dense foam gasket to seal to the truck, I won't need any silicon (which was a real PITA getting off from the old lights by the way, I don't recommend doing that anymore). The gasket also allows the light to seal against the curved roof line. If it doesn't seal well for some reason I can always go back to the silicon. The lights seem to be well designed (simple) and should last a good long time. The only downside is that you will have to make your own screw holes in the base as our trucks are not standard.
I've got one mounted but not wired just to see how it looked. It's a good bit bigger than your OEM / Recon units but not obnoxiously so. I think it it says "I'm a real truck, don't mess with me fool".
I touched the wire leads to the battery just to see the brightness and it seems much brighter than the LEDs I had in the Recons.
And maybe best of all, even though these lights are obviously engineered and built much better than the Recons / OEMs, they are actually a little cheaper. I got 5 from an online dealer for $85 plus shipping.
It's been raining here lately though so when I get some dry time to finish it up I'll post some pics, I'm pretty certain I'm going to like them a lot more than the smaller OEM / Recon units.
Thread Starter
Registered User
Joined: Jan 2003
Posts: 726
Likes: 0
From: Sayre, PA
I have 7 photos I just took of the first light installed, they are pending approval. I think it will look awesome, the clear lenses really dissappear on a silver truck while these stand out. These lights are bold and have a clean aerodynamic look, they are also much more functional being much brighter. Now if it would warm up a touch and the rain would have for a few hours I could finish, sheesh. I think you can see the rain coming in the distant gloomy sunset sky.

Thread Starter
Registered User
Joined: Jan 2003
Posts: 726
Likes: 0
From: Sayre, PA
Ok, pics are approved:
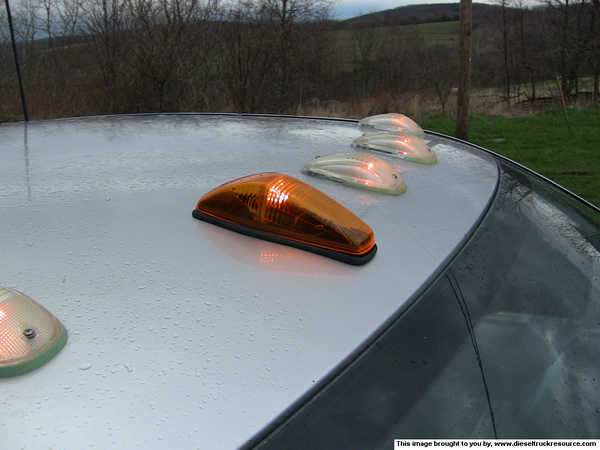
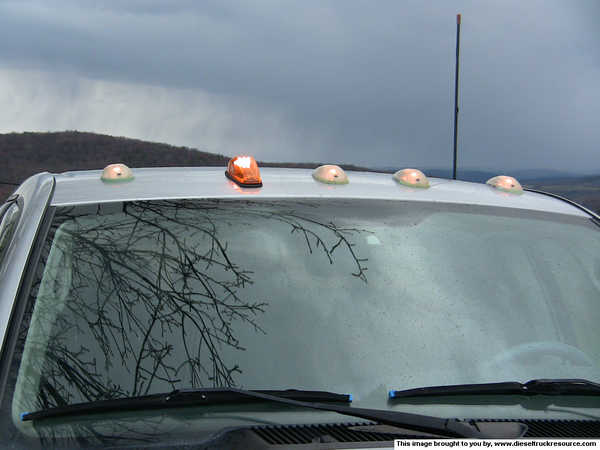
There is hard plastic base which is black. It's mostly embedded into the thick foam gasket, so although it might look like a gap in the photo, the seal is pretty tight. I don't expect any water infiltration issues.
Couple more pics in the gallery, but you get the idea.
There is hard plastic base which is black. It's mostly embedded into the thick foam gasket, so although it might look like a gap in the photo, the seal is pretty tight. I don't expect any water infiltration issues.
Couple more pics in the gallery, but you get the idea.

Registered User
Joined: Aug 2007
Posts: 558
Likes: 0
From: SUNNY Florida
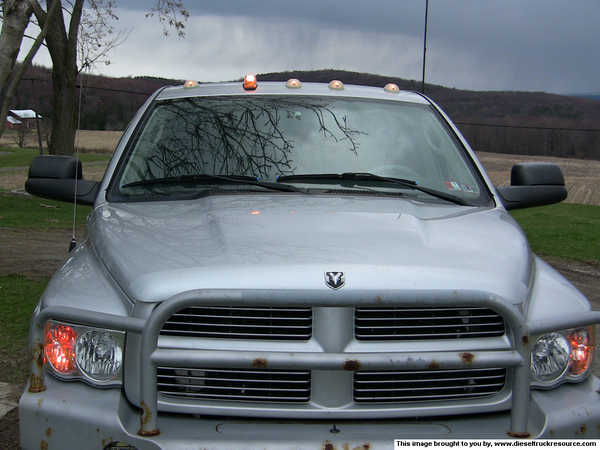
They look like they are making a big dent in the roof....I wonder how bad it`ll be when they are all bolted on.
They look O.K. , and have to be better than the Recons ( I had one of the first sets also...took them off after they cracked and leaked! ). Too bad they don`t have a little curve to the base.
They look O.K. , and have to be better than the Recons ( I had one of the first sets also...took them off after they cracked and leaked!
). Too bad they don`t have a little curve to the base.
Trending Topics
Thread Starter
Registered User
Joined: Jan 2003
Posts: 726
Likes: 0
From: Sayre, PA
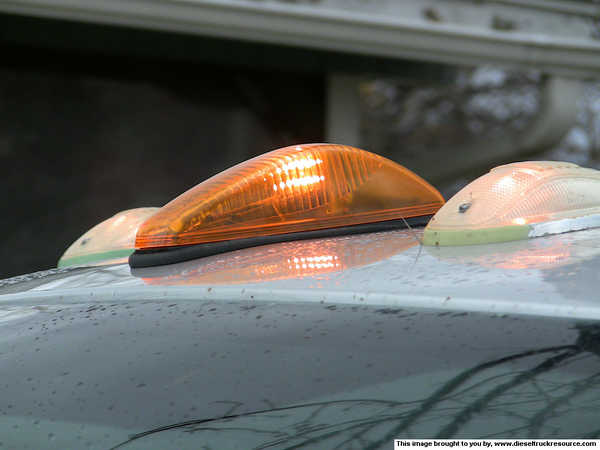
Hmm. Must be the pics don't do them justice. They look fine, the seperate black plastic base is flat, but when you tighten it down, it gets pulled into the thick (1/4") dense foam gasket. You would have to "profile" this base if you wanted to try to match the slight curvature of the roof, but honestly I wouldn't even consider going through that much effort since the foam gasket easily offers plenty of height to compensate for the slight curve. i don't think you would even be able to tell the difference since the foam gasket covers up most of the base as you tighten it down.
You could move it back about 1/2" more probably if you wanted, but I don't see anything wrong with the location they will be at. Remember that the one installed in the pics is more forward than the outer two. The light is a little longer on the front end than the back end.
I'll post another picture when I get them all done for a better idea.

Thread Starter
Registered User
Joined: Jan 2003
Posts: 726
Likes: 0
From: Sayre, PA
Thread Starter
Registered User
Joined: Jan 2003
Posts: 726
Likes: 0
From: Sayre, PA
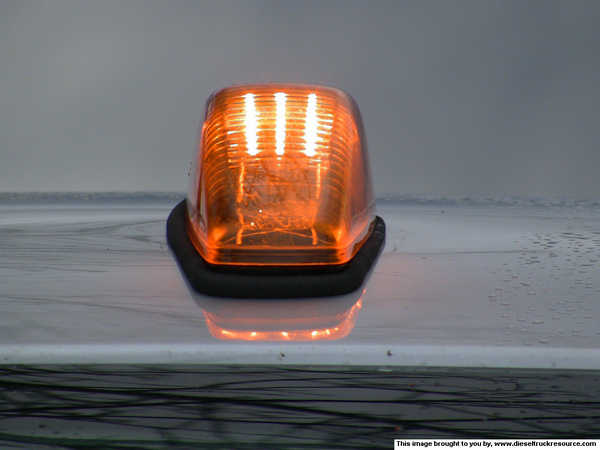
I've tried to explain how it seals, but I guess I'm not doing a good job. There are three seperate parts. The amber lens (ABS), a black base (ABS), and a thick sealing gasket (dense foam). The black base is flat, no curvature. It is screwed down onto roof with the thick (1/4") foam gasket underneath. (I will add a picture of just that). While the base does not bend to conform to the roofline, the gasket is plenty thick enough to cover the gap all the way across. You can barely see the base in my photos, it's buried into the thick foam. There is virtually no way water will get past the gasket from underneath the base, the gasket is very compressed. The amber lens just snaps tightly onto the black plastic base and covers everything up, preventing water from getting inside the base from above. Since there are no penetrating holes from outside, this whole thing is much less prone to water infiltration than the OEM, Recon, or other aftermarket units.

Thread Starter
Registered User
Joined: Jan 2003
Posts: 726
Likes: 0
From: Sayre, PA
Ok, I only got two more installed tonight before I ran out of daylight but I did take some pics that should show how they install and seal better.
First, the the light in it's three parts after it's been made ready to install:

Getting it ready to install consists of two main parts:
1) Crimping on the quick connect ends (I know soldering is better but then they could not be removed without cutting the wires).
2) Making the new holes to fit the OEM hole locations (I marked the hole locations and then heated a small round screwdriver with a propane torch which I used to melt through the base and gasket for the new holes). Unfortunately the provided for screw boss locations don't line up with our trucks.
Here is a closeup of the base unit:

Note that the LED and circuitry is fully potted and sealed. It is even potted to the base as can be seen here:

Here it is mounted in place but not screwed down yet:

Notice the thick foam gasket. Notice the silicone that is almost impossible to remove with a sander, lol. Does anything dissolve silicone? Now it gets screwed down and the gasket gets compressed and should make a good seal:

Note that it's pretty much waterproof now. I used washers with bonded rubber gaskets and #10 x 1" screws to replace the OEM screws. The amber lens just gets snapped on the base and it's done.
Should make sure they work:


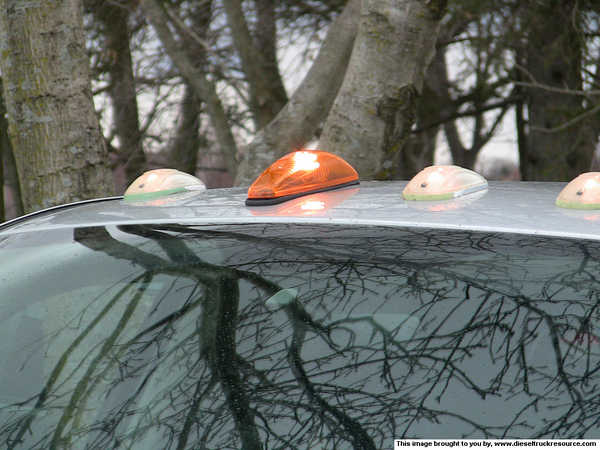
Three down, two to go!
First, the the light in it's three parts after it's been made ready to install:
Getting it ready to install consists of two main parts:
1) Crimping on the quick connect ends (I know soldering is better but then they could not be removed without cutting the wires).
2) Making the new holes to fit the OEM hole locations (I marked the hole locations and then heated a small round screwdriver with a propane torch which I used to melt through the base and gasket for the new holes). Unfortunately the provided for screw boss locations don't line up with our trucks.
Here is a closeup of the base unit:
Note that the LED and circuitry is fully potted and sealed. It is even potted to the base as can be seen here:
Here it is mounted in place but not screwed down yet:
Notice the thick foam gasket. Notice the silicone that is almost impossible to remove with a sander, lol. Does anything dissolve silicone? Now it gets screwed down and the gasket gets compressed and should make a good seal:
Note that it's pretty much waterproof now. I used washers with bonded rubber gaskets and #10 x 1" screws to replace the OEM screws. The amber lens just gets snapped on the base and it's done.
Should make sure they work:
Three down, two to go!