
HVAC fan is either off or on high????

Registered User

Joined: Jan 2004
Posts: 3,528
Likes: 16
From: Oregon
On the 3rd gens, the fan gets + from the ignition switch at all times when the key is on.
On/off and speed are controlled by the negative side. The fan **** completes the ground either through the resister block when on lower speeds, or directly when on high.
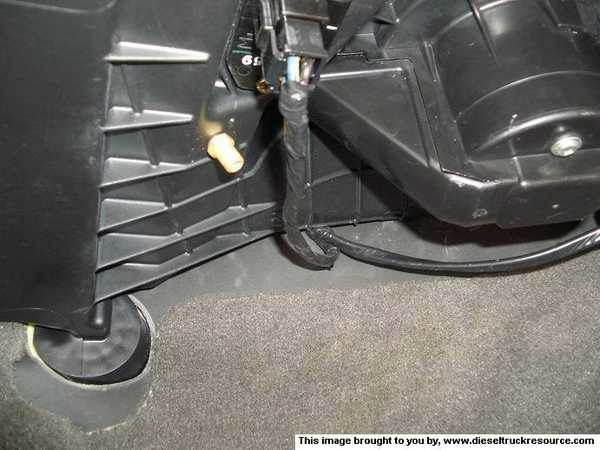
The resister block is mounted on the botton of the HVAC casing. Look up from the passenger foot area, and you will see it to the left of the fan motor.
Pull it and measure ohms between the pins. I bet you will find between the last two is open (infinite reading).
In 07 there was a change, where + power comes from the TIPM whenever key is on. Speed control is still through the negative side being run through the resistor block.
Here's a photo of the resistor block.
On/off and speed are controlled by the negative side. The fan **** completes the ground either through the resister block when on lower speeds, or directly when on high.
The resister block is mounted on the botton of the HVAC casing. Look up from the passenger foot area, and you will see it to the left of the fan motor.
Pull it and measure ohms between the pins. I bet you will find between the last two is open (infinite reading).
In 07 there was a change, where + power comes from the TIPM whenever key is on. Speed control is still through the negative side being run through the resistor block.
Here's a photo of the resistor block.

Registered User
Joined: Nov 2004
Posts: 36
Likes: 0
From: Georgia
Mine was doing the same thing. But yesterday, the coldest day we had so far in Atlanta area mine quit working all together. Can I get the resistor at the parts store? If I need a switch, will I have a problem with the key security computer that wraps around the key switch?
Registered User
Joined: Jan 2004
Posts: 3,528
Likes: 16
From: Oregon
If it totally died, it isn't going to be the resistor, as it is out of the circuit when set to high. If you unplug the resistor on one that is working fine, you would end up with a fan that runs fine on high but no other setting.
There have been people who have found charred wiring and charred ignition switch in the column.
One guy had +12 volt reading at the motor and good ground when on high. Turned out the ignition switch had pretty poor contact, and although you got a reading with a volt meter, it wouldn't carry the amp load of the motor.
The other possibility is the fan motor is bad.

Registered User
Joined: Aug 2004
Posts: 27
Likes: 0
From: Oakdale, CT
I checked the wiring diagram just now. The ignition switch provides the power to the blower motor when the key is turned to the run position (on the C7 CONNECTOR @ IGN SW, PIN #10, DARK BLUE). You are correct about that. But the original post states that the blower works, but only on high. So that rules out the ignition switch. The resistor provides the grounds that vary the blower speeds.
My vote is still with a faulty resistor. Definately check the plug for any corrosion or burnt/melted terminals.
My vote is still with a faulty resistor. Definately check the plug for any corrosion or burnt/melted terminals.
\
You are partly right csxt665. Ignition switch has nothing to do with "blower speeds" But it is where the on/off part of the system starts when key turns. If the ignition switch fails. Which this members now has. Its defualts to high only and goes to defrost for safety. So you can still see out window.
Now since you are finding this so hard to beliieve and trust me I WAS part of your club. I bought a resistor and changed it out in 10 mins. So $50 later and a extra resistor becuase you cant return electicral parts. when back down to Weber Dodge and talked to my buddy Sam. Who is head tech. he took out the book and showed me the wiring.
Registered User
Joined: Nov 2004
Posts: 36
Likes: 0
From: Georgia
I need information about repairing of the switch. How do you get to it? How do you get the top and bottom of the steering wheel covers off? What do I need to remove, and how do I do it safely with the air bag? Has anyone done a write up on this? 

Registered User
Joined: Aug 2003
Posts: 2,021
Likes: 7
From: Cochrane Alberta
Doing mine tommorrow. My heater quit completly but if I play with the tilt steering it comes back. I'm expecting to find a melted switch and some toasted wiring.
I would say that if your heater works on high that the ign switch is ok and that the resistor block is the problem.
FYI the ign switch was $40 CDN from the dealer, NAPA has been back ordered over 3 months and had no idea when it was coming in.
I would say that if your heater works on high that the ign switch is ok and that the resistor block is the problem.
FYI the ign switch was $40 CDN from the dealer, NAPA has been back ordered over 3 months and had no idea when it was coming in.
Registered User
Joined: Nov 2004
Posts: 36
Likes: 0
From: Georgia
If you can do a write up on it, that would be grate. Pics too. I have my covers off, but dont know what to look for. i also got the lock out. I had a tech service manual, but its not as telling as I had hoped. I guess I will buy a Haynes man for later.

Registered User
Joined: Jul 2006
Posts: 1,132
Likes: 1
From: MA
Removing the colum cover is simple a few torx bit screws. Then it just un clips. The igintion switch is on tp so tilt down steering wheel and you wil see you have to remove a few more screws and it slides right out. No more than 30 mins for a novice trying to be carefull and thats putting it all back together. Nothing to be afraid of. Undo the batteries if you are worried about airbag. It reall is simple and nothing to be affraid of.
There is a TSB out about this and if you wires are burnt dealer sells a rewire kit that rewires past the ignition switch
There is a TSB out about this and if you wires are burnt dealer sells a rewire kit that rewires past the ignition switch
Registered User
Joined: Jul 2006
Posts: 1,132
Likes: 1
From: MA


Registered User
Joined: Jul 2006
Posts: 1,132
Likes: 1
From: MA
I checked the wiring diagram just now. The ignition switch provides the power to the blower motor when the key is turned to the run position (on the C7 CONNECTOR @ IGN SW, PIN #10, DARK BLUE). You are correct about that. But the original post states that the blower works, but only on high. So that rules out the ignition switch. The resistor provides the grounds that vary the blower speeds.
My vote is still with a faulty resistor. Definately check the plug for any corrosion or burnt/melted terminals.
My vote is still with a faulty resistor. Definately check the plug for any corrosion or burnt/melted terminals.
Registered User
Joined: Aug 2003
Posts: 2,021
Likes: 7
From: Cochrane Alberta
Did mine today. Not too bad if you can just swap the switch but I had some burned wiring coming off the connector.
To get the switch off pull the covers, three torx bolts that are recessed so you'll need a skinny torx screw driver. I only had torx sockets and my screwdriver is the style that has interchangeable bits so it was too fat to fit in the hole. I managed to use a Robertson screwdriver to get them out. The plastic "lever" for the tilt just pulls off forward(toward you) with a good hard yank.
Next remove the bolts for the tilt mechanism, you'll have to undo an electrical connector to get at one of them, the release for it is on the top side and you'll have to jam your finger in there.
Now remove the two bolts holding the ign switch on. The switch is located at the 9 o'clock position in line with the ign key. To release the connector slide over the red locking tab on the bottom(doesn't come out completely). Then while pulling the connector off the switch gently pry up on the white tab on the top of the connector.
I had two fried wires so I pulled the connector out down under the dash so I had some room to work on it. Using a small pick I released the female spade connector from inside the plastic housing and pulled it out the back. I then cut the wire back so as to remove all the melted portion.
Carefully I pried back the crimp on the wire of the female spade connectors and removed the old wires as I had to reuse them. I inserted a new piece of 12ga wire, re-crimped it and soldered it for good measure.
I jammed the spade connectors back into the plastic housing and but connected them to what was left of the original wire. Then re-assembled. You may need the key in the ign to line up the switch with the key tumbler.
