Fuel Pressure and Dead Pedal
 12-06-2015, 09:15 PM
#271
Registered User
Thread Starter

Oh Ok gotcha! How would you get rid of the wire though? I mean now that it's been spliced what can you do other than put liquid tape or grease in the end of the blue connectors? Then maybe put some small split loom over it...
 12-06-2015, 09:22 PM
#272
Administrator
Could juust cut it, then wrap and seal the loose end left behind. From the pictures it looks like a dead end wire, but look it over very carefully and make sure before cutting anything.
12-06-2015, 09:39 PM
#273
Registered User
Thread Starter
I don't know. It was definitely tapped at one time. That's what the cut wire is. It was much longer and dangling down when I bought the truck. To tap the wire the PO put in that red section and ran a pig tail out of the bottom blue connector(cut end you can see). I think I'll try adding plenty of liquid tape in the ends of the connectors like you said and I'll cap the cut end. I'll post pics of how it works out. Thanks for all the help! Btw jrs could you make anything out on the other wire I was asking about? I'm planning to try and get some better pics of that tomorrow but I was just wondering what your take on it was.
12-07-2015, 06:31 AM
#275
Registered User
Thread Starter
Do either of you see any issue with cutting out the red section and crimp connectors and soldering in a new short piece of wire with some adhesive lined heat shrink? Assuming of course that its possible to get in there with all that....
12-07-2015, 06:41 AM
#276
Registered User
Thread Starter
also, will I hurt anything by unplugging that large cable on the back? If I'm going to solder and heat shrink in there I want to get us much out of the way as is easily possible. Then I can cover the surrounding area with foil to protect it?
12-07-2015, 07:19 AM
#277
Registered User
Thread Starter
I may have to leave some of the connector there(cut the plastic off) and solder to that, just to have a little extra length...Im thinking that would still be better than how it is now though...assuming I can get it heat shrunk...
12-07-2015, 09:27 AM
#278
Registered User
Are you talking about the large rectangular plug for the VP? If so then yes, you can unplug it. But just take note of how its sitting since making sure its fully seated in place is important.
I dont know if I'd bother doing anything other than sealing off all the exposed areas of the wiring with dielectric grease and liquid tape. You may end up causing an issue if you mess around with it more. Leaving it well enough alone is probably best as long as corrosion cant get in.
I dont know if I'd bother doing anything other than sealing off all the exposed areas of the wiring with dielectric grease and liquid tape. You may end up causing an issue if you mess around with it more. Leaving it well enough alone is probably best as long as corrosion cant get in.
12-07-2015, 10:06 AM
#279
Registered User
Thread Starter
Are you talking about the large rectangular plug for the VP? If so then yes, you can unplug it. But just take note of how its sitting since making sure its fully seated in place is important.
I dont know if I'd bother doing anything other than sealing off all the exposed areas of the wiring with dielectric grease and liquid tape. You may end up causing an issue if you mess around with it more. Leaving it well enough alone is probably best as long as corrosion cant get in.
I dont know if I'd bother doing anything other than sealing off all the exposed areas of the wiring with dielectric grease and liquid tape. You may end up causing an issue if you mess around with it more. Leaving it well enough alone is probably best as long as corrosion cant get in.
12-07-2015, 10:19 AM
#280

I would clean it with brake cleaner, let it dry then liquid tape first with a few applications of it.
12-07-2015, 10:21 AM
#281
Registered User
Thread Starter
Would you trust brake cleaner around all that sensitive stuff? I'm thinking maybe electrical contact cleaner...I have some of that anyway...thanks for the suggestions though because I wasn't going to clean it at all before you mentioned it :-)
12-07-2015, 04:24 PM
#282
Registered User
Thread Starter
Hi all,
Got some more pictures for you guys. I'll start off with what I did today.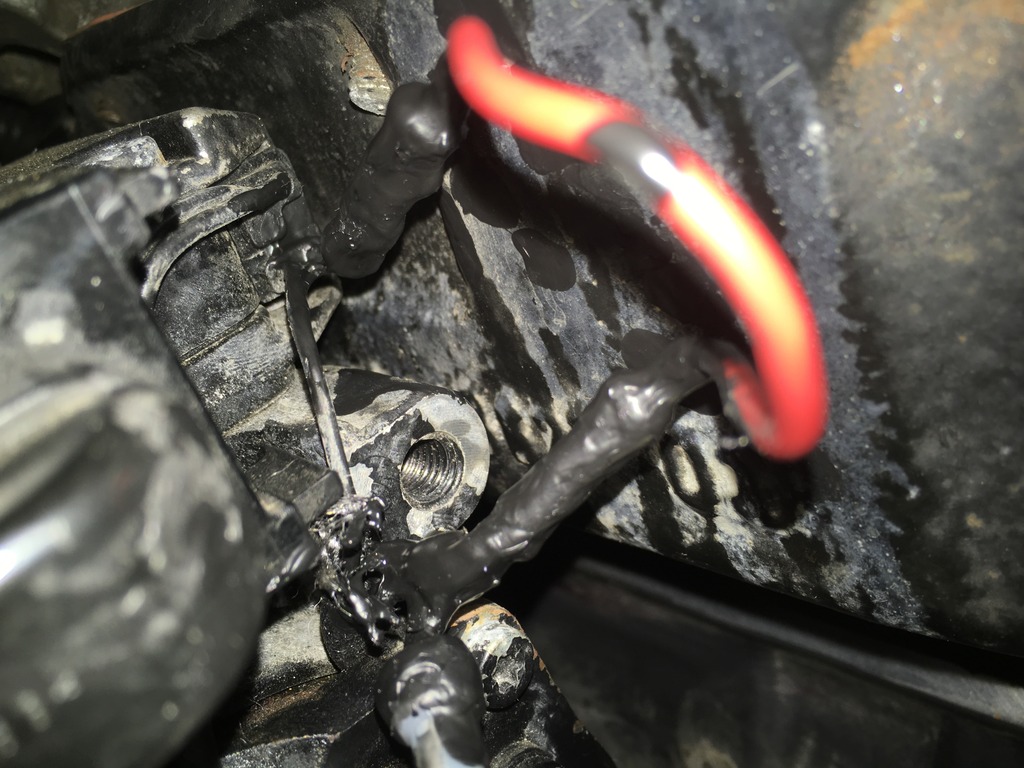
I know its a mess and it drives me nuts but its the best I could do :-( I had to use a Q tip to get it on that well. Hopefully the connection is protected better than it was before. Its definitely good I didn't try to cut and solder. Big thanks for advising against that Katoom. That will have to wait for a time in the future when the VP44 is off the truck.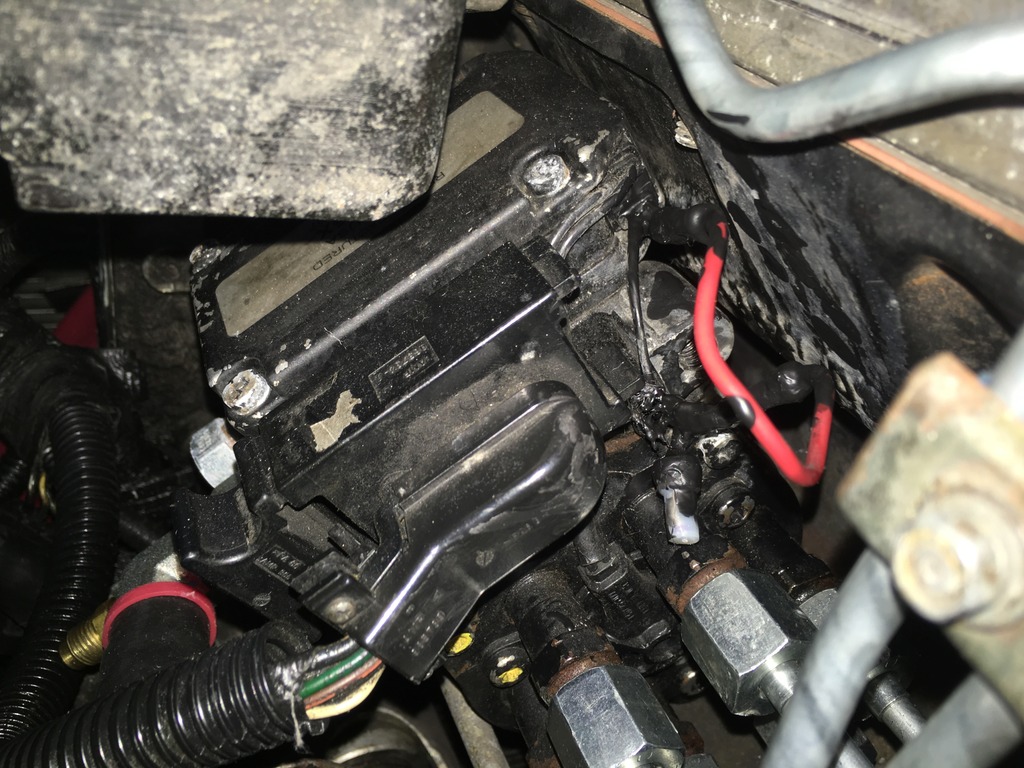
Also got some work done or the CCV mod.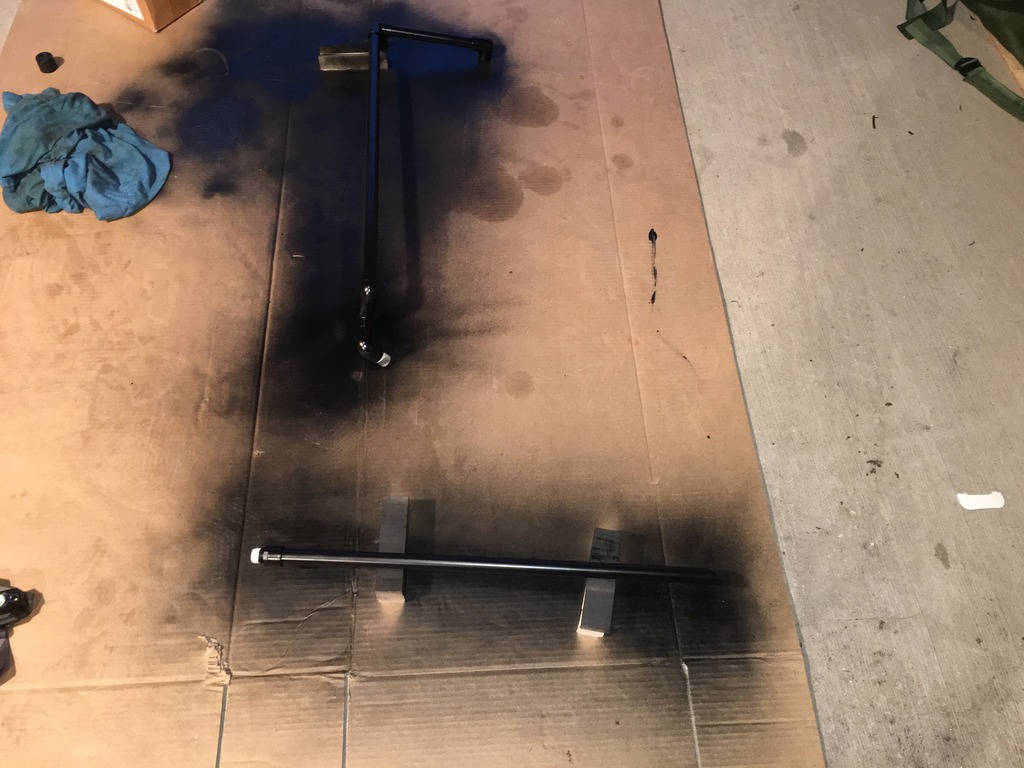
You wouldn't believe how hard it is to find oil resistant hose around here. I was thinking of just doing the mod the way jrs did with just hose up and over, but I could only find a few feet of oil resistant hose. So I went with the PVC and painted it with some Krylon plastic paint. I glued the joints but I didnt use primer. I figured it should be good enough for this. The down elbow at the back is threaded. I am planning to use heater hose for the connection the vent. Hopefully it will be ok since its only about 4 inches long. The only thing I don't like so far is that I don't have a good way to secure it at the back of the engine.... I don't have a rear lifting lug. The truck didn't have one when i bought it. I ordered a used one on eBay specifically for this mod so that I would have something to zip tie the pipe too, but it doesn't fit between the injector lines . So I'm trying to come up with other ideas. Im planning to try setting a rubber exhaust hanger back there and laying the pipe on top of that and zip tying through the lifting lug bolt holes. Not sure if thats gona work or not. I'm also thinking of securing it down where it ends to the frame. Not sure if it should be secured to the frame though since its attached to the engine. Any thoughts?
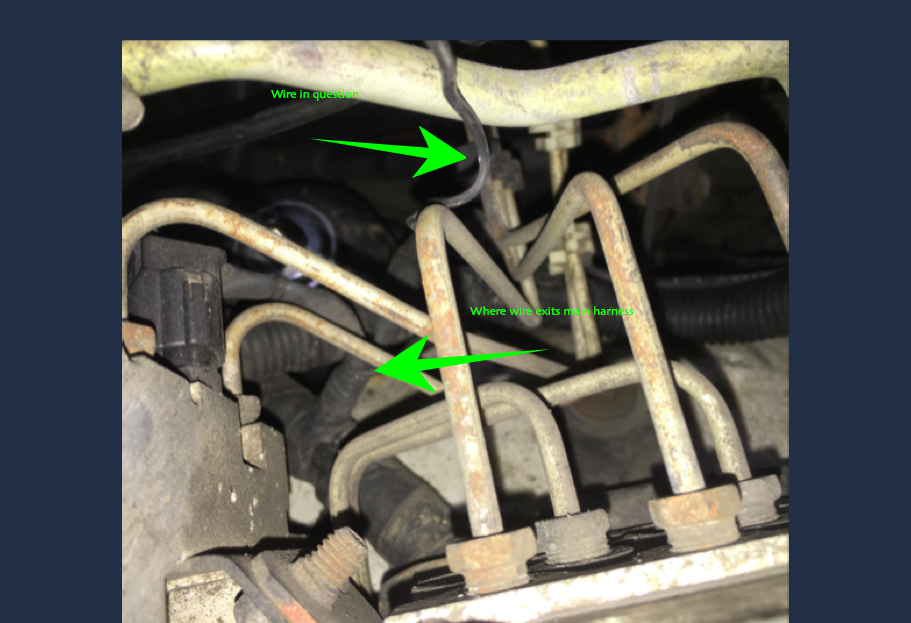
Next item, wire that I don't know where it is supposed to be attached. Here are some better pictures. It sure looks like it should be a ground but I don't feel good about just grounding it without knowing. And its weird that nothing is not working without it.It looks like it comes out of a small branch of a main wiring harness that then splits and one leg goes to the abs module which you can see on the left in the pictures, and the other leg I believe goes to a wheel speed sensor.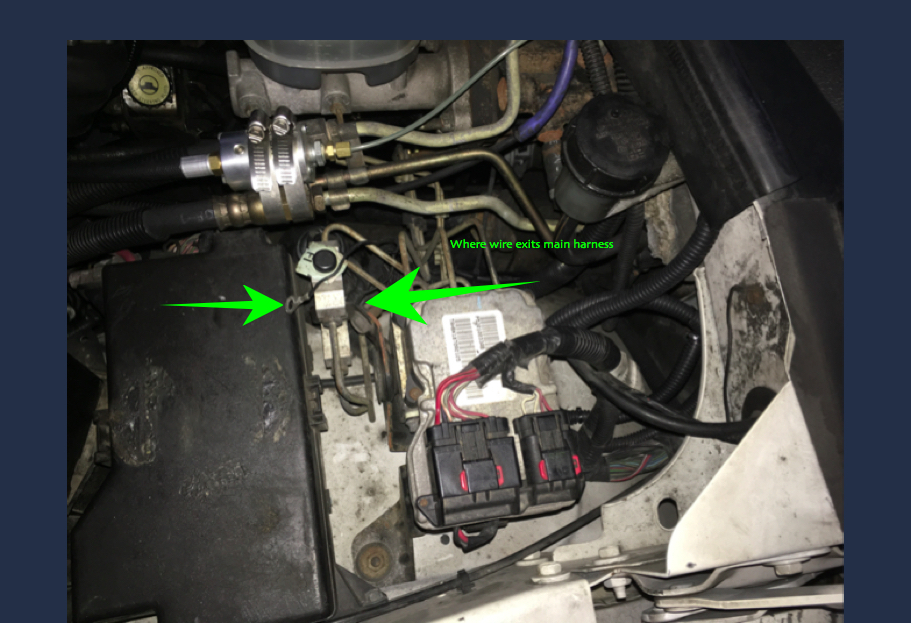
Also discovered that one or two of my injector lines were leaking at the back of the pump :-( I loosened and tightened them again but they didn't seem loose so I'm not sure what thats about. Hopefully its fixed now.
Got another start vid that I thought was slightly questionable too. But maybe its caused by the leak I found. Who knows. I really hope it doesn't keep leaking though. I've had enough of fuel leaks with this truck
http://vid428.photobucket.com/albums...ps8j1k7lnm.mp4
Got some more pictures for you guys. I'll start off with what I did today.

I know its a mess and it drives me nuts but its the best I could do :-( I had to use a Q tip to get it on that well. Hopefully the connection is protected better than it was before. Its definitely good I didn't try to cut and solder. Big thanks for advising against that Katoom. That will have to wait for a time in the future when the VP44 is off the truck.

Also got some work done or the CCV mod.

You wouldn't believe how hard it is to find oil resistant hose around here. I was thinking of just doing the mod the way jrs did with just hose up and over, but I could only find a few feet of oil resistant hose. So I went with the PVC and painted it with some Krylon plastic paint. I glued the joints but I didnt use primer. I figured it should be good enough for this. The down elbow at the back is threaded. I am planning to use heater hose for the connection the vent. Hopefully it will be ok since its only about 4 inches long. The only thing I don't like so far is that I don't have a good way to secure it at the back of the engine.... I don't have a rear lifting lug. The truck didn't have one when i bought it. I ordered a used one on eBay specifically for this mod so that I would have something to zip tie the pipe too, but it doesn't fit between the injector lines
. So I'm trying to come up with other ideas. Im planning to try setting a rubber exhaust hanger back there and laying the pipe on top of that and zip tying through the lifting lug bolt holes. Not sure if thats gona work or not. I'm also thinking of securing it down where it ends to the frame. Not sure if it should be secured to the frame though since its attached to the engine. Any thoughts?Next item, wire that I don't know where it is supposed to be attached. Here are some better pictures. It sure looks like it should be a ground but I don't feel good about just grounding it without knowing. And its weird that nothing is not working without it.It looks like it comes out of a small branch of a main wiring harness that then splits and one leg goes to the abs module which you can see on the left in the pictures, and the other leg I believe goes to a wheel speed sensor.


Also discovered that one or two of my injector lines were leaking at the back of the pump :-( I loosened and tightened them again but they didn't seem loose so I'm not sure what thats about. Hopefully its fixed now.
Got another start vid that I thought was slightly questionable too. But maybe its caused by the leak I found. Who knows. I really hope it doesn't keep leaking though. I've had enough of fuel leaks with this truck
http://vid428.photobucket.com/albums...ps8j1k7lnm.mp4
12-07-2015, 06:38 PM
#283
Administrator
In your video, that's another good startup. Nothing wrong that I see or hear there.
I looked at my truck to see where that stray black wire with the eye terminal goes. Mine doesn't connect to anything either. It's just wrapped up to the wire loom bundle under the ABS module. So no harm there. No idea why Dodge left it that way though
BTW, your ABS module is on the right in that picture (silver module with the hydraulic lines and two black plastic connectors on top), the black box on the left is the PDC (power distribution center) and has all of the main relays and fuses.
I like the PVC pipe mod for your crankcase vent, looks good. Zip tie it as you see fit, that's all I did when I ran the rubber hose. I just kept it out of the way of moving parts. I followed the fuel lines after the hose left the back of the engine, and I zip tied it to the fuel line hangers. That might not work for your PVC pipe though.
Nice work sealing the open crimp connectors, once that stuff sets, it'll last for years.
Just checked the service manual, the injector line nuts are to be tightened to 18 ft-lbs of torque. Don't know why yours was leaking unless whoever messed around with it didn't tighten it properly.
12-07-2015, 06:49 PM
#284
Registered User
Thread Starter
In your video, that's another good startup. Nothing wrong that I see or hear there.
I looked at my truck to see where that stray black wire with the eye terminal goes. Mine doesn't connect to anything either. It's just wrapped up to the wire loom bundle under the ABS module. So no harm there. No idea why Dodge left it that way though
BTW, your ABS module is on the right in that picture (silver module with the hydraulic lines and two black plastic connectors on top), the black box on the left is the PDC (power distribution center) and has all of the main relays and fuses.
I like the PVC pipe mod for your crankcase vent, looks good. Zip tie it as you see fit, that's all I did when I ran the rubber hose. I just kept it out of the way of moving parts. I followed the fuel lines after the hose left the back of the engine, and I zip tied it to the fuel line hangers. That might not work for your PVC pipe though.
Nice work sealing the open crimp connectors, once that stuff sets, it'll last for years.
12-07-2015, 07:42 PM
#285
Registered User
Thread Starter
I missed what you said about those injector line nuts before. Im not sure but if i had to guess I would say they are probably over 18 ft lbs. Not totally sure though since its in such a tight space. If they continue to leak I will back them off again and try not making them quite as tight. I didnt kill them though by any means. I'm not sure if only one is leaking or 2 because one is right above the other. Im also wondering if it could be caused by having the Smarty turned up. I was trying it on a higher setting the past day or so and I did notice in the past, when I had so much trouble with injector lines at the head, that they would leak worse with the Smarty on higher settings. I posted a question on the Smarty forum to see if it increasing the pressure in the injector lines, but I was told no, not on VP trucks. So I'm not sure what to make of the leak. I guess we'll have to wait and see if it continues or not. Another possible explanation that crossed my mind was that maybe that whole assembly that the lines bolt to on the back of the pump was leaking, but if that were the case I would think more would be wet than just 2 lines. I sure hope thats not it.