
Upgrade Your Valve Springs

Thread Starter
1st Generation Admin
Joined: Jan 2005
Posts: 4,601
Likes: 118
From: Buies Creek, NC
I found nothing out of the ordinary as far as I could tell.
A few of the lifters presented with some normal wear but nothing that I could attribute to the 60# springs.
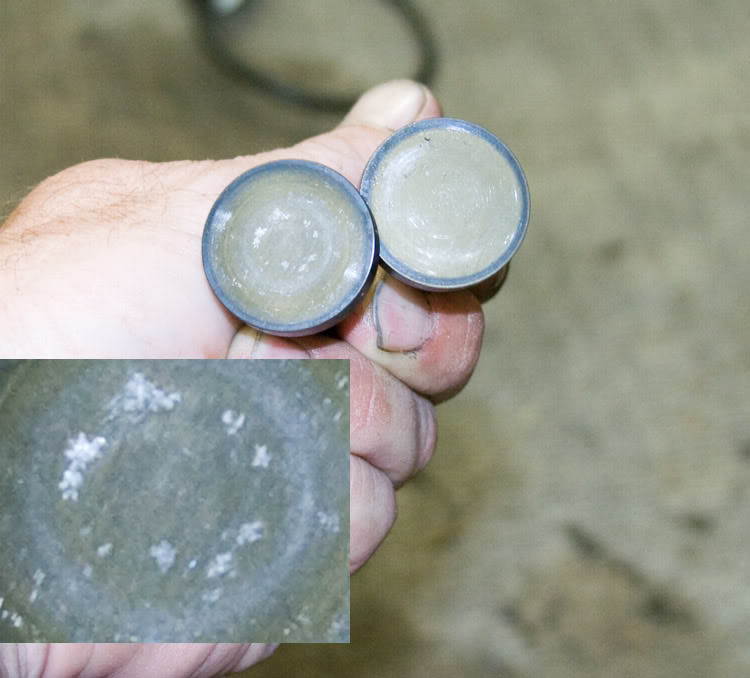
I can't find any images of the original camshaft but suffice it to say it presented with similar wear. A few of the lobes had a little pitting much like that shown above. According to the FSM, it would have been considered reusable IIRC.
Upgrading to the 60# springs couldn't hurt. While you may not be winding the engine up to crazy RPMs, the better springs will help to better control the valves at the upper engine RPMs with the increased boost.
A few of the lifters presented with some normal wear but nothing that I could attribute to the 60# springs.
I can't find any images of the original camshaft but suffice it to say it presented with similar wear. A few of the lobes had a little pitting much like that shown above. According to the FSM, it would have been considered reusable IIRC.
Upgrading to the 60# springs couldn't hurt. While you may not be winding the engine up to crazy RPMs, the better springs will help to better control the valves at the upper engine RPMs with the increased boost.

Registered User
Joined: Apr 2009
Posts: 29
Likes: 0
:Raises hand:
Theres a problem with ur process.
I have the same set of springs for my head. Went to put them on the other day and came up with too much seat pressure. 160lbs to be exact. Flat tappet cams like 80- 140ish pounds of seat pressure to live or they will go flat.
Might check your seat pressure to verify it. Camshaft might live too. Last one I seen with heavy springs Had all kinda pits in it and the one exhaust lobe wasnt the greatest.
Im gonna see if I can get some plus .050 locks and change the install height or end up cutting the seat pockets to get my seat pressure down.
It never ends on hassles to built something.
They were designed wo work with more back pressure to keep the exhaust valve seated against more pressure so seat pressure was raised considerably over OE springs. Since they were not designed for racing or high rpm, more pressure over the nose was not needed. They work okay for a mild performance spring under 45-50lbs of boost and under 3800rpm. In that instance they will work great. Over that and a stiffer spring is needed especially if you are running an aftermarket cam where you accelerate the valves much faster than a stock camshaft.
I like 160-170lbs of seat pressure on the 12v and try to keep it under 400-430 over the nose of the camshaft. A 24v can handle more pressure because the rocker ratio is much less so the cam sees less pressure if the springs pressures are the same.
stock 12v seat pressure 85lbs x 1.69 rocker ratio = 143 lbs pressure on tappet
stock 12v nose pressure 200lbs x = 338
60lb spring seat pressure150+/- x = 253
60lb spring nose pressure 212 +/- = 358
24v stock 82lbsx 2 x 1.37 rocker ratio =224lbs pressure on tappet
24v stock nose 150lbs x 2 x 1.37 =411
110# =301
110# are 170# nose =462


Registered User
Joined: May 2010
Posts: 531
Likes: 1
hey-Hey!!!,
Those little wedge shaped things are keepers. Depending on how fat your fingers are it can be helpful to take a bit of sticky grease to the valve stem to make those little things stick where you put them. It is also a good idea to give the spring retainer a tap with a hammer to insure the keepers have properly set and are not in danger of jumping out( once the compressor is removed ). Not talking a two-handed swing that would drive the valve through the piston crown( John Henry need not apply ).
cheers,
Douglas

Registered User
Joined: Jan 2007
Posts: 8
Likes: 0
I know this is an old thread, but still very good write-up. I'll be using this for my spring swap.
About how long does it take to complete? I would assume that now would also be a good time to switch to studs. If so, is it necessary to swap gaskets or can I keep my head on and not have to pull it?
About how long does it take to complete? I would assume that now would also be a good time to switch to studs. If so, is it necessary to swap gaskets or can I keep my head on and not have to pull it?
Thread Starter
1st Generation Admin
Joined: Jan 2005
Posts: 4,601
Likes: 118
From: Buies Creek, NC
While I'm sure there are plenty of folks who've been lucky, and simply screwed in some head-studs, that is contrary to the standard accepted install instruction, no matter who's brand. Both A1 and ARP want you to bottom-tap the threads of the block. That will require pulling the head so as to have ample room to work with the standard length tap, never mind cleaning that trash/metal shavings cut during the process. Further, ARP wants you to mill some material from the tops of the rocker-arm pedestals.
If you pull the head, you'll need a new gasket.
Thread Starter
1st Generation Admin
Joined: Jan 2005
Posts: 4,601
Likes: 118
From: Buies Creek, NC
If memory serves me correctly, I've always gone ahead and loosened all the head-bolts and brought them up to spec so as to be sure.
Registered User
Joined: Apr 2007
Posts: 1,260
Likes: 25
From: hesperia ca.
yes, I did the upgrade for the brake, but with the piston up, it will keep both valves positioned for spring removal, don't change the clocking of the valve, theres a chance it might not seal well from its relative seat contact, I used a magnet retrieval tool to remove and install collets
Registered User
Joined: Jan 2015
Posts: 541
Likes: 86
From: Outdoors
Bumping an oldie.
I have referred plenty a spring/seal install gent to this original post, as it's outlined far better than I could explain to them over the phone.
I will add a post with a couple pics on how to cut the head to install the newer "top hat" style # 3957912 seals, updated material that do not degrade with PAO/Ester based synthetic engine oils, they are held in place by the valve springs, and quite useful while experiencing higher boost, just to give high perf folks an added option.
They require the head to come off though, so I can do a how to on basic head porting for torque & mileage if anyone's thinking of doing that to their vehicle.
I will provide all torque values and use all genuine Mopar parts with their part numbers listed.
Registered User
Joined: Oct 2013
Posts: 84
Likes: 22
From: Denver, CO
I will say I have had that style valve spring compressor come off the spring and rocket at my face... I figured since I have access to Quickserve and many of the special service tools I would help others out with a part #. The Cummins valve spring compresser for 12 valves bolts into the same holes as the rocker pedestals. I know it's expensive... but if you are puling the springs often, or just don't feel like being blasted in the face it's an extremely nice option.
Cummins part # 3164329
Cummins part # 3164329

Registered User


Joined: Dec 2004
Posts: 4,312
Likes: 1,063
From: Commerce, OK
I will say I have had that style valve spring compressor come off the spring and rocket at my face... I figured since I have access to Quickserve and many of the special service tools I would help others out with a part #. The Cummins valve spring compresser for 12 valves bolts into the same holes as the rocker pedestals. I know it's expensive... but if you are puling the springs often, or just don't feel like being blasted in the face it's an extremely nice option.
Cummins part # 3164329
Cummins part # 3164329
Thanks