


Show & Tell ~ New Custom Intercooler


Thread Starter
1st Generation Admin
Joined: Jan 2005
Posts: 4,601
Likes: 118
From: Buies Creek, NC
- It is made with 1/2" OD thin wall copper tubing.
- It comes with aluminum AN6 fittings epoxied in the copper tubes (they neck down to a little over 1/4" ID I think).
- The cooler itself has a so-called "Turbulator" thing inside its pipe that improves heat transfer by minimizing fluid stratification along the pipe wall. It eats an appreciable amount of interior volume of the tube. (I was concerned about that myself).
To make mine fit like this and have the pipes come out the stock/OEM location . ..

. . . . . I had to:
- Cut off the cooler's original AN6 fittings right there where the copper meets the aluminum.
- Then dig out any remnants of epoxy and aluminum.
- Placing the cooler on top of the IC where I wanted it, I made two ELLs of the 1/2" thin-wall steel pipe such that with the cooler where I wanted it, the other ends of the pipes would poke through the Dodge/OEM hole in the radiator support.
- I silver-soldered the steel pipes to the cooler using standard copper 1/2" couplers (be sure to use flux with copper/steel).
- I went to Lowe's and got two plumbing adapters. The kind that one would normally use to connect copper pipe to the new-fangled plastic pipe used in today's domestic plumbing (the plastic pipe is set with a crimp-ring). They're made of brass and have a barb on one end that fits the AN6 (3/8th" ID) hose that I've plumbed the trans with. They fit the 1/2" OD steel pipe just fine. I silver-soldered them using flux there as well.
- The cooler "kit" comes with three plastic clamps that are used to clamp the cooler pipes and hoses in place when installed. I put one at each end o the cooler and the third where the steel pipe just go through the radiator support. Of course I had to make brackets to attach the clamps to the truck.
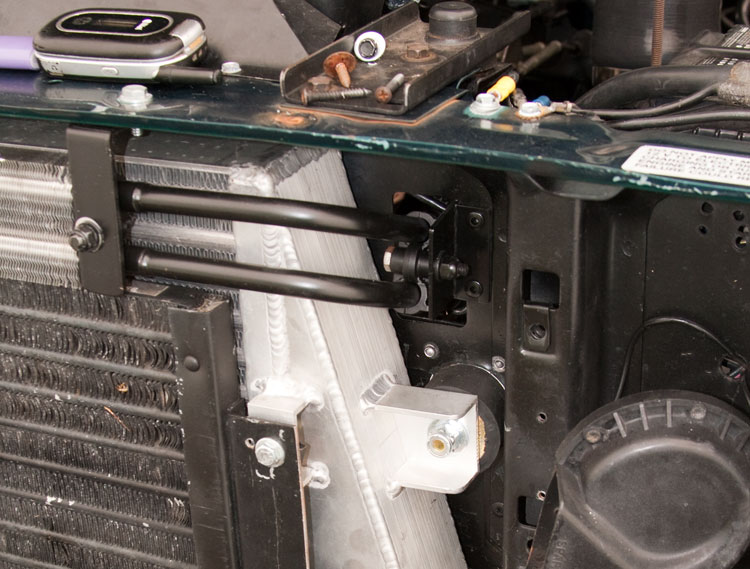
It works just fine as far as I can see and is in keeping with the factory over-all intended design. Ran the 1/8th in 8.28 @ 81.32 (1.78 60') this past Thursday.


Registered User
Joined: Oct 2009
Posts: 1,830
Likes: 1
From: Claymont, Del and Horsham, PA
I was looking at this the other night...

I thought it might work, but would require a lot of house rerouting. I'm not sure if the small one you have will cool the same, with less surface area than the stock one, but it won't leak like a sieve either. Plus you have 3 or 4 trans coolers?
Nice time by the way, i was told mine does 15.x in the 1/4. Haven't had it to the track yet, still working on little ends here and there before i commit to driving it daily.
I thought it might work, but would require a lot of house rerouting. I'm not sure if the small one you have will cool the same, with less surface area than the stock one, but it won't leak like a sieve either. Plus you have 3 or 4 trans coolers?
Nice time by the way, i was told mine does 15.x in the 1/4. Haven't had it to the track yet, still working on little ends here and there before i commit to driving it daily.
Thread Starter
1st Generation Admin
Joined: Jan 2005
Posts: 4,601
Likes: 118
From: Buies Creek, NC
Certainly that I have up front now hasn't the cooling capacity that the factory original had but there's still some there.
I still run the OEM fluid-to-fluid cooler/heater plumbed in as per factory spec. That and the equivalent of the optional fan assisted cooler in the back under the bed.
Pretty-much the same mess but in different locations.
- The factory original trans fluid plumbing has the fluid leave the cooler/heater under the exhaust manifold, go back under the bell-housing, then back up the driver's side of the engine to the cooler up front. I don't know that it'd be anymore complicated to simply run the fluid from under the manifold and alternator to the passenger's side of the radiator and to that cooler you show.
I'm planning on going to a 1/4 mile track tomorrow and see if I can best the current 13.16 @ 100 with some recent fueling stuff.
I still run the OEM fluid-to-fluid cooler/heater plumbed in as per factory spec. That and the equivalent of the optional fan assisted cooler in the back under the bed.
Pretty-much the same mess but in different locations.
- The factory original trans fluid plumbing has the fluid leave the cooler/heater under the exhaust manifold, go back under the bell-housing, then back up the driver's side of the engine to the cooler up front. I don't know that it'd be anymore complicated to simply run the fluid from under the manifold and alternator to the passenger's side of the radiator and to that cooler you show.
I'm planning on going to a 1/4 mile track tomorrow and see if I can best the current 13.16 @ 100 with some recent fueling stuff.

Registered User
Joined: May 2008
Posts: 266
Likes: 0
Have any of you guys looked at HYDRAULIC coolers? They selection should be much better then the auto trans coolers, and I am sure you could get one with the 1/2" in/out that you al seem to want. Just a suggestion, but figured it may help someone out.
DS79
DS79

Registered User
Joined: Jan 2009
Posts: 936
Likes: 0
From: H'ville Tx.
I bought a hydraulic cooler that came off of a heavy piece of equipment. It's about 2' long 16'' wide and about 3'' thick with 5/8'' lines. It is made of aluminum but it's still fairly heavy. It has double row tubes with probably 20' of tubing thru it just guessing. I mounted a 1100 cfm flex-a-lite fan on it to mount under the bed that it is still stacked on the shelf and not installed. Haven't decided how i'm going to pump the gear oil from the 5 sp. thru it yet.


Thread Starter
1st Generation Admin
Joined: Jan 2005
Posts: 4,601
Likes: 118
From: Buies Creek, NC
Again, knowing I had recently installed some Scheid 6x.016" EDMs and was basically over-fueling the mess, I installed this IC and an aftermarket camshaft in an effort to get more air into the engine so as to better burn said fuel. With that it appears the new standard for the 1/8th mile is 8.3x @ 80(ish) with a best of 8.28 seconds. Roughly a 1.5 tenth of a second improvement. The 60' now appears a consistent 1.8 seconds (A new best of 1.78 seconds). EGTs were at a max of 1500*F (I say were as I've already increased the fueling some pushing the EGTs back up to 1600*F).
I'm pleased with it all.
I'm pleased with it all.


Registered User
Joined: Aug 2007
Posts: 373
Likes: 2
From: Longview, Texas
Man I worded that wrong.
I need pictures of how you mounted the lower mount to the core support mounts. Did you use the factory lower mounts in the factory location or did you modify them?
Thanks.
I need pictures of how you mounted the lower mount to the core support mounts. Did you use the factory lower mounts in the factory location or did you modify them?
Thanks.