
pump timing


Thread Starter
Registered User
Joined: Jul 2013
Posts: 389
Likes: 0
From: Washington State
pump timing
I would like to adjust my pump timing, and I have a dial indicator so that I can measure actual pump lift in this video it shows how to do this between about 4:30 and 5:30
two questions
1) what mount is he using there on that dial indicator, I only have a magnet style like what is used for doing rear ends and such
2) if I had the proper mount, what is ideal lift for bosch 190's, or is it something id have to toy with
if its something to toy with, may as well give her an 1/8th and be done with it.
Thread Starter
Registered User
Joined: Jul 2013
Posts: 389
Likes: 0
From: Washington State
I just went through this sticky...
(Type a title for your page here)
and it says the adapter is Volkswagon special tool 2066
I may be onto something/answered my question #1 (partially)
(Type a title for your page here)
and it says the adapter is Volkswagon special tool 2066
I may be onto something/answered my question #1 (partially)
Registered User
Joined: Nov 2011
Posts: 4,479
Likes: 211
From: Isanti, MN
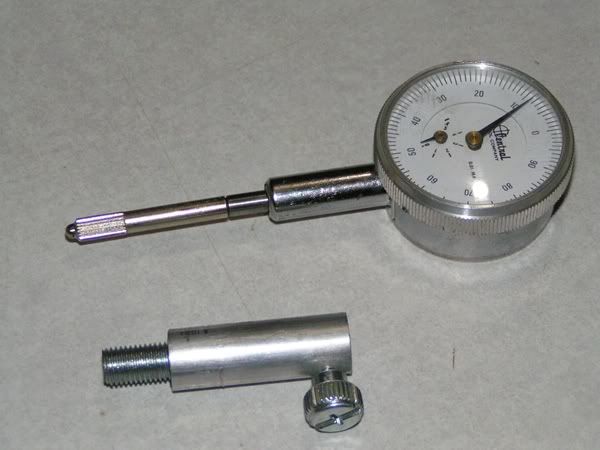
I made the tool with a drill press:
1. Drilled a 12mm hole in a wood block (1.5")
2. Put an m12 x 35 cap screw in the hole.
3. Used the hole to guide a centering punch.
4. Put the bolt through a piece of scrap 1/8" steel.
5. Used the jig to drill a 6mm hole through the bolt.
7. Sawed the head off the bolt.
8. Drilled a 12mm tap hole through a 3/4" x 1" piece of aluminum round stock.
9. Drilled a clearance for the indicator half way though said stock.
10. Threaded the other end 12mm
11. Cross drilled and threaded a 6-32 hole for a lock screw.
12. Put the drilled stud into the round stock with a drop of loc-tite.
13. Installed a 6-32 thumb screw.
Thread Starter
Registered User
Joined: Jul 2013
Posts: 389
Likes: 0
From: Washington State
I made the tool with a drill press:
1. Drilled a 12mm hole in a wood block (1.5")
2. Put an m12 x 35 cap screw in the hole.
3. Used the hole to guide a centering punch.
4. Put the bolt through a piece of scrap 1/8" steel.
5. Used the jig to drill a 6mm hole through the bolt.
7. Sawed the head off the bolt.
8. Drilled a 12mm tap hole through a 3/4" x 1" piece of aluminum round stock.
9. Drilled a clearance for the indicator half way though said stock.
10. Threaded the other end 12mm
11. Cross drilled and threaded a 6-32 hole for a lock screw.
12. Put the drilled stud into the round stock with a drop of loc-tite.
13. Installed a 6-32 thumb screw.
Trending Topics
Thread Starter
Registered User
Joined: Jul 2013
Posts: 389
Likes: 0
From: Washington State


Thread
Thread Starter
Forum
Replies
Last Post
GR40RCapri
Performance and Accessories 2nd gen only
5
Jun 25, 2006 12:53 AM
West Coast
12 Valve Engine and Drivetrain
3
Mar 26, 2006 11:09 AM
RonP
3rd Gen High Performance and Accessories (5.9L Only)
12
Feb 24, 2006 02:12 PM