
Ok, Let's replace our wing window seals

Registered User
Joined: Sep 2006
Posts: 584
Likes: 1
From: Bridgewater, Maine
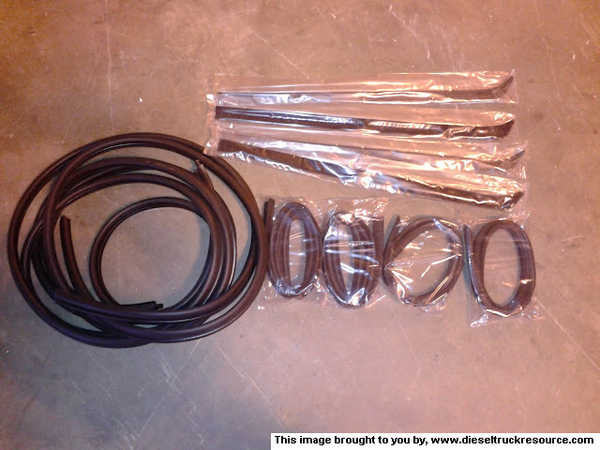
All the other seals on my doors are in pretty bad shape, so I found this kit on Rockauto. Anyone have experience with it? It has all of the window track and door seals, I think. So, when it gets here, I'll be pulling it apart again to replace the window track seals...Mark
I bought that same kit from rock auto, it has everything for the front doors other than the vent seal of course. The quality was equal to the stuff I bought from JC Whitney a few years back. It worked great and my vent actually stopped leaking once the door was stiffened up and the channel seals where replaced. my vent leak might not have been as bad as yours, not sure what the exchange rate is on using coins to stop the vent from leaking but I only needed a penny.
Thread Starter
Administrator
Joined: Jul 2009
Posts: 5,311
Likes: 566
From: Phoenix AZ
Mark,
I bought that same kit from rock auto, it has everything for the front doors other than the vent seal of course. The quality was equal to the stuff I bought from JC Whitney a few years back. It worked great and my vent actually stopped leaking once the door was stiffened up and the channel seals where replaced. my vent leak might not have been as bad as yours, not sure what the exchange rate is on using coins to stop the vent from leaking but I only needed a penny.
I bought that same kit from rock auto, it has everything for the front doors other than the vent seal of course. The quality was equal to the stuff I bought from JC Whitney a few years back. It worked great and my vent actually stopped leaking once the door was stiffened up and the channel seals where replaced. my vent leak might not have been as bad as yours, not sure what the exchange rate is on using coins to stop the vent from leaking but I only needed a penny.
 ...Mark

Registered User
Joined: Nov 2007
Posts: 780
Likes: 42
Glad someone figured it out. Asked several times.. what are the differences between 81-88 and the 89-93 vent weatherstrip. Noticed rock listed it under 92 model...
My drivers door has a gap at the bottom..maybe the door skin needs to be pulled in here? Maybereplace the window motor and fuzziness at the same time. Door glass channel strips do not seem to last a long time.
My drivers door has a gap at the bottom..maybe the door skin needs to be pulled in here? Maybereplace the window motor and fuzziness at the same time. Door glass channel strips do not seem to last a long time.
Registered User


Joined: Sep 2004
Posts: 4,053
Likes: 135
From: Tijeras, New Mexico, 7,000ft up
I had gaps at the top of my doors that I would see light through, so I bent them. The only problem in now my wing window seals are leaking air so bad I have to preload the handle with a bunch of cardboard, and it still had wind noise.
Guess I will be doing this one too. Thanks for the write-up!
Guess I will be doing this one too. Thanks for the write-up!
Thread Starter
Administrator
Joined: Jul 2009
Posts: 5,311
Likes: 566
From: Phoenix AZ
I had gaps at the top of my doors that I would see light through, so I bent them. The only problem in now my wing window seals are leaking air so bad I have to preload the handle with a bunch of cardboard, and it still had wind noise.
Guess I will be doing this one too. Thanks for the write-up!
Guess I will be doing this one too. Thanks for the write-up!
Registered User
Joined: Nov 2011
Posts: 4,479
Likes: 211
From: Isanti, MN
You're welcome, The door seal kit came in and I got the drivers side done. Wow, what a difference. I tried doing BC847's how to to install the long felt piece. You, Sir have a million times more patience than me, I went crazy trying to slide it by the window, so I pulled the window, as well as the vent window assembly, and installed the channel pieces on the bench, very easy and sanity restoring. Of course, you cannot install the latch side channel piece on the bench, but it is a lot easier with the window out. It was the new window scrapers that kicked my hiney, what is the trick to that? I'll take pics of the passenger side tomorrow...Mark
If you miss a couple, it'll still look fine. Then one day you'll notice it's missing. (don't ask)
Thread Starter
Administrator
Joined: Jul 2009
Posts: 5,311
Likes: 566
From: Phoenix AZ
When you tear the old ones out, you tend to distort the slots that the retainers go into. Straighten them out and get all the retainers started, then go from one end the other and push/bat each one in till it hooks on the other side of the slot.
If you miss a couple, it'll still look fine. Then one day you'll notice it's missing. (don't ask)
If you miss a couple, it'll still look fine. Then one day you'll notice it's missing. (don't ask)
Thread Starter
Administrator
Joined: Jul 2009
Posts: 5,311
Likes: 566
From: Phoenix AZ
Did the other side
Well, I resealed the passenger side today. I learned a few things and was taught some also. It is definitely easier and well worth the effort to remove the window. The latch side channel is real easy without the window in place. I took that shot of the channel with my camera inside the door. I also marked the location of the slots for the window scrapers, it really helps on reinstalling the scrapers. They were also distorted, thanks to Jmartin for the trick to reinstall the scrappers. I used a hammer and a screwdriver to straighten them a bit. I also removed the wing window assembly, which is necessary to remove the window. I could not get the lower hinge off the window, so I just pulled the hinge out with the window. This made reassembly a bit harder, because the new rubber was very hard to slide the hinge into. Took some effort, but got it done...Mark
Thread Starter
Administrator
Joined: Jul 2009
Posts: 5,311
Likes: 566
From: Phoenix AZ
It is real easy to install the wing channel rubber. There is actually another piece of seal that is not included in the kit. Mine is still real supple so I did not worry about reusing it. When reinstalling the window scrappers, I found it easier to put it on the door as evenly as possible, try to get the clips all in the right spot and start at to straight end. I kind of smacked the area of the clips with the palm of my hand. Work from the straight end to the curved end, be patient and try not to cry. The second one is the toughest. Thanks to Jmartin for the tips. The large door seal is the easiest of the bunch. The new seal comes with a tab A to go into hole B. I siliconed this joint, came out real clean...Mark
Thread Starter
Administrator
Joined: Jul 2009
Posts: 5,311
Likes: 566
From: Phoenix AZ
There sure is a lot of rubber in these 2 doors. Everything went well, except my window motor gave up the ghost, so I wired it up and bought one from rock auto. Can't wait get it out and hear myself think...Mark
Registered User
Joined: Mar 2008
Posts: 4,389
Likes: 114
From: Orange County, California
I bought new seals for my vent window assemblies last week. Went out to install them and found the glass "glued" to both hinges. What sort of adhesive is this and what chemicals can be used to remove it without destroying the glass?
Thread Starter
Administrator
Joined: Jul 2009
Posts: 5,311
Likes: 566
From: Phoenix AZ
I think that NJTman used solvent to dissolve the glue, but he did that on the bench, which is what I recommend, so as to not break them. You may want to pm Tman to see what he used...Mark