View Poll Results: Does anybody find these usefull in any way?
Very Much


14
73.68%
Yeah just a bit.


1
5.26%
I am glad you post that, I was wondering how to fix it.


3
15.79%
He must be a disgruntled Auto Shop teacher.


1
5.26%
Voters: 19. You may not vote on this poll
How to repair a weatherproof connector.
 08-31-2007, 05:43 AM
#1
Administrator
Thread Starter

Erratic oil pressure.
Part-1
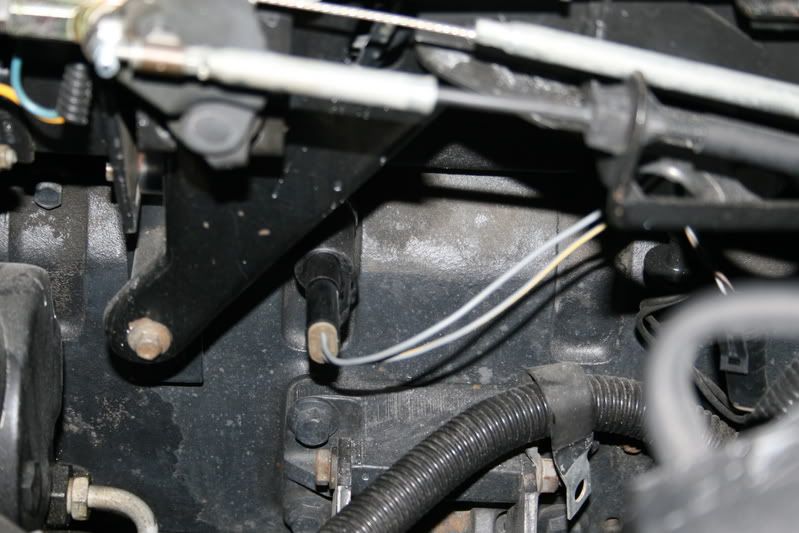
If you have noticed that your oil pressure gauge is reading low or it is wandering aimlessly before you go the dealer and spend $37.00 for a new oil pressure transmitter, WAIT and before you do, spend about 20 minuets and check your connections on the Weatherpack style connector and there is a good chance you might not need to spend all that money. Not saying this will cure the problem every time but it fixed my low and sometimes NO oil pressure.
This is not just for the oil pressure but should be routine maintenance for all of the Weatherpack style connectors under the hood, you might just find it will cure a multitude of other mysterious problems you might have...But for now we will repair the oil pressure.
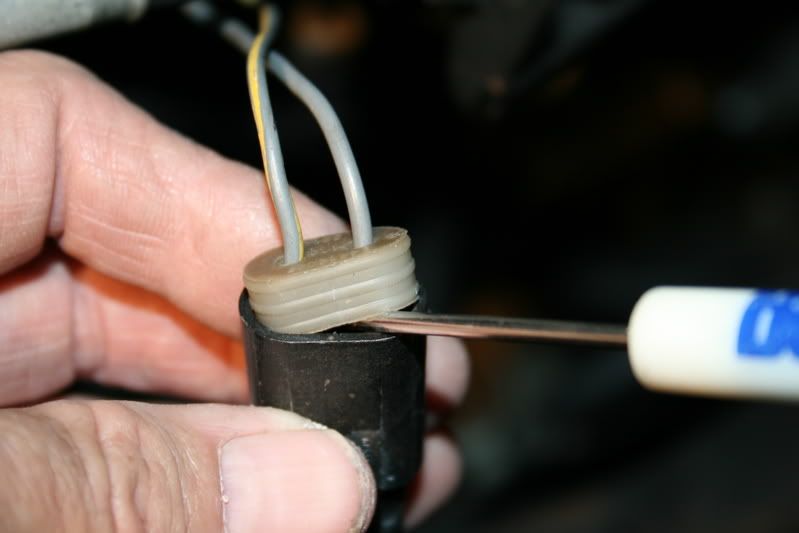
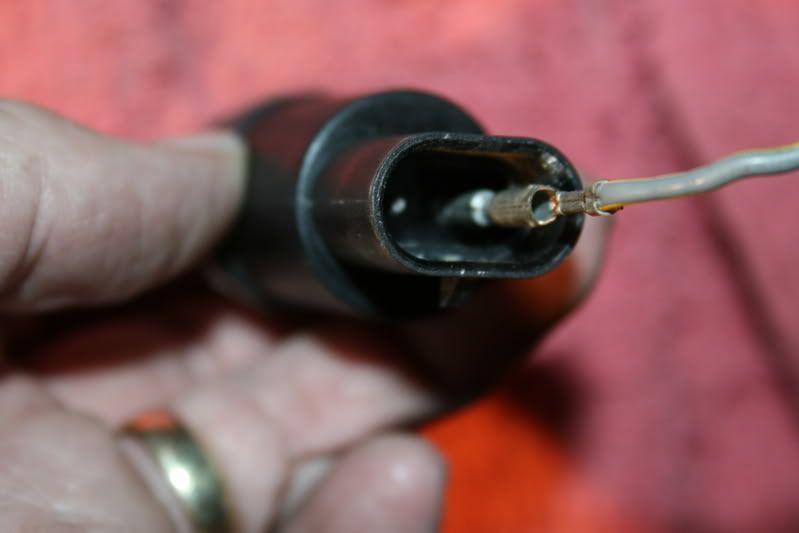
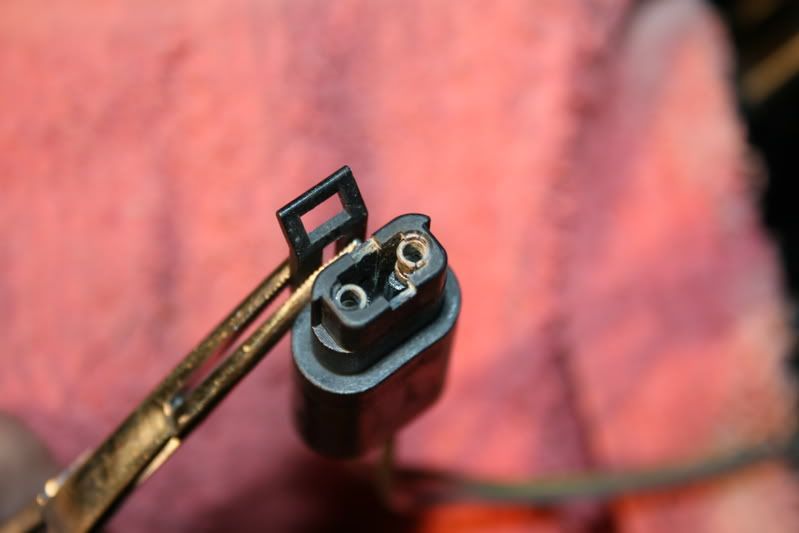
Carefully lift the locking tab and pull back on the connector to disengage it from the oil pressure transmitter.
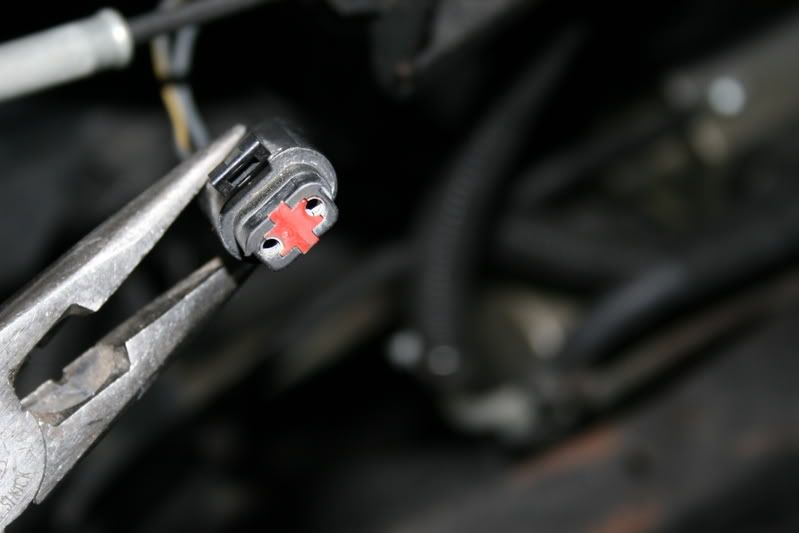
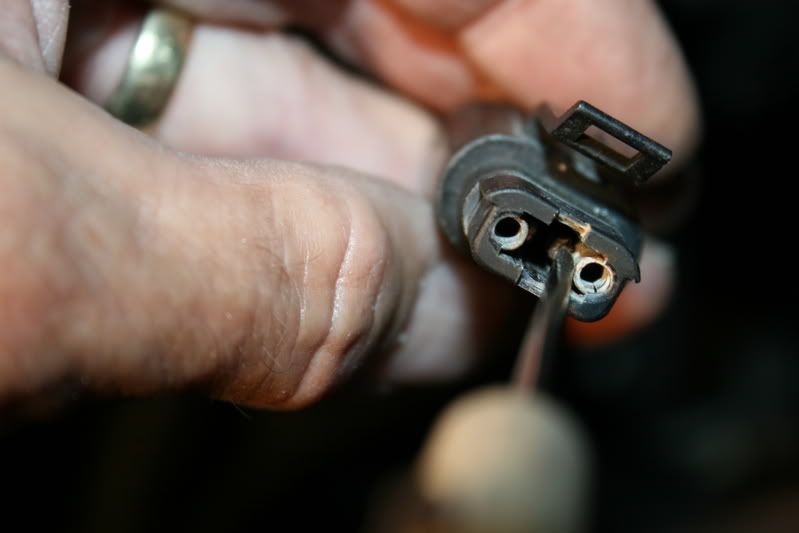
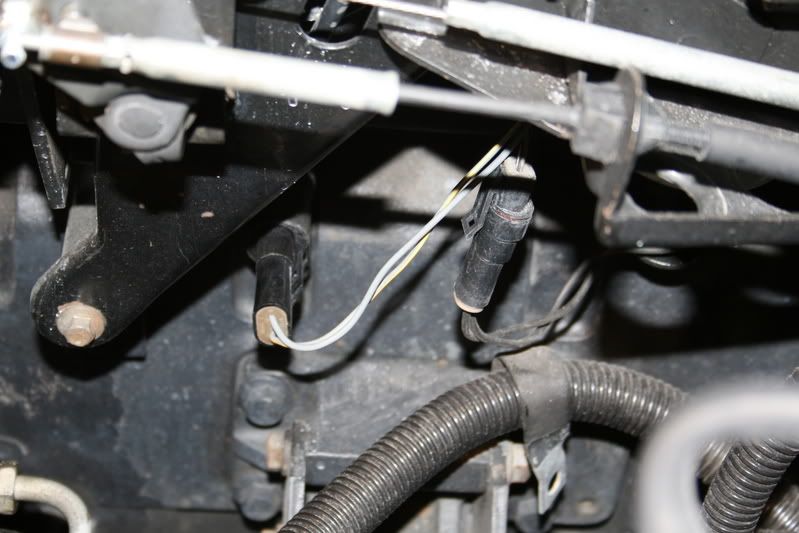
This is the business end of the Weatherpack style connector.
At this point it would be a good idea to make a sketch of the position of the locking tab and the color-coding of the wires. As you are looking at the connector head on with the tab on the top, the gray wire with the yellow stripe in on the LEFT.
First unwind the wire through the engine so you can get a bit of extra wire to work with and you are not hanging upside down trying to work on it, Also lay out a towel or rag under where you are working so incase you drop the small pieces you will not spend the rest of the night looking for them.
Now while you are holding the connector, using a pointed instrument like a small screwdriver carefully lift the locking clip from the end of the connector.
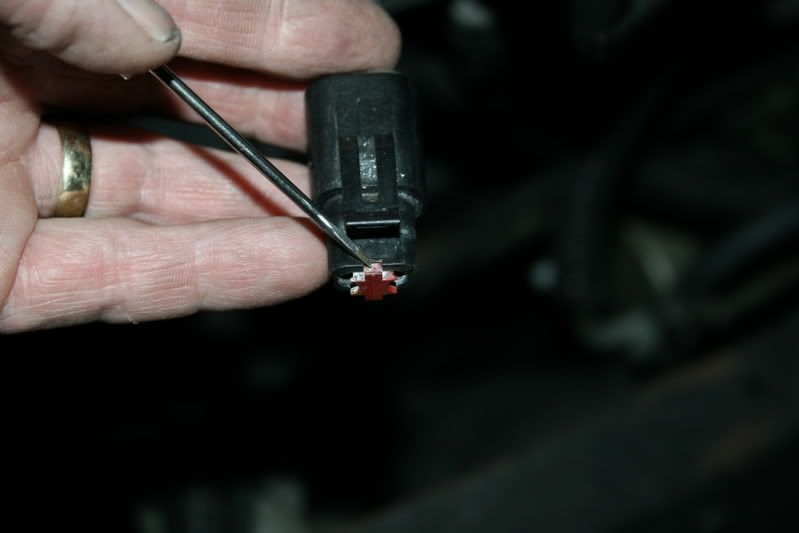
This clip is about an inch long, when it is loose move it to a safe place.
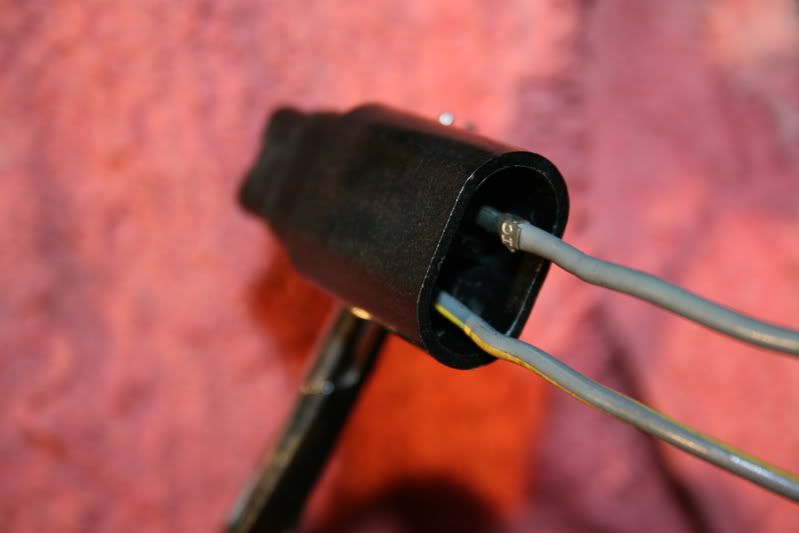
Then flip it around and carefully remove the weatherproof seal from back side, it will slide along the wires.
Looking straight into the connector next to each female connector there will be a small plastic clip that is holding the connector in place, carefully retract this away from the connector as you are pulling back on the wire, it will latch in 2 places one a bit farther down, just pull back the clip and the wire will pull completely out of the housing.
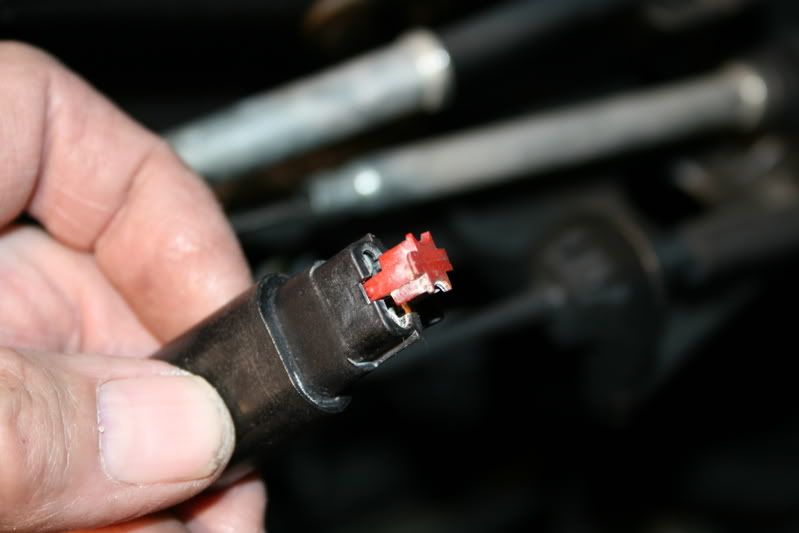
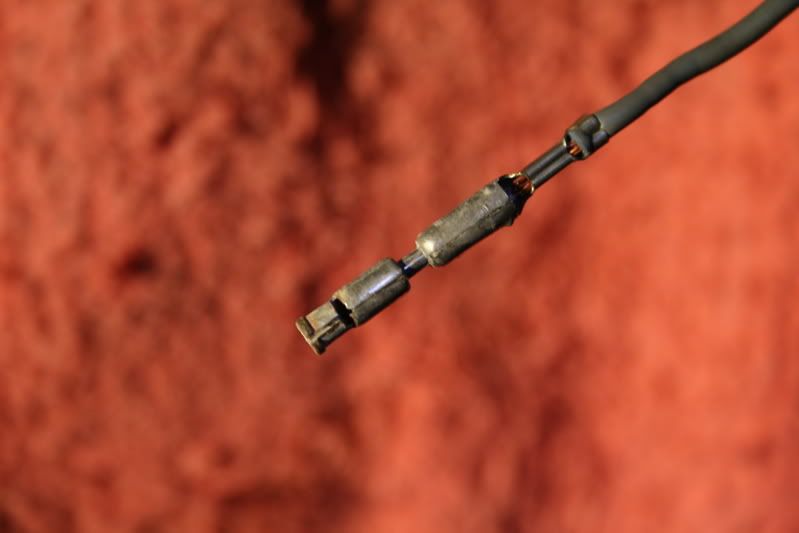
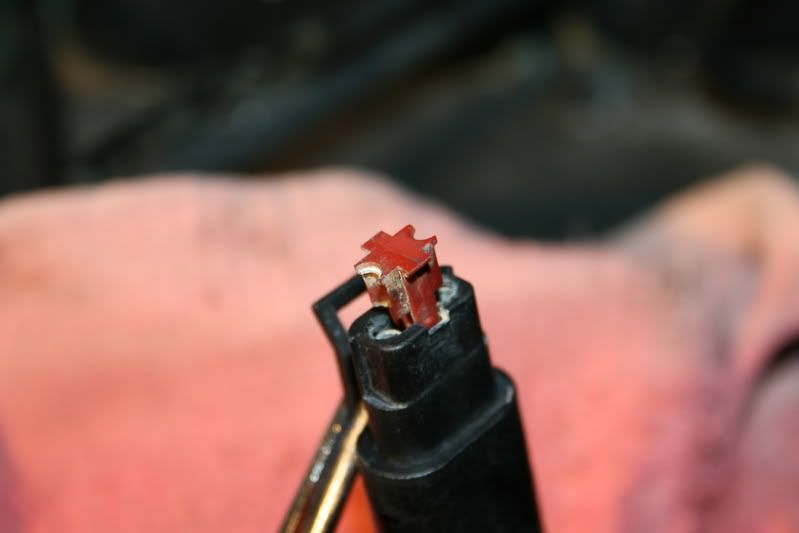
Here is the Weatherpack style connector, if you were to try to fit this onto the pin on the transmitter it would probably be loose and slip off easily.
Now that you have one wire out go back and remove the other wire, as I said before, make a note of the position of the wires so you can return them to their proper side.
Now retract the connector from the back of the housing and then set it aside.
Isn�t this getting easier?
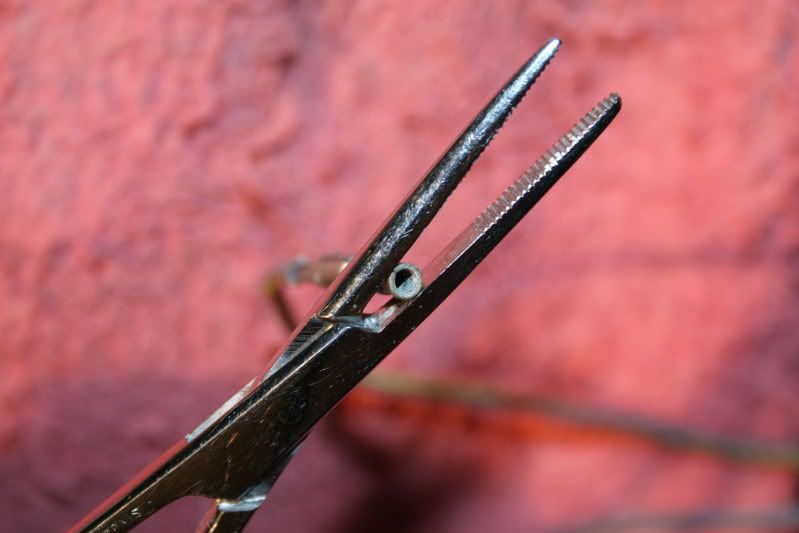
I used a small needle file and carefully cleaned the inside if the barrel end of the connector, you can do this step if you have the instruments or you can omit this step. When the connector is tight again it will make a good connection just by reinserting the connector onto the transmitter.
Then using a small pair of Hemostats or needle nose pliers, very carefully reform the end of the barrel until it is round and the small slit has closed up.
Part-1
If you have noticed that your oil pressure gauge is reading low or it is wandering aimlessly before you go the dealer and spend $37.00 for a new oil pressure transmitter, WAIT and before you do, spend about 20 minuets and check your connections on the Weatherpack style connector and there is a good chance you might not need to spend all that money. Not saying this will cure the problem every time but it fixed my low and sometimes NO oil pressure.
This is not just for the oil pressure but should be routine maintenance for all of the Weatherpack style connectors under the hood, you might just find it will cure a multitude of other mysterious problems you might have...But for now we will repair the oil pressure.
Carefully lift the locking tab and pull back on the connector to disengage it from the oil pressure transmitter.
This is the business end of the Weatherpack style connector.
At this point it would be a good idea to make a sketch of the position of the locking tab and the color-coding of the wires. As you are looking at the connector head on with the tab on the top, the gray wire with the yellow stripe in on the LEFT.
First unwind the wire through the engine so you can get a bit of extra wire to work with and you are not hanging upside down trying to work on it, Also lay out a towel or rag under where you are working so incase you drop the small pieces you will not spend the rest of the night looking for them.
Now while you are holding the connector, using a pointed instrument like a small screwdriver carefully lift the locking clip from the end of the connector.
This clip is about an inch long, when it is loose move it to a safe place.
Then flip it around and carefully remove the weatherproof seal from back side, it will slide along the wires.
Looking straight into the connector next to each female connector there will be a small plastic clip that is holding the connector in place, carefully retract this away from the connector as you are pulling back on the wire, it will latch in 2 places one a bit farther down, just pull back the clip and the wire will pull completely out of the housing.
Here is the Weatherpack style connector, if you were to try to fit this onto the pin on the transmitter it would probably be loose and slip off easily.
Now that you have one wire out go back and remove the other wire, as I said before, make a note of the position of the wires so you can return them to their proper side.
Now retract the connector from the back of the housing and then set it aside.
Isn�t this getting easier?
I used a small needle file and carefully cleaned the inside if the barrel end of the connector, you can do this step if you have the instruments or you can omit this step. When the connector is tight again it will make a good connection just by reinserting the connector onto the transmitter.
Then using a small pair of Hemostats or needle nose pliers, very carefully reform the end of the barrel until it is round and the small slit has closed up.
 08-31-2007, 05:53 AM
#2
Administrator
Thread Starter
Part-2
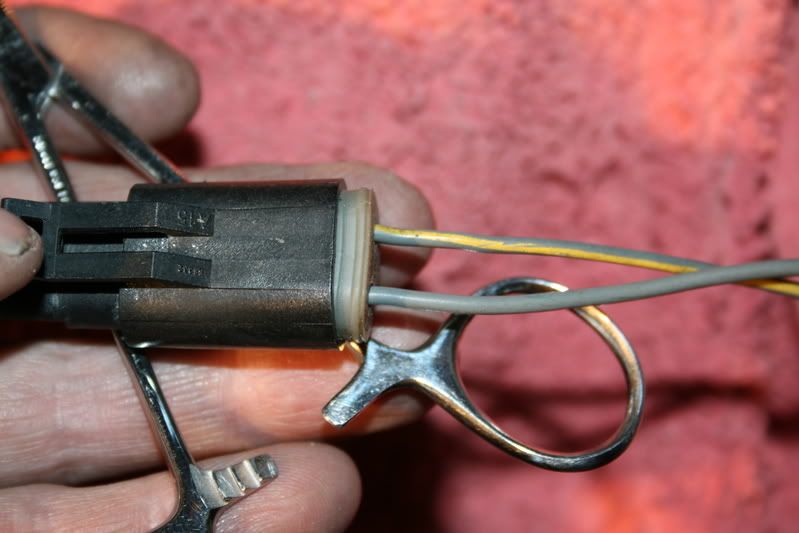
After you cleaned up and tightened both of the connectors I cleaned them off using a shot of CRC Electrical Contact Cleaner I bought at Home Depot and then you can reinsert them back into the body of the connector. Remember to observe where the wires go, incase you already forgot, looking at the BACK end with the locking tab DOWN the wire with the yellow stripe will go on the LEFT side.
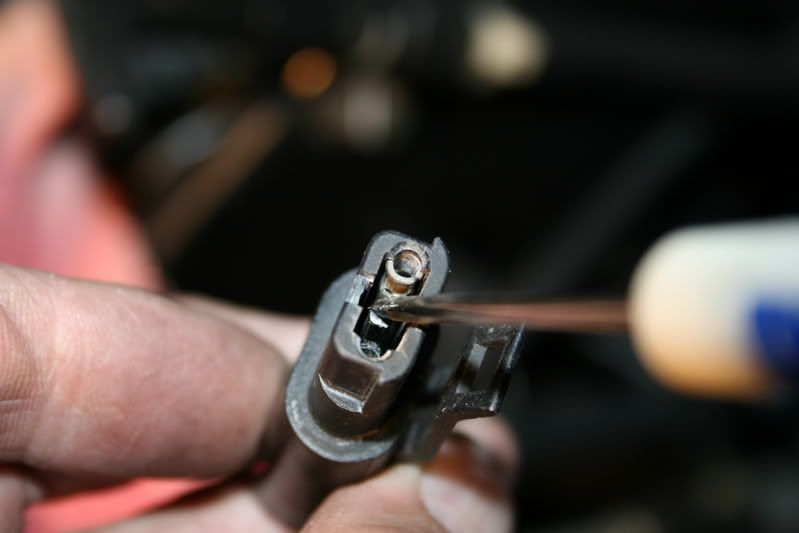
Carefully insert the wires as far as they will go and they will latch into place and with a tug they should not come out.
Then slide the weatherproof seal back down the wired and push it in until it is flush with the back of the connector.
Now turn it around and you should see both of the connectors should be equal distance from the end.
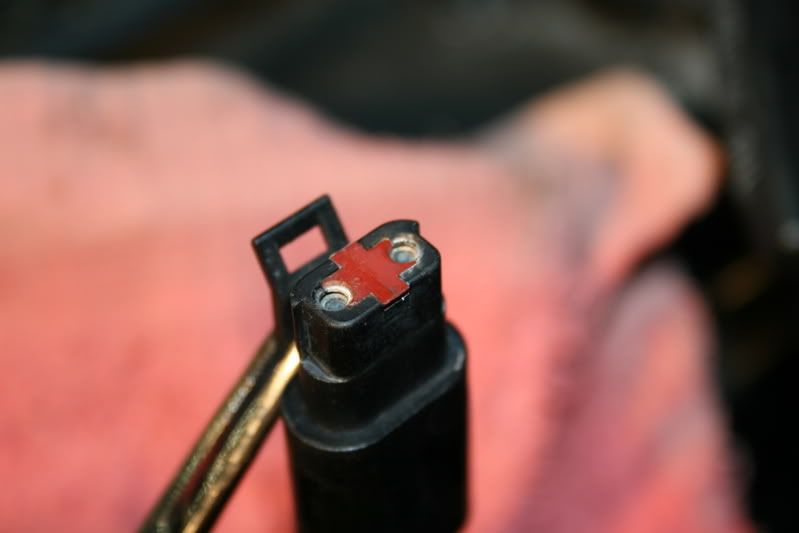
Ok now reinsert the locking tab back into the connector to secure them from coming out.
Carefully seat it in until it I flush with the end.
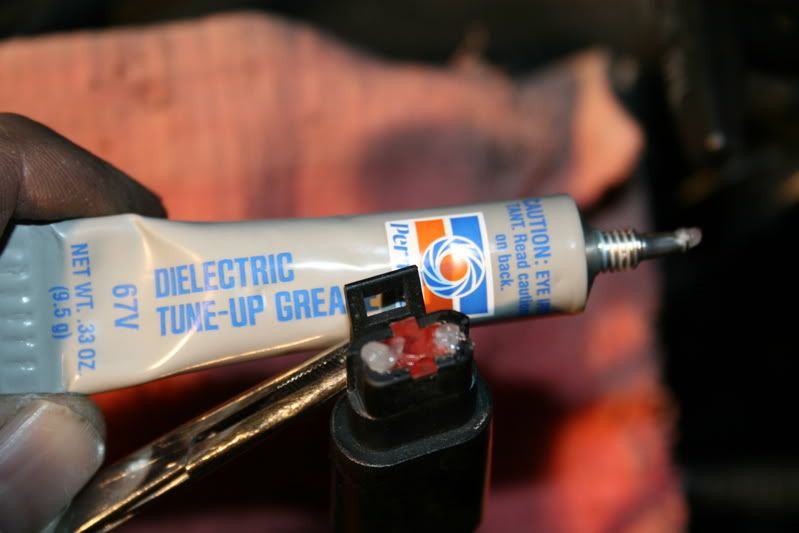
Apply a dab of Dielectric Grease into the ends of the connectors to keep the moisture out of the connection.
Reinsert the wire back down through the side of the engine and take care it is free of any moving parts and then carefully snap it back onto the end of the oil pressure transmitter, you will probably have to use a bit of force until the locking tab engages.
Pick up all of your tools out of the engine compartment.
Do another visual check of your work.
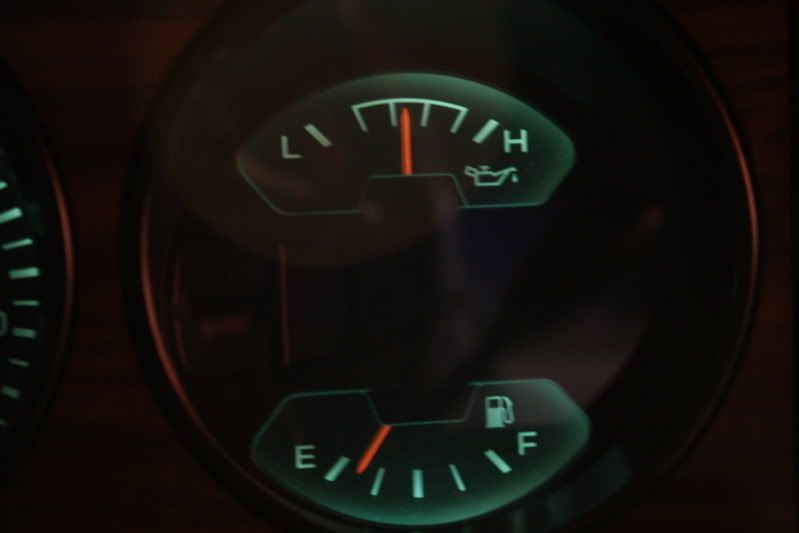
Start your engine and observe the readings on your gauge.
As I said, this might not fix your problem but it DID fix mine, I have a bad habit of washing out my engine compartment every time I wash my truck and probably every 6 months I will attack it with my steam cleaner.
This picture is with the engine idling and the ambient temperature was 92* and yes it was at 8:00 P.M. My gauge had been previously wandering between the end of the �L� and the first line.
These connectors are used throughout the engine compartment on out truck and even more so on the later ones (91.5 with ECM). Water and corrosion is their enemy, clean them and a liberal use of Dielectric grease will keep them working as they were designed to.
This should not take you more than maybe 20 minuets once you have all of the required tools.
If you happen to find any damaged connectors, you can purchase a repair kit and most GOOD auto parts like Napa.
Thank you for letting me share a bit of knowledge and helping you learn how to repair your own truck while not being held prisoner by a mechanic who probably hasn�t a clue as what he is doing.
If you have any questions feel free to ask.
Jim in Southern California.
After you cleaned up and tightened both of the connectors I cleaned them off using a shot of CRC Electrical Contact Cleaner I bought at Home Depot and then you can reinsert them back into the body of the connector. Remember to observe where the wires go, incase you already forgot, looking at the BACK end with the locking tab DOWN the wire with the yellow stripe will go on the LEFT side.
Carefully insert the wires as far as they will go and they will latch into place and with a tug they should not come out.
Then slide the weatherproof seal back down the wired and push it in until it is flush with the back of the connector.
Now turn it around and you should see both of the connectors should be equal distance from the end.
Ok now reinsert the locking tab back into the connector to secure them from coming out.
Carefully seat it in until it I flush with the end.
Apply a dab of Dielectric Grease into the ends of the connectors to keep the moisture out of the connection.
Reinsert the wire back down through the side of the engine and take care it is free of any moving parts and then carefully snap it back onto the end of the oil pressure transmitter, you will probably have to use a bit of force until the locking tab engages.
Pick up all of your tools out of the engine compartment.
Do another visual check of your work.
Start your engine and observe the readings on your gauge.
As I said, this might not fix your problem but it DID fix mine, I have a bad habit of washing out my engine compartment every time I wash my truck and probably every 6 months I will attack it with my steam cleaner.
This picture is with the engine idling and the ambient temperature was 92* and yes it was at 8:00 P.M. My gauge had been previously wandering between the end of the �L� and the first line.
These connectors are used throughout the engine compartment on out truck and even more so on the later ones (91.5 with ECM). Water and corrosion is their enemy, clean them and a liberal use of Dielectric grease will keep them working as they were designed to.
This should not take you more than maybe 20 minuets once you have all of the required tools.
If you happen to find any damaged connectors, you can purchase a repair kit and most GOOD auto parts like Napa.
Thank you for letting me share a bit of knowledge and helping you learn how to repair your own truck while not being held prisoner by a mechanic who probably hasn�t a clue as what he is doing.
If you have any questions feel free to ask.
Jim in Southern California.
08-31-2007, 08:32 AM
#5
Registered User
Join Date: May 2004
Location: Golden, Colorado
Posts: 2,867
Likes: 0
Received 0 Likes
on
0 Posts
After I replaced the clockspring to fix my cruise I then had to do basically the same thing on the plug to the cruise servo. That finally fixed the cruise. I did the reshaping and the grease, non of the other clean stuff. haha
09-02-2007, 07:19 PM
#7
Administrator
Thread Starter
The newer trucks have loads of these under the hood and once they get loose or get corrosion in them anything can happen or not happen.
Glad it worked for you.
Jim
Trending Topics
09-02-2007, 10:23 PM
#9
Registered User
Join Date: Mar 2006
Location: Salina, Kansas
Posts: 753
Likes: 0
Received 0 Likes
on
0 Posts
Thanks Jim! I'm going to do this tomorrow. I have the exact problem as you and hopefully this will fix her up. Keep up the good work! I thoroughly enjoy every single one of your write-ups. keep them coming!!
 11-15-2008, 07:47 PM
#11
Registered User
Join Date: Aug 2008
Location: canton oh
Posts: 13
Likes: 0
Received 0 Likes
on
0 Posts
If your oil pressure gauge still reads low, you can "recalibrate" the gauge by grounding the terminal for the gauge(in the weatherpack connector), and turning the ignition switch to the on position. Wait for the qauge to peg hi, turn off the ignition, and reconnect the weatherpack to the sending unit. I don't remember which wire is for the qauge(one is for the gauge, the other is for the low oil light) so if your low oil light comes on, you got the wrong wire . But perhaps someone with easy access to the diagram can post which is which
. But perhaps someone with easy access to the diagram can post which is which
10-27-2011, 04:01 PM
#13
Banned

Join Date: Mar 2011
Location: osoyoos BC canada
Posts: 492
Likes: 0
Received 0 Likes
on
0 Posts
Thanks Jim I was starting to wonder if my oil pump was going bad. It used to sit at the second mark when cruising down the highway and about the same at idle unless the truck was cold. Now it sits just on the low side of the third mark when driving and about half way between the second n third mark at idle.
10-27-2011, 07:23 PM
#14
Registered User
Join Date: Dec 2010
Location: Land of the Toxic Avenger
Posts: 6,770
Received 1,637 Likes
on
1,112 Posts
Hey Jim Lane,
How long were you an auto shop teacher ????

How long were you an auto shop teacher ????
11-02-2011, 01:54 PM
#15
Registered User

I did this the other night, and grounded the gauge to calibrate it. The wire with the stripe is the one for the gauge. Be careful, the locking tabs inside the plug will break easily. If you don't break it clear off, you can stick the wire back in and hold the wire the right way and close your mouth just so, the red locking piece will hold the tab against the terminal.
I gained about 2 widths of the needle at highway speed, and when my dummy light comes on I am now still above the last line yet. I only did the wire for the gauge because of breaking that tab.
I gained about 2 widths of the needle at highway speed, and when my dummy light comes on I am now still above the last line yet. I only did the wire for the gauge because of breaking that tab.