
How To Post Your Pictures On The DTR Forums

Thread Starter
1st Generation Admin
Joined: Jan 2005
Posts: 4,601
Likes: 118
From: Buies Creek, NC
Folks, there was a time not too long ago when I was road-kill on "The Information Highway". Everyone's been there. 
When I joined these forums, I had to eventually find the way to post pictures. If I wasn't sure, I had to ask. Everyone's been there.
So here I'm returning the favor . . . .. with PICTURES!!
Please understand, this is aimed at those who're not that sure-footed with such. I'm going to present this pretty-much in a step-by-step fashion. When I instruct you to press a button, I'll include a picture as to what will pop up or happen.
If I've thought this out good, by the time you get through reading it, you'll hopefully think ~ "Well shoot! That's not so hard."
With that, let's get started ~
Let's begin by becoming aware of what and why we're going through these motions. Three things . . . . .
- Why?
In order for one to see one's pictures on the Internet, the pictures must be Hosted. You can loosely compare this to calling up your favorite radio station on the phone and asking them to play Radar Love by Golden Earring. They respond that they don't have that LP (Blasphemy!). If you want to hear that song on your radio, you're gonna have to send them your record. You mail it to them, and when they get it, you can call and make the request. In a short time, you'll hear those tunes and want to get in your truck and drive.

The DTR server is the radio station. You want to see your pictures on DTR? You'll have to send them from your computer, to the server.
- Picture Physical Size:
Depending on how you got your picture be it a camera or copied from the Internet, etc, you may find you need to change how big the picture is in terms of inches wide by inches tall. You may have seen in forums where someone posted a picture that's huge! The scroll buttons pop-up and you have to move things around to see it all. Sometimes, it interferes with reading the thread. Sometimes the pictures are too small to make out the point of posting it.
This thread is not intended to explain how to resize your pictures. There's a BUNCH of software available. Complicated, and easy. Expensive, and free.
To help, here's a Google for Free Picture Resizing Software ~ http://www.google.com/search?hl=en&s...re&btnG=Search
How big is big enough? Here's some examples:
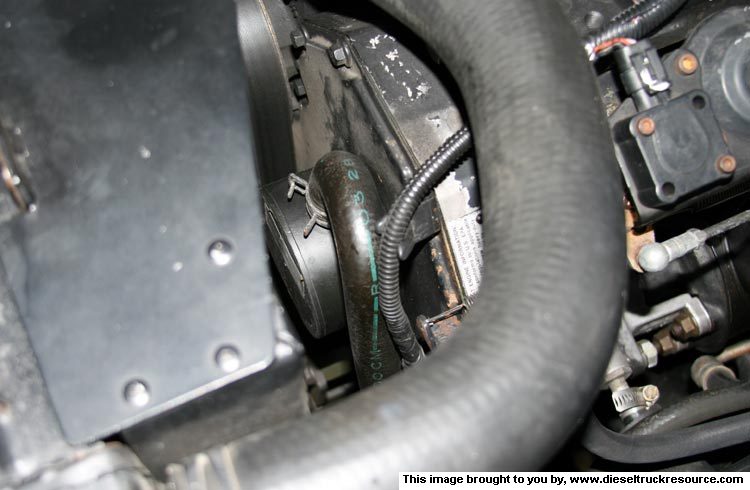
This picture is 750 pixels wide by 490 pixels tall. That equates to 10.4" wide by 6.8" tall on a standard size computer screen. ~
Here's the same picture but 500 pixels wide by 327 pixels tall. That equates to 6.9" tall by 4.5" tall on a standard size computer screen. . ~

Try to keep your picture size such that you can make your point without being annoying to your fellow readers.
When I joined these forums, I had to eventually find the way to post pictures. If I wasn't sure, I had to ask. Everyone's been there.
So here I'm returning the favor . . . .. with PICTURES!!
Please understand, this is aimed at those who're not that sure-footed with such. I'm going to present this pretty-much in a step-by-step fashion. When I instruct you to press a button, I'll include a picture as to what will pop up or happen.
If I've thought this out good, by the time you get through reading it, you'll hopefully think ~ "Well shoot! That's not so hard."
With that, let's get started ~
Let's begin by becoming aware of what and why we're going through these motions. Three things . . . . .
- Why?
In order for one to see one's pictures on the Internet, the pictures must be Hosted. You can loosely compare this to calling up your favorite radio station on the phone and asking them to play Radar Love by Golden Earring. They respond that they don't have that LP (Blasphemy!). If you want to hear that song on your radio, you're gonna have to send them your record. You mail it to them, and when they get it, you can call and make the request. In a short time, you'll hear those tunes and want to get in your truck and drive.
The DTR server is the radio station. You want to see your pictures on DTR? You'll have to send them from your computer, to the server.
- Picture Physical Size:
Depending on how you got your picture be it a camera or copied from the Internet, etc, you may find you need to change how big the picture is in terms of inches wide by inches tall. You may have seen in forums where someone posted a picture that's huge! The scroll buttons pop-up and you have to move things around to see it all. Sometimes, it interferes with reading the thread.
Sometimes the pictures are too small to make out the point of posting it.This thread is not intended to explain how to resize your pictures. There's a BUNCH of software available. Complicated, and easy. Expensive, and free.
To help, here's a Google for Free Picture Resizing Software ~ http://www.google.com/search?hl=en&s...re&btnG=Search
How big is big enough? Here's some examples:
This picture is 750 pixels wide by 490 pixels tall. That equates to 10.4" wide by 6.8" tall on a standard size computer screen. ~
Here's the same picture but 500 pixels wide by 327 pixels tall. That equates to 6.9" tall by 4.5" tall on a standard size computer screen. . ~
Try to keep your picture size such that you can make your point without being annoying to your fellow readers.
Thread Starter
1st Generation Admin
Joined: Jan 2005
Posts: 4,601
Likes: 118
From: Buies Creek, NC
- Picture File size:
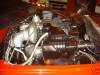
This relates to the picture quality, or resolution. Higher resolution (and resulting higher file size) presents with a picture of finer detail. It can be taken to a point where it's really of no value though. For example:
The two following images are the same picture (physical size on your screen). The image on the left is 10KB (kilobytes). A relatively small file. The image on the right is 100KB. A much larger file.

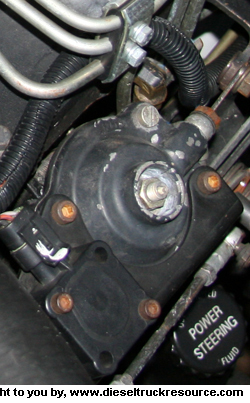
Both show the top of the VE injection pumps AFC housing. Both do so adequately. The image on the right however has a high enough resolution that one can zoom in to see things in great detail. Go ahead. Try zooming into both images to see the difference. The small file image quickly becomes fuzzy as you zoom in. The larger file however allows you to see small stuff clearly.
What's the point?
If you're just showing where the AFC is on top of the pump, use a small file size. If you need folks to zoom in to the AFC boost tube connection at the head (seen behind the AFC housing / Brass), then use a file size that's big enough to have the image present clearly.
Want another reason to pay attention to file size?
The DTR forums allow each member 5,000kb (5,120,000 bytes) of space on the servers. A simplification of this might be: They allow you $5.00 worth of space. You can upload a single $5.00 picture, two $2.50 pictures, or ten $.50 pictures, 100 $.05 pictures and so on. One can have a LOT of picture hosted by DTR if one keeps the file sizes under control. Different sizes are not a problem.
Want another reason?
Ever notice those pictures that load on your screen r e a l y s l o w ? They're usually a big file size. And depending on the speed of your Internet connection, it may take a while to download it. High speed DSL? Not so bad. But if you're like many, you're on a slow dial-up connection and those big file pictures take d a y s to load.
So again, try to keep your picture file size such that you can make your point without being annoying to your fellow readers.
OK. You've got your pictures all cropped and ready to go. Let's upload them. Step-by-step.
This relates to the picture quality, or resolution. Higher resolution (and resulting higher file size) presents with a picture of finer detail. It can be taken to a point where it's really of no value though. For example:
The two following images are the same picture (physical size on your screen). The image on the left is 10KB (kilobytes). A relatively small file. The image on the right is 100KB. A much larger file.
Both show the top of the VE injection pumps AFC housing. Both do so adequately. The image on the right however has a high enough resolution that one can zoom in to see things in great detail. Go ahead. Try zooming into both images to see the difference. The small file image quickly becomes fuzzy as you zoom in. The larger file however allows you to see small stuff clearly.
What's the point?
If you're just showing where the AFC is on top of the pump, use a small file size. If you need folks to zoom in to the AFC boost tube connection at the head (seen behind the AFC housing / Brass), then use a file size that's big enough to have the image present clearly.
Want another reason to pay attention to file size?
The DTR forums allow each member 5,000kb (5,120,000 bytes) of space on the servers. A simplification of this might be: They allow you $5.00 worth of space. You can upload a single $5.00 picture, two $2.50 pictures, or ten $.50 pictures, 100 $.05 pictures and so on. One can have a LOT of picture hosted by DTR if one keeps the file sizes under control. Different sizes are not a problem.
Want another reason?
Ever notice those pictures that load on your screen r e a l y s l o w ? They're usually a big file size. And depending on the speed of your Internet connection, it may take a while to download it. High speed DSL? Not so bad. But if you're like many, you're on a slow dial-up connection and those big file pictures take d a y s to load.
So again, try to keep your picture file size such that you can make your point without being annoying to your fellow readers.
OK. You've got your pictures all cropped and ready to go. Let's upload them. Step-by-step.
Thread Starter
1st Generation Admin
Joined: Jan 2005
Posts: 4,601
Likes: 118
From: Buies Creek, NC
-> To start with, put all the photos you want to upload in a folder all their own on your desktop. This will help in navagating to them later. You'll see . . . .
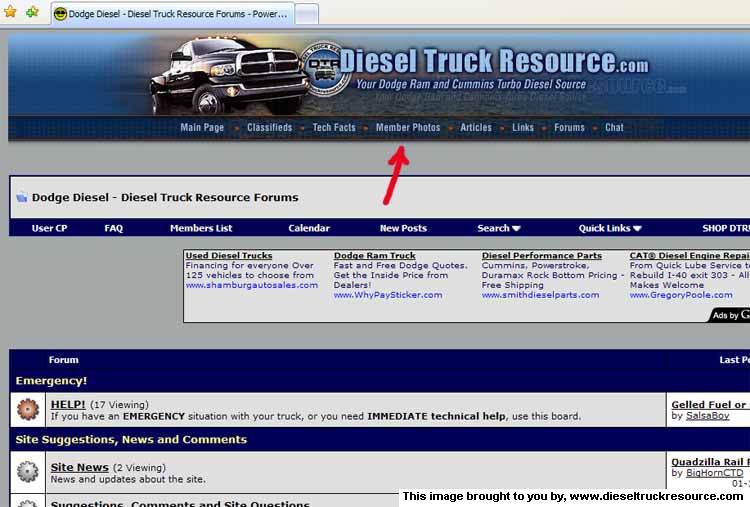
At the top of all the forum pages, you'll see the "Members Photos" button. Click it.
You will be taken to the DTR Photo Galleries. On the left-hand side of the page, you'll see the "My Photos" button. Click it.

Doing so will take you to your DTR Photo Gallery. This is where your pictures are stored. You can go to it anytime and link to the pictures as needed, etc. To upload your pictures, click on the "Upload Photos" button found at the top/right.

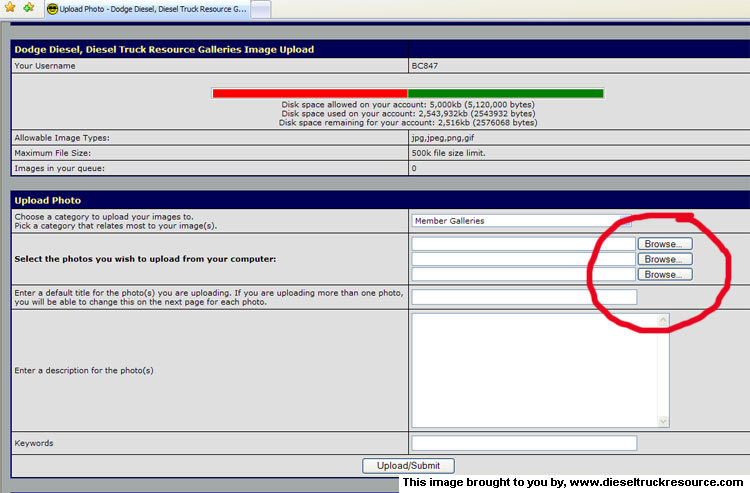
With that, you'll have a window open that shows a number of things.
- Up top, how much space for pictures you have used, as well as the space you have left.
- In the middle, you have the means to select where the pictures come from on your computer, where you can store them if other than your gallery, and a means of adding a description if posting only one picture (hold that thought).
- Other options. Apply as needed.
To start with, click the top-most "Browse" button.
You'll have a small window open that should by default go to your desktop listing everything on it. Let's say we're gonna post pictures of your new crankcase vent. Remember that folder you created and put all the pictures in? Find it in the list and click on it, opening the folder.

With the folder open, you can see all your pictures that you want to upload. Select one and press the "Open" button.
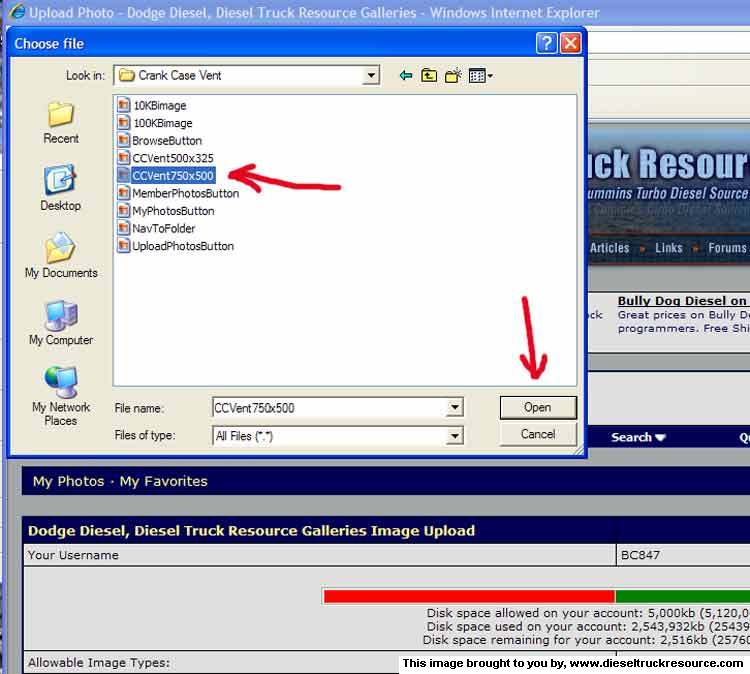
The small window will close and you'll see the picture you selected listed in the line. If you're only uploading one picture, go ahead and fill out the title, description, and key words.
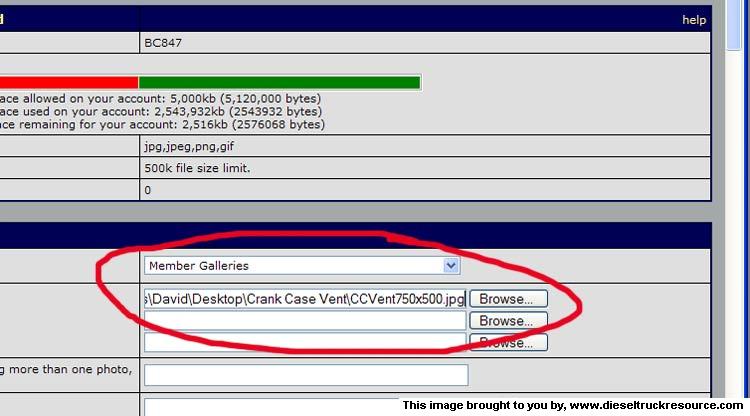
If you want to upload more than one picture, browse to them, select them, etc just as you did with the first for a total of three. If your uploading more than one image, you can wait till the next step to add titles and stuff. If you want to upload more than three pictures, you can repeat the process to do so.
OK?
Press the "Upload/Submit" button.

The following page will allow you to add titles, descriptions as well as key words for each picture. When thinking about key words, use words that one might use when searching for the subject. Use as many as you can related to the subject. Use a spell check
Then press the "Process" button at the bottom.

At the top of all the forum pages, you'll see the "Members Photos" button. Click it.
You will be taken to the DTR Photo Galleries. On the left-hand side of the page, you'll see the "My Photos" button. Click it.
Doing so will take you to your DTR Photo Gallery. This is where your pictures are stored. You can go to it anytime and link to the pictures as needed, etc. To upload your pictures, click on the "Upload Photos" button found at the top/right.
With that, you'll have a window open that shows a number of things.
- Up top, how much space for pictures you have used, as well as the space you have left.
- In the middle, you have the means to select where the pictures come from on your computer, where you can store them if other than your gallery, and a means of adding a description if posting only one picture (hold that thought).
- Other options. Apply as needed.
To start with, click the top-most "Browse" button.
You'll have a small window open that should by default go to your desktop listing everything on it. Let's say we're gonna post pictures of your new crankcase vent. Remember that folder you created and put all the pictures in? Find it in the list and click on it, opening the folder.
With the folder open, you can see all your pictures that you want to upload. Select one and press the "Open" button.
The small window will close and you'll see the picture you selected listed in the line. If you're only uploading one picture, go ahead and fill out the title, description, and key words.
If you want to upload more than one picture, browse to them, select them, etc just as you did with the first for a total of three. If your uploading more than one image, you can wait till the next step to add titles and stuff. If you want to upload more than three pictures, you can repeat the process to do so.
OK?
Press the "Upload/Submit" button.
The following page will allow you to add titles, descriptions as well as key words for each picture. When thinking about key words, use words that one might use when searching for the subject. Use as many as you can related to the subject. Use a spell check
Then press the "Process" button at the bottom.
Thread Starter
1st Generation Admin
Joined: Jan 2005
Posts: 4,601
Likes: 118
From: Buies Creek, NC
Finally, you'll be taken back to you Photo Gallery where it will initially present with a little "Image Pending Approval" thing. Let's face it, there's mean people who drive CTD's to. They may try to post images that your granddaughter might ask troubling questions about (while you're having a heart attack!). To stop that sort of thing, the forum staff has to approve each picture before it's seen on the forums. The forum staff has a life just like you so be patient. When the pictures are approved, you may receive an Email notification if you have that allowed in your user control panel.

Once the pictures have been approved, you can post them in the forums a number of ways. Go to your Photo Gallery as described above.
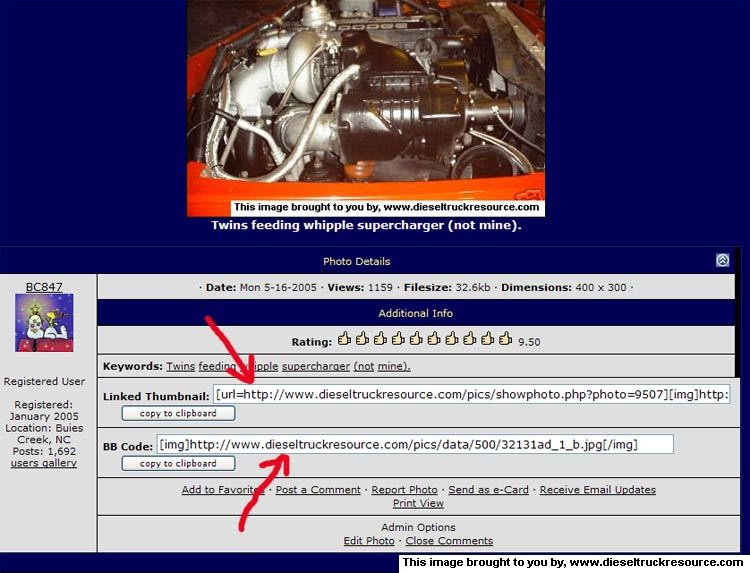
- Click on the image you want to see. You might notice that you can select from a small version of the picture, or a larger version that the forum servers automatically add once a certain size is reached. If you see at the bottom of your picture the words "Click for a smaller or larger version". Pick one as needed and work from there.
- At the bottom of the page, you'll see two strings of text. The top string of text will have you post a "Thumbnail" of your picture. Clicking on the thumbnail will have the image open in a separate window for the viewer. The thumbnail can help in keeping your post cleaner if you feel it might help.
The bottom string of text will present with the full sized picture as you uploaded it.
-Left-click on one of the two and the text will be high-lighted. Right-click it and select "Copy".
- Now go to the post in the thread where you want to see the picture and by right-clicking where the picture goes, select "Paste". It may look like this. ~
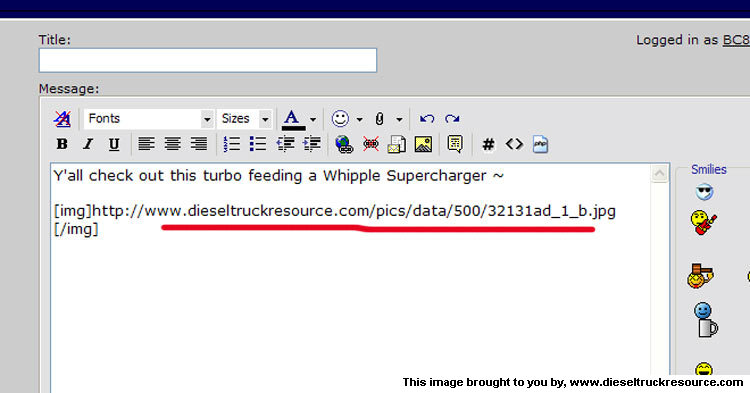
Completing your post as you normally would will have your picture show up all nice and purdy. .. . .Without annoying the neighbors.
Here's the Thumbnail version of the Whipple mess (Click it) ~
And the full size version ~

I hope this proves helpful to those interested without being too complicated.
Y'all drive carefully.
Once the pictures have been approved, you can post them in the forums a number of ways. Go to your Photo Gallery as described above.
- Click on the image you want to see. You might notice that you can select from a small version of the picture, or a larger version that the forum servers automatically add once a certain size is reached. If you see at the bottom of your picture the words "Click for a smaller or larger version". Pick one as needed and work from there.
- At the bottom of the page, you'll see two strings of text. The top string of text will have you post a "Thumbnail" of your picture. Clicking on the thumbnail will have the image open in a separate window for the viewer. The thumbnail can help in keeping your post cleaner if you feel it might help.
The bottom string of text will present with the full sized picture as you uploaded it.
-Left-click on one of the two and the text will be high-lighted. Right-click it and select "Copy".
- Now go to the post in the thread where you want to see the picture and by right-clicking where the picture goes, select "Paste". It may look like this. ~
Completing your post as you normally would will have your picture show up all nice and purdy. .. . .Without annoying the neighbors.
Here's the Thumbnail version of the Whipple mess (Click it) ~
And the full size version ~
I hope this proves helpful to those interested without being too complicated.
Y'all drive carefully.

Registered User
Joined: Feb 2003
Posts: 788
Likes: 89
From: Nevada Co., CA
Good point about file size/resolution. Also, smaller file size means faster upload for those of us with dial-up! I'll have to refer to this thread the next time I try posting pics! Now, got any tips for fixing my javascript?
Trending Topics
Thread Starter
1st Generation Admin
Joined: Jan 2005
Posts: 4,601
Likes: 118
From: Buies Creek, NC
Yup, uninstall the entire JAVA program and download the latest version. Java, like many constantly updating software, often has issues when cleaning up behind itself when updating.
Get the latest version here ~ http://www.java.com/en/download/index.jsp
Get the latest version here ~ http://www.java.com/en/download/index.jsp

Registered User
Joined: Feb 2003
Posts: 788
Likes: 89
From: Nevada Co., CA
To uninstall Java I got to be able to find it! It's not in add/remove programs but I can find a file for it in program files, but nothing in that file about uninstall. I love/hate computers.
If you can, you can remove my posts about this so I don't muck up your thread.
If you can, you can remove my posts about this so I don't muck up your thread.


