
>>> how i fixed the wiper-arm bushings <<<

Registered User
Joined: Feb 2007
Posts: 703
Likes: 1
From: MyTrailer, Canada
I couldn't find this in the stickies under Body or Electrical. It's a definite must-have for 1st Gen reliability, given the horror stories we've seen posted of failed linkages. Even BK says he was fooled at first when his wipers stopped. I did mine a while ago without the benefit of this thread and it would've been SO much easier not having to break my way in, ... 


Registered User
Joined: Nov 2011
Posts: 4,479
Likes: 211
From: Isanti, MN

Registered User
Joined: Jan 2004
Posts: 54
Likes: 0
From: SE Texas
Does anyone know if something can be applied to the rubberized bushings to keep them from degrading so fast? Mine broke this morning on the way to work. Gotta get some today and put them in (at work) because rain is forecast. This set is only 4 years old. Fourth time i've replaced them. It's getting old quickly.

Registered User
Joined: Jul 2005
Posts: 212
Likes: 0
From: Seattle Area
A few additional tips...
Though my wipers were squeaking before the passenger side quit, it was actually the splined bushing between the wiper shaft and wiper arm that stripped and actually came off of the wiper pivot. It is staked onto the pivot shaft, so it's surprising that it came off, but it ended up bending the shaft and cracking the pivot tower on it's way out.
Since the local pick-n-pull moved all of the Dodge pick ups (but not vans..) to a different (and distant) facility, I took a gamble and pulled a van's assembly thinking that even if the linkage was different, the pivots must be the same - not! The vans have shorter two-bolt pivots, the trucks have longer, three-bolt pivots, so they are not interchangeable. Lesson learned.
The pivot assemblies can be disassembled by carefully grinding the peened areas of the splined coupler with a Dremel, then using a small gear puller to remove the coupler from the shaft. This will allow the shafts to be removed from the pivot housings which can then be cleaned and re-greased. After reassembling the shafts into the pivot assemblies, re-peen the splined couplers onto the shafts.

Registered User
Joined: Mar 2009
Posts: 16
Likes: 0
I'm in the process of doing this on my rig. Has anyone used tension roll/spring pins instead of a cotter pin? I drilled the towers and used my last two cotter pins; I was thinking about using what I have on hand which is a package of 5/64" spring pins. Thoughts anyone?
Two cups of coffee later, it hit me that there wasn't anything for the tension spring to press against and retain....I wound up using #6-32 x 1in flat head machine screws. The hole was slightly larger, but with a a fender and lock washer it worked well......and red lock tite.
Rich
Two cups of coffee later, it hit me that there wasn't anything for the tension spring to press against and retain....I wound up using #6-32 x 1in flat head machine screws. The hole was slightly larger, but with a a fender and lock washer it worked well......and red lock tite.
Rich

Thread Starter
Registered User


Joined: Oct 2005
Posts: 6,457
Likes: 95
From: KENTUCKY
I wish I had of taken pictures of this process when I did all the trucks around here.
Maybe I will take time to do the bushings on one of the waiting-to-be-restored trucks and take plenty of pictures.
I know it is hard for me to explain and harder for others to envision just what I did without pictures.
I drilled through the length of the bushings --- not across the diameter.
I also drilled a matching hole through the length of the pivot-pins.
The cotter-pin goes up through this hole, then through a washer that is larger than the hole that the bushing resides in, then the ears of the cotter-pin get folded over.
The washer may very well shield the bushing from the damaging rays of the sun and, when the bushing finally does deteriorate and fail, the washer prevents the two pieces from separating until a new bushing can be installed.

Registered User
Joined: Jan 2013
Posts: 138
Likes: 10
I wonder if there is a way to do a bronze bushing? Maybe some round tube stock with the correct OD and ID to take the place of the bushing. Assemble with grease, then do the cotter pin and washer trick, or remove the pin entirely and reassemble with a bolt and locknut. I'm thinking of experimenting on my crew when I get to that point.
Thread Starter
Registered User
Joined: Oct 2005
Posts: 6,457
Likes: 95
From: KENTUCKY
I wonder if there is a way to do a bronze bushing? Maybe some round tube stock with the correct OD and ID to take the place of the bushing. Assemble with grease, then do the cotter pin and washer trick, or remove the pin entirely and reassemble with a bolt and locknut. I'm thinking of experimenting on my crew when I get to that point.
As best I recollect, the pivot-pins are sort of like little trailer-hitch ***** and "pop" into the bushings --- it has been a while...
The reason plain old bolts weren't used is due to the linkage not moving in a flat plane; the various pieces pivot up and down while hinging back and forth.
Registered User
Joined: Mar 2009
Posts: 16
Likes: 0
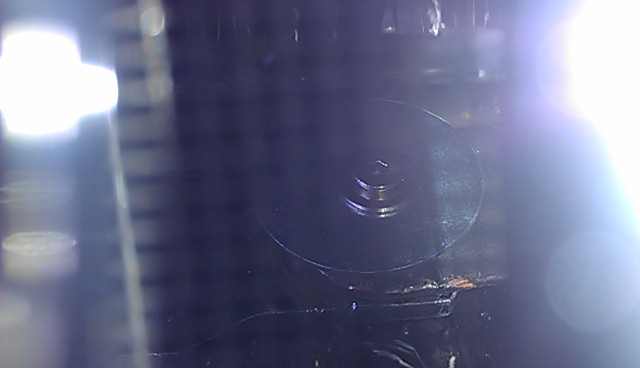
You can see the head of the bolt (6-32 x 1") along with a fender washer. There is a lock washer, nut and blue locktite on the bottom of the arm.

Figured out a use for the old torn screen from the sliding door.
