


Diving in - porting the head


Thread Starter
Registered User
Joined: Jul 2005
Posts: 212
Likes: 0
From: Seattle Area
Originally Posted by crossy
personally , i dont call that 'MILD' head porting. He's got some time invested there. JMHO. DAVE

1st Generation Admin
Joined: Jan 2005
Posts: 4,601
Likes: 118
From: Buies Creek, NC
IIRC, you may find the exhaust housing flange of the manifold will only need cleaning up in the top and bottom to mate nicely to the turbo's housing.
The center divider is pretty much dead on and the outer side-walls just need aligning. The shorter sides (top and bottom) need the most work to line them up with the turbo.
Any more will result in you trumpeting the manifold, only to have to do the same thing to the turbo's housing. A LOT of work for nothing IMO as you'll introduce turbulence that will hinder smooth gas flow.
Seems I recall there's a boss in the heads intake log up close to cylinder no1 that offers resistance to flow as compared to the other cylinders.
I'll see if I can find the article about it............
Looking good thus far goodtyms.
The center divider is pretty much dead on and the outer side-walls just need aligning. The shorter sides (top and bottom) need the most work to line them up with the turbo.
Any more will result in you trumpeting the manifold, only to have to do the same thing to the turbo's housing. A LOT of work for nothing IMO as you'll introduce turbulence that will hinder smooth gas flow.
Seems I recall there's a boss in the heads intake log up close to cylinder no1 that offers resistance to flow as compared to the other cylinders.
I'll see if I can find the article about it............
Looking good thus far goodtyms.

Registered User

Joined: Aug 2005
Posts: 2,309
Likes: 26
From: Smithfield, VA
Originally Posted by BC847
IIRC, you may find the exhaust housing flange of the manifold will only need cleaning up in the top and bottom to mate nicely to the turbo's housing.
The center divider is pretty much dead on and the outer side-walls just need aligning. The shorter sides (top and bottom) need the most work to line them up with the turbo.
Any more will result in you trumpeting the manifold, only to have to do the same thing to the turbo's housing. A LOT of work for nothing IMO as you'll introduce turbulence that will hinder smooth gas flow.
Seems I recall there's a boss in the heads intake log up close to cylinder no1 that offers resistance to flow as compared to the other cylinders.
I'll see if I can find the article about it............
Looking good thus far goodtyms.
The center divider is pretty much dead on and the outer side-walls just need aligning. The shorter sides (top and bottom) need the most work to line them up with the turbo.
Any more will result in you trumpeting the manifold, only to have to do the same thing to the turbo's housing. A LOT of work for nothing IMO as you'll introduce turbulence that will hinder smooth gas flow.
Seems I recall there's a boss in the heads intake log up close to cylinder no1 that offers resistance to flow as compared to the other cylinders.
I'll see if I can find the article about it............
Looking good thus far goodtyms.
Thread Starter
Registered User
Joined: Jul 2005
Posts: 212
Likes: 0
From: Seattle Area
Head Gasket Thickness
Okay, for those those of you that followed and especially contributed to my this thread, thanks!
Here's more pictures right before the head went to the machine shop . They finishing milling and took .010" off the head to get it true again and are grinding the valves, just because I was in there porting and did it as good measure. Anyway, I've heard of people installing the .020" headgasket to prevent detonation (in a diesel of all things ) when planning other mods.
I plan on minor pump mods, 190 "ish" injectors, porting of course, turbo-back 4" exhaust (all I need is the downpipe) the HX35 that's on there and no more than 32-35 PSI of boost. Should I go with the .010" or the .020" head gasket?
Is lowering compression by using a taller gasket only needed when twin are used or other extreme mods?
Exhaust port before porting:
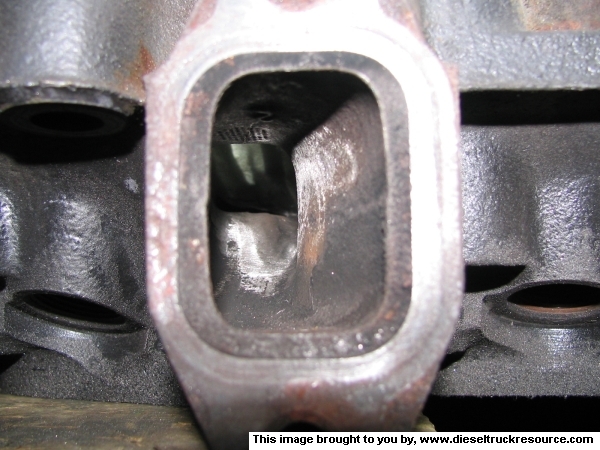
Exhaust port after polishing:
(I know about boundry layers, I'm just trying to keep soot from accumulating)

Exhaust bowl after polishing:
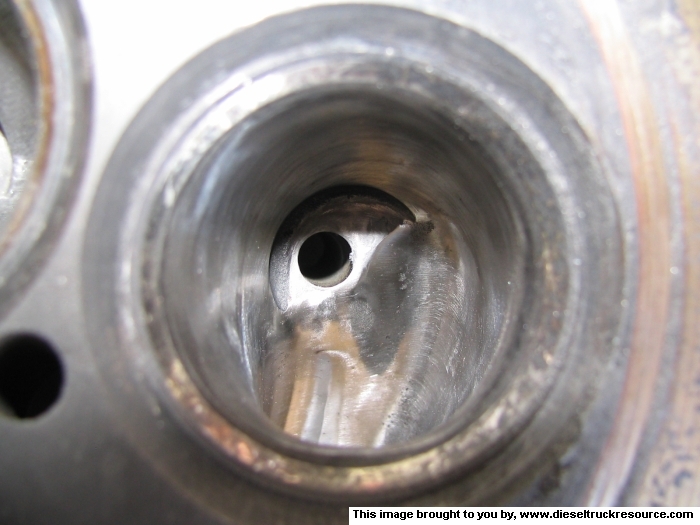
Surface rust is from damp compressor air...lots, and lots of it!
Here's more pictures right before the head went to the machine shop . They finishing milling and took .010" off the head to get it true again and are grinding the valves, just because I was in there porting and did it as good measure. Anyway, I've heard of people installing the .020" headgasket to prevent detonation (in a diesel of all things
) when planning other mods.I plan on minor pump mods, 190 "ish" injectors, porting of course, turbo-back 4" exhaust (all I need is the downpipe) the HX35 that's on there and no more than 32-35 PSI of boost. Should I go with the .010" or the .020" head gasket?
Is lowering compression by using a taller gasket only needed when twin are used or other extreme mods?
Exhaust port before porting:
Exhaust port after polishing:
(I know about boundry layers, I'm just trying to keep soot from accumulating)
Exhaust bowl after polishing:
Surface rust is from damp compressor air...lots, and lots of it!

Registered User
Joined: Mar 2004
Posts: 4,767
Likes: 5
From: port crane, NY
Lowering the compression is a side-effect of the .020 gasket. The real benefit is that there's now room for more air (.020XpiXsomethingXsomething....), making it easier to burn all the fuel you're likely to add The downside is harder cold starting.
The downside is harder cold starting.

Registered User
Joined: Mar 2006
Posts: 2,319
Likes: 1
From: WY
(I know about boundry layers, I'm just trying to keep soot from accumulating)
I don't, enlighten me!.....Please
Pic look grate, man you have got a lot of hours tide up in that head! ready to do a nether one? just kidding
I don't, enlighten me!.....Please
Pic look grate, man you have got a lot of hours tide up in that head! ready to do a nether one?
just kidding
Thread Starter
Registered User
Joined: Jul 2005
Posts: 212
Likes: 0
From: Seattle Area
Injector height/spacing
Originally Posted by wannadiesel
Go with the 0.020 gasket. You're throwing a lot more fuel in there than Cummins was planning on, and probably with more timing too.
Thread Starter
Registered User
Joined: Jul 2005
Posts: 212
Likes: 0
From: Seattle Area
Originally Posted by flashgordon
(I know about boundry layers, I'm just trying to keep soot from accumulating)
I don't, enlighten me!.....Please
Pic look grate, man you have got a lot of hours tide up in that head! ready to do a nether one? just kidding
I don't, enlighten me!.....Please
Pic look grate, man you have got a lot of hours tide up in that head! ready to do a nether one?
just kidding My understanding is that having a slightly rough surface (80grit) keeps the main part of flow away from the walls resulting in less restriction. After looking at how much soot was built up, I decided to make 'em shine.
Registered User
Joined: Mar 2006
Posts: 2,319
Likes: 1
From: WY
Originally Posted by goodtyms
Thanks...yes, lots of hours...probably at least 12 hours between the head, manifold and turbo, but I think it wil be worth it. I had three die grinders set up with diffeent tools - carbide cutters, flap sanders and cartidge rolls so I could switch back and forth quickly.
My understanding is that having a slightly rough surface (80grit) keeps the main part of flow away from the walls resulting in less restriction. After looking at how much soot was built up, I decided to make 'em shine.
My understanding is that having a slightly rough surface (80grit) keeps the main part of flow away from the walls resulting in less restriction. After looking at how much soot was built up, I decided to make 'em shine.
THANK FOR THE EDUCATION


Adminstrator-ess

Joined: Mar 2003
Posts: 22,594
Likes: 19
From: New Holland, PA
Originally Posted by goodtyms
Will using a different thickness headgasket require different thickness injector washers? I understand that injector height affects the spray patern, or is .010" trivial for injector spacing?
Thread Starter
Registered User
Joined: Jul 2005
Posts: 212
Likes: 0
From: Seattle Area
Back on the road!
Alrighty then! It's been together and back on the road for a few weeks!
It took way too long to get it back together...normally I can loosely organize my engine hardware (Plastic stacked drawers marked "block hardware", "Intake", "V/C", etc.) and can remember where almost everything goes...with minmal process-of-elimination educated guesses. It wasn't quite as easy this time, but I got there. In addintion to making my Ram fly, I also happen to be part of trying to make the biggest plastic airplane ever fly, and between the three of us, I'm the one the seems to be doing most of the flying!
Anyway, first and foremost, it doesn't leak...anymore, anywhere! I did pinch two valve cover gaskets during reasembly, promptly lubing up my clean engine, but they're fixed now.
A summary for those that don't want to start at the beginning of the thread:
I started this adventure to fix and external coolant leak at the head gasket under the #1 injector. But, as many things go, "while I'm in there"...
I ported and lightly polished the factory exhaust manifold, a 12 CM W/G housing and the head. I also had the head milled .010" and the valves ground. I reinstalled the head with an .020" head gasket, ARP 12mm head studs, and added a piston lift pump. I blended the aluminum intake elbow and replaced the whimpy stock I/C boots with silicone ones. It was a struggle, but I didn't touch them pump yet, wanting at leat 1 or 2 H/G retorques first - I've done one.
The EGTs seem to have dropped, maybe 50 to 100F. The maximum boost is down from 32 to 28lbs, but I expected that based on improved air flow. I haven't had stable enough driving conditions to get a reliable MPG number, but don't expect much change, if any.
The next step, even before pump mods, is to get the Transgo kit and deep pan installed on the trans, and maybe a Hughes torque convertor. Doing this stuff in order can quite an excercise in patience, but I'm familiar with what happens when you start a series of mods that dramatically increase torque, before beefing the downstream components - it ends up costing double!
Oh yeah, I almost forgot...I killed the KDP too! Tried the Cummins tab, but the coat hanger method looked and worked better.
It took way too long to get it back together...normally I can loosely organize my engine hardware (Plastic stacked drawers marked "block hardware", "Intake", "V/C", etc.) and can remember where almost everything goes...with minmal process-of-elimination educated guesses. It wasn't quite as easy this time, but I got there. In addintion to making my Ram fly, I also happen to be part of trying to make the biggest plastic airplane ever fly, and between the three of us, I'm the one the seems to be doing most of the flying!
Anyway, first and foremost, it doesn't leak...anymore, anywhere! I did pinch two valve cover gaskets during reasembly, promptly lubing up my clean engine, but they're fixed now.
A summary for those that don't want to start at the beginning of the thread:
I started this adventure to fix and external coolant leak at the head gasket under the #1 injector. But, as many things go, "while I'm in there"...
I ported and lightly polished the factory exhaust manifold, a 12 CM W/G housing and the head. I also had the head milled .010" and the valves ground. I reinstalled the head with an .020" head gasket, ARP 12mm head studs, and added a piston lift pump. I blended the aluminum intake elbow and replaced the whimpy stock I/C boots with silicone ones. It was a struggle, but I didn't touch them pump yet, wanting at leat 1 or 2 H/G retorques first - I've done one.
The EGTs seem to have dropped, maybe 50 to 100F. The maximum boost is down from 32 to 28lbs, but I expected that based on improved air flow. I haven't had stable enough driving conditions to get a reliable MPG number, but don't expect much change, if any.
The next step, even before pump mods, is to get the Transgo kit and deep pan installed on the trans, and maybe a Hughes torque convertor. Doing this stuff in order can quite an excercise in patience, but I'm familiar with what happens when you start a series of mods that dramatically increase torque, before beefing the downstream components - it ends up costing double!
Oh yeah, I almost forgot...I killed the KDP too! Tried the Cummins tab, but the coat hanger method looked and worked better.

Registered User

Joined: Feb 2004
Posts: 754
Likes: 76
From: Salina, KS
As expected on the boost drop, thats good. I cant wait to get the head we ported w/ radius cut and backcut valves to Mike down there in Texas and have him run 80-100 psi in it. We do alot of heads and these Cummins heads are pretty sorry in stock form.
Congrats on the results.
Congrats on the results.
Thread Starter
Registered User
Joined: Jul 2005
Posts: 212
Likes: 0
From: Seattle Area
I did notice a seat of the pants improvement, as well as a bit more turbo whistle - a good thing! I realize that I won't really benefit from all the porting work until I add fuel, but the hard part is done.