


The Anatomy of the Cowl


Thread Starter
Registered User
Joined: Mar 2007
Posts: 890
Likes: 4
From: Salem, OR
The Anatomy of the Cowl
I have been working on the core support for my crew and working through the conversion from mechanical to hydraulic clutch and doing a little body work. All the while, I have been wondering what to do with my cowls. I drove this truck for ten years listening to the screaky-screaky-sckreaky of the cowls. Now I drive the ramcharger and listen to the eetchy-eetchy-eetchy...
Back in the old days, before I knew about the cowl cracks, I used to pound on the dash, stomp on the floor, I was even known to reach over and kick the heater box while driving. Nothing ever even changed the pitch or rhythm of the noise.
Then there is the issue of the perpetually wet floor and the extremes that folks have gone through to keep them dry. I like my kick panel vent. I use it all the time.
Soooo, I want none of this on my crew. Rather than trying fixes that might work, I decided to hack into the cowl and check out how these things are supposed to work.
So here is the anatomy of the infamous cowl (this is a crew cab, build date 05/81, but I am guessing things didn't change much over the next dodecade):
This is my passenger side cowl.
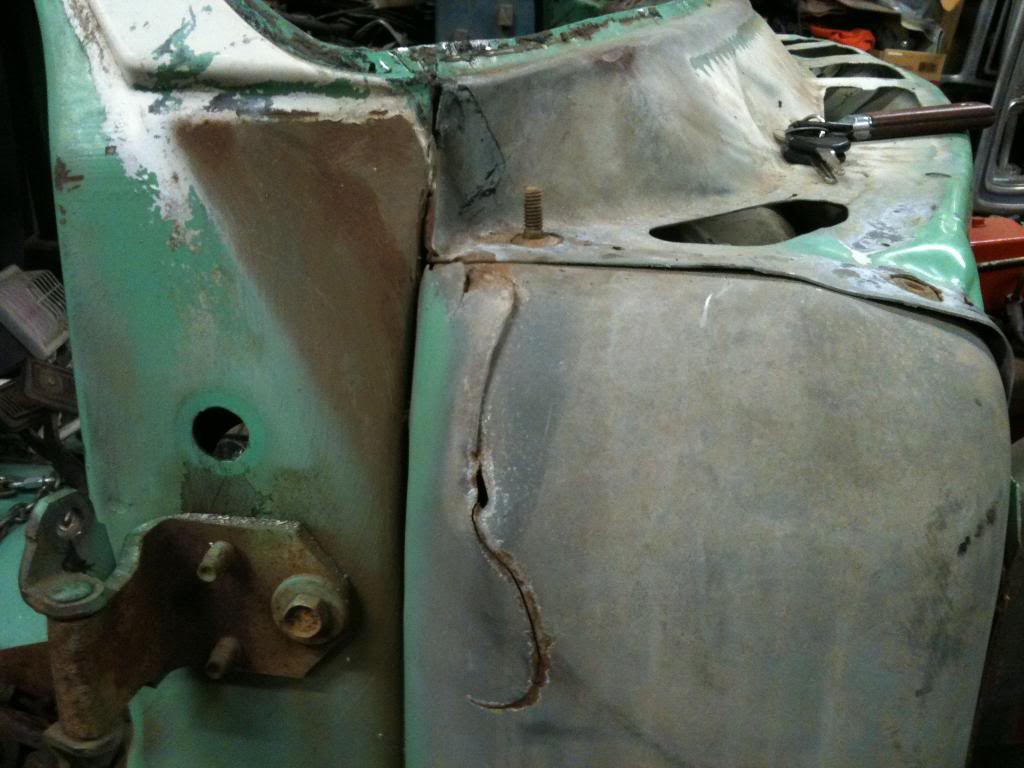
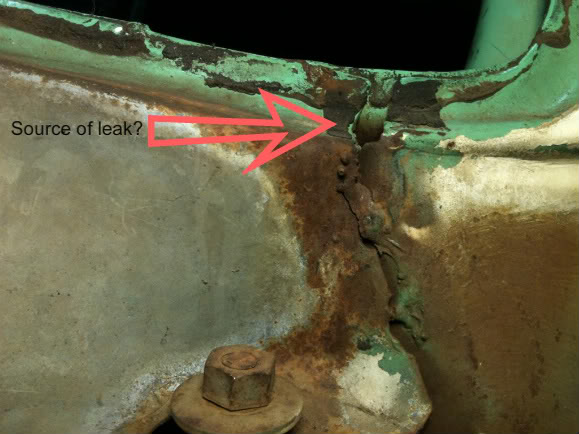
This is where the welds have given way below the windshield.
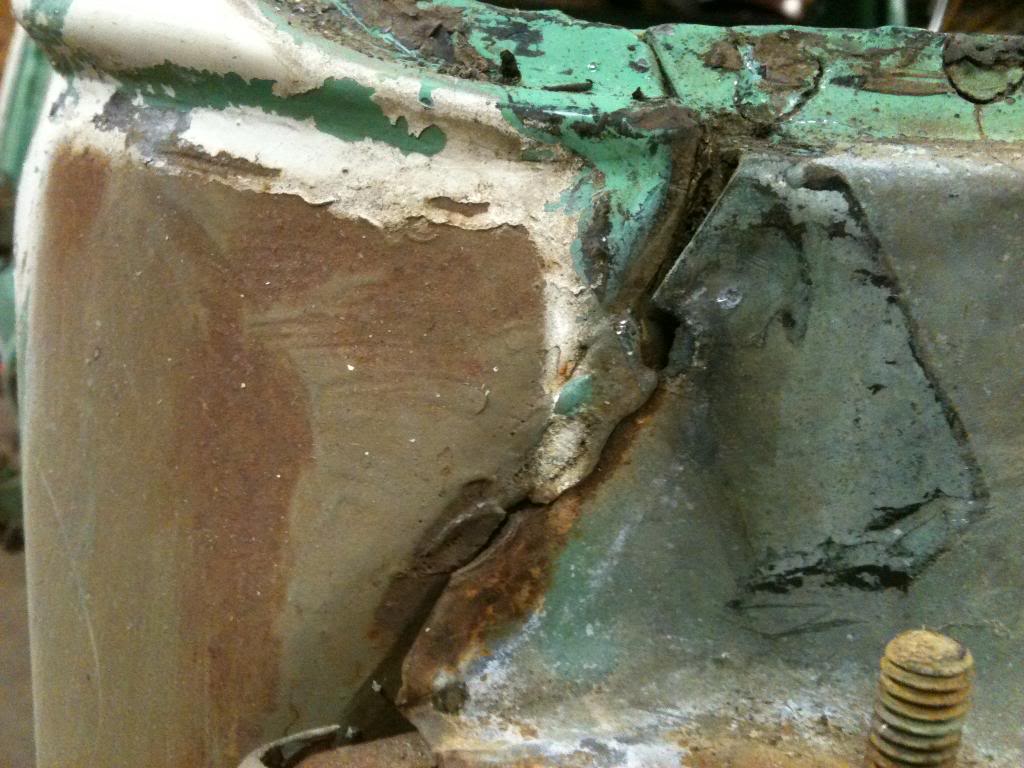
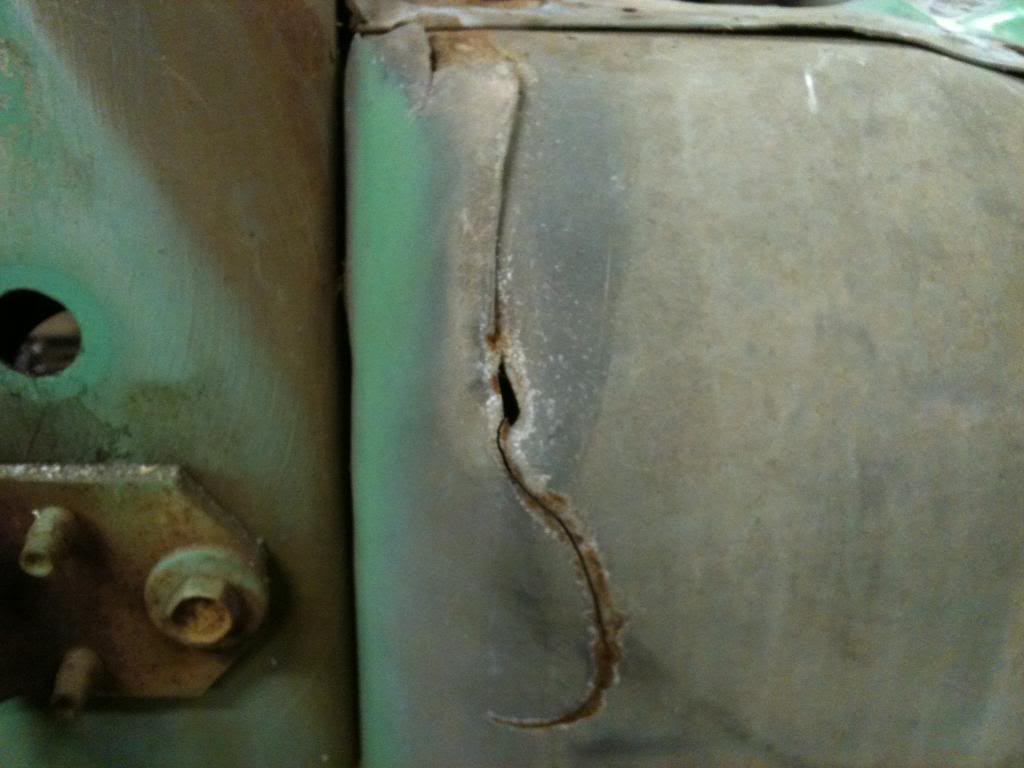
This is the crack that I am convinced causes the squeak.
Back in the old days, before I knew about the cowl cracks, I used to pound on the dash, stomp on the floor, I was even known to reach over and kick the heater box while driving. Nothing ever even changed the pitch or rhythm of the noise.
Then there is the issue of the perpetually wet floor and the extremes that folks have gone through to keep them dry. I like my kick panel vent. I use it all the time.
Soooo, I want none of this on my crew. Rather than trying fixes that might work, I decided to hack into the cowl and check out how these things are supposed to work.
So here is the anatomy of the infamous cowl (this is a crew cab, build date 05/81, but I am guessing things didn't change much over the next dodecade):
This is my passenger side cowl.
This is where the welds have given way below the windshield.
This is the crack that I am convinced causes the squeak.

Thread Starter
Registered User
Joined: Mar 2007
Posts: 890
Likes: 4
From: Salem, OR
Right Side Surgery
I cut a door in the cowl and peeled about an 8" x 8" square down.
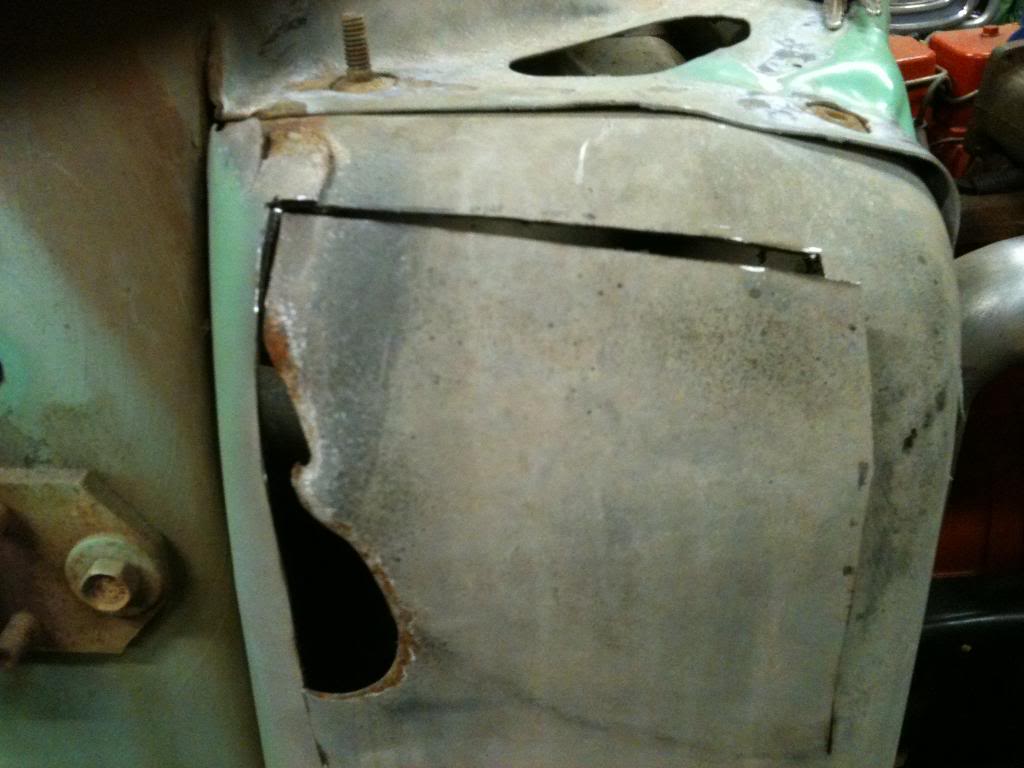
It is significant to note that i had sucked all the debris (I thought) from the top and up from the kick panel hole with a shopvac but this is what I found.
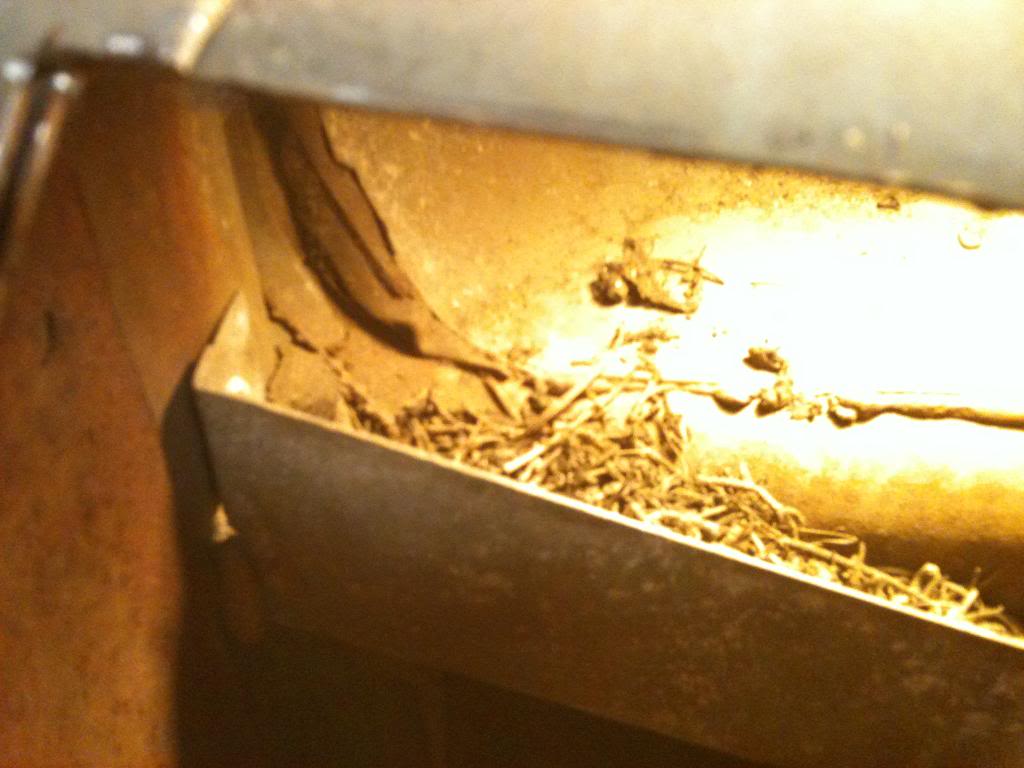
This is the dash side. This pile of moisture trapping debris is stuck in a trough designed to channel the water forward and out a vent in the firewall. Notice the missing seam sealer right at the forward side of the dash.
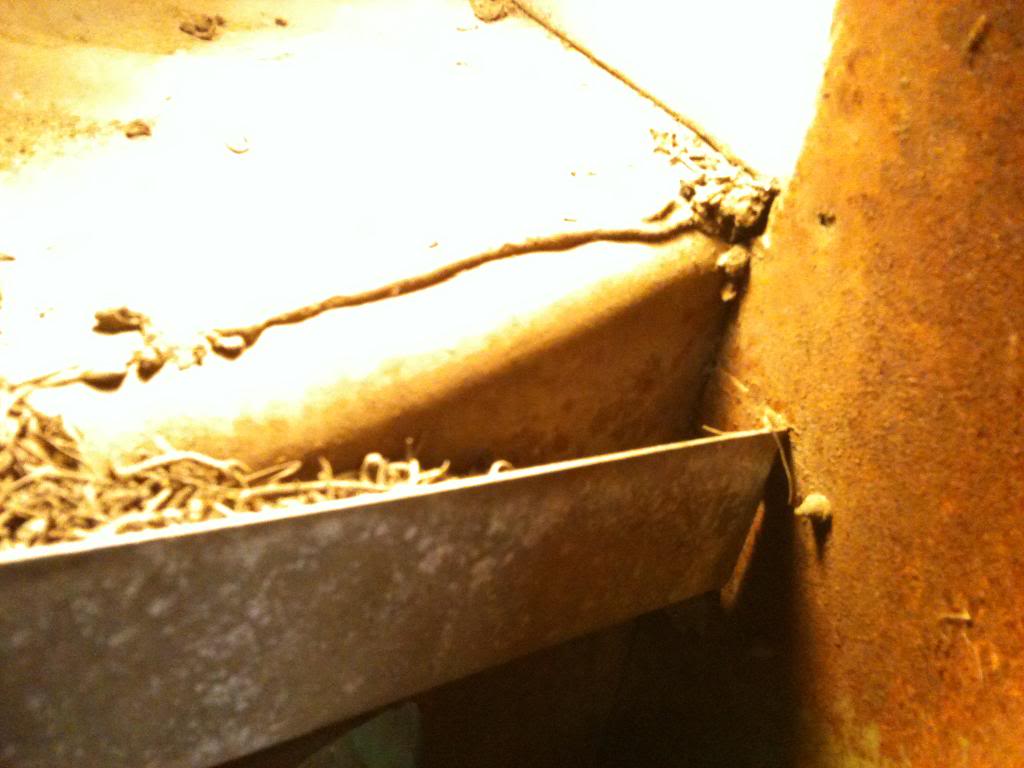
This if the firewall side of the trough.
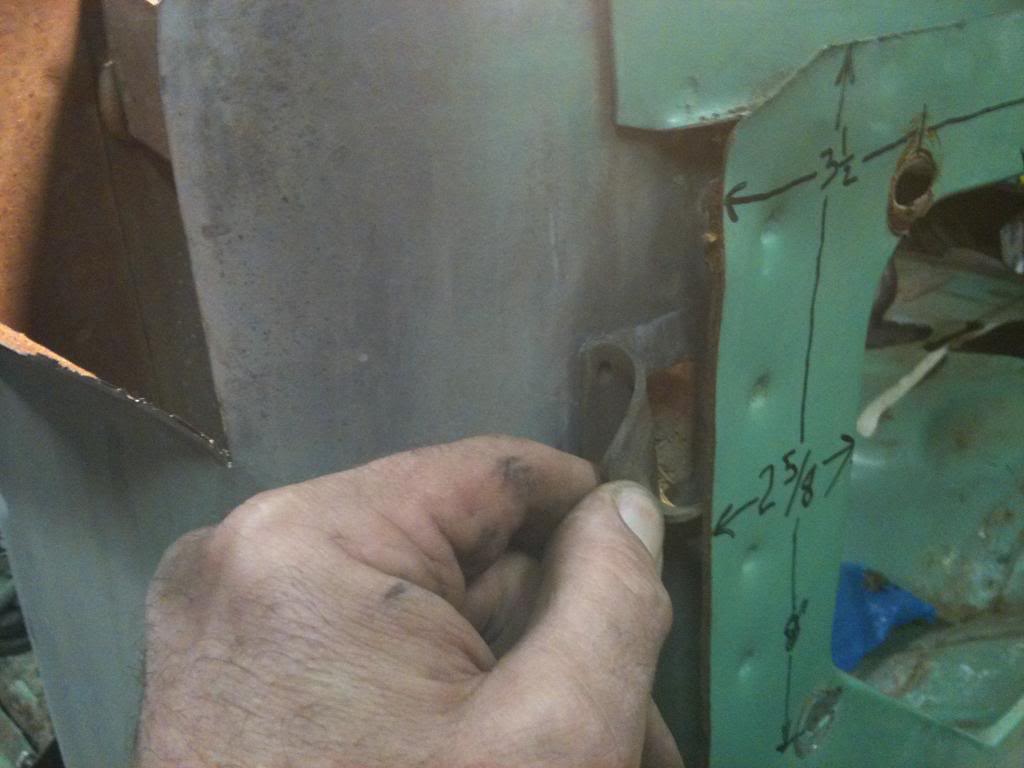
The trough leads down to this rubber flap where the water can run down the engine side of the firewall.
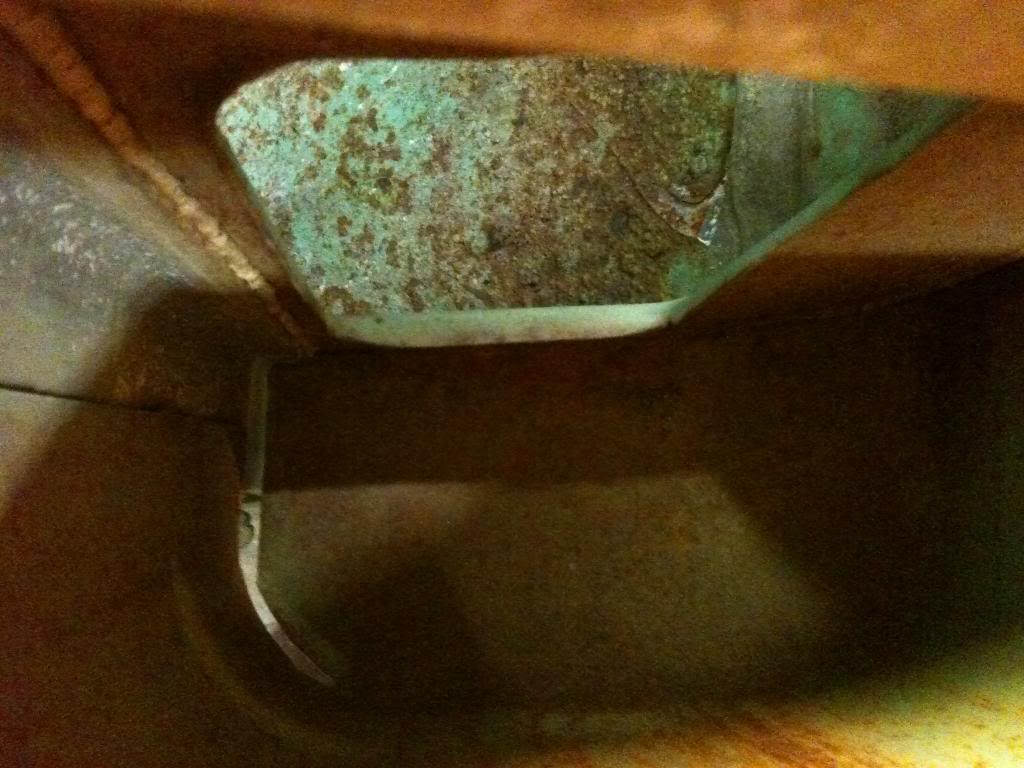
This is all to try to keep the water from running down the inside of the kick panel so it can not come in the vent, or in this case the heater box. If this trough rusts out, water runs right down the kick panel, here. Any water that does get by the trough will exit at the slot at the bottom (if it's not clogged with carp).
It is significant to note that i had sucked all the debris (I thought) from the top and up from the kick panel hole with a shopvac but this is what I found.
This is the dash side. This pile of moisture trapping debris is stuck in a trough designed to channel the water forward and out a vent in the firewall. Notice the missing seam sealer right at the forward side of the dash.
This if the firewall side of the trough.
The trough leads down to this rubber flap where the water can run down the engine side of the firewall.
This is all to try to keep the water from running down the inside of the kick panel so it can not come in the vent, or in this case the heater box. If this trough rusts out, water runs right down the kick panel, here. Any water that does get by the trough will exit at the slot at the bottom (if it's not clogged with carp).


Thread Starter
Registered User
Joined: Mar 2007
Posts: 890
Likes: 4
From: Salem, OR
Above, I mentioned that I think the squeak often comes from the crack in the right cowl. I made this little vid trying to duplicate the sound I hear coming from the right side. I think I nailed it.
In this next vid, you can definitely hear the same sound at about 50 seconds (and every time I turn left thereafter). This time it is a 77 ramcharger body with almost identical cracks.
In this next vid, you can definitely hear the same sound at about 50 seconds (and every time I turn left thereafter). This time it is a 77 ramcharger body with almost identical cracks.
Thread Starter
Registered User
Joined: Mar 2007
Posts: 890
Likes: 4
From: Salem, OR
Exploratory surgery on the left side.
Next, I opened up the left side. I knew this side would be different because I have dealt with rust issues in the past on this side, plus there was no little rubber escape hatch.
This side, the corner of the windshield is not as bad.
So, instead of a trough, this side has a dam. Once again, the water is directed forward and out away from the outside of the kick panel. You can see that debris will collect up against this dam and instead of rotting away the trough, it will rot a hole right over your left foot. I think this rot is the cause of some of the wet floors on the driver's side. The original cab off of my crew had a fist-size hole here and my ramcharger did as well. I cut a similar access in my original cab, way back when, to treat and patch the rust. When I put it all back together, I forgot to rebuild the dam. Ever since, when it rained, water would run down the outside of the kick panel and into the cab through the vent. I am guessing, that folks who have diagnosed this source of water influx either have a rotted away dam or it is full of a mass of debris and not working the way it is supposed to work.
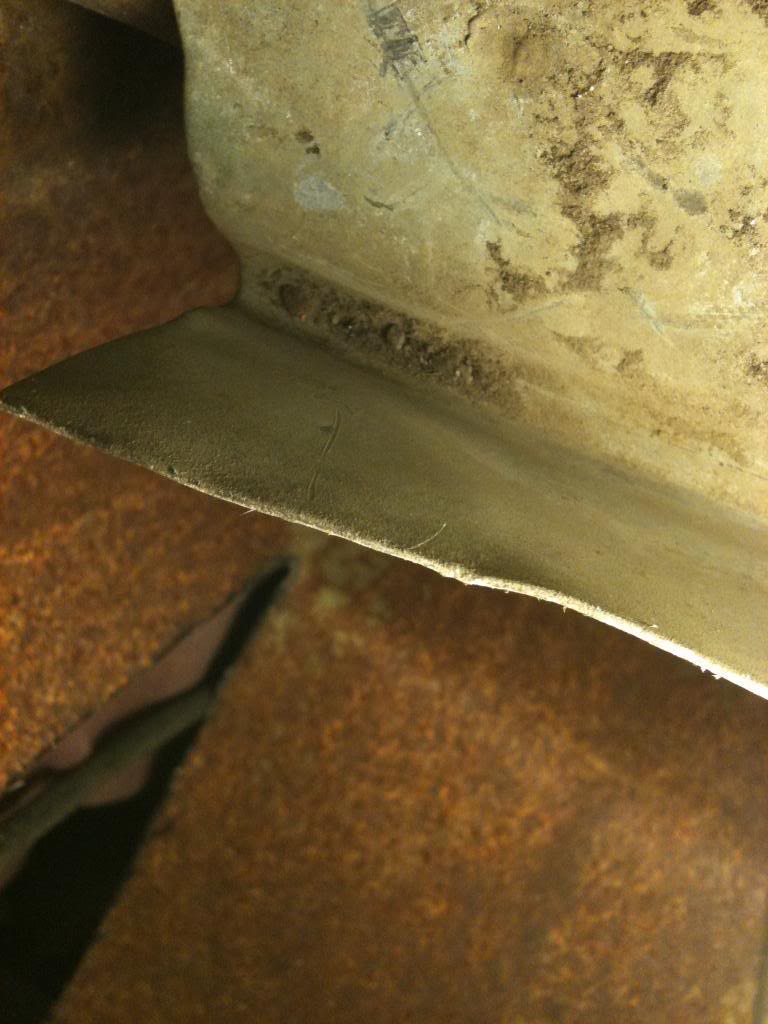
This is a picture looking down at the dash end of the little dam. You can see that my vac job was more thorough on this side. For reference, the hook on my drop light is up against the engine side of the dash and the cage on the light is down toward the ground.
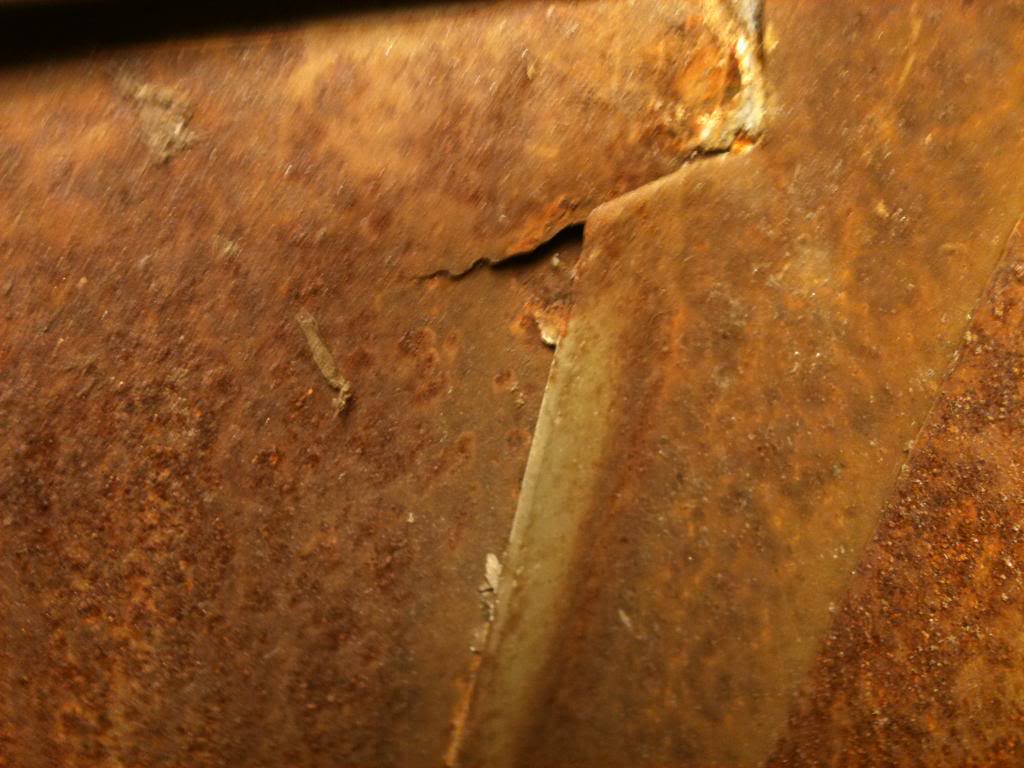
This is the firewall end of the dam. You can see that it is built to drip about 1.25" from the kick panel. The left is toward the engine the right is toward the cabin. The cut metal in the bottom is the bottom of where I cut my access.
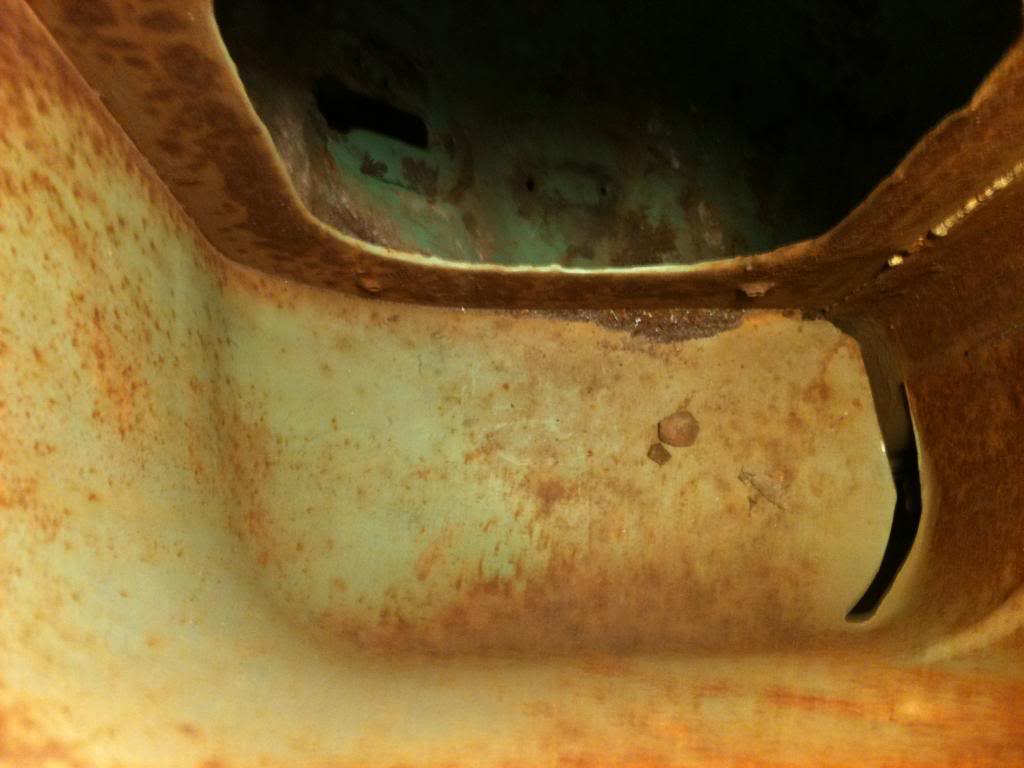
Down below all of this it looks pretty much like the other side. Water is supposed to fall all the way to the bottom and exit the slot seen on the right.
I am thinking about building an "eyebrow" directly over the vent on this side to divert anything that gets on the outside of the kick panel to the side (fore or aft) of the vent.
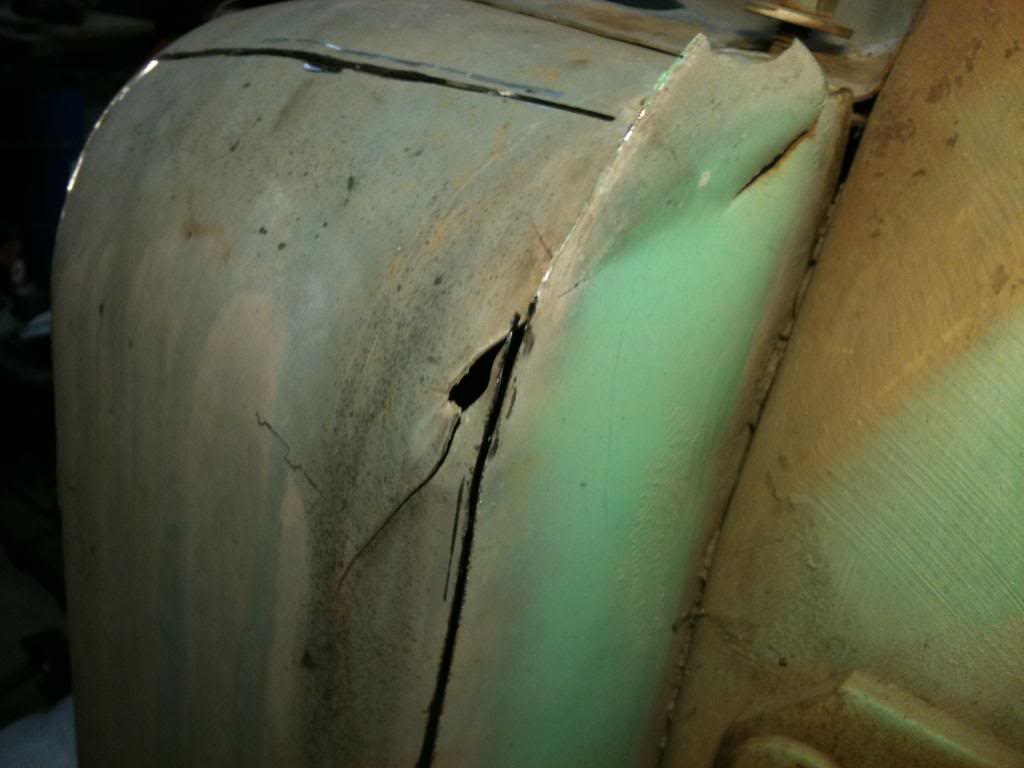
This side, the corner of the windshield is not as bad.
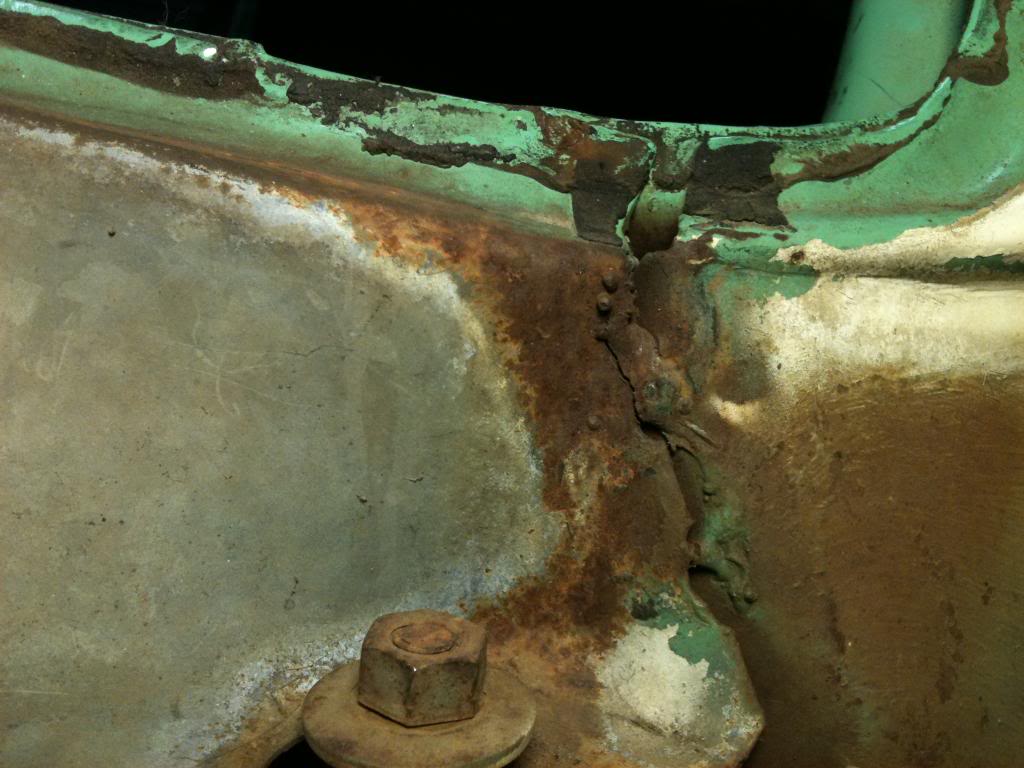
So, instead of a trough, this side has a dam. Once again, the water is directed forward and out away from the outside of the kick panel. You can see that debris will collect up against this dam and instead of rotting away the trough, it will rot a hole right over your left foot. I think this rot is the cause of some of the wet floors on the driver's side. The original cab off of my crew had a fist-size hole here and my ramcharger did as well. I cut a similar access in my original cab, way back when, to treat and patch the rust. When I put it all back together, I forgot to rebuild the dam. Ever since, when it rained, water would run down the outside of the kick panel and into the cab through the vent. I am guessing, that folks who have diagnosed this source of water influx either have a rotted away dam or it is full of a mass of debris and not working the way it is supposed to work.
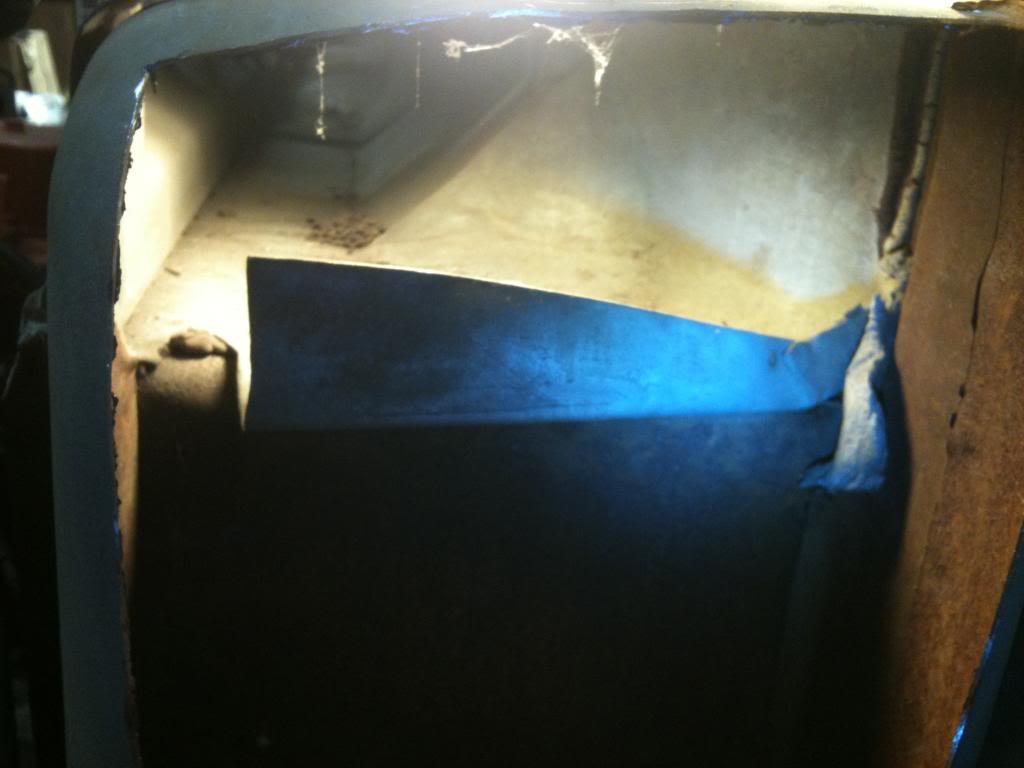
This is a picture looking down at the dash end of the little dam. You can see that my vac job was more thorough on this side. For reference, the hook on my drop light is up against the engine side of the dash and the cage on the light is down toward the ground.
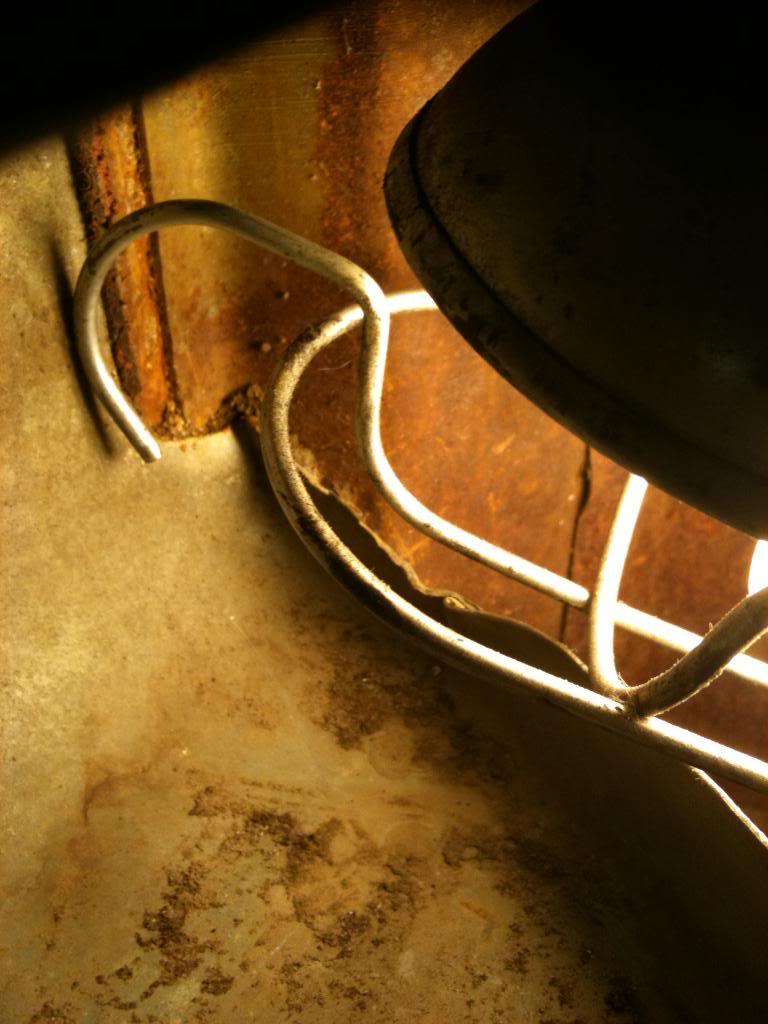
This is the firewall end of the dam. You can see that it is built to drip about 1.25" from the kick panel. The left is toward the engine the right is toward the cabin. The cut metal in the bottom is the bottom of where I cut my access.
Down below all of this it looks pretty much like the other side. Water is supposed to fall all the way to the bottom and exit the slot seen on the right.
I am thinking about building an "eyebrow" directly over the vent on this side to divert anything that gets on the outside of the kick panel to the side (fore or aft) of the vent.
Thread Starter
Registered User
Joined: Mar 2007
Posts: 890
Likes: 4
From: Salem, OR
Yeah, My curiosity got the best of me between finding the little rubber flap on the pass side that had pine needles and junk packed in behind it when I thought I had it all cleaned out and with the recent posts and commentary about eliminating the vent on the driver's side.
Trending Topics
Thread Starter
Registered User
Joined: Mar 2007
Posts: 890
Likes: 4
From: Salem, OR
While I was poking around in the driver's side cowl, I noticed this crack.
I had not noticed it before, but the parking brake pedal bracket is beginning to tear away from the kick panel taking a piece if the panel with it.
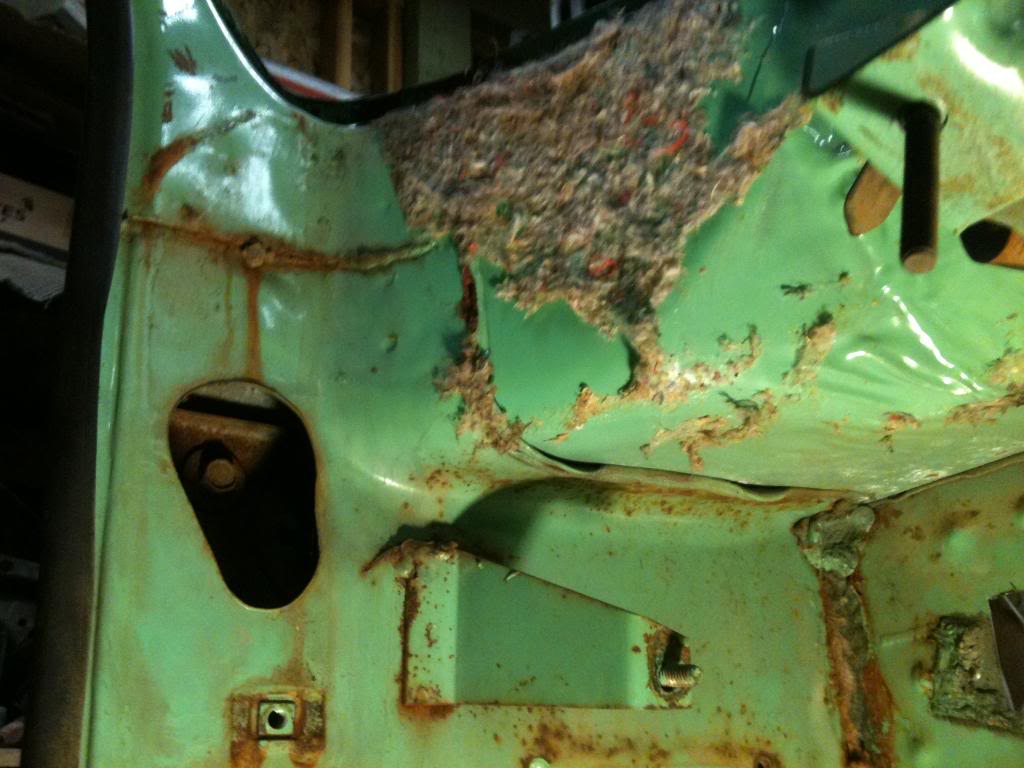
It should be an easy fix now that I can get to both sides. I will back it with beefier metal and use some bolts, maybe.
Also, in this pic, you can see, directly above the threaded stud for the parking brake mechanism, the underside of the cowl where these guys often rust through.
I had not noticed it before, but the parking brake pedal bracket is beginning to tear away from the kick panel taking a piece if the panel with it.
It should be an easy fix now that I can get to both sides. I will back it with beefier metal and use some bolts, maybe.
Also, in this pic, you can see, directly above the threaded stud for the parking brake mechanism, the underside of the cowl where these guys often rust through.

Registered User
Joined: Sep 2009
Posts: 196
Likes: 4
How's your roof/ drip rail? That last pic seems to show water trails from the "a" pillar.
I went through the same mess you are going through. Another suggestion I have for you is to remove the oval access covers on the firewall side of your rocker panels. The water that gets by the drain troughs flows into the rockers- along with leaves and mud. The access covers have a big enough hole to vacuum out the rockers, and put some por 15 in there.
I went through the same mess you are going through. Another suggestion I have for you is to remove the oval access covers on the firewall side of your rocker panels. The water that gets by the drain troughs flows into the rockers- along with leaves and mud. The access covers have a big enough hole to vacuum out the rockers, and put some por 15 in there.
Thread Starter
Registered User
Joined: Mar 2007
Posts: 890
Likes: 4
From: Salem, OR
How's your roof/ drip rail? That last pic seems to show water trails from the "a" pillar.
I went through the same mess you are going through. Another suggestion I have for you is to remove the oval access covers on the firewall side of your rocker panels. The water that gets by the drain troughs flows into the rockers- along with leaves and mud. The access covers have a big enough hole to vacuum out the rockers, and put some por 15 in there.
I went through the same mess you are going through. Another suggestion I have for you is to remove the oval access covers on the firewall side of your rocker panels. The water that gets by the drain troughs flows into the rockers- along with leaves and mud. The access covers have a big enough hole to vacuum out the rockers, and put some por 15 in there.
Thanks for the suggestion about the access to the rockers. I haven't gotten there yet. I chopped a section out of the back end of one of the rockers to replace some crushed sheet metal and the inards were amazingly clean. http://crewcabcummins.blogspot.com/2...in-rocker.html
Sorry about the pic size. I usually host my pics on my blogspot blog, but these I put on photobucket. I was surprised how big they came out. They do, however, fit on my laptop screen (except the those with portrait orientation.)


Administrator
Joined: Jul 2009
Posts: 5,311
Likes: 566
From: Phoenix AZ
[QUOTE=Sorry about the pic size. I usually host my pics on my blogspot blog, but these I put on photobucket. I was surprised how big they came out. They do, however, fit on my laptop screen (except the those with portrait orientation.)[/QUOTE]
I am definitely not complaining and truly appreciate the info. I also understand that each computer can have it's screen set to various resolutions, which is why I like the thumbnails...Mark
I am definitely not complaining and truly appreciate the info. I also understand that each computer can have it's screen set to various resolutions, which is why I like the thumbnails...Mark

Registered User
Joined: Mar 2010
Posts: 416
Likes: 7
From: Monmouth, Oregon
Nice work Eric. I saw you eyeballing my cowl when you were over. All my metal is in good shape. Should I just give it a good spraying of undercoating and call it good? I did weld the crack, should I try something different? Does that metal really need to be there, why not cut a triangle out of the cowl and call it good?
Thread Starter
Registered User
Joined: Mar 2007
Posts: 890
Likes: 4
From: Salem, OR
I am in favor of cutting out any metal from the hump part of the cowl that may rub on other metal. It was never sealed at the overlap from the factory. Up near the windshield is another matter as it needs to seal as well as be structural.

