2004 electrical gremlins
 04-27-2015, 08:09 AM
#31
Registered User

Join Date: Apr 2015
Posts: 5
Likes: 0
Received 0 Likes
on
0 Posts
It's not what I prefer, it's what you'll get when ordering parts. Tipm didn't come until 06. It replaces fuses with electronic programming. If you order a tipm you won't be happy when it comes in and you'll have only yourself to blame. Your dealer obviously used your vin. Not all dealers would bother and just order what you ask for. As a side note, you appear to be doing a very nice job rewiring the truck. It's tough when you don't know what the guy before you did. That ground strap goes to one of the top bell housing bolts. A new one is cheap, and it's there for a reason.
 04-27-2015, 08:16 AM
#32
Registered User
Thread Starter
So, what is the proper terminology for this thing then? Something like power distribution center?
If you look up the part number on one of the many Chrysler factory part websites, they simply refer to it as "BLOCK".
I don't really care what its called, as long as it fixes my lighting issues! LOL
It would be real sweet if it fixed the T-case shifting issues as well. But, I am pretty confident it wont.
04-27-2015, 08:23 AM
#33
Registered User

Join Date: Sep 2011
Posts: 239
Likes: 0
Received 0 Likes
on
0 Posts
Then you have the FCM mounted on the IPM. This is for 05 and before.
For 06 and up you have the Totally Integated Power Module.
TIPM = IPM + FCM (in one piece).
Does Part# 5026031AB come with the FCM???
04-27-2015, 08:26 AM
#34
Registered User
Thread Starter
 04-27-2015, 10:05 AM
#38
Registered User
Thread Starter
When the lighting gremlins started, I removed the FCM, and simply re-installed it, and all the lighting issues went away. For about a week. Then slowly, they all came back, and then some!
That tells me the socket that the FCM plugs in to has lost its grip, or tension, or however you want to word it. The female receptacles have opened up and don't make solid contact with the male pins of the FCM.
I could have tweaked the pins like Jhenderson suggested. I thought about that, but, like I mentioned a while back:
the outboard plastic pin on the side of the IPM that snaps in to the battery box to keep the IPM in place was broken off.
And the main mounting arm that actually bolts to the inner-fender to mount it, had a crack in it. The thing was literally flopping around.
As well, the arm that juts out the side of the battery-box that the IPM sits on, was broken almost off. So I replaced the battery box too.
It looks like somebody leaned on the IPM while wrenching on the truck. I would guess it was the guy who put the Jasper engine in it.
You know, the guy who didn't re-install any of the addell-clamps that hold all the wiring harness's in place. Or address that broken ground-strap.
And had all kinds of things routed wrong. And tightened the intake tube clamps soo tight they are cutting the rubber isolators.
And, didn't re-install either battery hold-downs. And had about 8 pieces of vacuum line scabbed together to get to the cruise module.
I have found numerous issues, and I am not that familiar with 3rd gens yet! I wish I would have taken my cover-alls with me, and really climbed around this thing on the test-drive.
I would own a different one. Ohh-well, it will be a nice truck when I am done. But, I will be very up-side-down on it. I guess I am stuck with it.
 04-27-2015, 03:13 PM
#40
Registered User
Thread Starter
The place that installed the engine, just like the original owner of the truck, is only 15minutes from me. Confirmed by both Car-Fax, and Jasper.
I went there to see if I could dig up contact info for the original owner. But, they wouldn't give out that info (don't blame them).
He acted like he didn't remember the truck at all. But, Car-Fax puts it in there for work several times.
It even shows service dates and mileages. I was pretty surprised how much info was in the report.
I am actually a decent mechanic. Dang good at nuts/bolts/bearings/gears/ and of course engines (tons of experience).
But, this terd is throwing my kryptonite at me. Troubleshooting electrical.
If it takes more than a test-light, and basic 12v knowledge, I get frustrated quick.
I will keep updating as I find and or fix things.
I just spend a whole bunch more money on it today on stuff I probably don't need.
But, when I fix something I like to fix it once and forget about it.
Ordered the updated heavy-duty Mopar steering box (P/N 68170214AA)
The updated (new style) steering linkage (P/N 52122362AL)
And a set of Dodge Off-Road control-arms Dodge Off Road Bent Short Arms Non-Adjustable 03-09
Two of the bushings in the factory arms on the truck are shot. I already have the parts to level it. And, I want the wheels centered in the wheel-wells.
So, I guess now is as good a time as any to order a set of arms.
Now I am not just up-side-down, I am hanging from my ankles over a fire!
Sold a whole bunch of stereo equipment to raise the funds. Otherwise, momma would keel me even worse than she already wants to over $3k for injectors!
It does run nice now though! Too bad I can't drive it!
I went there to see if I could dig up contact info for the original owner. But, they wouldn't give out that info (don't blame them).
He acted like he didn't remember the truck at all. But, Car-Fax puts it in there for work several times.
It even shows service dates and mileages. I was pretty surprised how much info was in the report.
I am actually a decent mechanic. Dang good at nuts/bolts/bearings/gears/ and of course engines (tons of experience).
But, this terd is throwing my kryptonite at me. Troubleshooting electrical.
If it takes more than a test-light, and basic 12v knowledge, I get frustrated quick.
I will keep updating as I find and or fix things.
I just spend a whole bunch more money on it today on stuff I probably don't need.
But, when I fix something I like to fix it once and forget about it.
Ordered the updated heavy-duty Mopar steering box (P/N 68170214AA)
The updated (new style) steering linkage (P/N 52122362AL)
And a set of Dodge Off-Road control-arms Dodge Off Road Bent Short Arms Non-Adjustable 03-09
Two of the bushings in the factory arms on the truck are shot. I already have the parts to level it. And, I want the wheels centered in the wheel-wells.
So, I guess now is as good a time as any to order a set of arms.
Now I am not just up-side-down, I am hanging from my ankles over a fire!
Sold a whole bunch of stereo equipment to raise the funds. Otherwise, momma would keel me even worse than she already wants to over $3k for injectors!
It does run nice now though!
Too bad I can't drive it!
 05-07-2015, 02:07 PM
#42
Registered User
Thread Starter
Been busy with work, and waiting on parts.
The new Power-module finally showed up earlier this week.
I managed to get the new battery box installed the other night after work.
All the new cables are built, except the smaller grounds.
And I have a slew of parts piled up.
I plan to hit it hard starting Saturday morning! And, hope to be back to driving the dang thing full-time by Sunday. (God knows I am sick and tired of driving that dang Camaro!!!!)
05-07-2015, 02:52 PM
#43
Registered User
Thread Starter
Included in the list of fun stuff for this weekend is to level the front suspension.
I am going about this a little differently than most.
I wanted to do it right, and for as little money as possible.
So, my "leveling-kit" is a hodge-podge of parts that I think (hope) will work well together.
For the actual "lift" I just ordered a set of Hell-Bent spacers off Ebay:
Ebay ads not allowed on DTR
Very sturdy, and at $70 plenty cheap.
As a solution for shocks. I really did not want a custom length shock. I knew the stock shocks would be too short after the spacers.
I saw this kit:
https://www.suspensionmaxx.com/store/product/SMX-10200
I liked the new drop-brackets for the shocks. But, did not care for the aluminum spacers.
I called them, and talked them in to selling me just a set of the dropped brackets. They were $65. I was stoked that I didn't have to build my own!
From Suspension-maxx, I also picked up a set of their extended sway-bar end-links:
https://www.suspensionmaxx.com/store/product/SMX-1226
These were $85.
And finally, I mentioned earlier that there are at least two bushings in my factory front control arms that are shot.
Combine that with the fact that re-centering the axle after the 2" lift is a MUST!
And, getting a set of new arms was pretty much mandatory. I shopped long and hard for arms. I looked at them all.
My criteria were:
Easy maintenance. This meant plain old poly bushings. No fancy heims, or "johnny-joints".
Longer to re-center the axle in the wheel-well.
Price had to be reasonable.
And, they had to be sturdy!
I ultimately ended up with these:
Dodge Off Road - Online Store
Compared to everything else on the market, these really are some nice arms!
Everything else is either out of my budget (there is some really nice stuff out there!) Or, under-built.
I was very pleased after the Dodge-off-road arms showed up!
The bushings are huge, and very robust. The arms themselves are very well built.
And they use top-notch materials! GOOD-STUFF! They were $500 (I opted for the bent arms for tire clearance)
So, I am in to my 2" leveling kit (after shipping) for about $800 total.
Significantly more than your typical $200 leveling kit. But, I think it is a very well thought out hodge-podge of parts that will all compliment each other.
My worn bushings get replaced (with better parts).
The arms are much-MUCH stronger than factory.
My axle will be centered in the wheel-well.
And, I will not have to even think about any of it for many years after install.
Truth be told, the only reason for even doing this is aesthetics.
I can't stand the stance of the truck. I hate when the rear sits higher than the front.
I know, its dumb, but, it bugs me. And I like to like my truck.
I actually contemplated lowering the rear. This truck actually has two "zero-rate" leafs in the main spring packs that I could remove, and effectively lower the rear 1.250" for the cost of U-bolts.
But, I also want to put 35" rubber under it because we have some mild off-road trips planned. So, I felt, it would be best if the front went up a wee bit for tire, and ground clearance.
It will never go any higher than this 2" though.
05-08-2015, 10:00 AM
#44
Registered User
Thread Starter
Snapped a pic of my hodge-podge leveling kit last night:
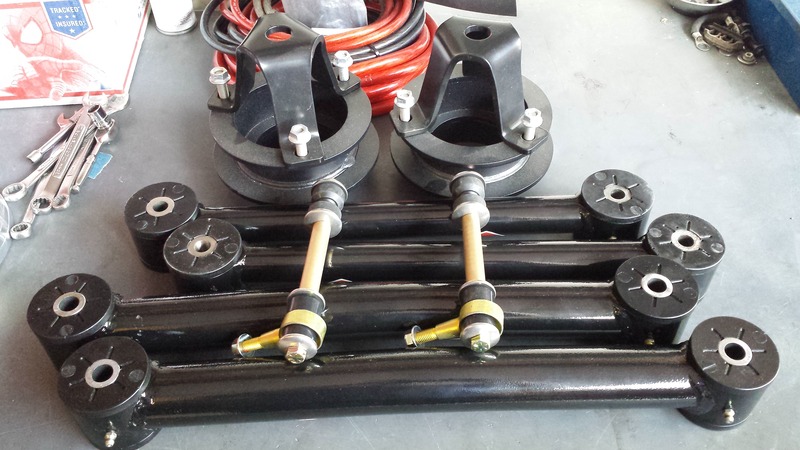
I was also able to install the Power-module (fuse-box), and all the new cables. All that is left to do is clean all the connectors that plug in to the bottom of the Power-module, and plug them in (DUH! LOL). Replace that body to bell-housing ground-strap. Then re-install the inner-fender liner. And cross my fingers!

I was also able to install the Power-module (fuse-box), and all the new cables. All that is left to do is clean all the connectors that plug in to the bottom of the Power-module, and plug them in (DUH! LOL). Replace that body to bell-housing ground-strap. Then re-install the inner-fender liner. And cross my fingers!
05-09-2015, 04:45 PM
#45
Registered User
Thread Starter
Alrighty!
New battery terminals, all new cables, new power-module, I removed and cleaned every ground I could find, installed new ground straps where they were missing, and I cleaned all the terminals in all the connectors that I had apart, or I knew were relevant to my issues, the best I could.
I drove it this morning for about 30 miles. I never saw the "lamp-out" light on the dash. All the lights work as they should. And it has yet to shift itself in to 4x4! So far so good. I am optimistic!
Now I am about half way through the front suspension upgrades.
The spacers are in, and the new shock-mounts are installed, and that stuff is all buttoned up.
Getting ready to swap out the control arms now. When I realized the exhaust is in the way, I figured that was a good time to stop for a sandwich and a beer.
New battery terminals, all new cables, new power-module, I removed and cleaned every ground I could find, installed new ground straps where they were missing, and I cleaned all the terminals in all the connectors that I had apart, or I knew were relevant to my issues, the best I could.

I drove it this morning for about 30 miles. I never saw the "lamp-out" light on the dash. All the lights work as they should. And it has yet to shift itself in to 4x4! So far so good. I am optimistic!
Now I am about half way through the front suspension upgrades.
The spacers are in, and the new shock-mounts are installed, and that stuff is all buttoned up.
Getting ready to swap out the control arms now. When I realized the exhaust is in the way, I figured that was a good time to stop for a sandwich and a beer.