Big Truck Little Garage
 11-12-2013, 01:42 PM
#31
Registered User
Thread Starter


About the thumb.. the gloves were a stupid idea. I was lucky that it actually ripped off now that I think about it. Otherwise I could have ended up with a broken thumb... and or no thumb. Lots of power in a little unit.
 11-12-2013, 02:13 PM
#32
Registered User
I had a 12" radial arm saw snag a glove once. Gives new meaning to the phrase "flying fingers."
BTW, it's tough to keyboard when your fingers are nailed on. (literally)
Also brings forth a new understanding of "cold finger nails" in the winter time.
BTW, it's tough to keyboard when your fingers are nailed on. (literally)
Also brings forth a new understanding of "cold finger nails" in the winter time.
11-12-2013, 02:58 PM
#33
Administrator

As it was, mostly hamburger and 37 stitches........ and a first hand respect for what power machinery is capable of.
About 10 years ago we had a guy get hung up in a mechanism that only rotates about 40 RPMs, but by the time they got it shut off, it had twisted his arm off at the elbow. You always have to figure the stinking thing is trying to kill you.......
11-18-2013, 06:43 AM
#34
Registered User
Thread Starter
Looking for some insight... how do you guys remove paint? I've been using everything and maybe this is just a long process. Took me 80 hours to remove the paint of one fender and my hands are killing me. Saturday I took a fender down to the local blasting place, I got a call and he told me it was going to cost much more because he is using up to much media. He hit it with soda, that wasn't doing the job and the walnut shells seemed to take some off. The paint is new, when I bought the truck it came with a fresh coat of it. The paint was never scuffed up so it's flaking off the cab. The fenders are new and I imagine they came with primer on them which is making it stick. I'm not worried about the cab, my soda blaster is taking off the paint and some of the factory electric blue paint.
I've been using abrasive pads such as these which seem to work.. just taking forever.

I thought about really roughing up the new paint with 80 and laying the primer on it. What do you think about going this route?
I've been using abrasive pads such as these which seem to work.. just taking forever.
I thought about really roughing up the new paint with 80 and laying the primer on it. What do you think about going this route?
11-18-2013, 10:20 AM
#35
Registered User
Join Date: Dec 2010
Location: Land of the Toxic Avenger
Posts: 6,770
Received 1,637 Likes
on
1,112 Posts
Stop killing yourself, and use a chemical stripper.
The guys from the Gas Monkey Garage ran into the same issue. They had a 56 chevy they were redoing for JR, and it turned out to be lacquer paint. Sanding doesn't cut it, as it cloggs the paper. They chemically stripped the car to get it to bare metal. The only real way to do it, from what I understand.
He looks better with the beard.....
11-18-2013, 04:54 PM
#36
Administrator
I never had Lacquer clog paper, old Alkyd enamel was absolutely terrible though.
Personally, I don't like chemical stripper, it works but if you don't neutralize ALL, and I mean ALL of it, you will have the biggest mad moment you ever will dream of. Don't be dissuaded just because I say so, in fact, many are chemical stripped, just be aware it will not tolerate ANY short cuts or misses.
I have taken to using an electric DA and a 6" either PSA or Hook and loop DA paper in 80 grit to strip. Strips fast and effective, Porter-Cable has a good unit for around 129 bucks at Lowes, and the paper is available just about anywhere. I have both the adhesive and look and loop 6" pads for mine, that way I can take advantage of sales I find on fleabay.
http://www.homedepot.com/p/Porter-Ca...8#.UoqZ5ieynf0
01-07-2014, 06:15 AM
#37
Registered User
Thread Starter
Well it's been a long time since I updated, my thumb has finally healed and left a ton of scare tissue. I've been really busy and I haven't had the time to actually give any updates.
My wife bought me a awesome Christmas present.

This is a bosch job site radio, the thing sounds amazing and the little sub woofer on the bottom of the box really kicks it. You can hook a usb drive to this guy and it will allow you to cycle through all your albums. Tool, Maserati, Perfect Circle.. they all sound amazing on this unit.
A lot of the paint you'll see is a combination of Rustoleum self etch and then Majic paint shop primer.

It's cheap paint (not really) and it sands like a dream. I've blocked out a ton of stuff already and haven't had the sand paper clog up on me yet. Granted you have to allow this stuff to cure 24 hours.

Fenders are all done, waiting for the weather to warm up to spray the color and final clear coatings.

I started to work on the doors, after much though I decided to purchase new door shells, gut these doors and install everything inside the new doors when they arrive. The reason is the passenger side door is warped (car accident). I used my stud puller to try and move the crease out of the way. I gained about a inch on it but came to the solution that it will never be right. It always would allow the weather in through the weather seal and you would always hear road noise.


I could mud this and cut my way through it but it would take so much time and effort. The driver side door had a hole in it, after cutting the hole out I noticed that the truck bed liner sprayed near the bottom was holding this thing together. When the new doors arrive I'm going to seam seal the folds. The salt and chemicals thrown on the roads here work its way between the bottom of the doors some how. Seam seal the bottom and then plaster the inside bottom with fluid film.
My wife bought me a awesome Christmas present.
This is a bosch job site radio, the thing sounds amazing and the little sub woofer on the bottom of the box really kicks it. You can hook a usb drive to this guy and it will allow you to cycle through all your albums. Tool, Maserati, Perfect Circle.. they all sound amazing on this unit.
A lot of the paint you'll see is a combination of Rustoleum self etch and then Majic paint shop primer.
It's cheap paint (not really) and it sands like a dream. I've blocked out a ton of stuff already and haven't had the sand paper clog up on me yet. Granted you have to allow this stuff to cure 24 hours.
Fenders are all done, waiting for the weather to warm up to spray the color and final clear coatings.
I started to work on the doors, after much though I decided to purchase new door shells, gut these doors and install everything inside the new doors when they arrive. The reason is the passenger side door is warped (car accident). I used my stud puller to try and move the crease out of the way. I gained about a inch on it but came to the solution that it will never be right. It always would allow the weather in through the weather seal and you would always hear road noise.
I could mud this and cut my way through it but it would take so much time and effort. The driver side door had a hole in it, after cutting the hole out I noticed that the truck bed liner sprayed near the bottom was holding this thing together. When the new doors arrive I'm going to seam seal the folds. The salt and chemicals thrown on the roads here work its way between the bottom of the doors some how. Seam seal the bottom and then plaster the inside bottom with fluid film.
01-07-2014, 10:40 PM
#40
Registered User
Those parts are looking good. Sucks about the doors though. I fill up the bottoms of my doors with a bit of used engine oil a few times a year. It weeps down into the seams and helps keep the rust monster at bay.
01-08-2014, 05:54 AM
#41
Registered User
Thread Starter
Ripped apart the old doors last night. In doing so the velvet or felt gasket on the top of the door fell out. It just crumbled so I will need to source one of these.
Is the window regulator motor suppose to align the gear teeth at the very end? Or does it not matter what way it goes?
01-13-2014, 06:04 AM
#42
Registered User
Thread Starter
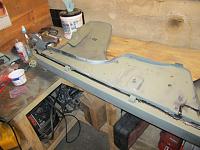
Doors arrived, they came in two huge boxes about as big as my garage door. After cutting them out I went to town on the seam sealer.
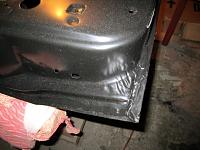

This is what the doors look like, this one had a small dent in it but I was able to work it out with my flat tool. After I leveled it and tossed some primer on it, perfection.

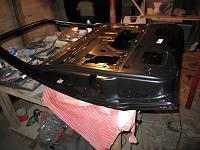
I finished up seam sealing my fenders as well.
To answer my question about the power window motor, it doesn't matter where the teeth go, the motor runs until it hits the stop both ways. I'm thinking about starting on my cab, getting it mounted. 30F today at 4am, I almost put shorts on after the -40F.


This is what the doors look like, this one had a small dent in it but I was able to work it out with my flat tool. After I leveled it and tossed some primer on it, perfection.


I finished up seam sealing my fenders as well.

To answer my question about the power window motor, it doesn't matter where the teeth go, the motor runs until it hits the stop both ways. I'm thinking about starting on my cab, getting it mounted. 30F today at 4am, I almost put shorts on after the -40F.
01-13-2014, 07:51 AM
#43
Registered User

Just wait till it gets up to 50, you'll be turning on the AC. At least you didn't get rain into freezing rain -- normally it stays cold enough for us to avoid that here, but not this year . . .
More importantly, though, whose seam sealer are you using, and what are you doing inside the door for the seams?
Thanks,
Alec
More importantly, though, whose seam sealer are you using, and what are you doing inside the door for the seams?
Thanks,
Alec
01-13-2014, 08:12 AM
#44
Registered User
Thread Starter
Just wait till it gets up to 50, you'll be turning on the AC. At least you didn't get rain into freezing rain -- normally it stays cold enough for us to avoid that here, but not this year . . .
More importantly, though, whose seam sealer are you using, and what are you doing inside the door for the seams?
Thanks,
Alec
More importantly, though, whose seam sealer are you using, and what are you doing inside the door for the seams?
Thanks,
Alec
The seam sealer is from NAPA(martin senour), it's a black paintable seam sealer. Inside the door I'm going to leave it as is. Once I get the doors blasted with primer and painted, I will be fluid filming the entire truck, inside the doors and all over.
01-13-2014, 09:57 PM
#45
Registered User
How does the thickness of the new doors sheet metal seem, compared to the originals?