
Tips on changing coolant?

Thread Starter
Registered User

Joined: Nov 2006
Posts: 3,263
Likes: 582
From: Central KY
I have the anti-freeze and distilled water.
From searching posts I've gleaned the following:
have the truck parked facing down hill
pull the plug above the oil filter to burp the system
Any other tips to get as much as possible drained and filled sufficiently?
I have no reason to clean or flush and, based on the horror stories, don't plan too. Just want to refresh the fluid.
Thanks,
1st Generation Admin
Joined: Jan 2005
Posts: 4,601
Likes: 118
From: Buies Creek, NC
Make sure the radiator cap is of the correct type and is in good working order. 
As you may know, oxygen promotes/supports corrosion. If we can exclude any free or dissolved oxygen from the engine coolant, we can almost stop corrosion.
Most tap water we use to fill our systems contains varying degrees of a number of dissolved gasses. It's common practice in the boiler water treatment field to remove the gasses by "Scrubbing" the water. The scrubbing process typically includes agitating the water by having it cascade over plates while injecting high pressure steam. The now boiling water readily gives up much of the dissolved gasses.
A good example of the above is easily seen in our refrigerator. Check out your ice cubes. Notice all the bubbles frozen in the cubes? That's the dissolved gasses in the water that have been disassociated from the water by the freezing. One can have crystal clear ice cubes by simply boiling the water prior to putting it in the freezer.
What's my point?
If one looks hard at the radiator cap, and the OEM coolant overflow tank, you should note a couple of things.
The cap: notice the area at the rubber goods. Notice that with the small discs (valves), coolant can move out of the radiator by having the pressure rise above the caps rating, and into the overflow tank. In the center of the cap, there's typically a smaller disc that allows coolant to flow back into the radiator.
OK.
Now notice the overflow tank's construction and plumbing. It's such that the coolant flows to and from the bottom of the tank. When the tank is properly filled, the tank's tube and hose will always be filled with coolant.
OK.
When you finish draining all the old fluid etc. fill the system with premixed coolant (mix it yourself in a bucket to the manufacturers recommended strength). Be sure to fill the overflow tank to it's highest mark.
Now start the engine and drive it around the block ensuring it comes up to normal operating temperature.
The design of the engine's coolant system include thought regarding air elimination. With normal operation, the air will migrate to the highest point in the system. In our application, the top of the radiator.
As the coolant heats up, it expands. The agitation and heat provided to the coolant as it passes through the engine will "Scrub" the coolant of dissolved gasses and have them collect at the top of the radiator. Again, with the rising pressure, the gasses will be expelled through the radiator cap and be pushed through the plumbing to the bottom of the overflow tank where they are released to the atmosphere.
OK, fine.
Shutting the engine down and having it cool to room temperature now has the coolant contract. With that, the overflow tank's submerged tube now has only liquid coolant flow back to the radiator cap, through that small disc/valve and into the coolant system replacing that space formerly occupied by the gasses.
A couple of heating and cooling cycles will almost render the system completely free of dissolved gasses. Anything left is addressed by the chemicals included in the new antifreeze solution.
Be sure to keep the overflow tank at it's full mark through out the "Burping" process.
If ya want, after filling the system for the first time, let it warm up some in the drive way and watch the bubbles of air/gasses move through the overflow tank and bubble out.
Also note that the distilled water is a good idea in that it won't contain much in the way of "Dissolved Solids" which contribute to scale forming on the coolant system's surfaces. As such, they act as insulation and interfere with the transfer of heat.
On the other hand, distilled water by itself is highly corrosive if used exclusively. It tends to leach minerals etc. The antifreeze solution also contains chemicals to buffer such.
With that, always make sure to use the recommended strength when mixing the coolant. Don't assume that since the mix is still green it's still good. The chemical composition of the coolant often provides much of it's protective qualities by forming protective films on the surfaces. These chemical qualities don't necessarily parallel the antifreeze qualities in terms of useful service life.
Hope this helps and isn't too long winded. (I'm on vacation at the beach and it's raining a little . . . . . sigh . . . a good day ).
).
Don't foget to check the hoses.
As you may know, oxygen promotes/supports corrosion. If we can exclude any free or dissolved oxygen from the engine coolant, we can almost stop corrosion.
Most tap water we use to fill our systems contains varying degrees of a number of dissolved gasses. It's common practice in the boiler water treatment field to remove the gasses by "Scrubbing" the water. The scrubbing process typically includes agitating the water by having it cascade over plates while injecting high pressure steam. The now boiling water readily gives up much of the dissolved gasses.
A good example of the above is easily seen in our refrigerator. Check out your ice cubes. Notice all the bubbles frozen in the cubes? That's the dissolved gasses in the water that have been disassociated from the water by the freezing. One can have crystal clear ice cubes by simply boiling the water prior to putting it in the freezer.
What's my point?
If one looks hard at the radiator cap, and the OEM coolant overflow tank, you should note a couple of things.
The cap: notice the area at the rubber goods. Notice that with the small discs (valves), coolant can move out of the radiator by having the pressure rise above the caps rating, and into the overflow tank. In the center of the cap, there's typically a smaller disc that allows coolant to flow back into the radiator.
OK.
Now notice the overflow tank's construction and plumbing. It's such that the coolant flows to and from the bottom of the tank. When the tank is properly filled, the tank's tube and hose will always be filled with coolant.
OK.
When you finish draining all the old fluid etc. fill the system with premixed coolant (mix it yourself in a bucket to the manufacturers recommended strength). Be sure to fill the overflow tank to it's highest mark.
Now start the engine and drive it around the block ensuring it comes up to normal operating temperature.
The design of the engine's coolant system include thought regarding air elimination. With normal operation, the air will migrate to the highest point in the system. In our application, the top of the radiator.
As the coolant heats up, it expands. The agitation and heat provided to the coolant as it passes through the engine will "Scrub" the coolant of dissolved gasses and have them collect at the top of the radiator. Again, with the rising pressure, the gasses will be expelled through the radiator cap and be pushed through the plumbing to the bottom of the overflow tank where they are released to the atmosphere.
OK, fine.
Shutting the engine down and having it cool to room temperature now has the coolant contract. With that, the overflow tank's submerged tube now has only liquid coolant flow back to the radiator cap, through that small disc/valve and into the coolant system replacing that space formerly occupied by the gasses.
A couple of heating and cooling cycles will almost render the system completely free of dissolved gasses. Anything left is addressed by the chemicals included in the new antifreeze solution.
Be sure to keep the overflow tank at it's full mark through out the "Burping" process.
If ya want, after filling the system for the first time, let it warm up some in the drive way and watch the bubbles of air/gasses move through the overflow tank and bubble out.
Also note that the distilled water is a good idea in that it won't contain much in the way of "Dissolved Solids" which contribute to scale forming on the coolant system's surfaces. As such, they act as insulation and interfere with the transfer of heat.
On the other hand, distilled water by itself is highly corrosive if used exclusively. It tends to leach minerals etc. The antifreeze solution also contains chemicals to buffer such.
With that, always make sure to use the recommended strength when mixing the coolant. Don't assume that since the mix is still green it's still good. The chemical composition of the coolant often provides much of it's protective qualities by forming protective films on the surfaces. These chemical qualities don't necessarily parallel the antifreeze qualities in terms of useful service life.
Hope this helps and isn't too long winded. (I'm on vacation at the beach and it's raining a little . . . . . sigh . . . a good day
).Don't foget to check the hoses.

Registered User


Joined: Oct 2005
Posts: 6,457
Likes: 95
From: KENTUCKY
GOSH, BC847, I am overwhelmed,........... whatever that means; I had no idea all of those scientific things were taking place inside a rusty old radiator; I thought so long as you didn't dip up any minnows or crawdaddies in your fill-bucket, it should be good to go.
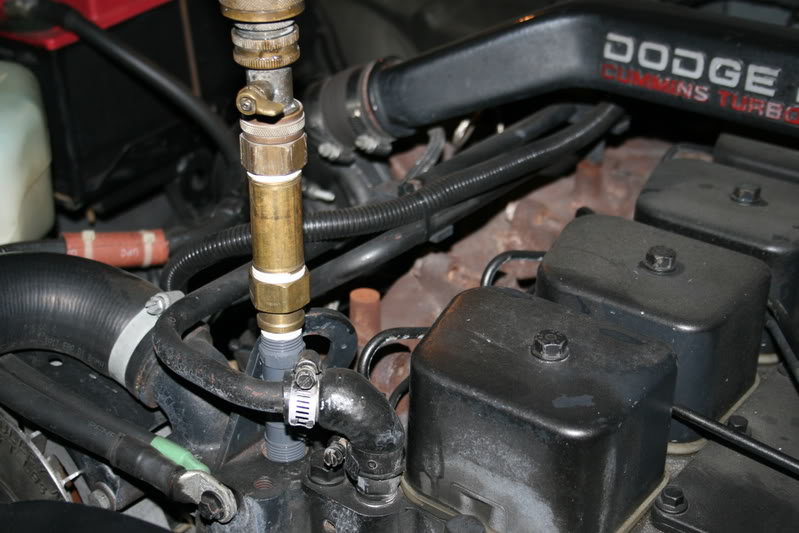
KRB, next time you are close to my truck, take a peek at the modified radiator-drain that I installed on it.
I got tired of the coolant pouring all over everywhere, whenever I opened the draincock; so, I removed the factory one and installed a long brass nipple, a "through" draincock shutoff-valve, then a down-pointing elbow, then another length of brass nipple, finished off with an end-cap just for good measure.
I can drain one drop, or the whole system, and catch every bit in jugs, with no more sticky anti-freeze splattered all over everything.
One other tip: I saved and rinsed a bunch of those clear see-thru gallon-size jugs that those fruity kid's drinks come in; by using these, I can see just how full they are getting and close the valve when they get full.
Thread Starter
Registered User
Joined: Nov 2006
Posts: 3,263
Likes: 582
From: Central KY
Wow BC, I never expected such an indepth comprehensive disertation on the function of the cooling system! 
Let me know next time you're going on vacation and I'll ask a really hard question then...
Is your trade in the business or are you a chemist?
Thanks. BTW sorry its raining on your day and which beach you at?
Bearkiller - Is there anypart of your truck you haven't modified/upgraded? Its like looking at the kid's "find the differences" books. Everywhere you look you see something.
Registered User
Joined: Oct 2005
Posts: 6,457
Likes: 95
From: KENTUCKY

Administrator

Joined: Nov 2004
Posts: 4,084
Likes: 235
From: Southern California
Here is how I did it.
I have been going to replace the coolant on my truck for awhile now but I have not had the time but today with the temperature being over the 105* mark here in sunny Southern California I went to drive through McDonalds on the way home to get something to eat and I got stuck in a drive through line that would not move, so as I sit for 10 minuets 3 feet behind the next car for the second time that I can remember the truck started to get hot with the temp gauge needle between the last line and the �H� mark.
The only other time it had gotten hot was a few summers ago and we were going to Las Vegas for the weekend, we stopped in Baker, Ca at the A&W for a drink and I let it idle with the AC on while I went in to order. The outside air temperature was 128*on the big thermometer.
It was so hot that it hurt your lungs to breathe and when you walked on the asphalt you could feel yourself sink in with each step.
So anyway I had 2 gallons of Shell Zone Low Silicate Anti Freeze in my garage I figured it was time to flush the system and give it fresh new green stuff.
It was too hot for me to do any work on the engine while the sun was up so I waited till it cooled off.
It was now 10:00 P.M and it was still in the 80�s so I tried to find the drain petcock and could not find it so I just pulled the lower radiator hose and this time remembered to get up on the bumper so I didn�t soak my feet with hot water and it all come gushing out and missed the drain pan.
After it was all drained out I stuck the hose in the lower hose and tried to back flush the block but you cannot force muck against the closed thermostat so I then forced water back up through the radiator till it was all clear.
You would think it would be good enough about now wouldn�t you but you know I don�t think that way.
I needed some way to flush out the block.
One of the ways I have done it was I made an adapter so I can connect the hose of my steam cleaner to the engine block and steam out the water passages.
I used to do this on Cummins and Detroit�s when the oil coolers would leak.
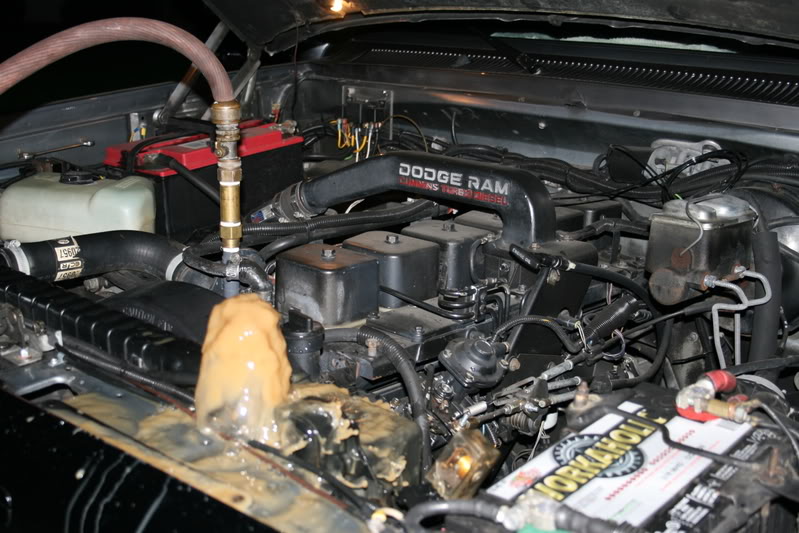
So I made up a simple adapter so I can connect the garden hose the block and flush out all of the crud.
This is important!
First make sure your engine is not HOT, if it has been running, let it sit for about an hour because of Heat Soak your engine gets hotter when it is turned off than when it was running.
Also now would be the time to replace your upper and lower hoses, thermostat and any bypass hoses that might need replacing.
I will do mine next time.
Sorry for the long introduction so I will show you how you can make your own.
It only consists of 4 pipe fittings that I already had on hand from another successful idea.
�� Female Hose Adapter
�� nipple
��X �� Bell Reducer
��X 3� nipple
An inline hose shutoff makes the job much easier.
After you make the device you remove the �� plug from the thermostat housing using a 3/8� socket wrench and extension.
This plug might be stuck in pretty good so take your time and a long handle wrench.
Then screw the pipe into the thermostat housing.
Now REMOVE your radiator Cap and then connect your garden hose to the top fitting, close the valve and turn on the water.

Up to this point all of the water that had drained out of the radiator and engine was clear, but guess what, because the engine was cold the thermostat was closed and you were not really flushing out the block.
You could have removed the thermostat and flushed it out but that is a lot of work, or you could repeadly fill the radiator and run the engine till it got hot.
But you still would not be able to flush out all of the rust, remaining casting sand and small animals from the block.
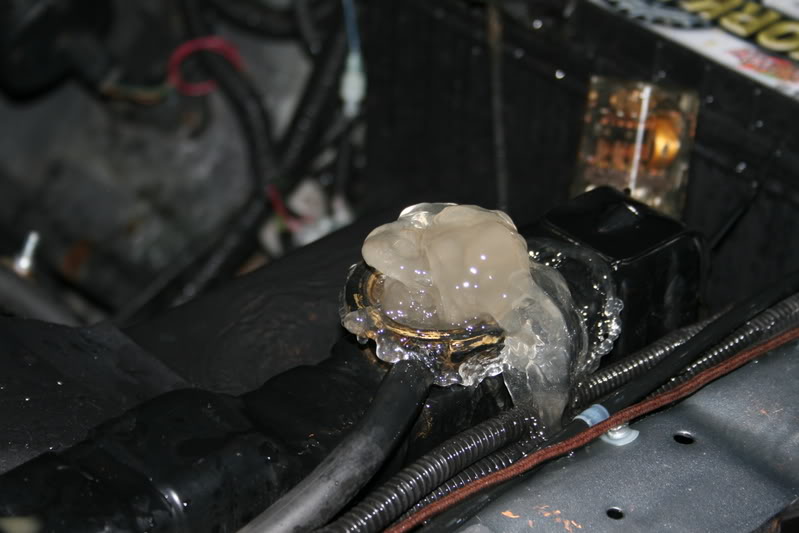
The water had come out looking like this for about 2 minuets until is started to clear up.
After about 2 minuets of back flushing all of the water being forced through the system backwards came out clear.
Although I did not do so it is recommended to first back flush the block with the lower radiator hose disconnected as to not force any debris into the bottom of the radiator.
From here it is then a simple task to remove the hose connection and drain any remaining water from the cooling system by removing the lower radiator hose.
Reinstall the lower hose and tighten the clamp.
If you haven�t already, remove the overflow tank and clean it out so it is nice and clean. I used some Simple Green and a rag on the end of a pair of long forceps. (Sorry guys, I use a lot of surgical instruments here)
Without replacing the plug in the thermostat housing you can now pour in 2 gallons of your choice of Anti Freeze, make sure it is Low Silicate.
Now you can slowly refill the radiator using the hose or bucket until the coolant starts to come from the open hole, now replace the �� pipe plug after you wrap some Teflon tape around it and tighten it with your 3/8� socket wrench.
Start the engine and slowly top off the radiator until it at her neck.
I added some Antifreeze and water to the recovery tank about 7/8 full.
Install a new 16# pressure cap, make sure it is for a Recovery System and does NOT have a LEVER on the top.
Go for a ride and get the truck up to operating temperature and then let it cool back down, doing this several cycles will purge out any remaining air from the system.
Keep the recovery tank at least � full so it will not suck any air back into the system.
After a few days adjust the level in the recovery tank as needed.
I am confident the inside of my engine is now clean.
Geez I was only going to show you how I had flushed out my block.
My neighbors are used to me working on my truck in the middle of the night and come out to visit.
Jim
I have been going to replace the coolant on my truck for awhile now but I have not had the time but today with the temperature being over the 105* mark here in sunny Southern California I went to drive through McDonalds on the way home to get something to eat and I got stuck in a drive through line that would not move, so as I sit for 10 minuets 3 feet behind the next car for the second time that I can remember the truck started to get hot with the temp gauge needle between the last line and the �H� mark.
The only other time it had gotten hot was a few summers ago and we were going to Las Vegas for the weekend, we stopped in Baker, Ca at the A&W for a drink and I let it idle with the AC on while I went in to order. The outside air temperature was 128*on the big thermometer.
It was so hot that it hurt your lungs to breathe and when you walked on the asphalt you could feel yourself sink in with each step.
So anyway I had 2 gallons of Shell Zone Low Silicate Anti Freeze in my garage I figured it was time to flush the system and give it fresh new green stuff.
It was too hot for me to do any work on the engine while the sun was up so I waited till it cooled off.
It was now 10:00 P.M and it was still in the 80�s so I tried to find the drain petcock and could not find it so I just pulled the lower radiator hose and this time remembered to get up on the bumper so I didn�t soak my feet with hot water and it all come gushing out and missed the drain pan.
After it was all drained out I stuck the hose in the lower hose and tried to back flush the block but you cannot force muck against the closed thermostat so I then forced water back up through the radiator till it was all clear.
You would think it would be good enough about now wouldn�t you but you know I don�t think that way.
I needed some way to flush out the block.
One of the ways I have done it was I made an adapter so I can connect the hose of my steam cleaner to the engine block and steam out the water passages.
I used to do this on Cummins and Detroit�s when the oil coolers would leak.
So I made up a simple adapter so I can connect the garden hose the block and flush out all of the crud.
This is important!
First make sure your engine is not HOT, if it has been running, let it sit for about an hour because of Heat Soak your engine gets hotter when it is turned off than when it was running.
Also now would be the time to replace your upper and lower hoses, thermostat and any bypass hoses that might need replacing.
I will do mine next time.
Sorry for the long introduction so I will show you how you can make your own.
It only consists of 4 pipe fittings that I already had on hand from another successful idea.
�� Female Hose Adapter
�� nipple
��X �� Bell Reducer
��X 3� nipple
An inline hose shutoff makes the job much easier.
After you make the device you remove the �� plug from the thermostat housing using a 3/8� socket wrench and extension.
This plug might be stuck in pretty good so take your time and a long handle wrench.
Then screw the pipe into the thermostat housing.
Now REMOVE your radiator Cap and then connect your garden hose to the top fitting, close the valve and turn on the water.
Up to this point all of the water that had drained out of the radiator and engine was clear, but guess what, because the engine was cold the thermostat was closed and you were not really flushing out the block.
You could have removed the thermostat and flushed it out but that is a lot of work, or you could repeadly fill the radiator and run the engine till it got hot.
But you still would not be able to flush out all of the rust, remaining casting sand and small animals from the block.
The water had come out looking like this for about 2 minuets until is started to clear up.
After about 2 minuets of back flushing all of the water being forced through the system backwards came out clear.
Although I did not do so it is recommended to first back flush the block with the lower radiator hose disconnected as to not force any debris into the bottom of the radiator.
From here it is then a simple task to remove the hose connection and drain any remaining water from the cooling system by removing the lower radiator hose.
Reinstall the lower hose and tighten the clamp.
If you haven�t already, remove the overflow tank and clean it out so it is nice and clean. I used some Simple Green and a rag on the end of a pair of long forceps. (Sorry guys, I use a lot of surgical instruments here)
Without replacing the plug in the thermostat housing you can now pour in 2 gallons of your choice of Anti Freeze, make sure it is Low Silicate.
Now you can slowly refill the radiator using the hose or bucket until the coolant starts to come from the open hole, now replace the �� pipe plug after you wrap some Teflon tape around it and tighten it with your 3/8� socket wrench.
Start the engine and slowly top off the radiator until it at her neck.
I added some Antifreeze and water to the recovery tank about 7/8 full.
Install a new 16# pressure cap, make sure it is for a Recovery System and does NOT have a LEVER on the top.
Go for a ride and get the truck up to operating temperature and then let it cool back down, doing this several cycles will purge out any remaining air from the system.
Keep the recovery tank at least � full so it will not suck any air back into the system.
After a few days adjust the level in the recovery tank as needed.
I am confident the inside of my engine is now clean.
Geez I was only going to show you how I had flushed out my block.
My neighbors are used to me working on my truck in the middle of the night and come out to visit.
Jim
Thread Starter
Registered User
Joined: Nov 2006
Posts: 3,263
Likes: 582
From: Central KY
Once again I am overwhelmed - but not suprised. Thanks for the tips & ideas.
First off, you all intentionally live in those temperatures right
Now, the search I did earlier had eveyone cautioning about flushing the system as it wakes up leaks and dislodges stuff better left unlodged. Kinda like let sleeping dogs lay and if it ain't broke don't fix it.
But I think they were mostly using a harsh coolant flush chemical maybe? And maybe the first ever flush for that engine? Straight water (does your tap water come out 126* on the cold side too) flush may not cause those problems or concerns I'm thinking?
OR, maybe the flushing that exposes cracks and holes is just waking up the inevitable and you're better off dealing with replacing parts under a controled environment in your driveway than on the road in the dark.
SO, do you have any concerns or reservations on flushing? How many miles on yours and how many flushes? Mine, to my knowledge, has not had anything done to the system, definately not since I bought it 50K ago.
Once again, thanks for the indepth responses. Typing takes time and I appreciate!
Thanks for the tips & ideas.First off, you all intentionally live in those temperatures right
Now, the search I did earlier had eveyone cautioning about flushing the system
as it wakes up leaks and dislodges stuff better left unlodged. Kinda like let sleeping dogs lay and if it ain't broke don't fix it.But I think they were mostly using a harsh coolant flush chemical maybe? And maybe the first ever flush for that engine? Straight water (does your tap water come out 126* on the cold side too
) flush may not cause those problems or concerns I'm thinking?OR, maybe the flushing that exposes cracks and holes is just waking up the inevitable and you're better off dealing with replacing parts under a controled environment in your driveway than on the road in the dark.
SO, do you have any concerns or reservations on flushing? How many miles on yours and how many flushes? Mine, to my knowledge, has not had anything done to the system, definately not since I bought it 50K ago
.Once again, thanks for the indepth responses. Typing takes time and I appreciate!
Trending Topics
Registered User
Joined: May 2005
Posts: 2,867
Likes: 536
if you look at the picture in your dodge owners manual, it shows a picture of a fitting placed inline on the coolant hoses at the firewall, made purposely for flushing the system. This fitting accepts the garden hose threads, and can be found at your local NAPA, Kragen's, Pep Boy's, etc. 5/8" barbed ends is what you need.
now, the comment on the sand from the engine block. Since you are flushing out the system, now would be a good time to install a coolant filter, bypass style. Not meaning to boast, but my coolant looks as clean as the day I poured it in. The filter itself acts as a heat dissipator, also. See my photo gallery for the set up. It is mounted on the passenger side of the radiator, on the 2 bolts that hold the radiator in place by the front grill. stainless steel bracket. I picked up the filter and the housing/valves from www.dieselsite.com. It is a powerstroke site, but the filtering solutions will work on the 1st Gens.
now, the comment on the sand from the engine block. Since you are flushing out the system, now would be a good time to install a coolant filter, bypass style. Not meaning to boast, but my coolant looks as clean as the day I poured it in. The filter itself acts as a heat dissipator, also. See my photo gallery for the set up. It is mounted on the passenger side of the radiator, on the 2 bolts that hold the radiator in place by the front grill. stainless steel bracket. I picked up the filter and the housing/valves from www.dieselsite.com. It is a powerstroke site, but the filtering solutions will work on the 1st Gens.
Registered User
Joined: Oct 2005
Posts: 6,457
Likes: 95
From: KENTUCKY
Jim, you spend way too much time at the drive-thru; my engine is always much cooler after a good sit-down meal of prime-rib at the Kentucky Depot.
Please explain your reason for this.
I had problems with one of my engines always spewing coolant all over the place, when loosening the cap, even after sitting cold for a week; I installed a lever-cap and problem gone.
All of my trucks have lever-caps and the recovery jug has always worked as it should.
Maybe some lever caps work with recovery systems and others don't.
I will add this :
If you are flushing, dis-connect both hoses that feed the heater-core; this allows you to flush both ways through the core, and prevents crud from the block entering the core.
You can buy those simple plastic 5/8 garden-hose flushing ports with a sealed cap at any Walmart, chain parts store, etc.
If using one of them, follow my instructions about taking the heater-core out of the loop, prior to flushing.
By the way, by-pass coolant filters for all of my fleet are on the list of things to do.
I have seen nothing but positive results from their use.
Almost all big trucks come with them factory equipped.
; my engine is always much cooler after a good sit-down meal of prime-rib at the Kentucky Depot.Please explain your reason for this.
I had problems with one of my engines always spewing coolant all over the place, when loosening the cap, even after sitting cold for a week; I installed a lever-cap and problem gone.
All of my trucks have lever-caps and the recovery jug has always worked as it should.
Maybe some lever caps work with recovery systems and others don't.
I will add this :
If you are flushing, dis-connect both hoses that feed the heater-core; this allows you to flush both ways through the core, and prevents crud from the block entering the core.
You can buy those simple plastic 5/8 garden-hose flushing ports with a sealed cap at any Walmart, chain parts store, etc.
If using one of them, follow my instructions about taking the heater-core out of the loop, prior to flushing.
By the way, by-pass coolant filters for all of my fleet are on the list of things to do.
I have seen nothing but positive results from their use.
Almost all big trucks come with them factory equipped.
Administrator
Joined: Nov 2004
Posts: 4,084
Likes: 235
From: Southern California
Once again I am overwhelmed - but not suprised. Thanks for the tips & ideas.
First off, you all intentionally live in those temperatures right
Now, the search I did earlier had eveyone cautioning about flushing the system as it wakes up leaks and dislodges stuff better left unlodged. Kinda like let sleeping dogs lay and if it ain't broke don't fix it.
But I think they were mostly using a harsh coolant flush chemical maybe? And maybe the first ever flush for that engine? Straight water (does your tap water come out 126* on the cold side too) flush may not cause those problems or concerns I'm thinking?
OR, maybe the flushing that exposes cracks and holes is just waking up the inevitable and you're better off dealing with replacing parts under a controled environment in your driveway than on the road in the dark.
SO, do you have any concerns or reservations on flushing? How many miles on yours and how many flushes? Mine, to my knowledge, has not had anything done to the system, definately not since I bought it 50K ago.
Once again, thanks for the indepth responses. Typing takes time and I appreciate!
Thanks for the tips & ideas.First off, you all intentionally live in those temperatures right
Now, the search I did earlier had eveyone cautioning about flushing the system
as it wakes up leaks and dislodges stuff better left unlodged. Kinda like let sleeping dogs lay and if it ain't broke don't fix it.But I think they were mostly using a harsh coolant flush chemical maybe? And maybe the first ever flush for that engine? Straight water (does your tap water come out 126* on the cold side too
) flush may not cause those problems or concerns I'm thinking?OR, maybe the flushing that exposes cracks and holes is just waking up the inevitable and you're better off dealing with replacing parts under a controled environment in your driveway than on the road in the dark.
SO, do you have any concerns or reservations on flushing? How many miles on yours and how many flushes? Mine, to my knowledge, has not had anything done to the system, definately not since I bought it 50K ago
.Once again, thanks for the indepth responses. Typing takes time and I appreciate!
No, not at all, I hate the heat. That was when I was going through Baker Ca that is located in Death Valley.
http://en.wikipedia.org/wiki/Baker,_California
Now, the search I did earlier had eveyone cautioning about flushing the system
as it wakes up leaks and dislodges stuff better left unlodged. Kinda like let sleeping dogs lay and if it ain't broke don't fix it.I feel if it reveals a leak then better to get fixed now than when you are on the road to Las Vegas where you can drive for hours and not see another soul.
SO, do you have any concerns or reservations on flushing? How many miles on yours and how many flushes? Mine, to my knowledge, has not had anything done to the system, definately not since I bought it 50K ago
.Not at all, I try and keep my engine compartment as clean as the outside of my truck; I wash it out every time I wash the outside.
Jim
Administrator
Joined: Nov 2004
Posts: 4,084
Likes: 235
From: Southern California
Jim, you spend way too much time at the drive-thru; my engine is always much cooler after a good sit-down meal of prime-rib at the Kentucky Depot.
Hey this the way my life is, I am always 2 hours behind for everything I do from the time I get up I am always running until I drive through Jack N the Box on the way home when the day is winding down.
It can be either funny or sad because I am so predictable that when I pull into the drive through of either Jack N the Box or McDonalds they hear the rumble and tell me my order.
Originally Posted by Jim Lane
Install a new 16# pressure cap, make sure it is for a Recovery System and does NOT have a LEVER on the top.
Please explain your reason for this.
I say this because the pressure caps for a recovery system have a check valve built in so as the engine cools down it will siphon the coolant back into the radiator from the bottom of the recovery tank and must be a sealed system.
However a standard pressure cap is only designed to seal the neck of the radiator and allow it to pressurize to a certain PSI thereby raising the boiling point but when it gets too hot it will exceed the rated pressure and vent to the atmosphere, once it vents it should not allow any air to be drawn back in as the engine cools back down.
That is why you will sometimes see a collapsed radiator hose once you cooled down an overheated engine.
The lever is only to safely vent the pressure before you remove the cap.
Even though there is a coolant tank it is not always a recovery system, they were just a barf bucket.
I had problems with one of my engines always spewing coolant all over the place, when loosening the cap, even after sitting cold for a week; I installed a lever-cap and problem gone.
That is a strange one; one reason for excessive pressure in a cooling system is a leaking head gasket allowing combustion gasses into the cooling medium.
I have seen this a lot.
The lever cap might have been at a higher pressure than what was leaking in causing the pressure.
Also if you ever have a problem with an over pressurized cooling system on a Fork Lift or other LPG fueled motor, it is usually the Vaporizer that is leaking and must be replaced.
All of my trucks have lever-caps and the recovery jug has always worked as it should.
Maybe some lever caps work with recovery systems and others don't.
They very well could be true.
The cap I have on mine is a Stant #10231
I will add this :
If you are flushing, dis-connect both hoses that feed the heater-core; this allows you to flush both ways through the core, and prevents crud from the block entering the core.
You can buy those simple plastic 5/8 garden-hose flushing ports with a sealed cap at any Walmart, chain parts store, etc.
If using one of them, follow my instructions about taking the heater-core out of the loop, prior to flushing.
The heater core is the only thing I would be careful about how much pressure I flushed it with, some of them could be paper thin and on the verge of leaking without even looking at them.
I used to use a power flush gun that you connected to the water hose AND the air line and that really cleaned them out good.
I think it might have been a Balkamp
By the way, by-pass coolant filters for all of my fleet are on the list of things to do.
I have had all of the parts for some time and I am now welding the mounting bracket for the filter.
I have seen nothing but positive results from their use.
Almost all big trucks come with them factory equipped.
Bigragu,
Which filter are you using, is it an SCA or a plain filter?
Thanks Jim
; my engine is always much cooler after a good sit-down meal of prime-rib at the Kentucky Depot.Hey this the way my life is, I am always 2 hours behind for everything I do from the time I get up I am always running until I drive through Jack N the Box on the way home when the day is winding down.
It can be either funny or sad because I am so predictable that when I pull into the drive through of either Jack N the Box or McDonalds they hear the rumble and tell me my order.
Originally Posted by Jim Lane
Install a new 16# pressure cap, make sure it is for a Recovery System and does NOT have a LEVER on the top.
Please explain your reason for this.
I say this because the pressure caps for a recovery system have a check valve built in so as the engine cools down it will siphon the coolant back into the radiator from the bottom of the recovery tank and must be a sealed system.
However a standard pressure cap is only designed to seal the neck of the radiator and allow it to pressurize to a certain PSI thereby raising the boiling point but when it gets too hot it will exceed the rated pressure and vent to the atmosphere, once it vents it should not allow any air to be drawn back in as the engine cools back down.
That is why you will sometimes see a collapsed radiator hose once you cooled down an overheated engine.
The lever is only to safely vent the pressure before you remove the cap.
Even though there is a coolant tank it is not always a recovery system, they were just a barf bucket.
I had problems with one of my engines always spewing coolant all over the place, when loosening the cap, even after sitting cold for a week; I installed a lever-cap and problem gone.
That is a strange one; one reason for excessive pressure in a cooling system is a leaking head gasket allowing combustion gasses into the cooling medium.
I have seen this a lot.
The lever cap might have been at a higher pressure than what was leaking in causing the pressure.
Also if you ever have a problem with an over pressurized cooling system on a Fork Lift or other LPG fueled motor, it is usually the Vaporizer that is leaking and must be replaced.
All of my trucks have lever-caps and the recovery jug has always worked as it should.
Maybe some lever caps work with recovery systems and others don't.
They very well could be true.
The cap I have on mine is a Stant #10231
I will add this :
If you are flushing, dis-connect both hoses that feed the heater-core; this allows you to flush both ways through the core, and prevents crud from the block entering the core.
You can buy those simple plastic 5/8 garden-hose flushing ports with a sealed cap at any Walmart, chain parts store, etc.
If using one of them, follow my instructions about taking the heater-core out of the loop, prior to flushing.
The heater core is the only thing I would be careful about how much pressure I flushed it with, some of them could be paper thin and on the verge of leaking without even looking at them.
I used to use a power flush gun that you connected to the water hose AND the air line and that really cleaned them out good.
I think it might have been a Balkamp
By the way, by-pass coolant filters for all of my fleet are on the list of things to do.
I have had all of the parts for some time and I am now welding the mounting bracket for the filter.
I have seen nothing but positive results from their use.
Almost all big trucks come with them factory equipped.
Bigragu,
Which filter are you using, is it an SCA or a plain filter?
Thanks Jim
Thread Starter
Registered User
Joined: Nov 2006
Posts: 3,263
Likes: 582
From: Central KY
Well, with all your alls tips and advice I disconnected both heater hoses and the bottom radiator. Drained and then flushed the system, emptied & cleaned the overflow tank. Removed the plug and filled until overflowing and then topped off the system. Haven't run it yet, only idled in the drive.
Maybe I'll have a filter someday...
Thanks!
Maybe I'll have a filter someday...
Thanks!
Registered User
Joined: Oct 2005
Posts: 6,457
Likes: 95
From: KENTUCKY
I know these are Fords, but the principle applies and some good ideas on just how to approach the installation of a BY-PASS COOLANT FILTER can be used on any engine/truck.
Here is quick and easy :
http://www.thedieselstop.com/content...%20Application
Note how the hose "Ys" carry the coolant through the filter from one hose to the other.
Although quicker/cheaper to install, in this set-up, there is nothing that holds the housing against leverage on a filter-wrench, and the weight of the filter is un-supported; never-the-less, it is far better than no filter at all.
Here is somewhat more involved, but more secure and easier to service in the future :
http://www.oilburners.net/articles/coolfilter1.html
The valves allow the filter to be serviced with the only loss of coolant being that which is trapped in the filter.
My plan is to plumb the filter similarly to the one in the second "link" above, the filter being located in a cross-over between the heater-hoses, with my heater-core summer-time cut-off valve being located down-stream of the cross-over point for the filter.
My thinking is that, if I can currently simply close the valve and the coolant that would have went to the heater-core bypass inside the block, then, with the filter plumbed in a cross-over "bypass" in the heater-hoses, when the summer-time valve is closed, a portion of the coolant will pass through the filter, while the excess pressure still bypasses in the block.
Are there any flaws in this thinking ??
Thanks.
Thread Starter
Registered User
Joined: Nov 2006
Posts: 3,263
Likes: 582
From: Central KY
Yep, coyotes loved it
Seriously though - not yet. It's still sitting in covered 5 gallon buckets. Once my oil jugs get full I make a run to the recycle center. Once that occures MY answer will be "yes". Can't say for the others...
Seriously though - not yet. It's still sitting in covered 5 gallon buckets. Once my oil jugs get full I make a run to the recycle center. Once that occures MY answer will be "yes". Can't say for the others...