My 92's Power Loc rebuild
 09-18-2012, 05:56 PM
#1
Registered User
Thread Starter
Join Date: Dec 2010
Location: Land of the Toxic Avenger
Posts: 6,770
Received 1,637 Likes
on
1,112 Posts
My 92's Power Loc rebuild
I'll start this off by saying .....HUGE THANKS to Faith helped me diagnose my truck's diff issue. She warned me about the "metallic clunk" that I hear when I put my truck into gear, and after I explained my U-joints and hanger bearing are new, so .... as usual, Faith was right about my truck needing maintenance .... Onemoparnut Bill offered me the advice and the re-assurance that I could do this myself, as he's done his before, and walked me through it on the phone. I read my service manual, and it didn't seem that difficult to do. Here's the service information found in the sticky I used to do the work.
http://www2.dana.com/pdf/5315-3.pdf
After disassembling the trucks axles and gear cover, I found the numbers on the ring gear that the supplier needed to provide the proper power lock rebuild kit. You need the tag number on the cover (which mine was missing) or the 6 digit code on the ring gear that begins with a letter. Mine was a " TXXXXXX ". Now I ordered a Dana spider kit from DTS in Michigan. Erik was the guy who was most helpful, and got the parts right out.
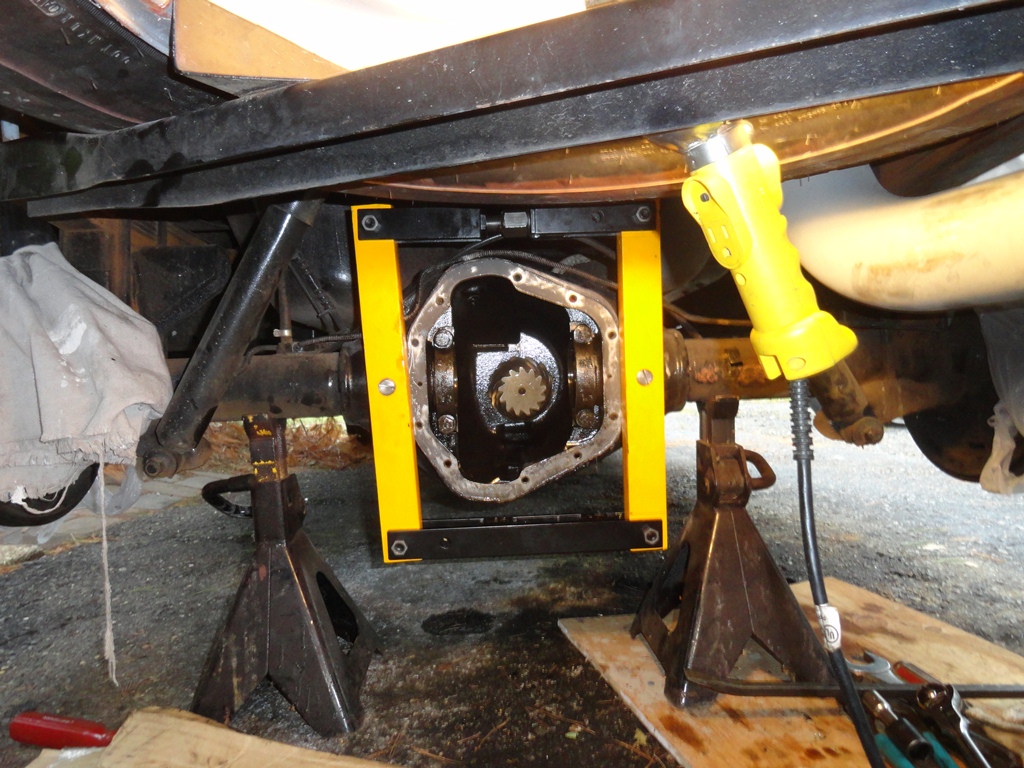
I attempted to pull the gear out without any spreader. Wasn't happening. So after purchasing a spreader (no one would rent it to me), it didn't take much to get the gear out. The Preload on the side bearings keep the diff in there, and most guys can just pry it out. I'm not that lucky... You shouldn't spread the case more than .015 of an inch, from what I've read, so a dial indicator was used to make sure of it. Here's the spreader in place
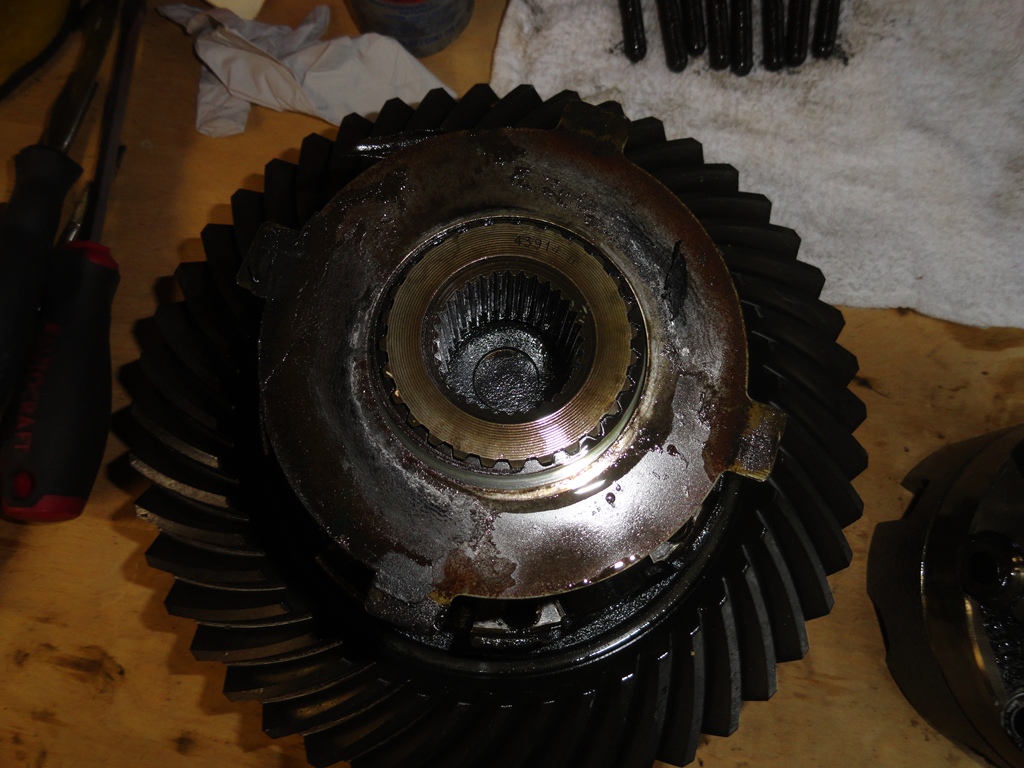
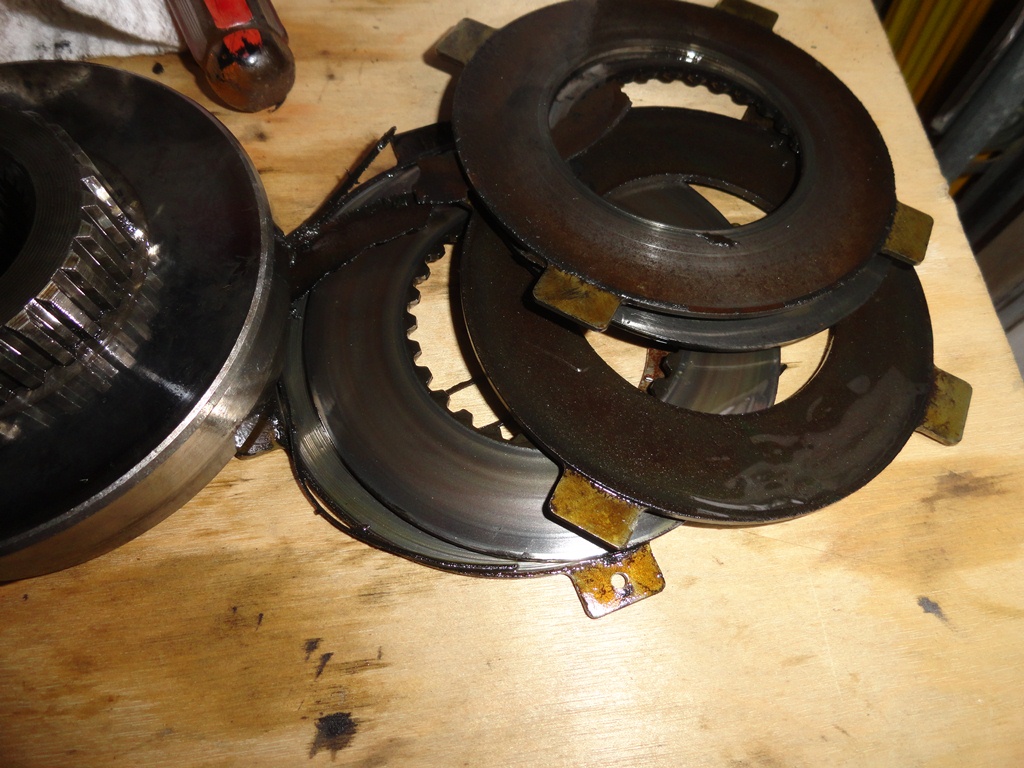
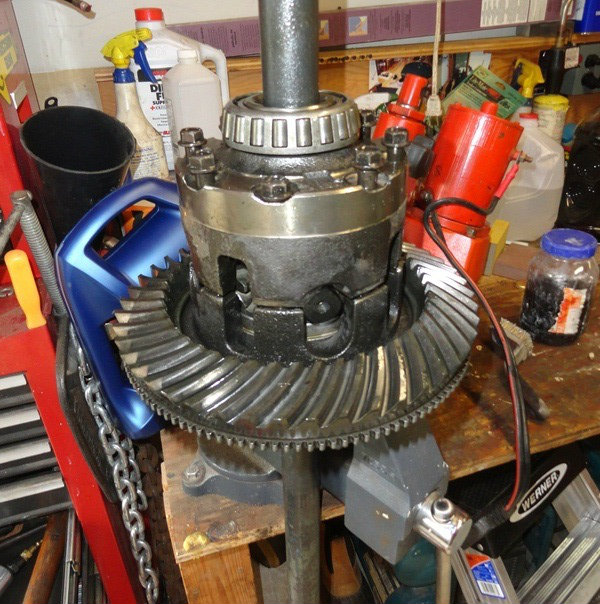
Here's the gear on the bench. I put the bearing races and bearing caps back in the rear, so they wouldn't get misplaced nor switched around. Those bearing caps HAVE to go back in the same way they came as they're machined in a specific manner requiring it. Don't mix them up. The clutches were GONE.... as Faith said they would be....
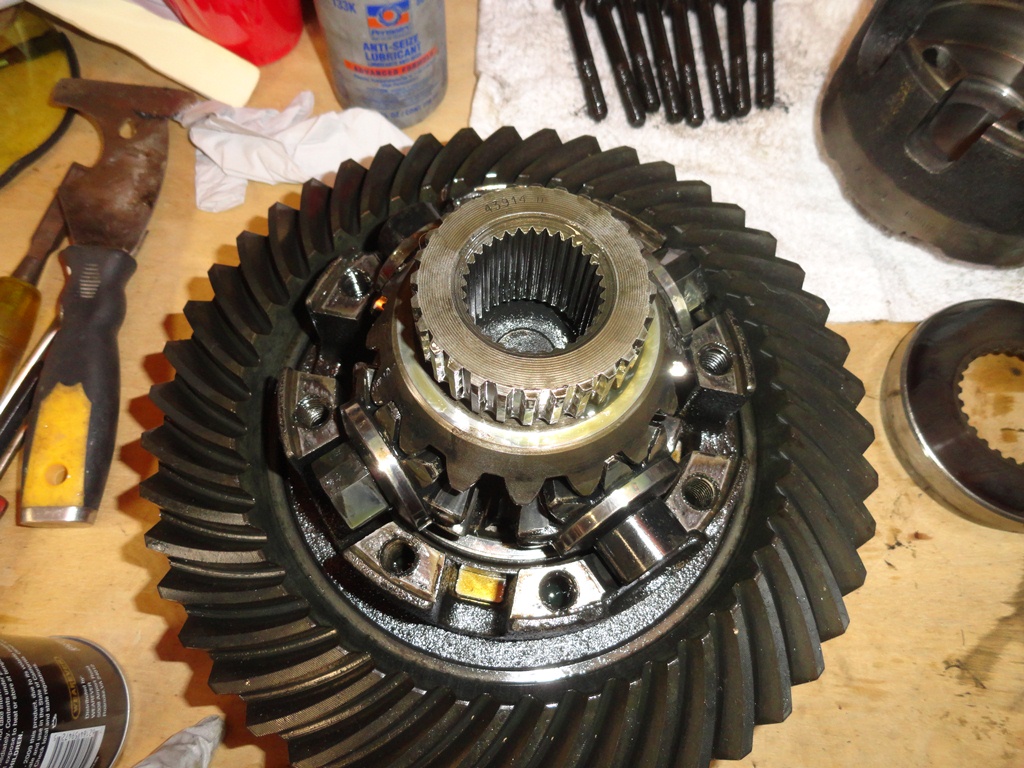
Make sure you mark the case halves as shown in the manual, as the case halves must be put back in the same orientation as they were removed. I marked each half, and if you're going to reuse the spiders, the crosses need to go back as they came out. Don't mix up their locations unless you're buying a new internal kit as I have where all the parts are new. Here's what the spiders look like behind the clutches.
If you're wondering what the clutch material does over time..... here is a good shot
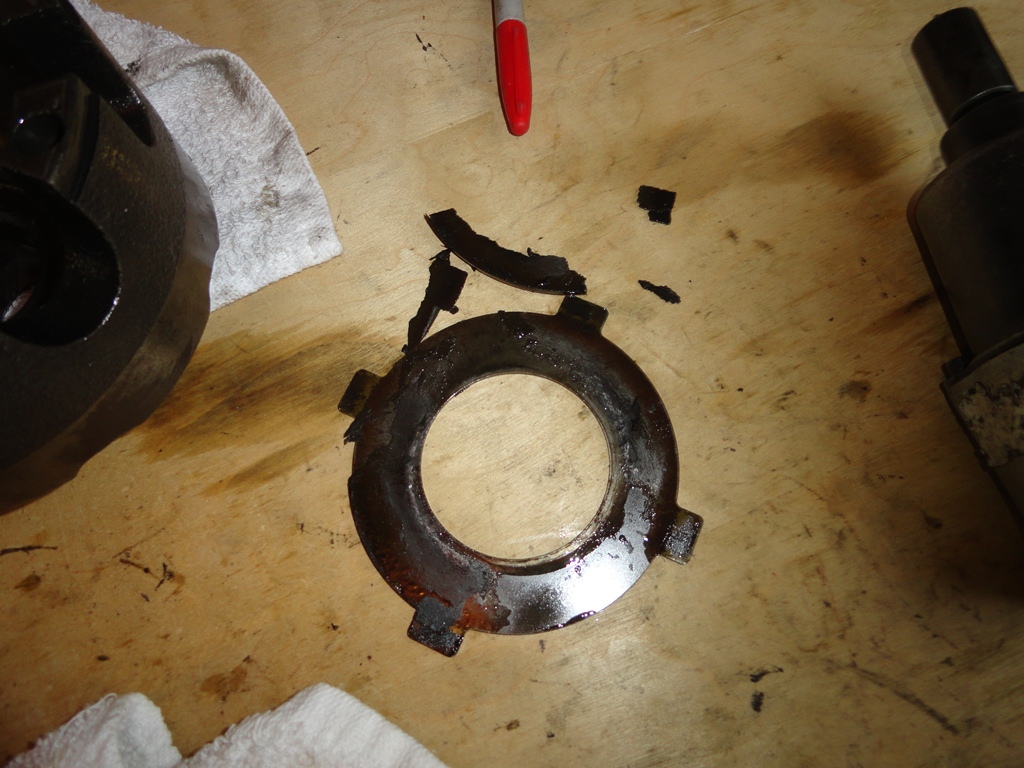
Here is another of the pack disassembled
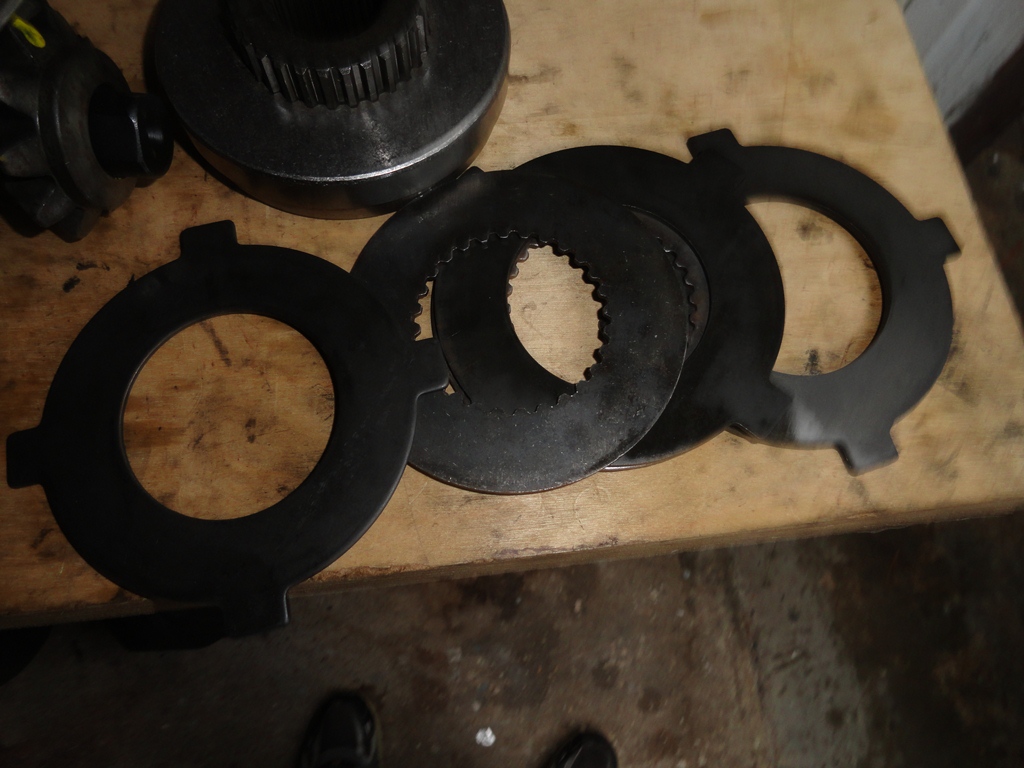
Unfortunately, the clutches in the new kit are wrong, as they don't have any friction materials on them. I have to call tomorrow to find out what happened.
I'll post pix of the re-assembly when I get the clutch missing their friction materials mess figured out... Go figure... This crap always happens to me....
EDIT: The new clutches are supposed to be STEEL ON STEEL, and not a fiber coated material as the OEM was. I called spicer to confirm this, and apparently, they went back to the "OLD STYLE" clutches, which no longer contain / coated with friction materials. They're NOT supposed to have friction material on them, and you do have to soak them in the friction modifier for at least 20 minutes prior to assembly.
http://www2.dana.com/pdf/5315-3.pdf
After disassembling the trucks axles and gear cover, I found the numbers on the ring gear that the supplier needed to provide the proper power lock rebuild kit. You need the tag number on the cover (which mine was missing) or the 6 digit code on the ring gear that begins with a letter. Mine was a " TXXXXXX ". Now I ordered a Dana spider kit from DTS in Michigan. Erik was the guy who was most helpful, and got the parts right out.
I attempted to pull the gear out without any spreader. Wasn't happening. So after purchasing a spreader (no one would rent it to me), it didn't take much to get the gear out. The Preload on the side bearings keep the diff in there, and most guys can just pry it out. I'm not that lucky... You shouldn't spread the case more than .015 of an inch, from what I've read, so a dial indicator was used to make sure of it. Here's the spreader in place
Here's the gear on the bench. I put the bearing races and bearing caps back in the rear, so they wouldn't get misplaced nor switched around. Those bearing caps HAVE to go back in the same way they came as they're machined in a specific manner requiring it. Don't mix them up. The clutches were GONE.... as Faith said they would be....
Make sure you mark the case halves as shown in the manual, as the case halves must be put back in the same orientation as they were removed. I marked each half, and if you're going to reuse the spiders, the crosses need to go back as they came out. Don't mix up their locations unless you're buying a new internal kit as I have where all the parts are new. Here's what the spiders look like behind the clutches.
If you're wondering what the clutch material does over time..... here is a good shot
Here is another of the pack disassembled
Unfortunately, the clutches in the new kit are wrong, as they don't have any friction materials on them. I have to call tomorrow to find out what happened.
I'll post pix of the re-assembly when I get the clutch missing their friction materials mess figured out... Go figure... This crap always happens to me....
EDIT: The new clutches are supposed to be STEEL ON STEEL, and not a fiber coated material as the OEM was. I called spicer to confirm this, and apparently, they went back to the "OLD STYLE" clutches, which no longer contain / coated with friction materials. They're NOT supposed to have friction material on them, and you do have to soak them in the friction modifier for at least 20 minutes prior to assembly.
 09-18-2012, 06:43 PM
#2
Registered User
I wonder if this is my issue aswell. Everytime i let out the clutch from a stop i get slight bouncing so to speak. I thought it was the clutch but the new one does the same thing.
09-19-2012, 06:05 AM
#3
Registered User
Thread Starter
Join Date: Dec 2010
Location: Land of the Toxic Avenger
Posts: 6,770
Received 1,637 Likes
on
1,112 Posts
If you have a limited slip diff, and you've got 150K on the ticker, then I suggest you think about changing out the clutches as soon as you can. Faith has some great pix on her gallery of what happens if you don't. After I saw what she had to deal with, I immediately set myself up for doing the maintenance... Since the newly designed clutches are now STEEL ON STEEL, they're supposed to last much longer than the OEM did.
Worn clutches in a LSD are normal, and over time all LSD diffs require clutch replacement
 09-19-2012, 11:35 AM
#5
Registered User
Thread Starter
Join Date: Dec 2010
Location: Land of the Toxic Avenger
Posts: 6,770
Received 1,637 Likes
on
1,112 Posts
No I'm not, as the original ones were in really good shape. If I remove the brgs, I have to mess with the diff shims and I'd have to correct the new ring and pinion relationship. The new brgs wouldn't be identical, and I'd have to re-set everything back up.
Soak your shims in diff additive for a little while (not really necessary for very long as they're all steel) and start your reassembly. You align the shims by using your axles as guides for their placement.
You put your axle in a bench vise with 3 inches sticking up.
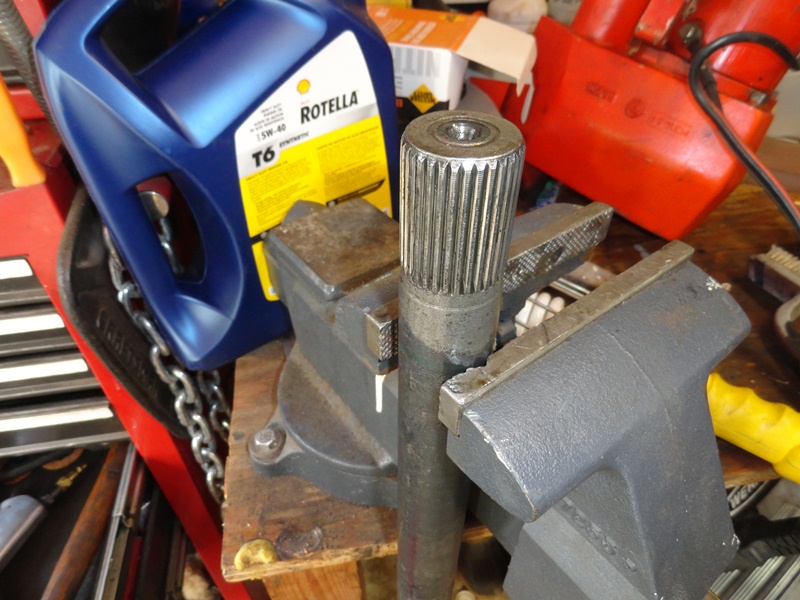
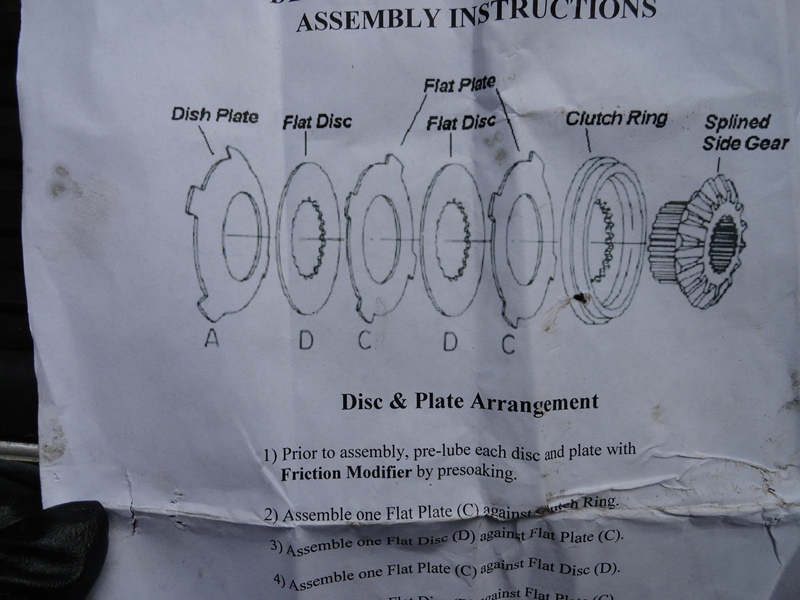
After the pack is assembled with the side gears in the clutch ring, you put them in the ring gear side, making sure you don't mis-align the clutch pack. Put the gear assembly on your vise, lightly twisting the unit so that your splines on the axle match the splines in the hub side gear. Put the other half together, and stick the bolts loosely in the outer half, and place the other shaft in that corresponding half. It should look like this..
Tighten the bolts in an even cross pattern to 70 ft lbs, unless you have a "heavy duty" version which requires a higher torque rating.
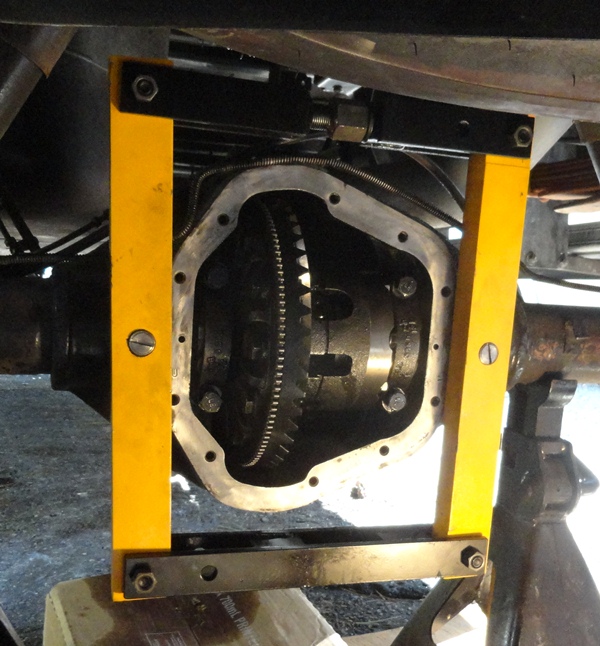
Here it is back in it's place where it belongs. Filled the case up with the rest of the Diff additive, and topped it off with 85w 140 HD gear oil and Lucas Oil Stabilizer. Time for a test ride.

Trending Topics
09-19-2012, 09:37 PM
#9
Registered User
Thread Starter
Join Date: Dec 2010
Location: Land of the Toxic Avenger
Posts: 6,770
Received 1,637 Likes
on
1,112 Posts
The diff is designed to be disassembled, the maintenance of the clutches completed, and put back together without completely re-setting up the specs, as done from scratch. I guess in theory, if you found the exact same size bearings, and replaced them, without misplacing the OE shims, then you could "possibly" get away with not checking it as well. I personally wouldn't change the bearings without confirming, but that's me.
In an ideal situation you would check those, but I didn't think it was necessary, as even the service manual didn't state that you had to do it.
Good point, though.
09-19-2012, 09:43 PM
#10
Registered User
Thread Starter
Join Date: Dec 2010
Location: Land of the Toxic Avenger
Posts: 6,770
Received 1,637 Likes
on
1,112 Posts
Rebuild kit (everything needed to replace all the internals of the power loc) $290 from DTS in Michigan
Spreader was from Mike @ Extreme engineering (EBAY) $220 including the $45 shipping charge as it weighs about 45 lbs
09-19-2012, 10:09 PM
#11
Registered User
Thread Starter
Join Date: Dec 2010
Location: Land of the Toxic Avenger
Posts: 6,770
Received 1,637 Likes
on
1,112 Posts
BTW,
I took it out for a 2 hour test ride after I broke in the new clutches. With the truck still on the stands, and the tires still not put back on, I started the truck up and let it ride in drive for about 15 minutes. I turned it off. By doing this, It allows the gear oil to be "pumped" to the wheel bearings and lubricate them up.
I did, however, "pre-lube" the bearings by using the oil stabilizer on them during installation, and I made sure there was oil in the hub, but it's easy to have them run dry. I then did the same process of letting it idle, but in reverse gear this time. This ensures both drivers and passenger side brgs are oiled.
I know this method works, as I filled it up to the drain hole (before I let it run in gear) where it was just starting to drip out, and closed it up. I then let it sit to "drain the gear oil" back to the center diff. Pulled the plug, and it was slightly lower than the fill hole, so I fillled it back up again. If it didn't lube the bearings, the level wouldn't have changed.
Before I dropped the truck on it's tires, I pitched it both left and right for about 10 minutes, to ensure both axle bearing sets are lubed.
Result ??????
Faith was 100% dead on.
The "play" in the rear, which I experienced previously, is completely gone. The movement of the axle, on either side has no deviation... or almost none, where previously, the movement of one axle took a minute amount of time to start turning the other side. There was a lot of play in those spiders....
The metallic "Clunk" is gone. The shift from park to drive or drive to reverse, or back into park is smooth as silk. No more "BANG" when you put it into gear. No more noise..... and the steel plates that replaced the fiber coated plates made no noise whatsoever. I thought that they would chatter due to "metal on metal" but not a peep.
Truly a fun project, and well worth the expense to know I'm good to go.
09-21-2012, 05:36 PM
#12
Registered User
So i guess this isn't my issue, changed oil in the rear diff today and mine is a peg-legger.
09-22-2012, 07:03 AM
#13
Registered User
I'm thinking this is what mine will be needing soon. I have that lovely "clumk" as you describe. Not checked to see if there's a delay between each side, good idea.
So how does the case spreader work? It attaches by threading into the cover bolts and slightly opens the pumpkin with the turn buckles?
So how does the case spreader work? It attaches by threading into the cover bolts and slightly opens the pumpkin with the turn buckles?
09-22-2012, 11:02 AM
#14
Registered User
Thread Starter
Join Date: Dec 2010
Location: Land of the Toxic Avenger
Posts: 6,770
Received 1,637 Likes
on
1,112 Posts
The spreader doesn't thread but it just fits into the two bung holes, one on either side of the cover. The holes are about 7/8" in diameter, and the spreader snuggly fits into each one, and the pressure from the turnbuckle holds it there while you work. Extreme caution needs to be the rule when using the spreader, as you can overspread the housing and then the rear is done. .015 is the max, but the realty is, I barely moved it at all. I just removed the caps, set up my dial indicator, and slowly cranked it out until I was at about .008. Loosened up enough to pry out the rear, and when I put it back in the pre-load that was there from the factory was retained. Didn't take much to spread it out ... maybe 6 turns once it made contact ?
12-20-2012, 07:07 PM
#15
Registered User

Join Date: Nov 2004
Location: Ingleside, Tx.
Posts: 207
Likes: 0
Received 0 Likes
on
0 Posts
First of all, thanks for the very informative thread you have here. I have been away from this site for a while but I see it is just as great as always!
Now to business. I have a '92 W250 4X4 with 3.54 LS gears. The spider gears are shot. I also found the shim pack on the left side to be pretty much destroyed. The shims were smashed.
I have found the complete 3rd member assembly minus carrier bearings (which I plan on replacing) for around $550.
I did not need to use a spreader to remove the assembly. That fact and the damaged shims makes me wonder if I have other problems. Any comments or ideas?
My plan is to change out the 3rd member assy, carrier bearings and replace the shims. The ring and pinion are not damaged at all. Then check the backlash and adjust as necessary.
Any info will be very much appreciated! I am sure I will have plenty more questions before I finish this project.