How to install a Coolant Filter
 07-01-2008, 02:52 AM
#1
Administrator
Thread Starter

Part-1
How to install a Coolant Filter on out 1st.Gen Dodges.
Today I finally had the time to get out the wire-feed welder so I could make my filter bracket and finish a project that was in the planning for some time now.
The most difficult was trying to decide where I wanted to install the filter head but after some thought I decided on hanging it off the front of the engine next to the injection pump.
I figure here it will be easy to service and it will be in the airflow of the fan to help cool it down.
Also being mounted to the engine it will keep all of the coolant lines secured and not require any flexible connections to fail from movement.
So here is how I started with a scrap of steel from another project. I was going to fabricate a bracket using �� square tube and tabs for the bolts but I wanted to keep it as low profile and as forward as possible as not to waste any room in the engine bay.
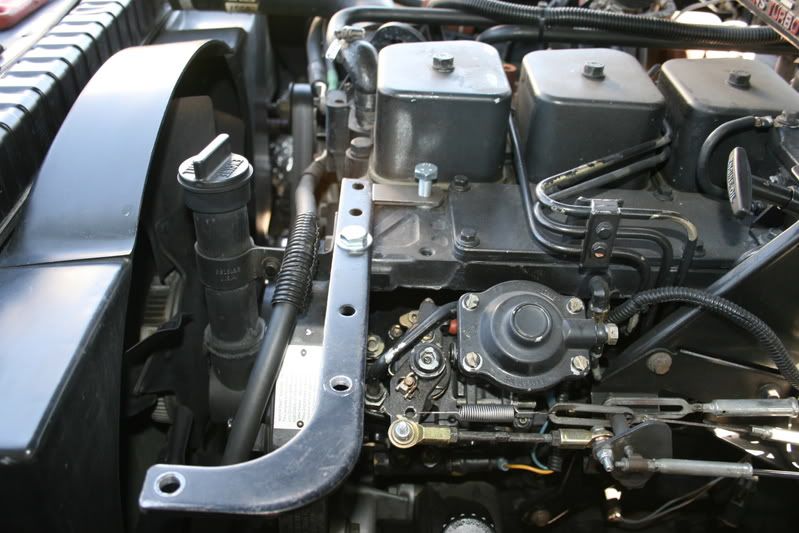
And since I do not have any other accessories mounted to the front of the head I will use these holes.
To keep the bracket secure I will support it from the rear hole as well so I cut a piece of 1� stock and ground the contour to fit perfectly.
I set up a barrier of Nomex around the joint and tacked the joint.
Then I carefully removed the bracket and then using my wire-feed welder I joined the 2 pieces together into a solid bracket.
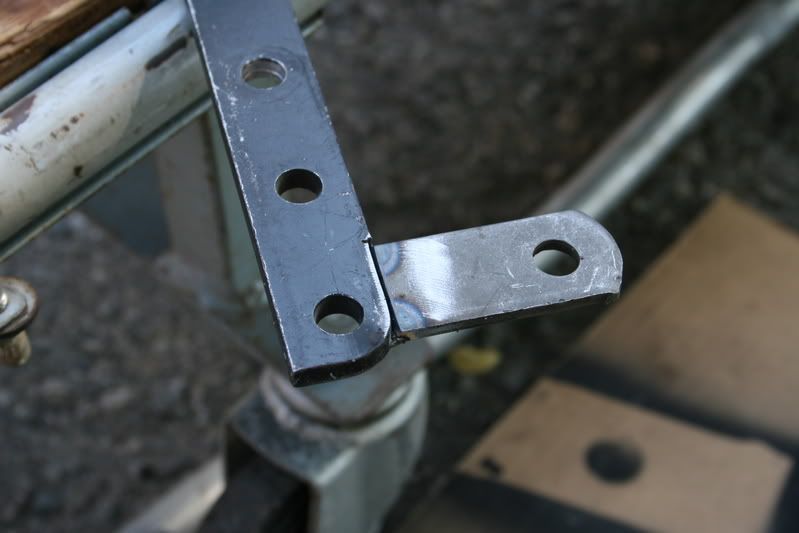
Back for a trial fit before it went under the grinder wheel for a nice finish.
From here using my air-powered grinder I chamfered all of the edges to a smooth finish, then I wiped it down with lacquer thinner and several coats of RustOleum Rust Reformer Satin Black and set out to dry.
From here it was hung from the garage door with a piece of welding rod and every time someone came out of the house they ran into it with their head requiring several re-coats.
Although you cannot see but it is welded on both sides and then all welds were ground and polished.

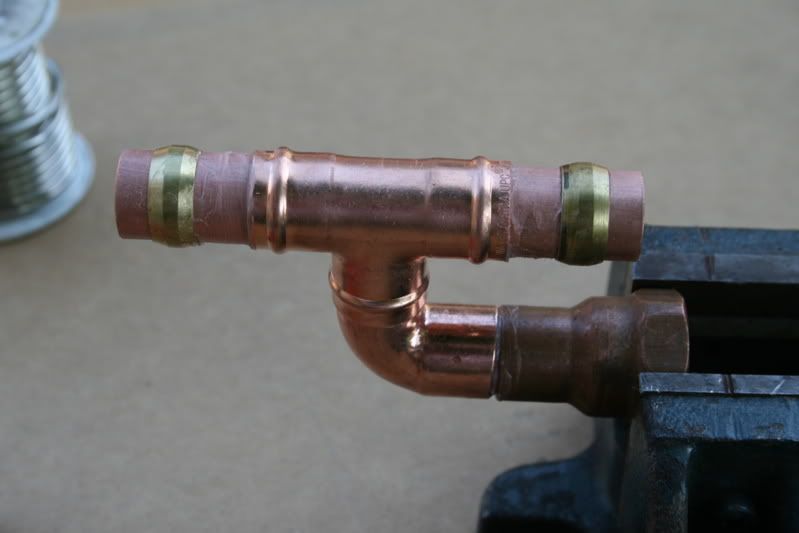
Now for the coolant return where it reenters the heater return circuit I could have coupled some barbed adapters together into a brass �T� but I wanted to make it as compact as possible so I made my own return fitting with a few �� copper fittings.
You will need:
1) �� copper �T�
1) �� copper street ell.
2) ��X 1 �� sections of copper pipe.
1) ��X 1� section of copper pipe.
1) �� Female adapter.
2) 5/8� compression sleeves.
You will also need Flux, Solder, Abrasive cloth (to clean joints with) and a torch.
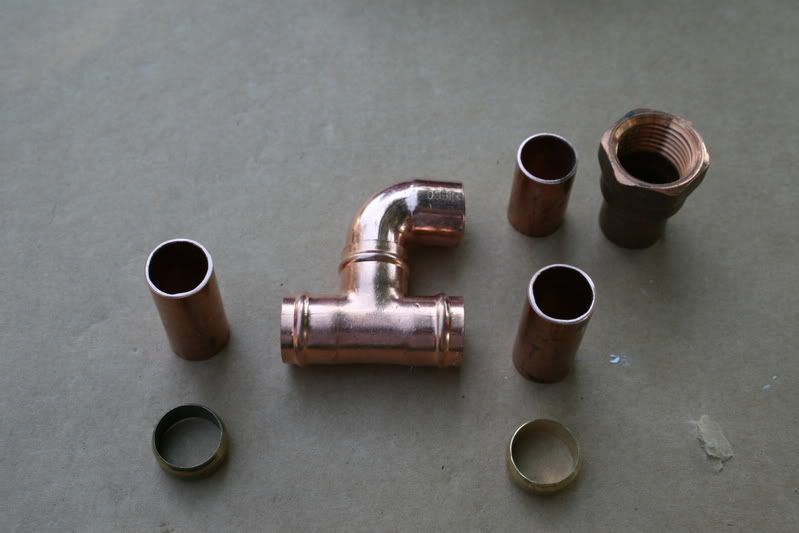
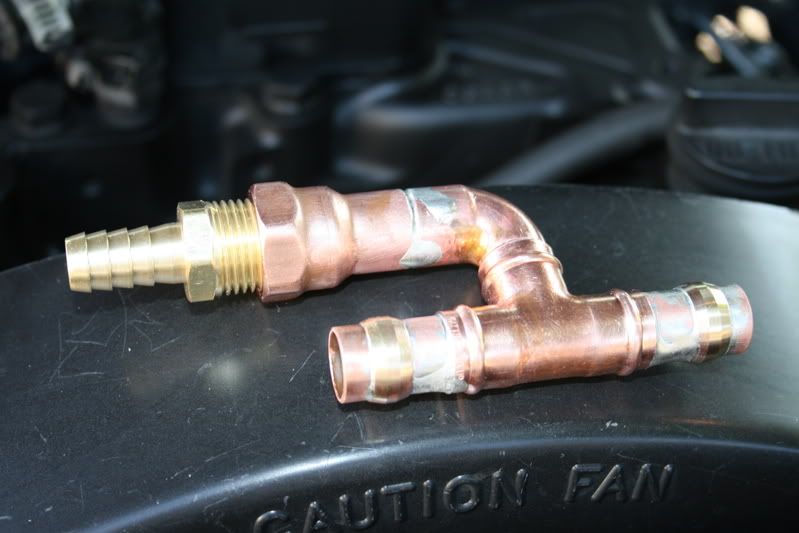
This is what it will look like when it is assembled, and then you will need to solder all of the joints with a torch. I use a MAPP Turbo Torch.
Once it has cooled I cleaned off all of the flux using some Simple Green, hot water and a Scotch Brite pad.
These are the 3/8� FIPxMIP Street Ells I had bought from Hose Man and as you can see they are very rough, and I did not want this on my truck or for any of my projects to me it gives the impression of not caring about your work.
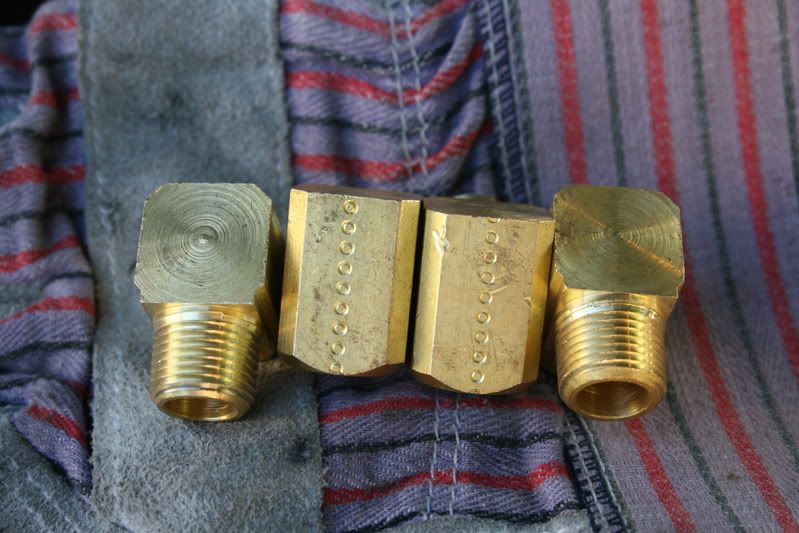
So using my Die Grinder I carefully broke all of the rough edges and then chamfered all of the edges of the fittings for a nice smooth look and feel.
This will also save me from loosing some blood when I have to work in their proximity.

I also did the same for the 3/8� FIPxMIP Street Ell that we will use at the water outlet.
Hey, good lookin camera ^^
How to install a Coolant Filter on out 1st.Gen Dodges.
Today I finally had the time to get out the wire-feed welder so I could make my filter bracket and finish a project that was in the planning for some time now.
The most difficult was trying to decide where I wanted to install the filter head but after some thought I decided on hanging it off the front of the engine next to the injection pump.
I figure here it will be easy to service and it will be in the airflow of the fan to help cool it down.
Also being mounted to the engine it will keep all of the coolant lines secured and not require any flexible connections to fail from movement.
So here is how I started with a scrap of steel from another project. I was going to fabricate a bracket using �� square tube and tabs for the bolts but I wanted to keep it as low profile and as forward as possible as not to waste any room in the engine bay.
And since I do not have any other accessories mounted to the front of the head I will use these holes.
To keep the bracket secure I will support it from the rear hole as well so I cut a piece of 1� stock and ground the contour to fit perfectly.
I set up a barrier of Nomex around the joint and tacked the joint.
Then I carefully removed the bracket and then using my wire-feed welder I joined the 2 pieces together into a solid bracket.
Back for a trial fit before it went under the grinder wheel for a nice finish.
From here using my air-powered grinder I chamfered all of the edges to a smooth finish, then I wiped it down with lacquer thinner and several coats of RustOleum Rust Reformer Satin Black and set out to dry.
From here it was hung from the garage door with a piece of welding rod and every time someone came out of the house they ran into it with their head requiring several re-coats.
Although you cannot see but it is welded on both sides and then all welds were ground and polished.
Now for the coolant return where it reenters the heater return circuit I could have coupled some barbed adapters together into a brass �T� but I wanted to make it as compact as possible so I made my own return fitting with a few �� copper fittings.
You will need:
1) �� copper �T�
1) �� copper street ell.
2) ��X 1 �� sections of copper pipe.
1) ��X 1� section of copper pipe.
1) �� Female adapter.
2) 5/8� compression sleeves.
You will also need Flux, Solder, Abrasive cloth (to clean joints with) and a torch.
This is what it will look like when it is assembled, and then you will need to solder all of the joints with a torch. I use a MAPP Turbo Torch.
Once it has cooled I cleaned off all of the flux using some Simple Green, hot water and a Scotch Brite pad.
These are the 3/8� FIPxMIP Street Ells I had bought from Hose Man and as you can see they are very rough, and I did not want this on my truck or for any of my projects to me it gives the impression of not caring about your work.
So using my Die Grinder I carefully broke all of the rough edges and then chamfered all of the edges of the fittings for a nice smooth look and feel.
This will also save me from loosing some blood when I have to work in their proximity.
I also did the same for the 3/8� FIPxMIP Street Ell that we will use at the water outlet.
Hey, good lookin camera ^^

The following users liked this post:
w6pea (11-10-2018)
07-01-2008, 02:53 AM
#2
Administrator
Thread Starter
Part-2
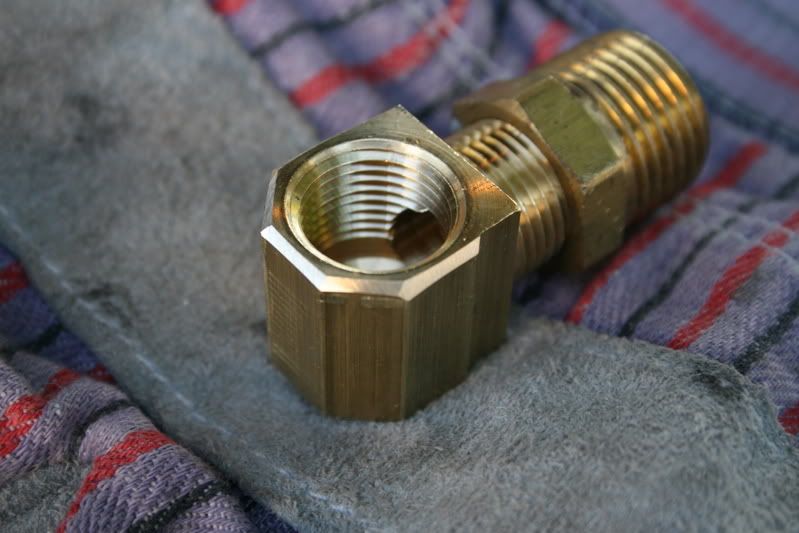
This is a comparison of the 2 different Street Ells used in this project, notice how much narrower the top one is, we will need it like this because with it we can install it into the water outlet without removing the thermostat housing and lifting hook.
I found this at Home Depot it is manufactured by WATTS Part #A782 FIPxMIP 3/8� Street Elbow
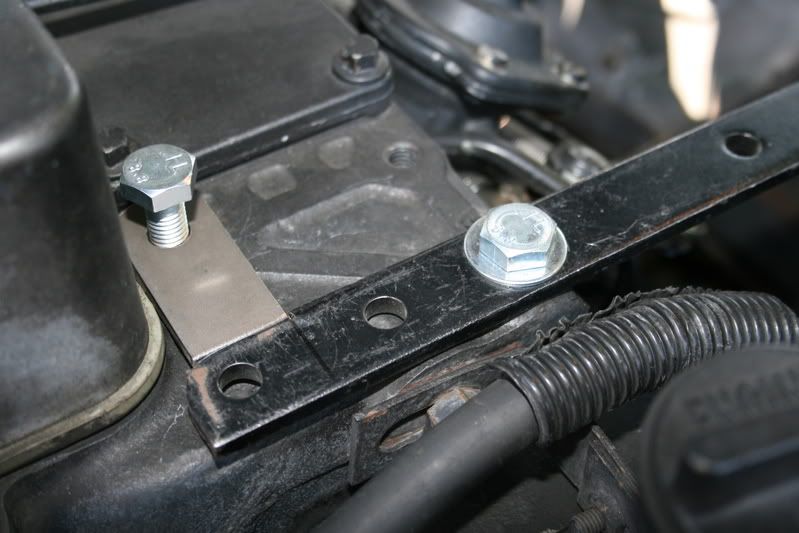
Now the paint is dry and we can now install the mounting bracket to the engine and secure it using 2) 10mm 1.5x20mm Metric Bolts and washers (also from Home Depot)

Now comes the Filter Head, the one I am using is made by Fleetguard and is P.N. #204163-S I paid $20.93 from my local Heavy Duty Truck Parts.
There are many different manufactures that make these so your bracket will have to be modified to suit the mounting configuration.
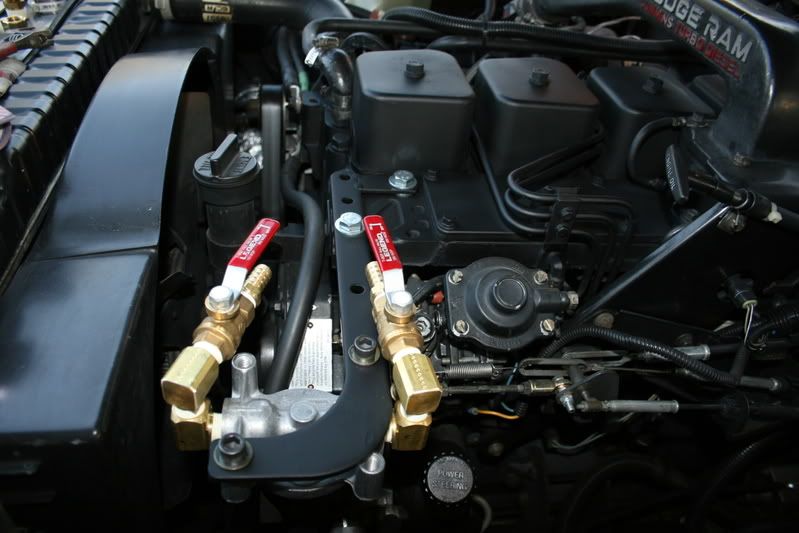
Here I started installing the Street Ells and shut off valves into the head and then after I had them in the correct positions I tightened the bolts securing the head to the bracket.

Another angle showing how the hoses will flow gracefully across the bracket.
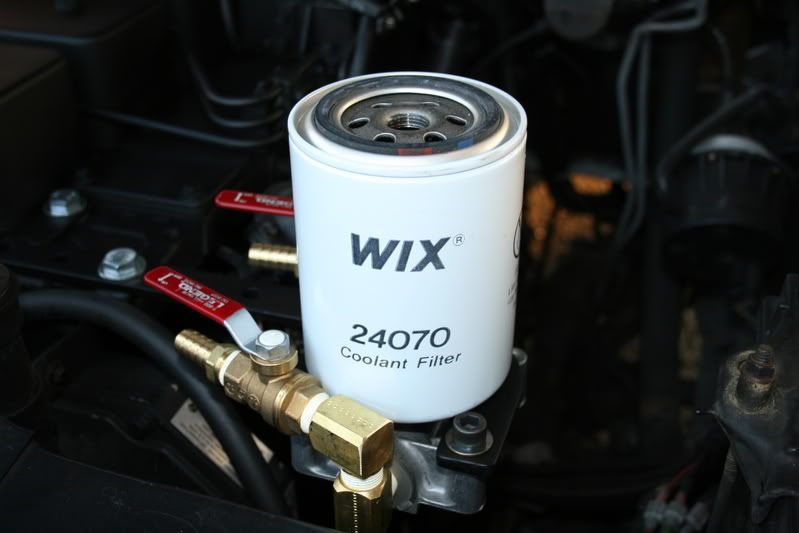
This is the filter I chose for the initial installation, it is a WIX #24070 and it is a straight filter meaning it has no SCA additives.
After I run this for a few months and filter out the system I am going to use a SCA filter for corrosion protection.
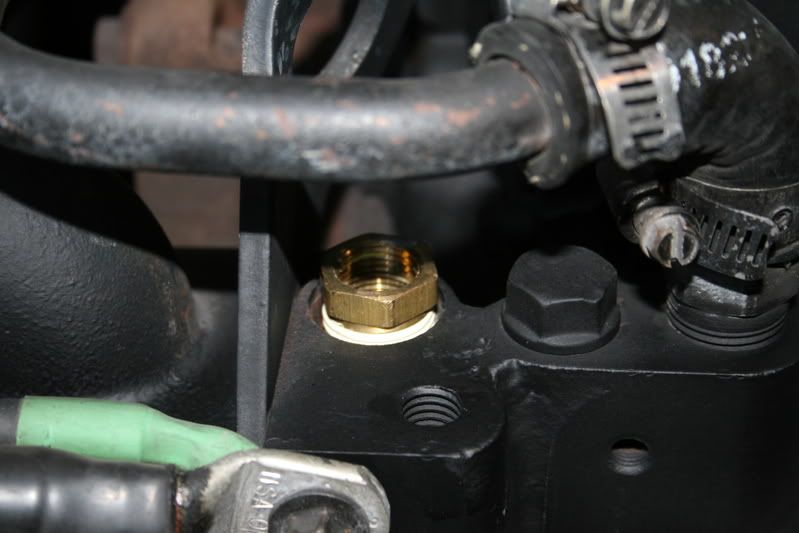
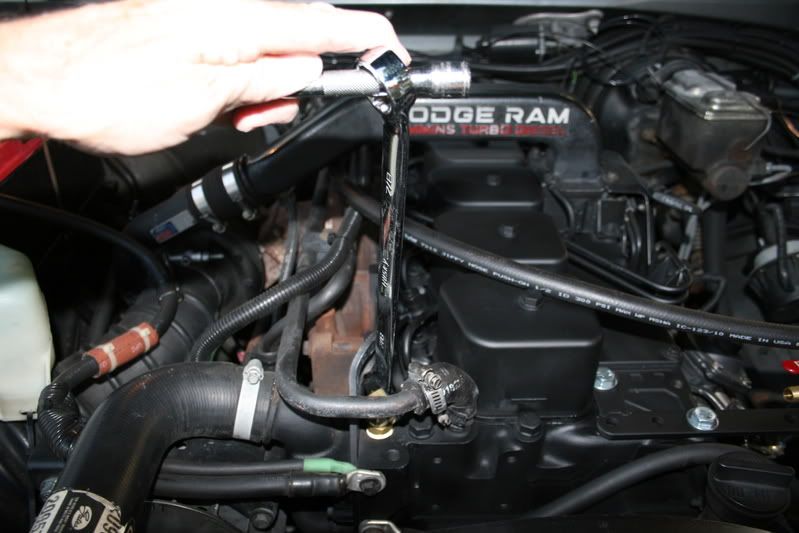
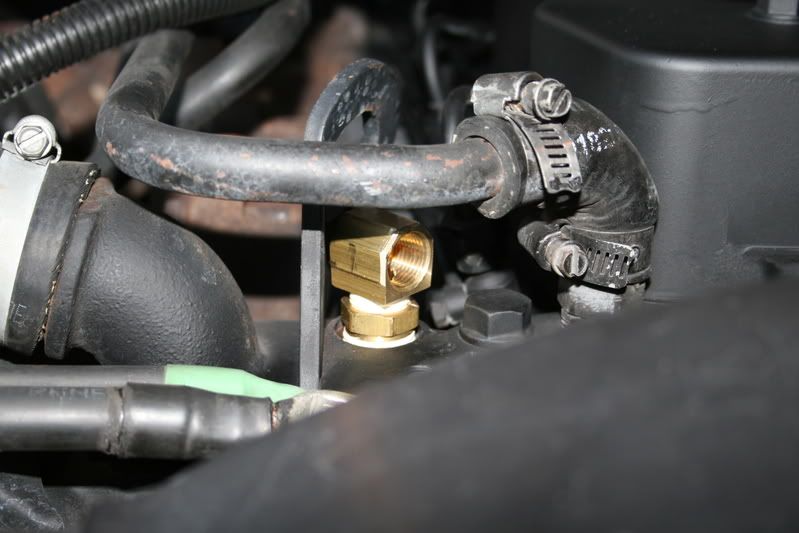
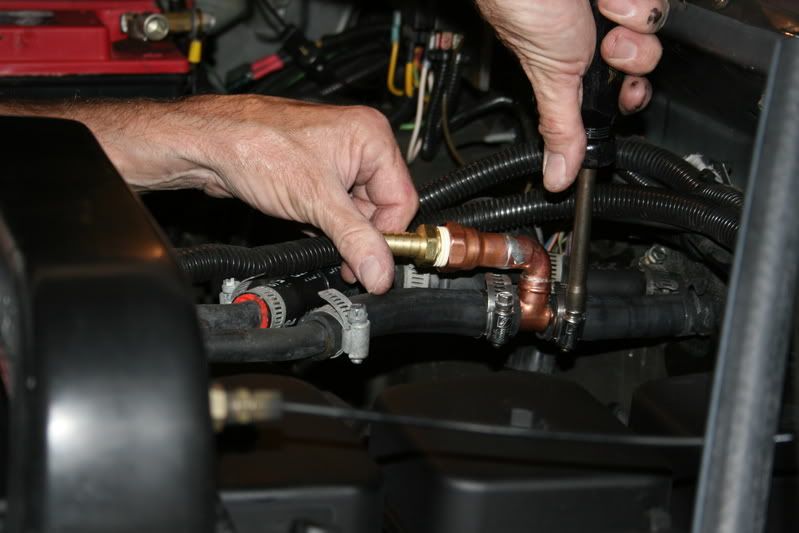
Next step is to remove the �� male pipe plug from the block, it will take a 3/8� extension and a ratchet handle.
If you have never had this plug out before remove it carefully because it might be seized in the block.
You can see I have had mine out before and sealed it using Teflon Tape.
Then we install our bushing into the block using Teflon Tape for a seal.
This is a 3/8� x 1/2� FIPxMIP bushing.
This can be securely tightened using a deep socket.
Do not over tighten this bushing.
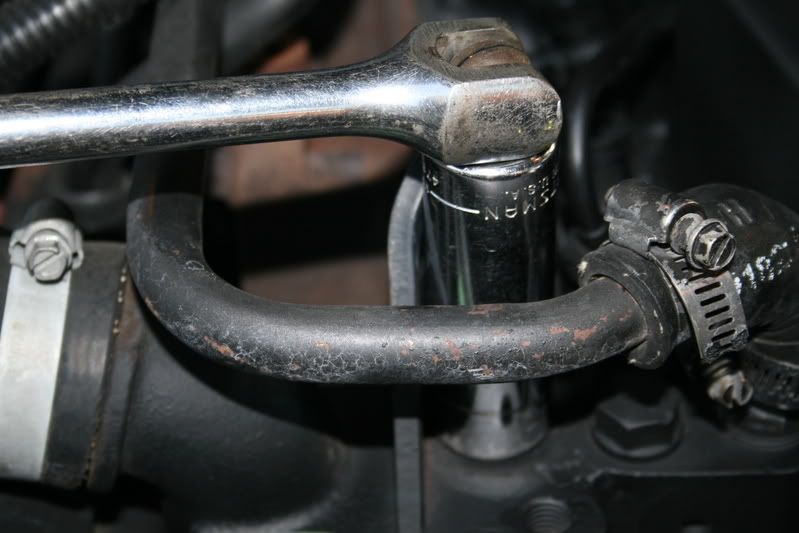
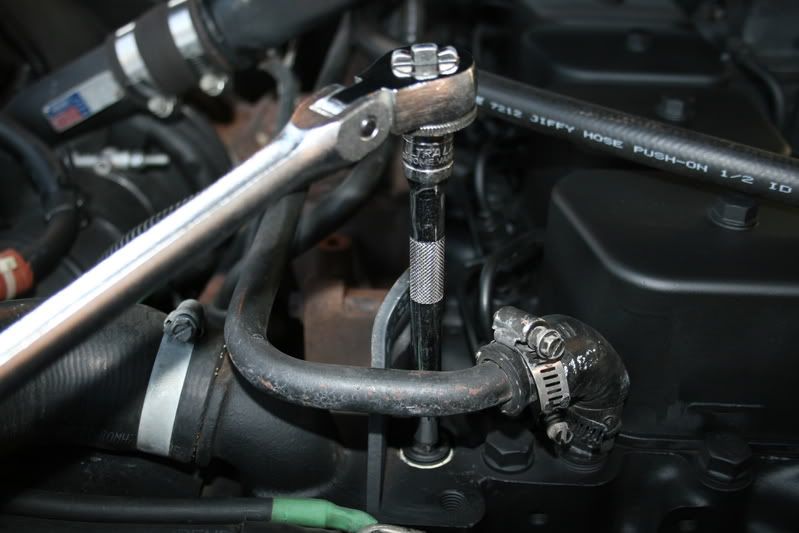
Then install the �short� 3/8� FIPxMIP Street Ell into the bushing and tighten.
I found it easy to tighten this fitting using a 7/8� wrench on the top of the fitting, go slow and easy.
This worked better than my Weatherhead socket.
This is a comparison of the 2 different Street Ells used in this project, notice how much narrower the top one is, we will need it like this because with it we can install it into the water outlet without removing the thermostat housing and lifting hook.
I found this at Home Depot it is manufactured by WATTS Part #A782 FIPxMIP 3/8� Street Elbow
Now the paint is dry and we can now install the mounting bracket to the engine and secure it using 2) 10mm 1.5x20mm Metric Bolts and washers (also from Home Depot)
Now comes the Filter Head, the one I am using is made by Fleetguard and is P.N. #204163-S I paid $20.93 from my local Heavy Duty Truck Parts.
There are many different manufactures that make these so your bracket will have to be modified to suit the mounting configuration.
Here I started installing the Street Ells and shut off valves into the head and then after I had them in the correct positions I tightened the bolts securing the head to the bracket.
Another angle showing how the hoses will flow gracefully across the bracket.
This is the filter I chose for the initial installation, it is a WIX #24070 and it is a straight filter meaning it has no SCA additives.
After I run this for a few months and filter out the system I am going to use a SCA filter for corrosion protection.
Next step is to remove the �� male pipe plug from the block, it will take a 3/8� extension and a ratchet handle.
If you have never had this plug out before remove it carefully because it might be seized in the block.
You can see I have had mine out before and sealed it using Teflon Tape.
Then we install our bushing into the block using Teflon Tape for a seal.
This is a 3/8� x 1/2� FIPxMIP bushing.
This can be securely tightened using a deep socket.
Do not over tighten this bushing.
Then install the �short� 3/8� FIPxMIP Street Ell into the bushing and tighten.
I found it easy to tighten this fitting using a 7/8� wrench on the top of the fitting, go slow and easy.
This worked better than my Weatherhead socket.
The following users liked this post:
w6pea (11-10-2018)
07-01-2008, 02:54 AM
#3
Administrator
Thread Starter
Part-3
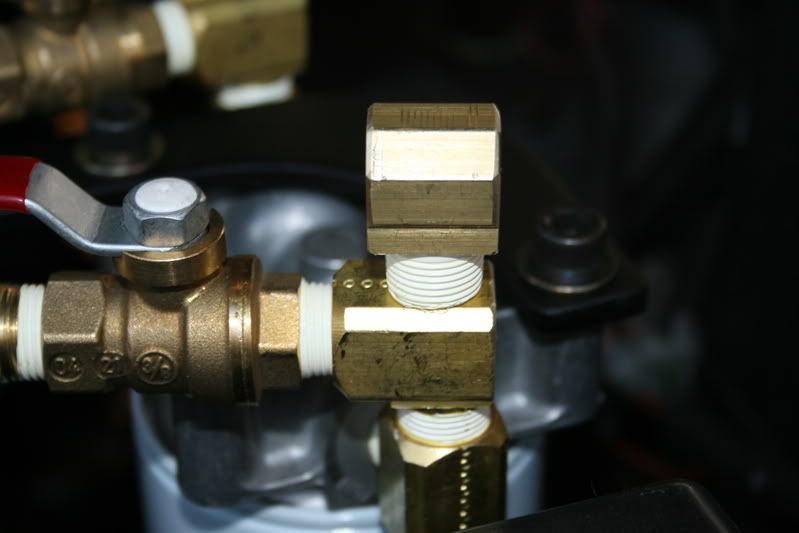
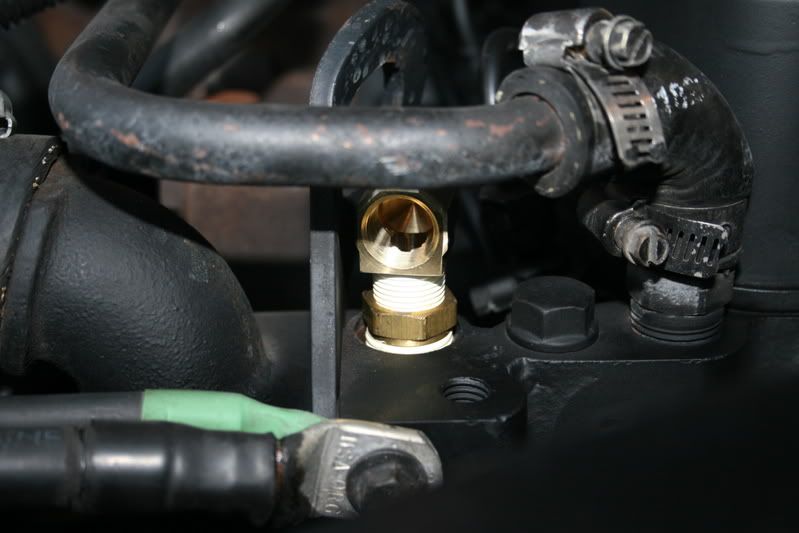
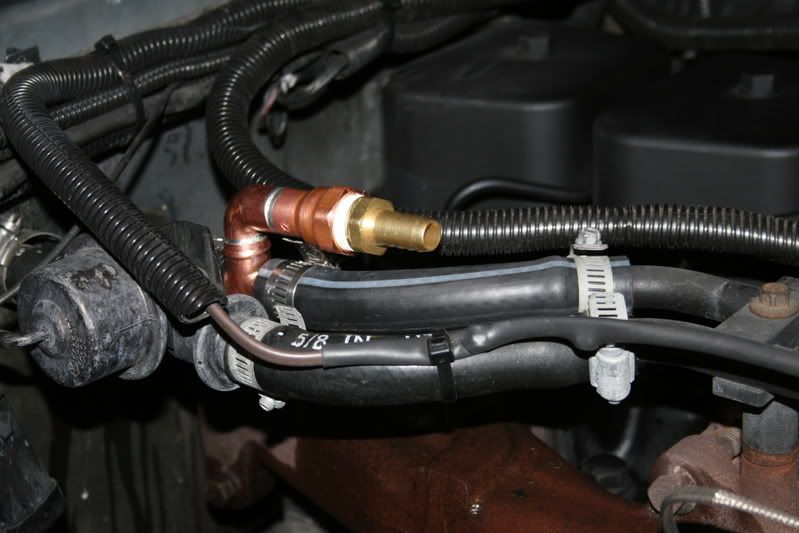
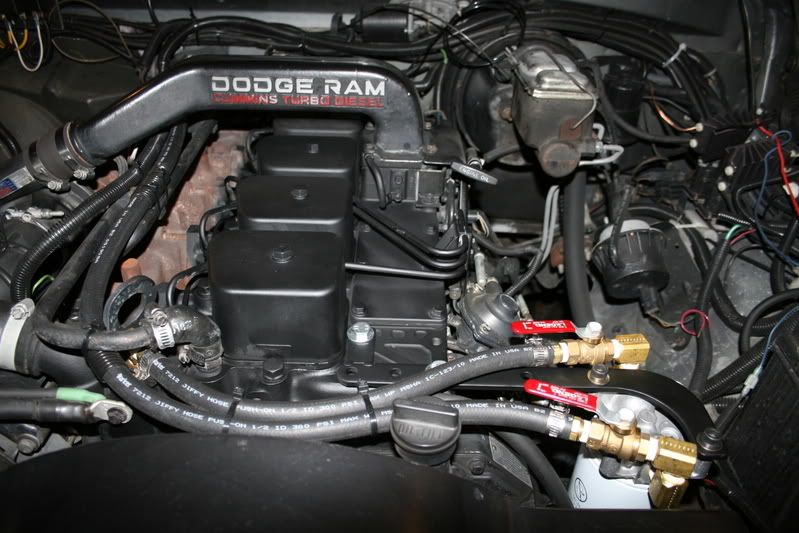
This fitting you will want to be pointing towards the drivers side headlight, it is not exact but you can move it after the next step for a final alignment.
Then you install the ��MIPx �� Hose Barb fitting.
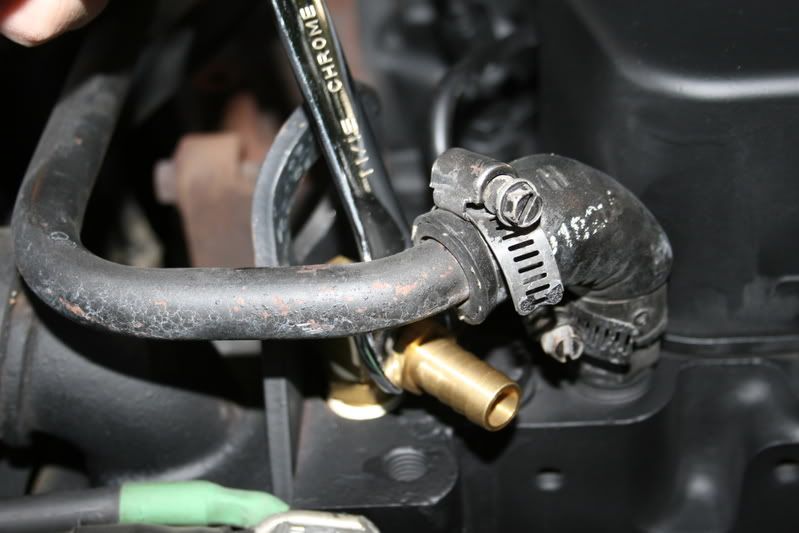
Using some of the �� hose connect it to the water outlet and then make a graceful curve and connect it into the Inlet of the filter head and secure it using #10 stainless steel clamps.
Do not over tighten.
The hose on the right is the return to the block and is where the filtered coolant will re enter the system.
Notice I have silicone hose.
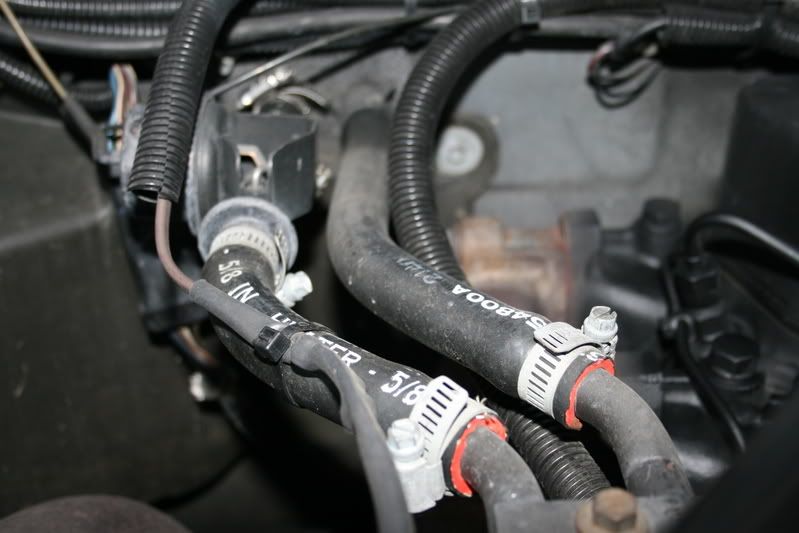
Use a short section of 5/8� Gates Green Stripe hose slip it over the outlet nipple of the heater core and then another short section of hose to continue on to the return pipe.
I am going to replace these hoses with Silicone hose next time I go to my supply house.
At $3.00 per foot I wanted to get the measurements right first.
Install the hose clamps but do not over tighten them.
I used the spring �Corbin� clamp on the heater side.
This is what my fitting looks like, it should point straight forward.
Then connect the free end of the �� hose to the hose barb and secure it using a clamp.
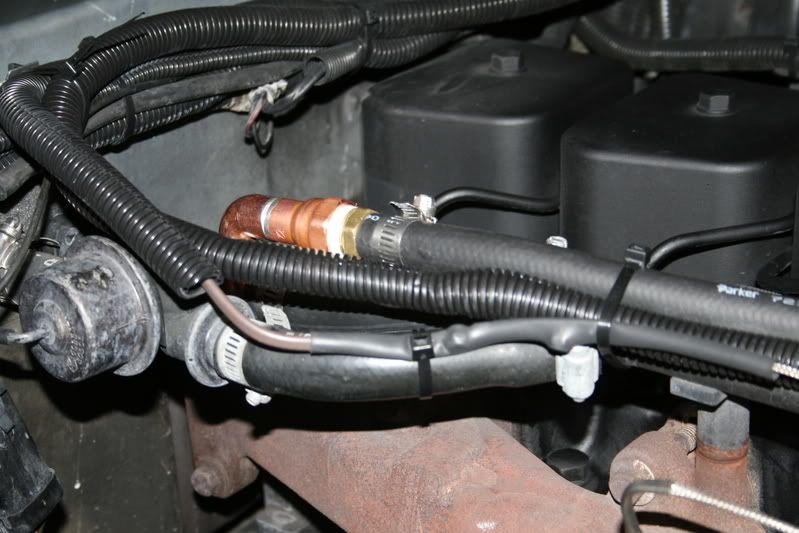
Route it along the top of the heater pipes and then under the front and across the front of the engine and then connect it to the Outlet of the filter head then install the clamp.
Be careful that the hoses do not come in contact with anything sharp, hot or any moving parts.
I installed sections of loom and secured them using Ty-Wraps
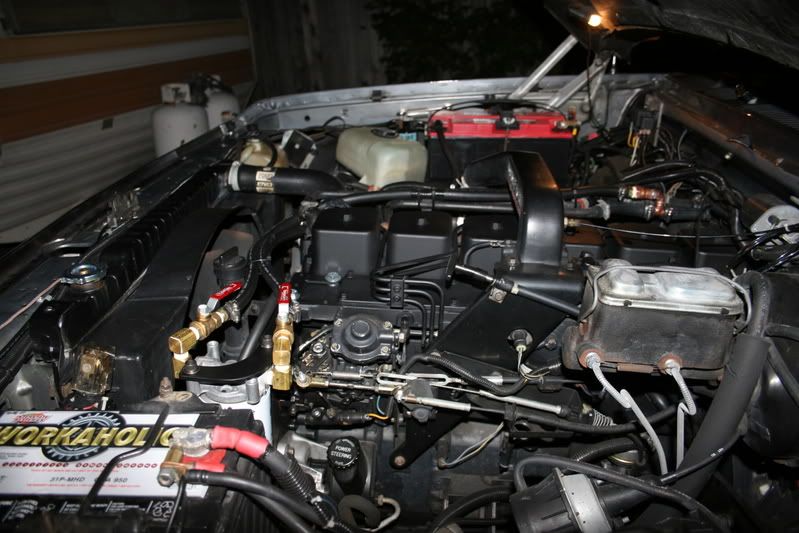
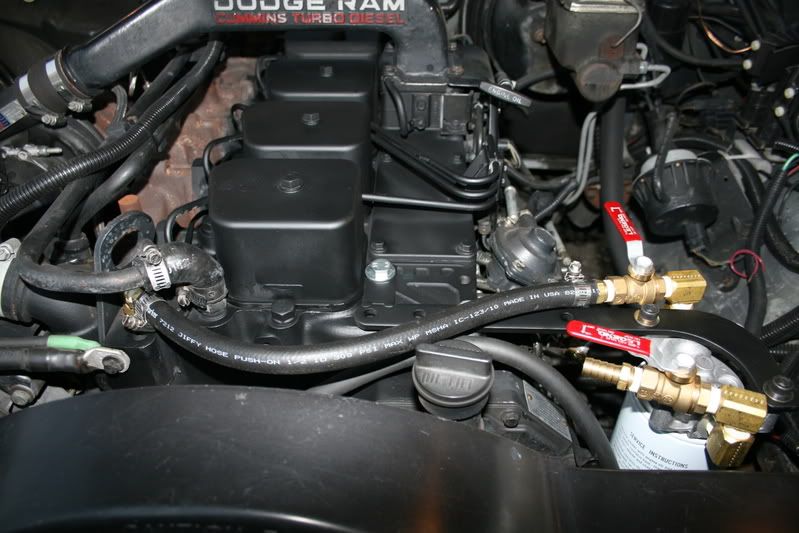
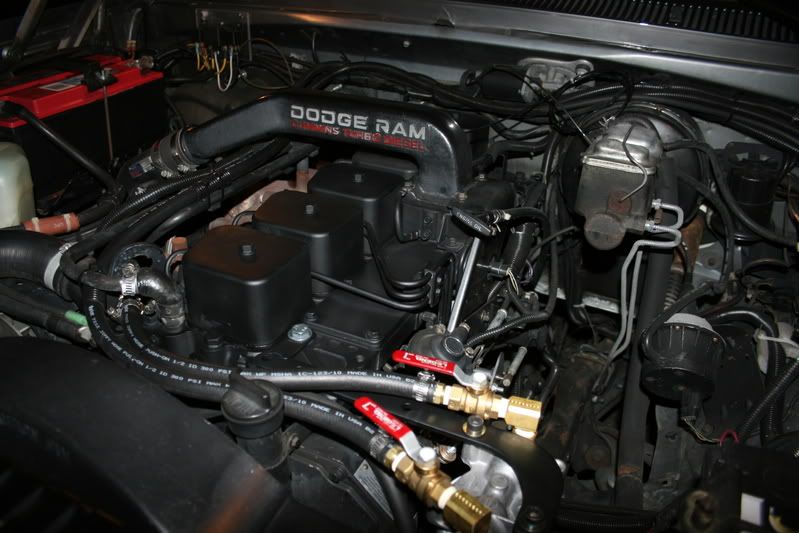
This is a look at the finished project. No it is not an accident that the gig line of the hoses are clocked the same.
All that is left is to install your filter, start the engine and allow it to warm up and then open the ball valves to allow the coolant to flow through the filter and start cleaning your coolant as you drive.
After the engine is up to operating temperature check and be sure to make up the coolant for the additional amount being used in the lines and filter element.
You can tell it is working when you carefully touch the canister and it is the same as the engine temperature.
As the filter becomes clogged it will begin to cool down and will be a signal that it will soon need to be replaced.
This filter is a Bypass style filter and only filters a small portion of the coolant on each pass.
But when the heater valve is in the closed position it forces more coolant through the filter and not the heater core.
This is what I had installed on my truck over the weekend, I hope it will give you the confidence to get the parts and install a filter on your truck.
List of materials:
Fleetguard W/F Head P.N. #204163-S @$20.93
Wix Filter P.N. #24070
1) �� copper �T�
1) �� copper street ell.
2) ��X 1 �� sections of copper pipe.
1) ��X 1� section of copper pipe.
1) �� Female adapter.
2) 5/8� compression sleeves.
2) 3/8� Ball Valves FIPxMIP
4) #10 Stainless Steel Hose Clamps
2) #12 Stainless Steel Hose Clamps
1) �� MIP x �� Hose Barb
4) 3/8� MIP x �� Hose Barb
4) 3/8� FIPxMIP Street Elbow
1) 3/8� FIPxMIP Street Elbow WATTS P.N.#A-782 (Home Depot)
1) 3/8� FIPx1/2�MIP Bushing
6� of �� High Temperature Hose I used Parker #7212 Jiffy Hose Push On
Teflon Tape (Yellow)
2) #10mm1.5x20mm Metric Bolts (Home Depot)
Misc. bolts to secure your particular filter head to the bracket.
Ty-Wraps and Loom to secure your hoses.
The only improvements I am going to make to this are I am going to install a sight glass in line with the output of the filter. (I am going to use a refergent sight glass) and I am going to install a Liquid Crystal thermometer to the side of the filter canister to monitor the inside temperature.
I am going to get these from my HVAC supplier.
If you have any questions about anything in this article please feel free to ask.
Again I hope you will find this information useful as I get my truck one step closer to being the perfect truck.
Thanks Jim
This fitting you will want to be pointing towards the drivers side headlight, it is not exact but you can move it after the next step for a final alignment.
Then you install the ��MIPx �� Hose Barb fitting.
Using some of the �� hose connect it to the water outlet and then make a graceful curve and connect it into the Inlet of the filter head and secure it using #10 stainless steel clamps.
Do not over tighten.
The hose on the right is the return to the block and is where the filtered coolant will re enter the system.
Notice I have silicone hose.
Use a short section of 5/8� Gates Green Stripe hose slip it over the outlet nipple of the heater core and then another short section of hose to continue on to the return pipe.
I am going to replace these hoses with Silicone hose next time I go to my supply house.
At $3.00 per foot I wanted to get the measurements right first.
Install the hose clamps but do not over tighten them.
I used the spring �Corbin� clamp on the heater side.
This is what my fitting looks like, it should point straight forward.
Then connect the free end of the �� hose to the hose barb and secure it using a clamp.
Route it along the top of the heater pipes and then under the front and across the front of the engine and then connect it to the Outlet of the filter head then install the clamp.
Be careful that the hoses do not come in contact with anything sharp, hot or any moving parts.
I installed sections of loom and secured them using Ty-Wraps
This is a look at the finished project. No it is not an accident that the gig line of the hoses are clocked the same.
All that is left is to install your filter, start the engine and allow it to warm up and then open the ball valves to allow the coolant to flow through the filter and start cleaning your coolant as you drive.
After the engine is up to operating temperature check and be sure to make up the coolant for the additional amount being used in the lines and filter element.
You can tell it is working when you carefully touch the canister and it is the same as the engine temperature.
As the filter becomes clogged it will begin to cool down and will be a signal that it will soon need to be replaced.
This filter is a Bypass style filter and only filters a small portion of the coolant on each pass.
But when the heater valve is in the closed position it forces more coolant through the filter and not the heater core.
This is what I had installed on my truck over the weekend, I hope it will give you the confidence to get the parts and install a filter on your truck.
List of materials:
Fleetguard W/F Head P.N. #204163-S @$20.93
Wix Filter P.N. #24070
1) �� copper �T�
1) �� copper street ell.
2) ��X 1 �� sections of copper pipe.
1) ��X 1� section of copper pipe.
1) �� Female adapter.
2) 5/8� compression sleeves.
2) 3/8� Ball Valves FIPxMIP
4) #10 Stainless Steel Hose Clamps
2) #12 Stainless Steel Hose Clamps
1) �� MIP x �� Hose Barb
4) 3/8� MIP x �� Hose Barb
4) 3/8� FIPxMIP Street Elbow
1) 3/8� FIPxMIP Street Elbow WATTS P.N.#A-782 (Home Depot)
1) 3/8� FIPx1/2�MIP Bushing
6� of �� High Temperature Hose I used Parker #7212 Jiffy Hose Push On
Teflon Tape (Yellow)
2) #10mm1.5x20mm Metric Bolts (Home Depot)
Misc. bolts to secure your particular filter head to the bracket.
Ty-Wraps and Loom to secure your hoses.
The only improvements I am going to make to this are I am going to install a sight glass in line with the output of the filter. (I am going to use a refergent sight glass) and I am going to install a Liquid Crystal thermometer to the side of the filter canister to monitor the inside temperature.
I am going to get these from my HVAC supplier.
If you have any questions about anything in this article please feel free to ask.
Again I hope you will find this information useful as I get my truck one step closer to being the perfect truck.
Thanks Jim
The following users liked this post:
w6pea (11-10-2018)
07-01-2008, 06:41 AM
#4
Registered User
Wow, very well photographed and described. Excellence as always, sir! I sure hope I never see the day when you announce your leaving for the third generation. I suppose that won't be until you run out of re-engineering our trucks.

 07-01-2008, 02:34 PM
#7
Registered User

Join Date: Apr 2007
Location: Central Mi
Posts: 666
Likes: 0
Received 0 Likes
on
0 Posts
And by the time he gets through re-engineering our trucks he'll have too much invested to upgrade to a newer model, let alone a new one....
Seriously Jim, do you stay awake at night thinking " what can I do to make
--------( fill in the blank ) better "

Keep it up. I've used a couple of your ideas and DO like them..
Trending Topics
07-02-2008, 01:18 AM
#8
Registered User

 Another good job by Mr. Lane !!!
Is that the black hose with red lining ??
The wife's truck is plumbed with the same black-hose/red-lining; I thought it looked cool and have looked all over for a source to buy more.
I am going to install a sight glass in line with the output of the filter.
I have one that I bought years ago that I intend to convert into a fuel-line sight-glass; much larger ones are available that would be suitable for heater-hose.
07-02-2008, 04:30 AM
#9
Administrator
Thread Starter
2nd that...
And by the time he gets through re-engineering our trucks he'll have too much invested to upgrade to a newer model, let alone a new one....
Seriously Jim, do you stay awake at night thinking " what can I do to make
--------( fill in the blank ) better "
Keep it up. I've used a couple of your ideas and DO like them..
When I get some time I will have to get all of my receipts and add them up.
I love this truck and if someone wanted to trade me straight across for a 3rd. Gen I would not take it although I would like the soft ride of the new ones.
Almost every day I somewhere I will get a compliment on how nice it looks, and this kinda makes me proud.
I actually do a lot of my best thinking in the middle of the night and lately I have been doing some of my work on the truck after midnight.
Jim
07-02-2008, 05:14 AM
#10
Administrator
Thread Starter
Another good job by Mr. Lane !!!
Is that the black hose with red lining ??
Yes
The wife's truck is plumbed with the same black-hose/red-lining; I thought it looked cool and have looked all over for a source to buy more.
I am going to use either Gates Silicone Hose, or some Blue hose I can get from my other supplier.
http://www.gates.com/europe/brochure...cation_id=5197
http://www.boostcontroller.com/index.php?category=154
You are also supposed to use a special hose clamp that has a continuous band under the worm gear to protect the outer jacket.
Silicone hose is considered a Lifetime Hose and should last the life of the application
Another idea is really cool and looks really neat is to look in one of the racing catalogs, such as Sumthat mit Racing or JEGs or the like, and buy one of those clear glass-tube fuel-filters with the chrome ends, remove the filter element, and install the filter-less clear glass housing in whatever line you want to observe.
I have one that I bought years ago that I intend to convert into a fuel-line sight-glass; much larger ones are available that would be suitable for heater-hose.
I actually have one of those but I do not really trust it with the hot coolant although the pressure would be low I would be afraid of the glass part shattering.
I already have the first 2 of these but they have a moisture indicator built in, it will just show I have excessive moisture in my coolant all of the time.
http://www.grainger.com/Grainger/items/6X723
http://www.grainger.com/Grainger/items/6X720
This is the kind I was thinking about, I use these on my charging manifolds; these are the kind I used to have on the fuel line before the inj pump on my last GM 6.2 to check for air in the fuel.
http://www.grainger.com/Grainger/items/1U899
Jim
07-02-2008, 03:31 PM
#11
Registered User
Join Date: Apr 2007
Location: Central Mi
Posts: 666
Likes: 0
Received 0 Likes
on
0 Posts
 DON'T ADD UP THE RECEIPTS !!
 Esp. if your wife can see the totals...
And I agree on the middle of the night...Now I don't have a garage or yard light to work on my truck after dark - so it's daylight only.
Currently I've 2 projects - 1 - Totally digital dash that fits into the original gauge housing; 2 - an HE351V microprocessor controlled with inputs from my digital dash, and if that works then an HE55V !
OOPS..Guess you can tell my background wasn't auto mechanics
07-02-2008, 06:54 PM
#12
Registered User
I am proud to find that out before I un-knowingly tossed those hoses in the dumpster and replaced with new ones; of course there is not much real danger in that, as I have never threw anything away in my life.
Well..........., I did throw away one item, many years ago, and needed it real bad a few months later; since then, I learned the error of my ways, and everything I have ever owned, and a lot of stuff others have tossed, is around here somewhere.
I actually have one of those but I do not really trust it with the hot coolant although the pressure would be low I would be afraid of the glass part shattering.
No need to fear; my cousin's old J.I.Case steam-engine has numerous real glass sight-glasses in various line-of-fire places, with nary a crack in any of them.
The 3rd Saturday in August we will test them again.

 07-03-2008, 12:02 AM
#14
Registered User
Join Date: Mar 2004
Location: Fair Oaks CA
Posts: 847
Likes: 0
Received 0 Likes
on
0 Posts
Jim, it all looks great, If I can see how you plumbed that filter, for it to function correctly, you want the block pressure flowing into the filter inlet and then the outlet to return to the head side pressure, the head gasket has orifices built into the coolant passages on the gasket to create the pressure differential between the block and head,
I may be wrong , but it looks like you have your return going to the outlet of the heater core which is block pressure(high) and the feed coming from the fitting close to your thermostat(low) and flowing the opposite of what you want for the filter to work correctly, easy fix if I am right , switch the hoses at the filter.
I may be wrong , but it looks like you have your return going to the outlet of the heater core which is block pressure(high) and the feed coming from the fitting close to your thermostat(low) and flowing the opposite of what you want for the filter to work correctly, easy fix if I am right , switch the hoses at the filter.
07-03-2008, 03:09 AM
#15
Administrator
Thread Starter
Jim, it all looks great, If I can see how you plumbed that filter, for it to function correctly, you want the block pressure flowing into the filter inlet and then the outlet to return to the head side pressure, the head gasket has orifices built into the coolant passages on the gasket to create the pressure differential between the block and head,
I may be wrong , but it looks like you have your return going to the outlet of the heater core which is block pressure(high) and the feed coming from the fitting close to your thermostat(low) and flowing the opposite of what you want for the filter to work correctly, easy fix if I am right , switch the hoses at the filter.
I may be wrong , but it looks like you have your return going to the outlet of the heater core which is block pressure(high) and the feed coming from the fitting close to your thermostat(low) and flowing the opposite of what you want for the filter to work correctly, easy fix if I am right , switch the hoses at the filter.
When I had flushed out the system last week I removed the plug from the head behind the thermostat and started the engine and the water was pumped out through the open port by the water pump, this is why I back flushed the block from this port because I was going against the normal flow.
You could be right about the return but the other hose that leads to the heater core is the one with the water valve to turn off the hot water and it originates from the same place I am getting the supply from, it would not make much sense to stop the hot water after the heater core because the whole idea is to keep the heat out of the cab.
The way that I know it is working is because I can shut the valves off until the engine is up to temperature and then when I open them the filter immediately comes up to coolant temperature.
If I did not have a sufficient pressure differential the hot coolant would not flow.
I do understand what you are saying about the restrictor.
On the top of the filter head I made sure the coolant flows in the direction of the arrows.
I did not want to disturb any of the plumbing for the trans cooler.
I have seen a lot of coolant kits that simply connect in between the 2 coolant lines to the heater core.
I am going to stop by and see my friend that owns my local Radiator Shop and see what he says.
As part of my preventive maintence program I am going to have him build me a new radiator soon.
I do not like to wait until after something is broken until I fix it.
Like I said, I could be wrong and if there is a better way please do let me know.
Jim