Beefing-Up My A518 Transmission (Updated As It Occurs)
 07-07-2010, 12:13 AM
#1
1st Generation Admin
Thread Starter
Folks, this isn't a "How-To" beef-up your trans type of thread. It's more of a how I beefed-up my trans thread.  Doing anything similar is at your own risk.
A little background . . .
- Three years ago (WOW!), after 230,000ish miles of normal wear plus some amateur drag racing, I did a general transmission overhaul, increased the clutch/steel count here and there, and a typical valve-body tuning. See: https://www.dieseltruckresource.com/....html?t=160276
The transmission worked very well, easily supporting about 244.2HP / 611.1ftlbs (on #2) to the ground. 1/8th ~ 9.67 @ 68.69 and 1/4 ~ 15.38 @ 86.12 (@ 6400lbs). OK, fine.
- Fast forward right at a year, after a bunch more bombing, I added a conservative set of twins (HX35 Hybrid / HT3B). That brought me up to 406HP / 840ft/lbs (on #2) to the ground. A couple of passes at the local 1/4 mile track had me at 13.90 @ 97.78. It was noted however that there was a little slipping of the intermediate clutch upon the initial engagement of 3rd and 4th gears. I think I might have slipped it about four times. (Hold That Thought). Massaging the valve-body a little fixed that.
- Fast forward to the 1st quarter of 2010, and I'm just shy of 450HP / 825ft/lbs (on #2) to the ground with a best 1/4 mile pass of 13.03.
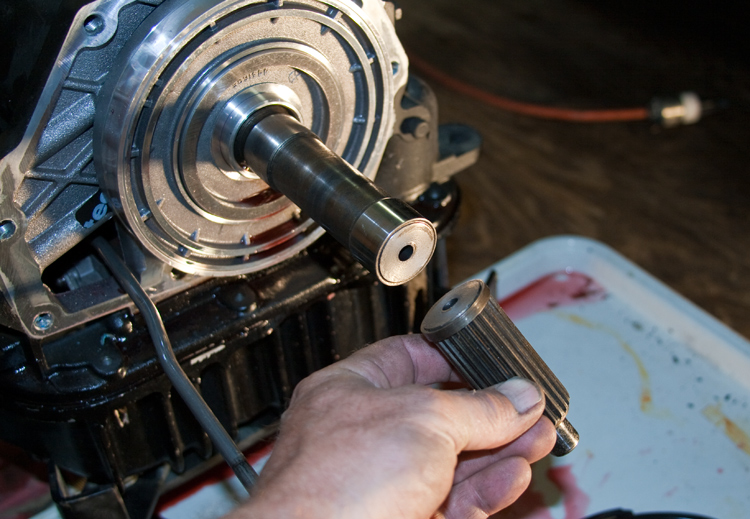
Yeah, well, I was tuning-up for an upcoming NADM event at Rockingham recently and broke the intermediate shaft just before the splines of the overdrive section.
Well, shoot! I can't really complain as the thing has given me faithful service for almost a quarter million miles. The last few have admittedly been brutal.
An initial tear-down reveals a couple of surprises along with the expected.
Clutches
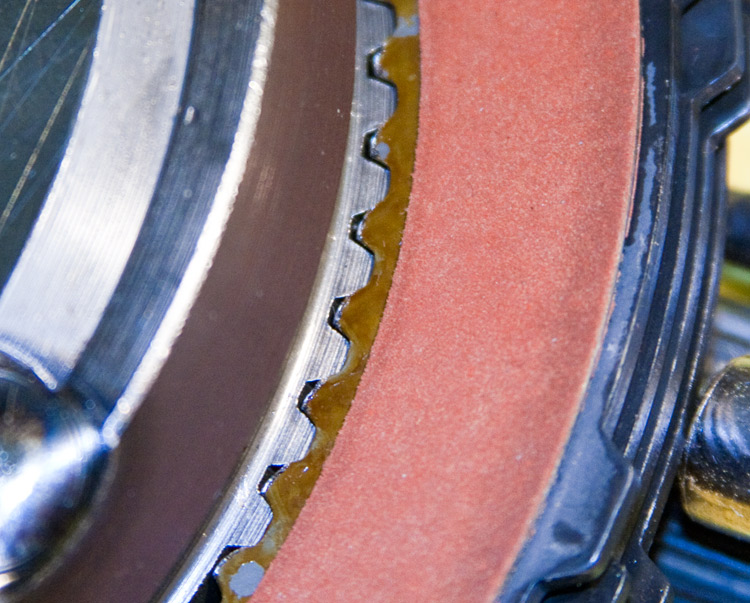
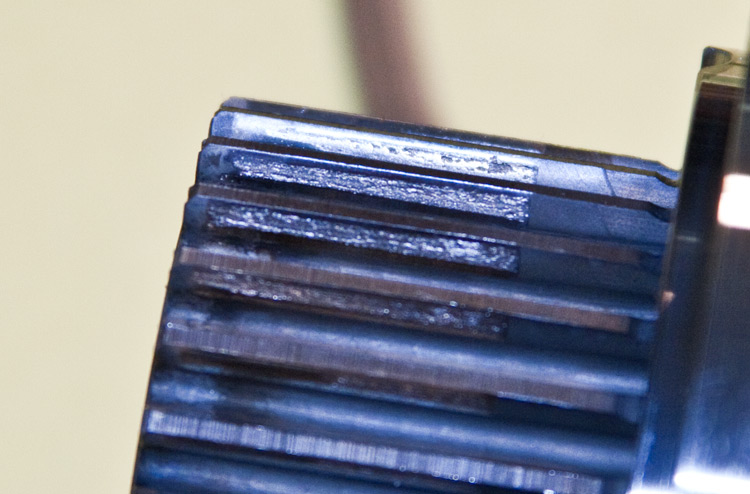
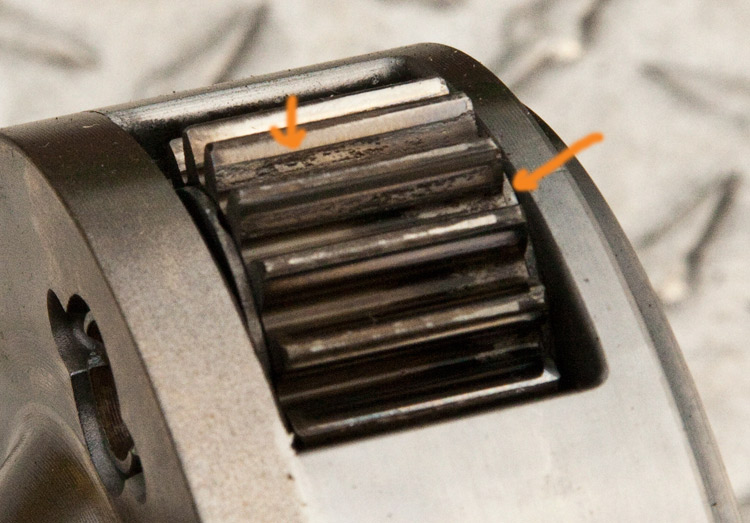
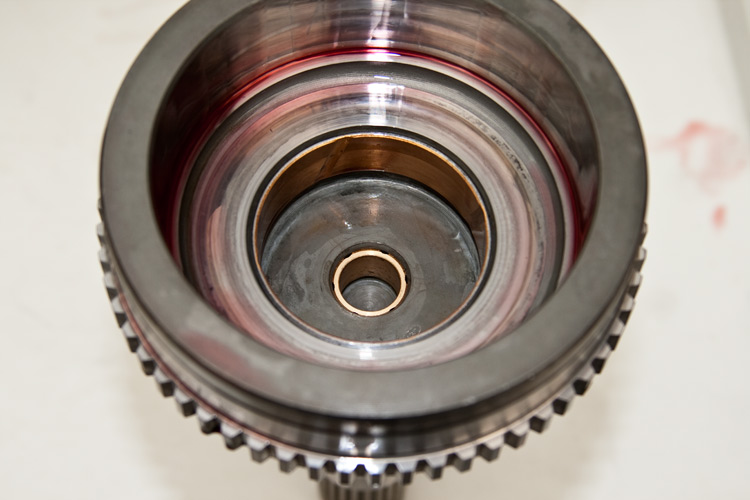
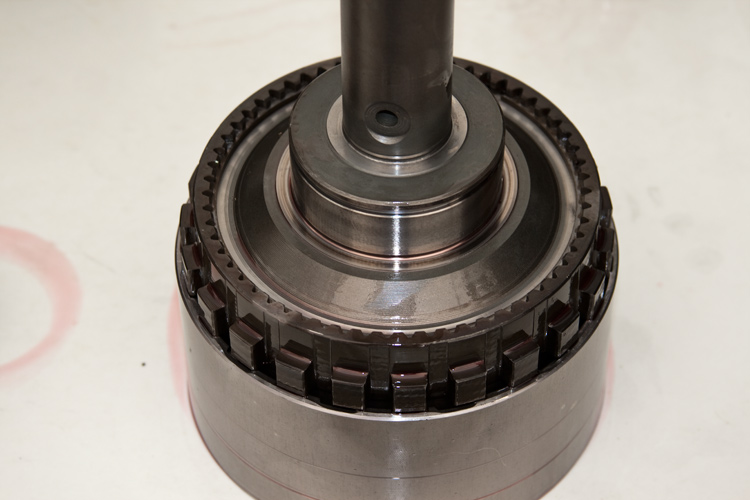
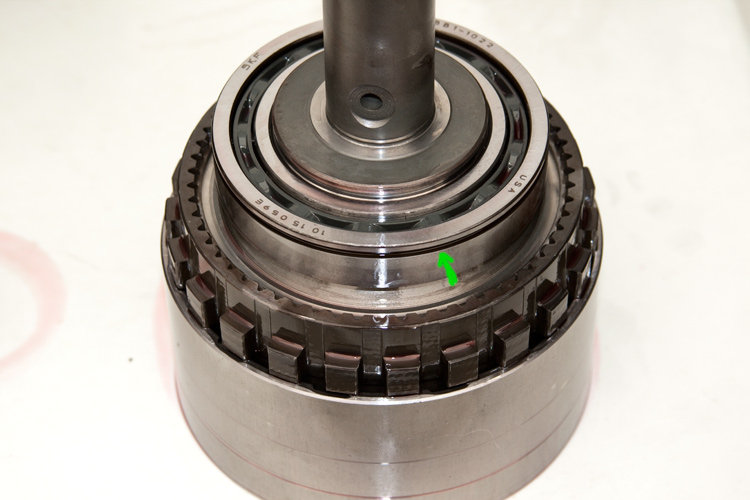
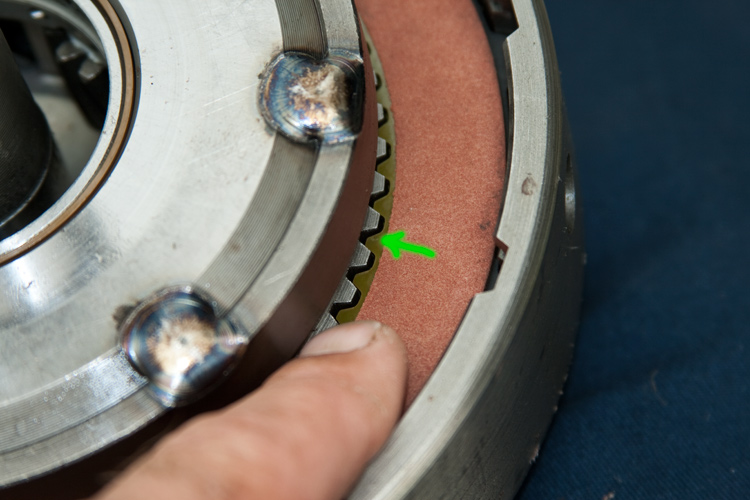
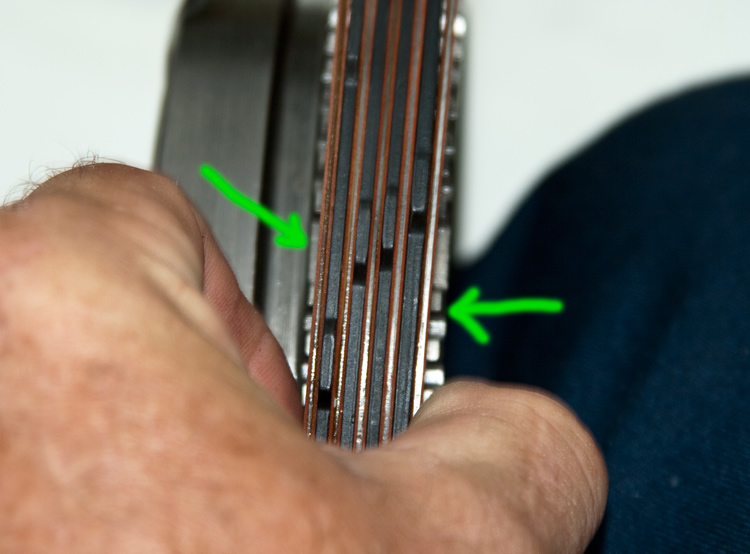
- My upgraded rear transmission clutch (that which makes the truck move forward / often called the Forward clutch) had an issue with one of the clutch discs not fully engaging it's associated hub. I had increased the clutch/steel count, and truthfully, "Assumed" things would fit (lesson learned). Note the outermost clutch disc's splines just at the edge of the hub. Riding like that, the operating loads presented effectively stripped the splines. See brown spline section .. . .
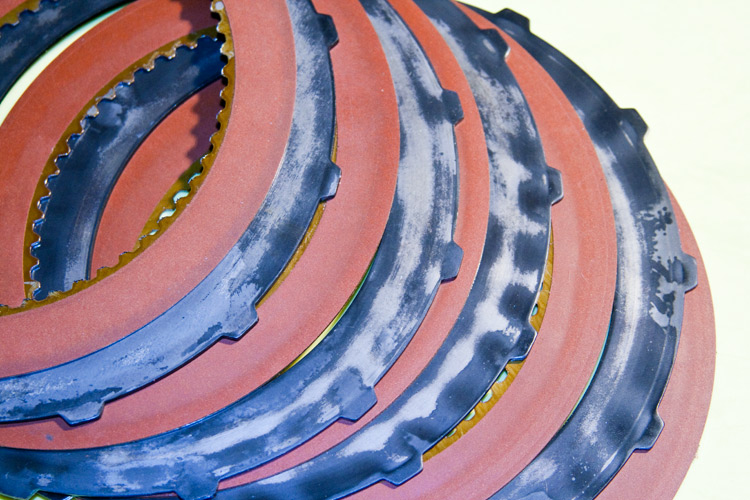
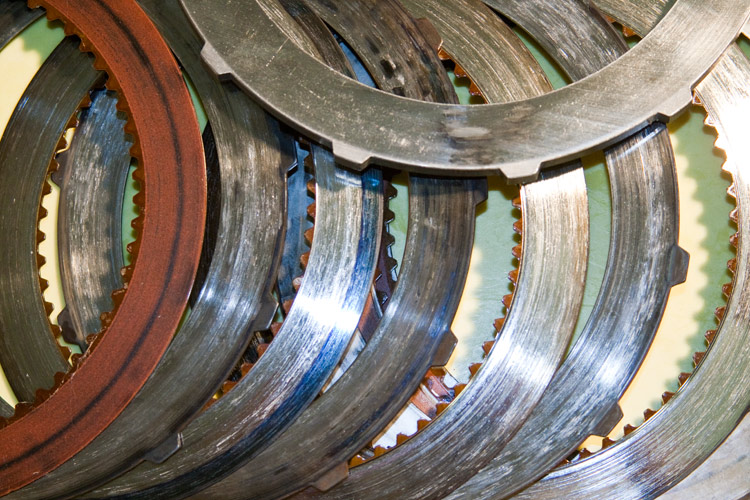
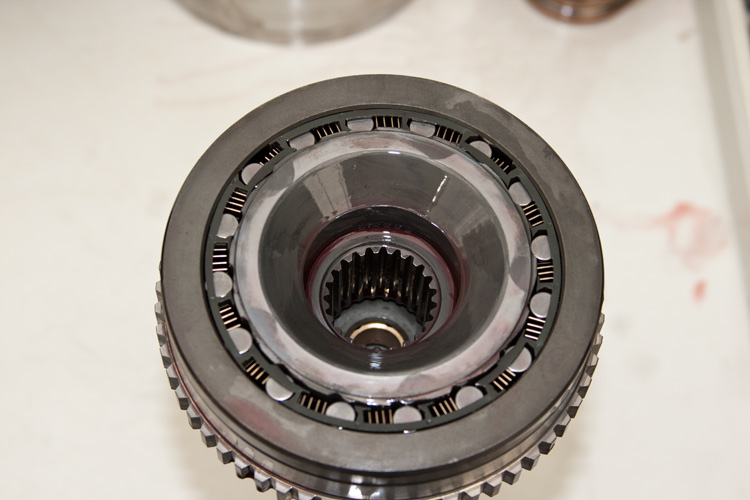
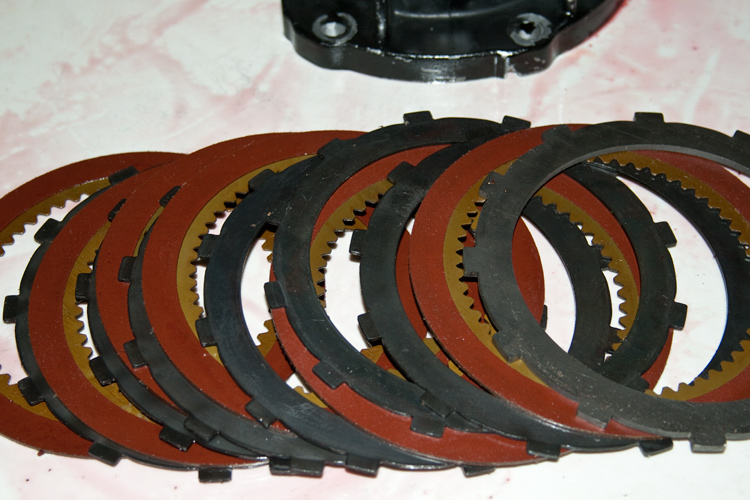
Otherwise, the clutches and steels look relatively OK. I'm hoping one of you more informed can help me cipher the wear patterns on the steels.
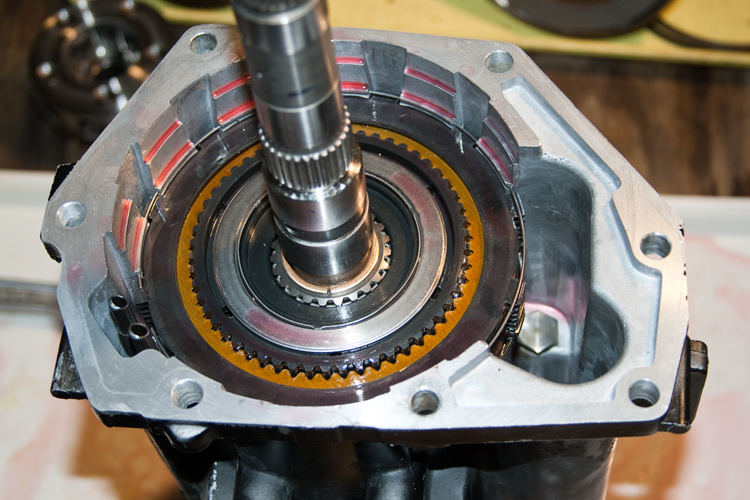
- Moving to the front of the transmission (that end closest to the converter), there's the front clutch (it engages with 3rd and Overdrive / often called the intermediate clutch). Like the rear clutch, I increased the clutch/steel count. Yeah, well, . . .. remember when I slipped that clutch with adding the twins? I burnt the stinky out of it. Interestingly, It's worked just fine since I tweaked the valve-body. I never knew there was a problem . . .. yet!
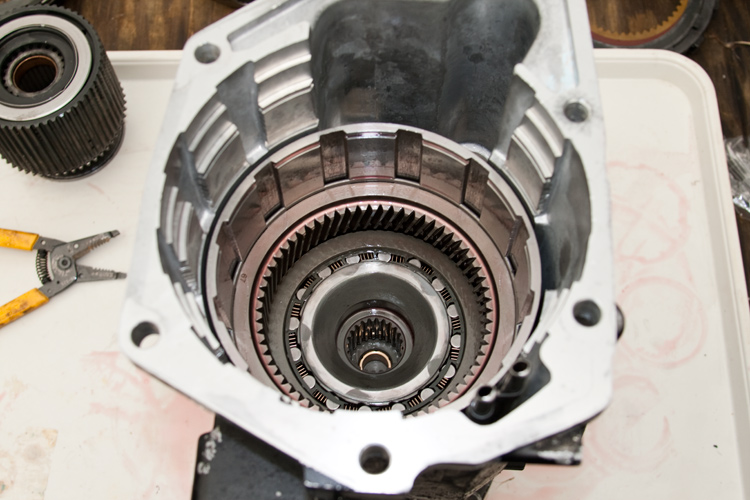
Planetary Gear-sets From front to back;
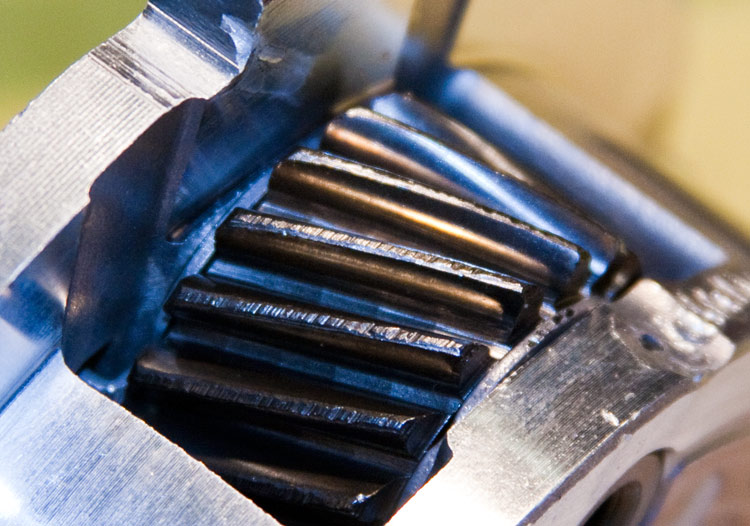
Of the three-speed transmission section, the front planetary gear-set was worn the most. The planet gears present with pitting in the root section of the teeth. Further, there's manually detectable slop with the planet shafts. I think it's standard wear-n-tear . . ..
The associated Sun-gear presents with some funky wear across the crowns of the teeth (it's internal bushings are worn as well) . . . .
That same Sun-gear is part of the rear planetary gear-set. Of the lot, it doesn't present with any apparent excessive wear short of that same funky crown wear . . . .
Doing anything similar is at your own risk.A little background . . .
- Three years ago (WOW!), after 230,000ish miles of normal wear plus some amateur drag racing, I did a general transmission overhaul, increased the clutch/steel count here and there, and a typical valve-body tuning. See: https://www.dieseltruckresource.com/....html?t=160276
The transmission worked very well, easily supporting about 244.2HP / 611.1ftlbs (on #2) to the ground. 1/8th ~ 9.67 @ 68.69 and 1/4 ~ 15.38 @ 86.12 (@ 6400lbs). OK, fine.
- Fast forward right at a year, after a bunch more bombing, I added a conservative set of twins (HX35 Hybrid / HT3B). That brought me up to 406HP / 840ft/lbs (on #2) to the ground. A couple of passes at the local 1/4 mile track had me at 13.90 @ 97.78. It was noted however that there was a little slipping of the intermediate clutch upon the initial engagement of 3rd and 4th gears. I think I might have slipped it about four times. (Hold That Thought). Massaging the valve-body a little fixed that.
- Fast forward to the 1st quarter of 2010, and I'm just shy of 450HP / 825ft/lbs (on #2) to the ground with a best 1/4 mile pass of 13.03.
Yeah, well, I was tuning-up for an upcoming NADM event at Rockingham recently and broke the intermediate shaft just before the splines of the overdrive section.
Well, shoot! I can't really complain as the thing has given me faithful service for almost a quarter million miles. The last few have admittedly been brutal.
An initial tear-down reveals a couple of surprises along with the expected.
Clutches
- My upgraded rear transmission clutch (that which makes the truck move forward / often called the Forward clutch) had an issue with one of the clutch discs not fully engaging it's associated hub. I had increased the clutch/steel count, and truthfully, "Assumed" things would fit (lesson learned). Note the outermost clutch disc's splines just at the edge of the hub. Riding like that, the operating loads presented effectively stripped the splines. See brown spline section .. . .
Otherwise, the clutches and steels look relatively OK. I'm hoping one of you more informed can help me cipher the wear patterns on the steels.
- Moving to the front of the transmission (that end closest to the converter), there's the front clutch (it engages with 3rd and Overdrive / often called the intermediate clutch). Like the rear clutch, I increased the clutch/steel count. Yeah, well, . . .. remember when I slipped that clutch with adding the twins? I burnt the stinky out of it. Interestingly, It's worked just fine since I tweaked the valve-body. I never knew there was a problem . . .. yet!
Planetary Gear-sets From front to back;
Of the three-speed transmission section, the front planetary gear-set was worn the most. The planet gears present with pitting in the root section of the teeth. Further, there's manually detectable slop with the planet shafts. I think it's standard wear-n-tear . . ..
The associated Sun-gear presents with some funky wear across the crowns of the teeth (it's internal bushings are worn as well) . . . .
That same Sun-gear is part of the rear planetary gear-set. Of the lot, it doesn't present with any apparent excessive wear short of that same funky crown wear . . . .
 07-07-2010, 12:14 AM
#2
1st Generation Admin
Thread Starter
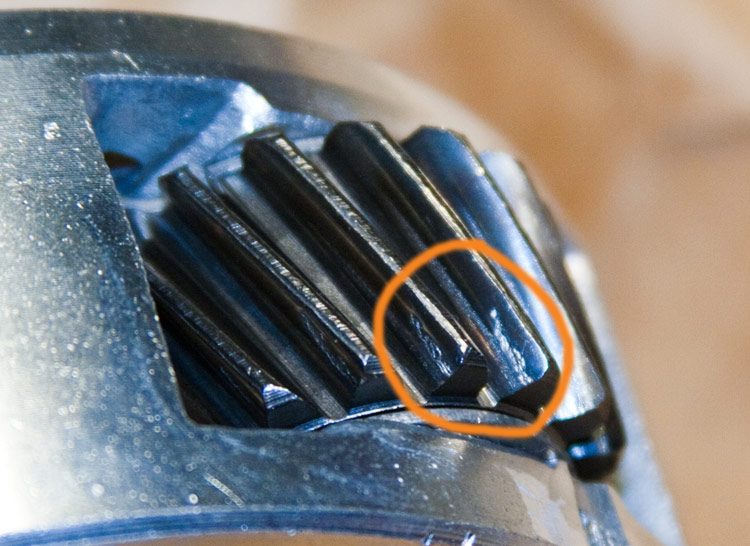
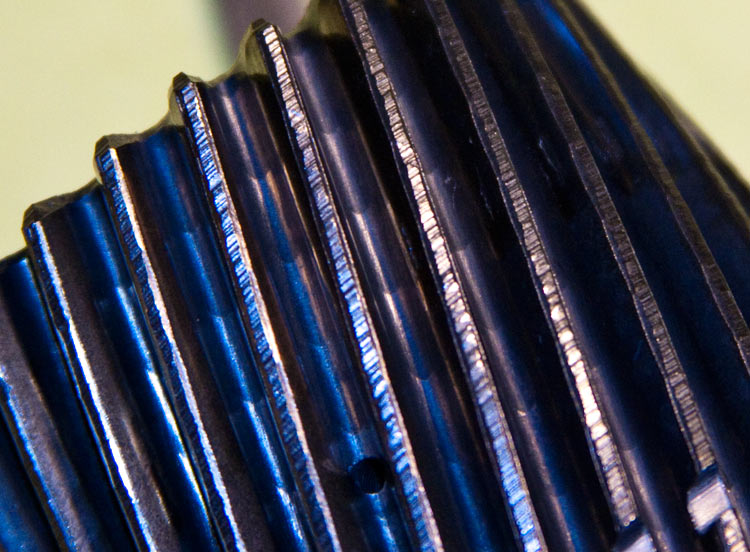
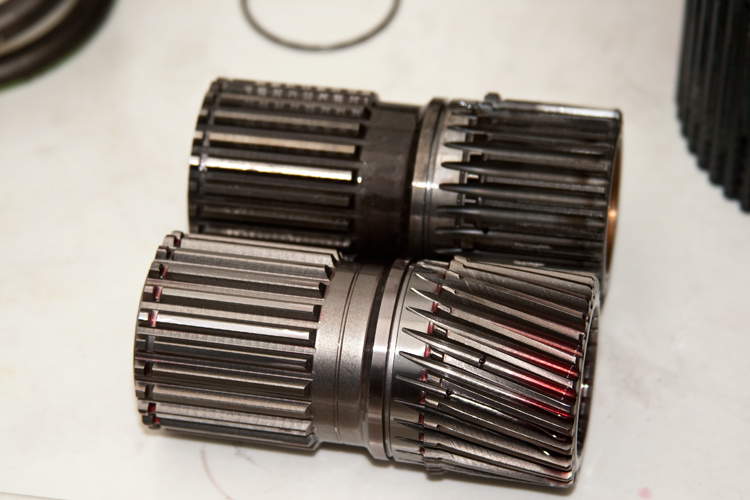
Moving on back to the Overdrive section finds a few concerns. The Sun-gear presents with substantial galling of the upper portions of the teeth faces as well as some pitting in the roots of others . . .
The overdrive planet gears present with similar, albeit lighter galling with heavy pitting in many teeth . . . .
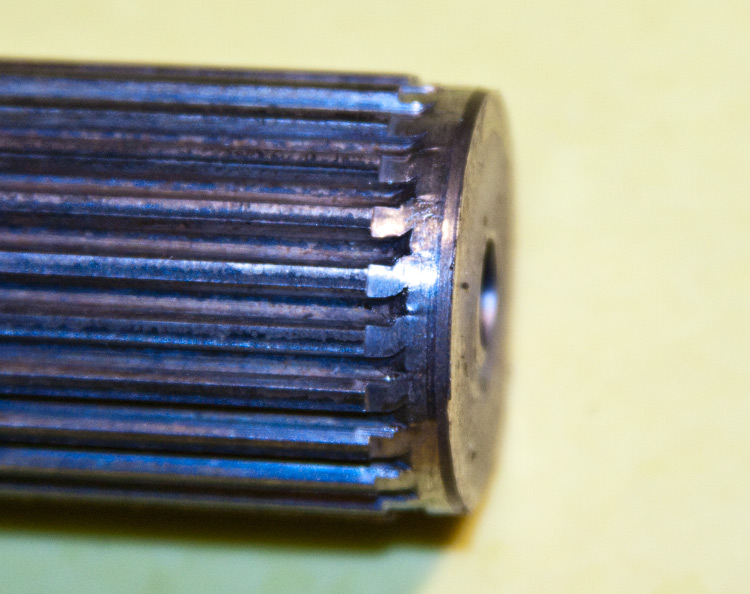
I can feel some slop in the front of the output shaft's assembly in the OD section. I've got to check all that still. I'm thinking that during the heat of coming off the line with over 20psig of boost, somewhere around the top of 1st and going to 2nd, the slop of all the overdrive's planetary gear-set (and the general area), the intermediate shaft was perhaps allowed to flex (or maybe forced). With that, the shaft popped in the root of a groove in the shaft that holds a spacer ring. Immediately adjacent to the main fracture, one can see the splines had begun to twist. Those splines to the left of the twist are what actually engage the overdrive planetary carrier.
I'm thinking that in general, those hard-parts above were on their last leg with the pitting/slop and would have needed replacement/overhaul soon anyway. I just as well bomb it while I'm there.
Lessons learned with the first rebuild mandate I start with the overdrive section. Stay tuned.
The overdrive planet gears present with similar, albeit lighter galling with heavy pitting in many teeth . . . .
I can feel some slop in the front of the output shaft's assembly in the OD section. I've got to check all that still. I'm thinking that during the heat of coming off the line with over 20psig of boost, somewhere around the top of 1st and going to 2nd, the slop of all the overdrive's planetary gear-set (and the general area), the intermediate shaft was perhaps allowed to flex (or maybe forced). With that, the shaft popped in the root of a groove in the shaft that holds a spacer ring. Immediately adjacent to the main fracture, one can see the splines had begun to twist. Those splines to the left of the twist are what actually engage the overdrive planetary carrier.
I'm thinking that in general, those hard-parts above were on their last leg with the pitting/slop and would have needed replacement/overhaul soon anyway. I just as well bomb it while I'm there.
Lessons learned with the first rebuild mandate I start with the overdrive section. Stay tuned.


Trending Topics
07-08-2010, 08:52 PM
#9
1st Generation Admin
Thread Starter
 07-08-2010, 09:08 PM
#10
1st Generation Admin
Thread Starter
Digging into the overdrive section tonight had that little bushing that supports the absolute tail of the intermediate shaft literally fall out. See below next to the broken shaft that plugs into it . . .
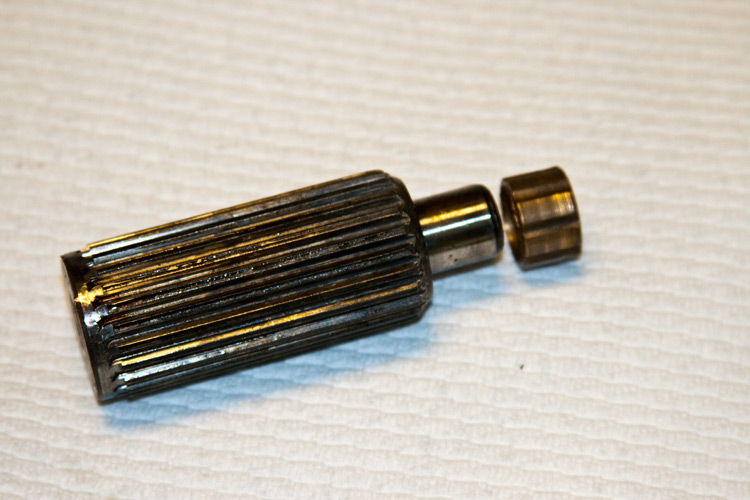
Closer inspection of that bushing reveals it has been wallowed out. I'm thinking that, combined with the slop in the OD planetary assembly allowed the intermediate shaft to flop around some . . . . >SNAP<. It appears as though it were spinning in its bore as well.

>Sigh< Back to the parts house.
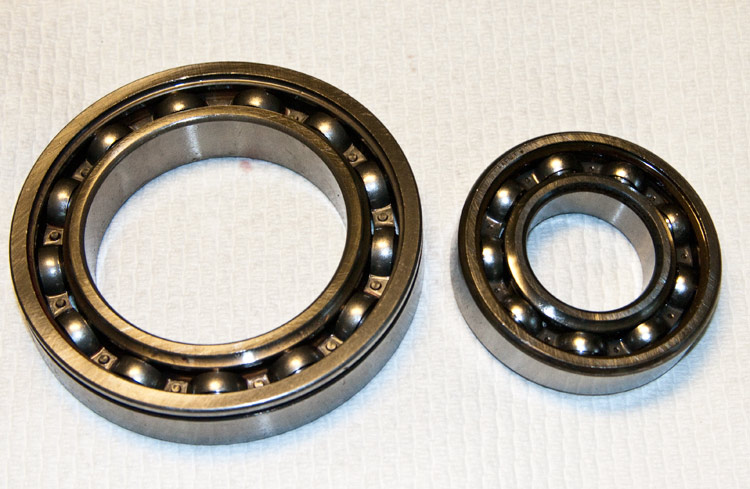
While not worn obviously, those two ball-bearings that support the output shaft, don't feel right when I spin them on my fingers. It seems there's some slop in the sides of the ball races. I'll replace them as well.
Closer inspection of that bushing reveals it has been wallowed out. I'm thinking that, combined with the slop in the OD planetary assembly allowed the intermediate shaft to flop around some . . . . >SNAP<. It appears as though it were spinning in its bore as well.
>Sigh< Back to the parts house.
While not worn obviously, those two ball-bearings that support the output shaft, don't feel right when I spin them on my fingers. It seems there's some slop in the sides of the ball races. I'll replace them as well.
 07-11-2010, 01:33 AM
#12
1st Generation Admin
Thread Starter
I managed to get some work done on the Overdrive section today.
NOTE: My stock/OEM overdrive planetary gear-set is made with Spur type gears (straight-cut). My planet and sun gears are considerably pitted and in need of repair at best. It seems replacement assemblies are made of unobtainium. It's been suggested that one can get some planet gears from a gasser trans and renew the carrier but overall, readily available replacement spur planetary stuff is expensive as fire!
On the other hand, relatively inexpensive upgrade kits are readily available that include 5 & 6-pinion steel carriers, as well as the associated annulus and sun gears. Made for the newer trucks running the 47 and 48 series transmissions. They come with either 15 or 22 degree Helical teeth. The steeper the angle of the teeth, the quieter the gear noise.
By default, it's suggested the spur teeth are the strongest. With that, The big-dog trans builders I talked with agreed the 15 degree type would be the best alternative. That's what I went with in a steel 6-pinion carrier.
After cleaning everything, it's pretty much just swapping in the new parts.
So . . . ..
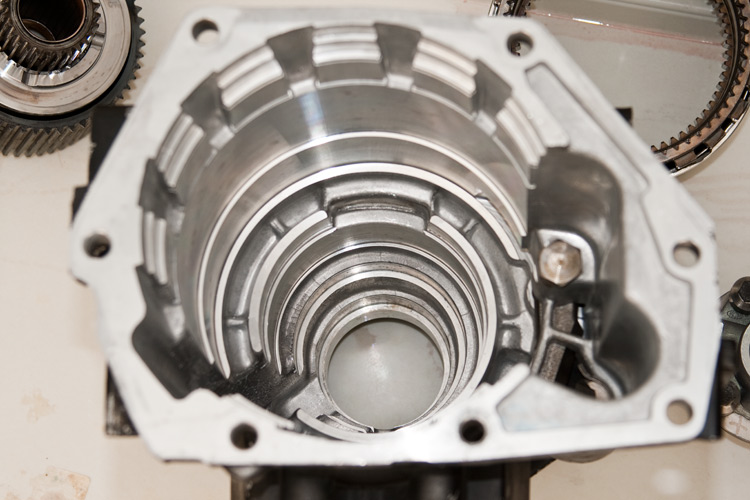
Starting with a clean overdrive section case . .. .
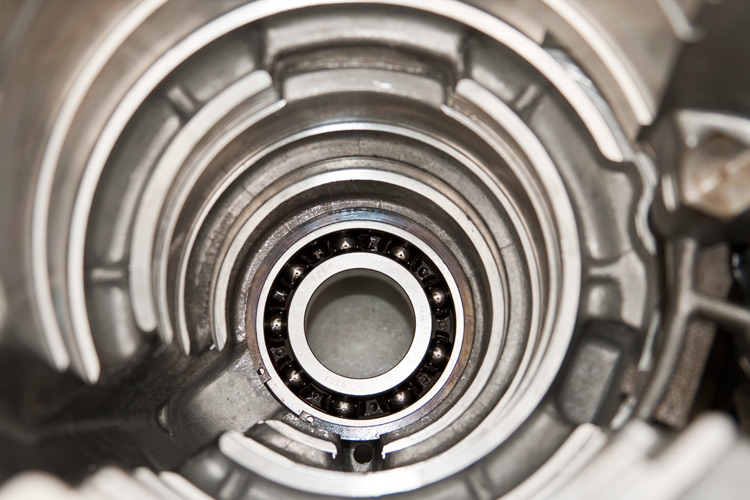
I slipped in a new rear output shaft bearing. The stock/OEM bearing just felt funny when I spun it on my fingers. It seemed the outer race wanted to orbit funny (wobble).
Now drop in the governor support thing . . .
And set the OD case aside for the moment.
If you remember, my stock/OEM intermediate shaft's pilot bushing was having issues so I replaced it.
NOTE: Perhaps this issue is not unusual and as a fix, it appears a subtle change was made to the new bushing.
Understand that lube oil for that bushing is provided by way of pressurized trans fluid being fed to the bushing, by way of a passage in the intermediate shaft. It squirts into the base of the hole in the output shaft where the bushing resides. With that, oil is fed through the bushing and the intermediate shaft's interface.
If you look at the damaged/worn bushing images above, you'll notice grooves in the outside of the bushing. That's where excess lube oil is bypassed around the bushing. The new bushing has smaller grooves that would lessen bypassed lube oil, and force more through the bushing/shaft interface. At least, that's the way I see it. More on this later.
The overdrive sprag and it's inner race goes in after the bushing. Here, I'm just making sure things fit right. It's temporarily removed as it'll just fall out with the next assembly steps.
Next, I swapped the stock/OEM spur type overdrive ring-gear (annulus), . . . . .
With the new 15 degree, helical type overdrive ring-gear. It's nested in the overdrive's direct drum. . . . .
From there, I installed the the output shaft into the direct drum . . .
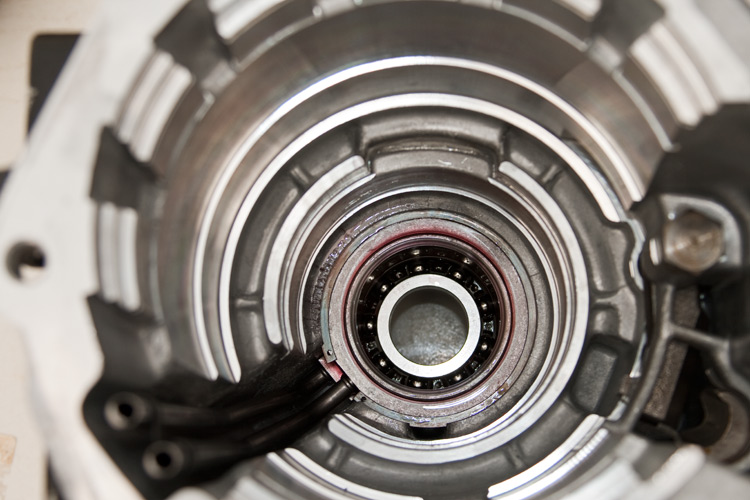
I then installed the new front, output shaft bearing.
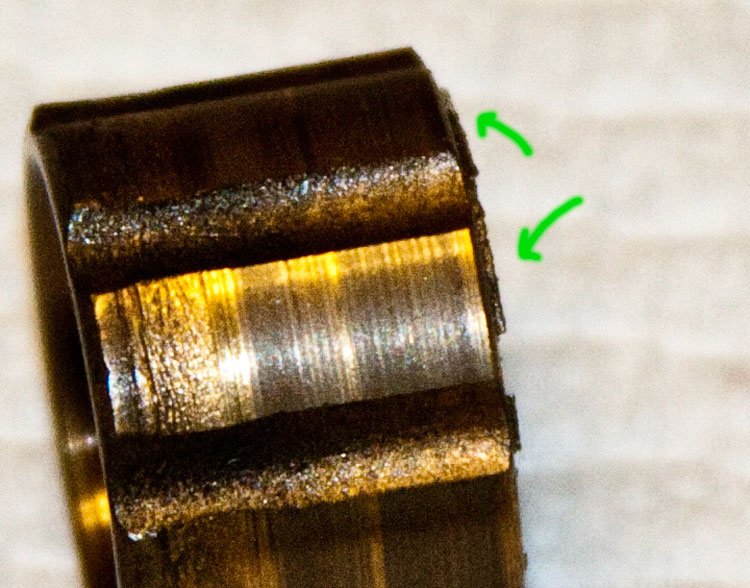
NOTE: Be sure to install the bearing so that groove on the outside of the bearing (see green arrow) is up (as shown). That groove is for a snap-ring that holds the output shaft assembly in the overdrive case.
NOTE: My stock/OEM overdrive planetary gear-set is made with Spur type gears (straight-cut). My planet and sun gears are considerably pitted and in need of repair at best. It seems replacement assemblies are made of unobtainium. It's been suggested that one can get some planet gears from a gasser trans and renew the carrier but overall, readily available replacement spur planetary stuff is expensive as fire!
On the other hand, relatively inexpensive upgrade kits are readily available that include 5 & 6-pinion steel carriers, as well as the associated annulus and sun gears. Made for the newer trucks running the 47 and 48 series transmissions. They come with either 15 or 22 degree Helical teeth. The steeper the angle of the teeth, the quieter the gear noise.
By default, it's suggested the spur teeth are the strongest. With that, The big-dog trans builders I talked with agreed the 15 degree type would be the best alternative. That's what I went with in a steel 6-pinion carrier.
After cleaning everything, it's pretty much just swapping in the new parts.
So . . . ..
Starting with a clean overdrive section case . .. .
I slipped in a new rear output shaft bearing. The stock/OEM bearing just felt funny when I spun it on my fingers. It seemed the outer race wanted to orbit funny (wobble).
Now drop in the governor support thing . . .
And set the OD case aside for the moment.
If you remember, my stock/OEM intermediate shaft's pilot bushing was having issues so I replaced it.
NOTE: Perhaps this issue is not unusual and as a fix, it appears a subtle change was made to the new bushing.
Understand that lube oil for that bushing is provided by way of pressurized trans fluid being fed to the bushing, by way of a passage in the intermediate shaft. It squirts into the base of the hole in the output shaft where the bushing resides. With that, oil is fed through the bushing and the intermediate shaft's interface.
If you look at the damaged/worn bushing images above, you'll notice grooves in the outside of the bushing. That's where excess lube oil is bypassed around the bushing. The new bushing has smaller grooves that would lessen bypassed lube oil, and force more through the bushing/shaft interface. At least, that's the way I see it. More on this later.
The overdrive sprag and it's inner race goes in after the bushing. Here, I'm just making sure things fit right. It's temporarily removed as it'll just fall out with the next assembly steps.
Next, I swapped the stock/OEM spur type overdrive ring-gear (annulus), . . . . .
With the new 15 degree, helical type overdrive ring-gear. It's nested in the overdrive's direct drum. . . . .
From there, I installed the the output shaft into the direct drum . . .
I then installed the new front, output shaft bearing.
NOTE: Be sure to install the bearing so that groove on the outside of the bearing (see green arrow) is up (as shown). That groove is for a snap-ring that holds the output shaft assembly in the overdrive case.
07-11-2010, 01:34 AM
#13
1st Generation Admin
Thread Starter
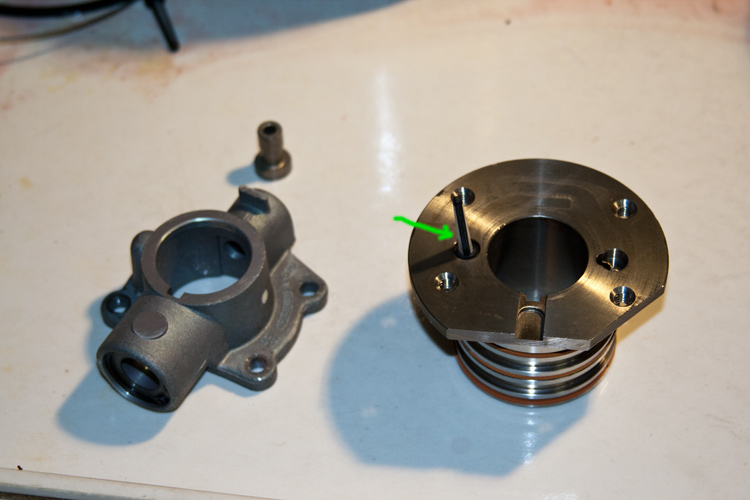
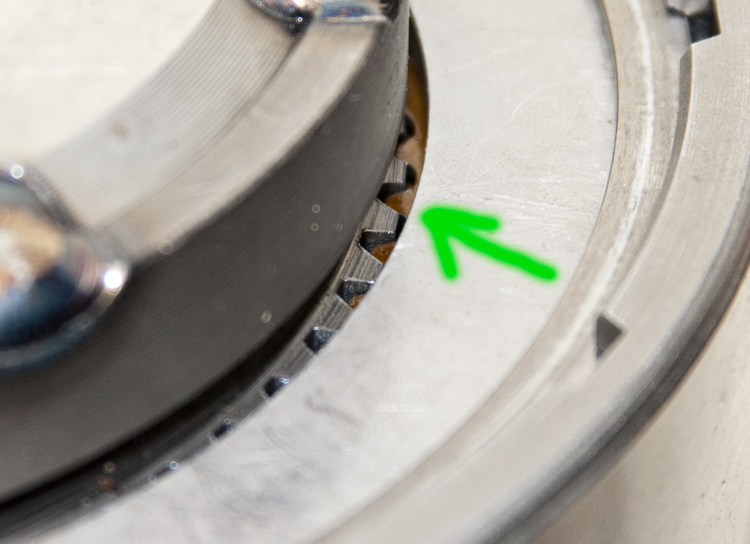
As part of general cleaning, I replaced that trans fluid filter in the governor housing (see green arrow) . .. .
With that, installing the governor on the output shaft completes that sub-assembly . . . .
While being careful of the governor's hydraulic ring-seals, ya gotta install the output shaft assembly while holding that snap-ring open so that big bearing will fully seat. Make sure that snap-ring is fully seated in both the big bearing and the case. Now drop in the sprag and the inner race thing.
Moving on, I swapped the worn, stock/OEM spur type overdrive sun-gear with the newer 15 degree teeth unit . . .
Again, the upgrade kit can be had with 5 or 6-pinion steel planetary carriers. I went with the 6-pinion design (48RE) for it's strength. I reused that spring-plate on the sun-gear. I installed it with the 1st rebuild as it supposedly has a funky angle cut to it's face so as to fit better while under the 800+ pound load presented by the overdrive direct apply spring.
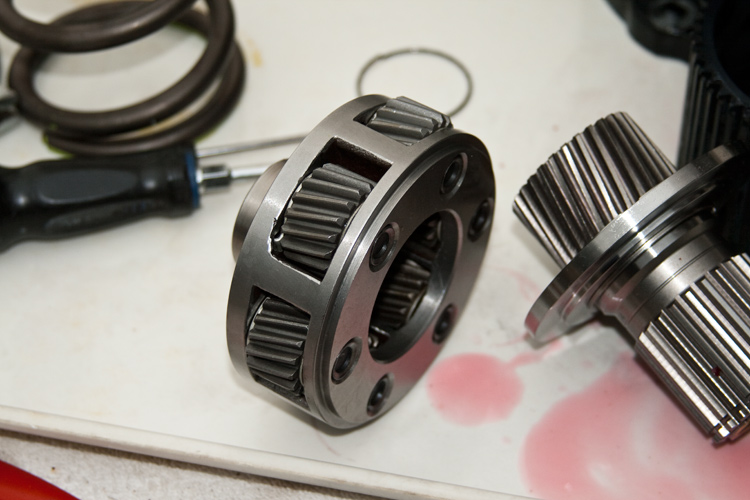
Now dropping that boy in there completes the overdrive planetary upgrade. From a stock/OEM 4-pinion, spur-cut planetary gear-set, to a 6-pinion, 15* helical-cut planetary gear-set. All things considered, perhaps stronger, and quieter too.
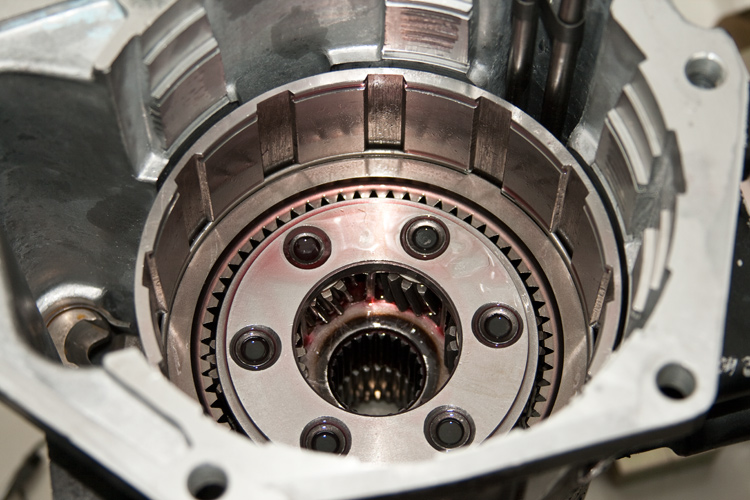
The overdrive and direct clutches & steels as removed, look just fine.
NOTE: If you remember, the OEM A518 (46RH) direct clutch has eight double-sided clutch discs and seven steels. I've upgraded mine to the 48RE style which uses 23 single-sided friction elements giving me about 44% more clutch apply area. The OEM overdrive clutch in the A518 came with five clutch discs and four steels. There, I've upgraded to six clutches and six steels for a 20% increase in apply area.
With that, installing the governor on the output shaft completes that sub-assembly . . . .
While being careful of the governor's hydraulic ring-seals, ya gotta install the output shaft assembly while holding that snap-ring open so that big bearing will fully seat. Make sure that snap-ring is fully seated in both the big bearing and the case. Now drop in the sprag and the inner race thing.
Moving on, I swapped the worn, stock/OEM spur type overdrive sun-gear with the newer 15 degree teeth unit . . .
Again, the upgrade kit can be had with 5 or 6-pinion steel planetary carriers. I went with the 6-pinion design (48RE) for it's strength. I reused that spring-plate on the sun-gear. I installed it with the 1st rebuild as it supposedly has a funky angle cut to it's face so as to fit better while under the 800+ pound load presented by the overdrive direct apply spring.
Now dropping that boy in there completes the overdrive planetary upgrade. From a stock/OEM 4-pinion, spur-cut planetary gear-set, to a 6-pinion, 15* helical-cut planetary gear-set. All things considered, perhaps stronger, and quieter too.
The overdrive and direct clutches & steels as removed, look just fine.
NOTE: If you remember, the OEM A518 (46RH) direct clutch has eight double-sided clutch discs and seven steels. I've upgraded mine to the 48RE style which uses 23 single-sided friction elements giving me about 44% more clutch apply area. The OEM overdrive clutch in the A518 came with five clutch discs and four steels. There, I've upgraded to six clutches and six steels for a 20% increase in apply area.
07-11-2010, 01:34 AM
#14
1st Generation Admin
Thread Starter
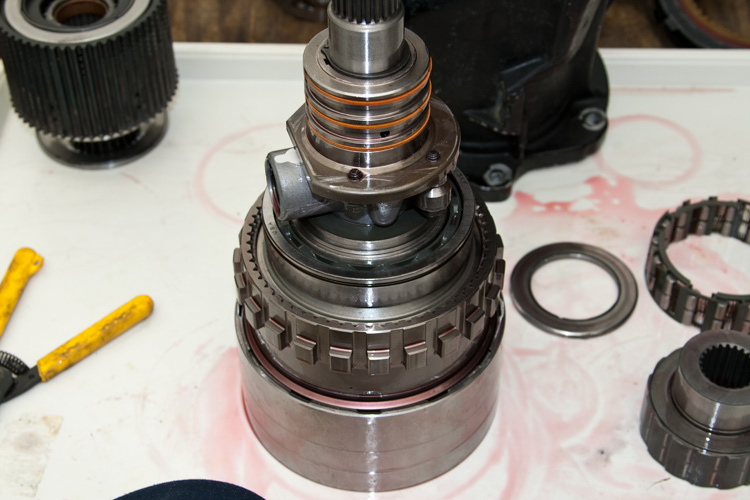
With that, I reinstalled those same direct and overdrive clutch-pacs.
While installing the clutch-pacs, I was sure to use the new intermediate shaft to align the splines of the gear-set and hubs before installing the big overdrive direct spring. That'll save me some aggravation later when bolting the overdrive section to the transmission.
Wrapping the overdrive case in a clean plastic trash bag completes that mess.
Next; the 3-speed transmission section.
07-11-2010, 09:19 PM
#15
1st Generation Admin
Thread Starter
NOTE: The following doesn't work.
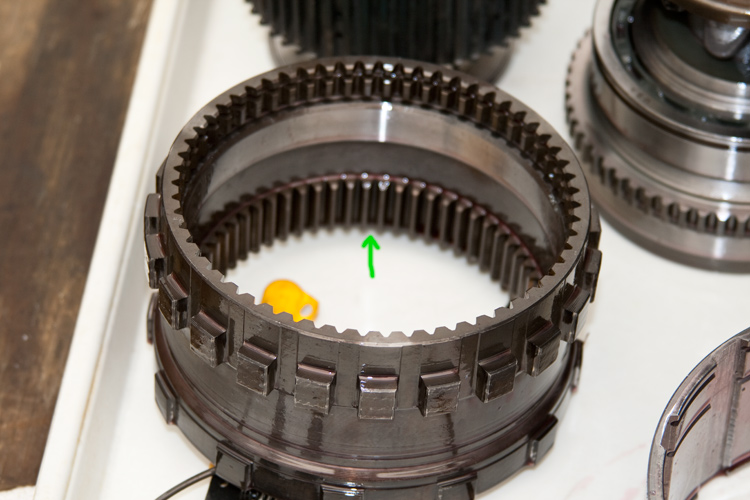
Alright, talking about that clutch-pack at the rear of the 3-speed transmission (the forward clutch). I have upgraded from an OEM of four clutches and steels to five of each. 25% more apply area. That being said, when I 1st rebuilt the trans and installed this upgrade, I failed to check and verify things fit right. With that, one of the clutch discs failed to fully engage the inner hub and chewed the inner splines of that clutch disc.
NOTE: It's been suggested that this clutch upgrade isn't really required at my power level. Oops. Well, it's there, I just as well make it work.

It needs to fit like this .. . . .
Keep in mind, the inner hub of that clutch-pack isn't much wider than the clutch/steel stack itself when fully compressed. There's about an eighth of an inch on either side of the clutch/steel stack. Based on the above image of the damaged disc, I'm way off to the left.
I need to move the clutch/steel stack over a little.
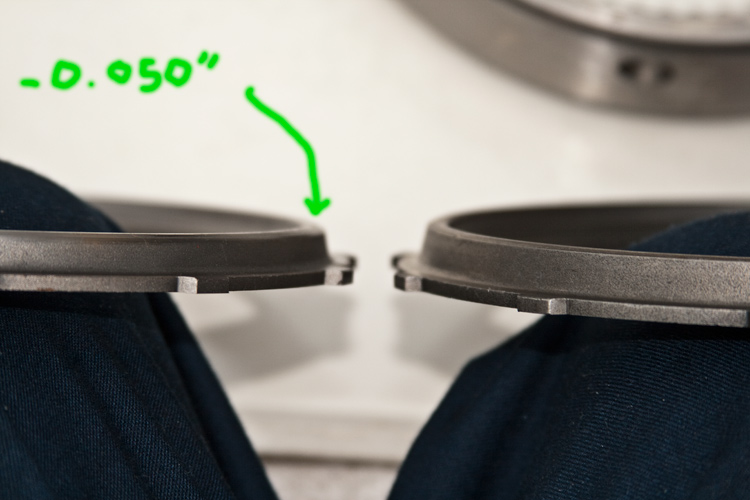
I had 0.050" milled off the pressure-plate to do just that. See the milled one on the left compared to an OEM one on the right . ...
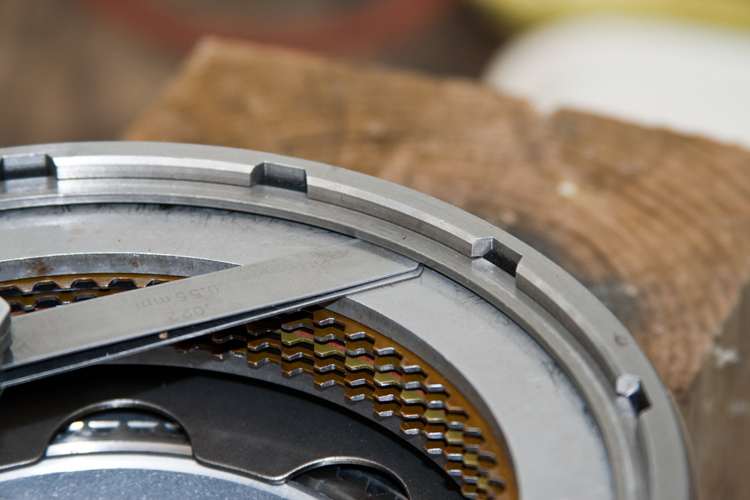
Swapping in a reaction-plate that's about 0.050" thicker, combined with a mix of new and the used but good clutches and steels, with the appropriate selectable snap-ring gives me right at 0.050" clearance (correct for this setup).
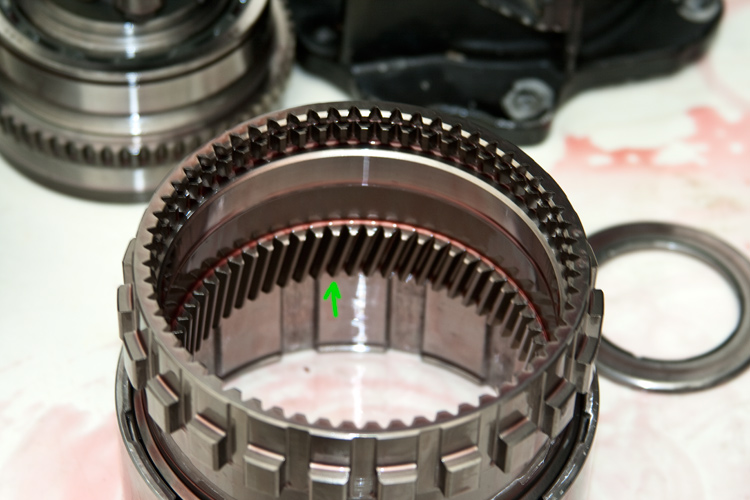
As such, with everything installed and mashed as though the clutch were engaged, gives me this . . . .
That Should work just fine ensuring full spline engagement while still allowing things to expand on the other side when the piston relaxes and still keep the splines on that side engaged. We'll see . . . .
NOTE: The above doesn't work. Read on . . . .
Alright, talking about that clutch-pack at the rear of the 3-speed transmission (the forward clutch). I have upgraded from an OEM of four clutches and steels to five of each. 25% more apply area. That being said, when I 1st rebuilt the trans and installed this upgrade, I failed to check and verify things fit right.
With that, one of the clutch discs failed to fully engage the inner hub and chewed the inner splines of that clutch disc.NOTE: It's been suggested that this clutch upgrade isn't really required at my power level. Oops. Well, it's there, I just as well make it work.
It needs to fit like this .. . . .
Keep in mind, the inner hub of that clutch-pack isn't much wider than the clutch/steel stack itself when fully compressed. There's about an eighth of an inch on either side of the clutch/steel stack. Based on the above image of the damaged disc, I'm way off to the left.
I need to move the clutch/steel stack over a little.
I had 0.050" milled off the pressure-plate to do just that. See the milled one on the left compared to an OEM one on the right . ...
Swapping in a reaction-plate that's about 0.050" thicker, combined with a mix of new and the used but good clutches and steels, with the appropriate selectable snap-ring gives me right at 0.050" clearance (correct for this setup).
As such, with everything installed and mashed as though the clutch were engaged, gives me this . . . .
That Should work just fine ensuring full spline engagement while still allowing things to expand on the other side when the piston relaxes and still keep the splines on that side engaged. We'll see . . . .
NOTE: The above doesn't work. Read on . . . .