
Evaporator Change

 Thanks!

Registered User
Joined: Aug 2007
Posts: 3,901
Likes: 37
From: On the Farm, Manitoba
You don't need to "remove" the dash, just take out all the fasteners and drop the steering column down to the seat. Note if you have an AUTO trans and a gear posn indicator disconnect the small cable or it WILL get broken. If it's a standard 4X4 you'll have to remove the ctr console and one or both gear levers (I don't remember) With the dash now sitting loose on the steering column the disconnected heater plenum can be removed from underneath by lifting up on the pax corner of the dash. (watch for antifreeze from the heater core.) It's a tight fit but that's how it's done. On reinstall watch for small vac that passes through firewall at the same time. Do things gently and be careful of airbags.
Registered User
Joined: Aug 2007
Posts: 3,901
Likes: 37
From: On the Farm, Manitoba
5/16 across the top by the windshield (careful not to break glass) the trim around the gauges just pulls off evenly, remove the glove box, there is one bolt either side down low along the bottom of the dash and there is usually some sort of center brace unless it's been removed. When you remove the ctr console things will become clearer. remove the panel under the steering column, there are 2 nuts on studs under the steering column. Drop the steering column LAST after disconx the heater plenum nuts and electrical and vac. Note cut the heater hoses off or you'll likely end up with a leaking heater core after if you try to pry them off. Also it's not necessary to drain the rad you can just crimp the heater hoses close to the core.
Trending Topics
Thread Starter
Registered User
Joined: Jul 2007
Posts: 13
Likes: 0
From: Oakland, MD
Busboy, thanks for the info. Everything went well, although I had to do it twice because I must have pinched one of the shutters in the htr box and had to take it back out to realign.
Thread Starter
Registered User
Joined: Jul 2007
Posts: 13
Likes: 0
From: Oakland, MD
Here is a more detailed description of how to replace the evaporator:
UNDER THE HOOD
1. Disconnect Batteries 2. Remove Air Cleaner Assembly 3. Disconnect and Remove Dryer 4. Remove Computer from firewall 5. Remove Computer Bracket 6. Disconnect Htr Hoses at engine block and use LP air to drain Htr Core (hoses can be left attached to Htr Core, they will fit through firewall) 7. Disconnect A/C line from Evaporator 8. Disconnect Vac line at Evaporator connections 9. Remove two (2) 11mm nuts from Htr Box studs (one behind the engine valve cover and one behind the Computer bracket)
DASH REMOVAL
1. Remove the trim from the guages above the steering wheel 2. Remove the Glove Box and Disconnect two (2) electrical connections on the Htr Box and the Radio Antenna 3. Remove the Shift Lvers, CTR Console, and CTR Brace 4. Remove six (6) 5/16" screws from across the top of the Dash 5. Remove the Panel under the Steering Column 6. Disconnect the Vacuum Line for the Htr Box above the Throttle Pedal 7. Remove two (2) nuts on studs that holds the Steering Column and set the Steering Column in the drivers seat 8. Remove the driver and passenger side Kick Panels 9. Loosen the bolts behind the Kick Panels for the Dash (hold on to Dash, it is loose now) and roll it towards the seats 10. Lift the passenger side of the Dash off of the lower bolt and set it back against the seat (this will make room to work on the Htr Box)
HTR BOX REMOVAL
1. Remove the ground strap above the Htr Box from the firewall 2. Remove the 10mm nut near the passenger A-Pillar from the stud holding the Htr Box 3. Remove the 10mm nut above the Htr Box where the ground strap came off 4. Remove the Htr Box 5. Remove the phillips head screws from the Htr Box seam to access the evaporator
RE-ASSEMBLY
Perform in reverse order. Ensure Htr Box functions properly prior to re-installation. Take care not to kink Vac line on Htr Box when it goes back through firewall. Like Busboy said above, "TAKE YOUR TIME" and don't force anything. It took me about 6 hrs the first time and 2.5 hrs the second time.(I HATE REWORK!!) Good Luck!
Registered User
Joined: Aug 2006
Posts: 286
Likes: 0
From: outside of H-town, Tx, thankfully
I've read many post's on this subject, and save them all for future use, good info, ------------but my question is, what have all of you found to be the problem for the evap. core going bad????? Is it just that thin of wall tubing or corrosion, I just find it hard to think how they would "wear" out since theres no moving parts, persay and if it's corrosion, what can be done to stop it?
Thanks
Thanks
Chapter President
Joined: Aug 2004
Posts: 3,481
Likes: 2
From: Kingsville, MD
I've read many post's on this subject, and save them all for future use, good info, ------------but my question is, what have all of you found to be the problem for the evap. core going bad????? Is it just that thin of wall tubing or corrosion, I just find it hard to think how they would "wear" out since theres no moving parts, persay and if it's corrosion, what can be done to stop it?
Thanks
Thanks
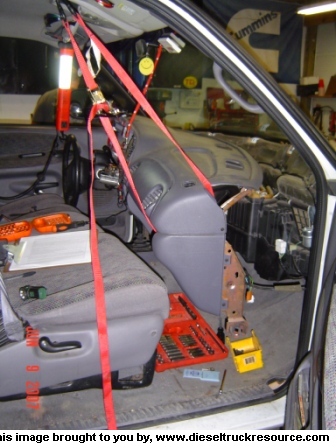
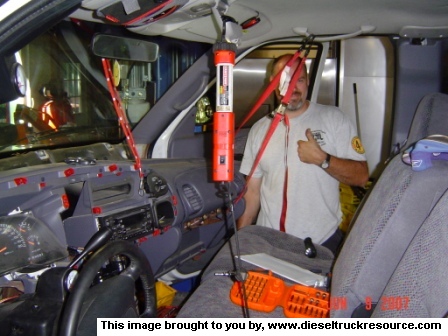
by using the ratchet straps you don't have to remove the dash.
PS don't waste your time using a used one. Too much work. Not hard just too much. you can get one from the Dealer called the economy brand for about $130
Registered User
Joined: Dec 2005
Posts: 912
Likes: 0
From: cornelius oregon
i need to do my brothers 97 I take it is the same as the above post. mech. said he would charge 100 bucks for the core and 1000 for his time. i told him i will take care of it. thanks so much for the info on this web page.

Banned
Joined: Aug 2001
Posts: 125
Likes: 0
I found it was easier to get a friend to help remove the entire dash from the truck. That way, I could sit in the truck and work on the HVAC box. I have pics, with details, if anyone is interested. There are quite a few, so post or PM if interested. If not, I'll save y'all the trouble of scrolling past them.

Chapter President
Joined: Aug 2004
Posts: 3,481
Likes: 2
From: Kingsville, MD
I found it was easier to get a friend to help remove the entire dash from the truck. That way, I could sit in the truck and work on the HVAC box. I have pics, with details, if anyone is interested. There are quite a few, so post or PM if interested. If not, I'll save y'all the trouble of scrolling past them.