Front Jump Seat Conversion Commencing Soon
 06-07-2012, 05:07 PM
#31
Administrator / Severe Concussion Aficionado
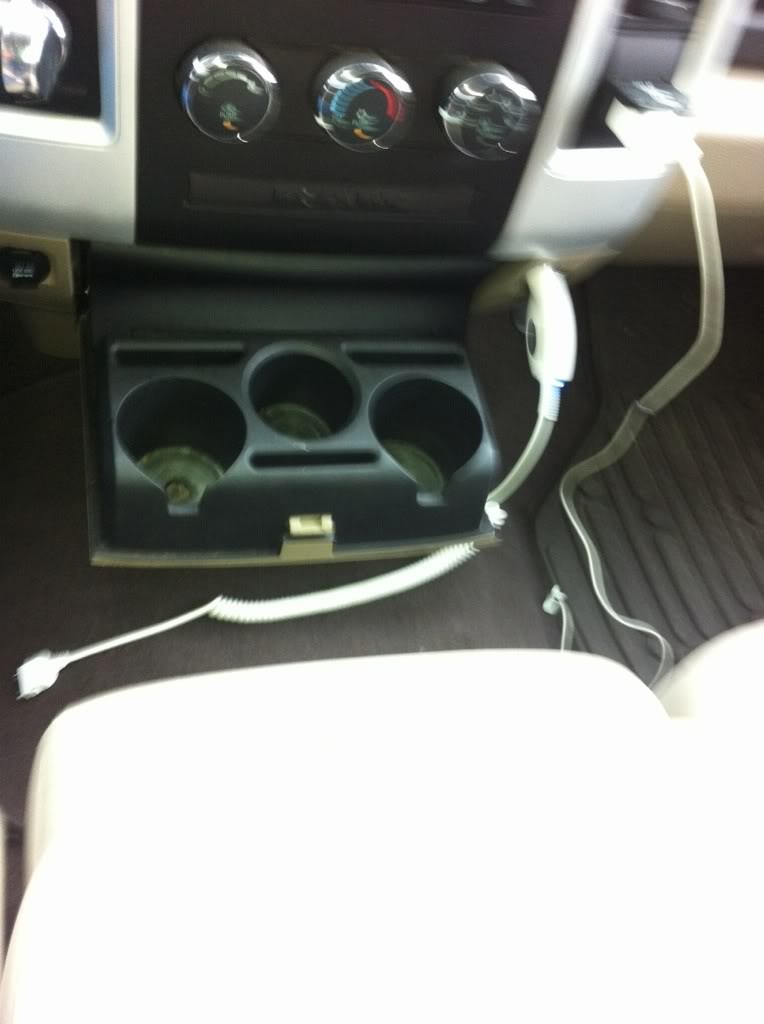
Best he could do while driving.
But, his radio bezel and lower bezel are the same style as mine.
It looks as if it takes a certain lower bezel for the cup holders. Mine is just a blank that accommodates room for the shifter.
And he does have the rear AC vents, so his must run under the carpet.
But, his radio bezel and lower bezel are the same style as mine.
It looks as if it takes a certain lower bezel for the cup holders. Mine is just a blank that accommodates room for the shifter.
And he does have the rear AC vents, so his must run under the carpet.
 06-07-2012, 05:14 PM
#32
Registered User
Thread Starter
Thanks for the pic! So, when you are talking about the lower bezel, are you referring to the left/right side of the cup holder with the 12V outlets?
06-07-2012, 05:16 PM
#33
Administrator / Severe Concussion Aficionado
It seems as if your radio bezel extends much lower than the one for the standard shift, or fold down cup holders.
06-07-2012, 05:26 PM
#34
Registered User
Thread Starter
Okay awesome! I've found those and the bottom trim for the cup holder. Do you know if there is any difference between the dash on quad cabs vs crew cabs/Mega's? They all look the same, but the parts I've found say for quad cabs only?
06-10-2012, 06:42 PM
#37
Registered User
Thread Starter
I hope everyone has enjoyed their weekend so far!
I just wanted to provide an update on this since it has been a few days.
I am making progress! Center seat arrived yesterday. Temporarily installed it today, to fill the space and have an arm rest, since it will have to be removed (I think) once I source the air duct that goes under the carpet between the seat and where the old ducting attached under the dash use to be.
Some quick observations: There will be two holes in the carpet right in front of the seat, where the old console use to be. This may be the determining factor on getting the fold down cup holder or going with the floor console. Since I already ordered the cup holder, I'm pressing with that route. I figure a good way to cover those holes would be to get a tray like what Staarma has pictured on page two--or a floor liner.
Staarma, if you happen to see this, can you provide any info on the tray you have right in front of the center seat? It looks stock in the picture, but I haven't been able to find it.
I have the cup holder and the two outlets and bottom trim (that goes below the cup holder) on order. I still need to source the radio bezel. Brand new it is just over $200 through dodgeparts.com. Trying to save as much money as possible. Once the parts arrive I will start the install tutorial.
06-11-2012, 09:04 AM
#38
Registered User
Join Date: Jul 2005
Location: Belgrade, Montana
Posts: 2,953
Likes: 0
Received 0 Likes
on
0 Posts
Mine is attached to the center console and is all stock. I would imagine it's there to accommodate the different configs. The only thing in the pics that isn't are the obvious husky liners.
06-13-2012, 09:46 AM
#39
Registered User
Thread Starter
Thanks Staarma for the update!
Does anyone know if a basic radio bezel, one without 115v outlet and no 4wd, if the blanks can be removed and the 4wd switch and outlet installed or do I need to get a bezel with those already there?
I found one for $100 shipped, just doesn't have the switch or outlet.
Thanks!
Sent from my DROID X2 using Tapatalk 2
06-19-2012, 09:11 AM
#40
Registered User
Thread Starter
I checked my radio bezel. Unfortunately, if you have the 115V Power Outlet, you have to find a bezel that has it included (the 4WD switch comes out as one unit--one would think Chrysler Engineers would have done the same for the outlet as well). That's the bad news-not really bad news, just shot my hopes of Chrysler making a universal bezel . So I am back on my search for a bezel. DodgeParts.com has the bezel I need for $208--so if anyone comes across the one I need for less, please let me know
Good news: The cup holder, two outlets and bottom trim piece arrived. All of those fit just fine. I was a bit worried because the Mopar site had I believe 4 different base instrument panels listed. When I selected my specific model (SLT), only 2 was on there, but it doesn't say exactly what configurations they are for.
Two 12V Outlets: I found the connector that goes to the left outlet taped up out of the way, can't find the one for the right though, so I am wondering if there is a wire harness that runs between the two and plugs into the connector on the left?
Just wanted to provide an update of my findings for anyone watching this and thinking about doing the same thing.
. So I am back on my search for a bezel. DodgeParts.com has the bezel I need for $208--so if anyone comes across the one I need for less, please let me knowGood news: The cup holder, two outlets and bottom trim piece arrived. All of those fit just fine. I was a bit worried because the Mopar site had I believe 4 different base instrument panels listed. When I selected my specific model (SLT), only 2 was on there, but it doesn't say exactly what configurations they are for.
Two 12V Outlets: I found the connector that goes to the left outlet taped up out of the way, can't find the one for the right though, so I am wondering if there is a wire harness that runs between the two and plugs into the connector on the left?
Just wanted to provide an update of my findings for anyone watching this and thinking about doing the same thing.
07-04-2012, 11:37 AM
#41
Registered User
Thread Starter
Happy Fourth of July!
It's been a couple weeks since my last update. Figure it is fitting to say Happy Fourth of July and for anyone following this, give an update.
1. I ordered everything I think I need to complete my conversion. Should be here on Tuesday. I ordered through DodgeParts.com. However, I did a lot of researching on the parts using the Mopar eStore since you can get the part numbers through there. Hint: When doing this conversion, find a VIN that is the exact opposite of your truck (woodgrain, dark slate, brown, etc, 115V outlet, or no outlet, auto vs. manual, etc) and put that in the VIN field of the eStore to minimize results. Also use that VIN when ordering through a Mopar dealer to alleviate any confusion. When ordering the bezel, if you have the 115V outlet, make sure the one you order has it too. The Mopar eStore only gives the 3 digit codes, so I had to reference my build sheet (DodgeParts.com spells out whether it is w/ or w/o power outlet or w/ or w/o center console - however, I did find some discrepancies)
The VIN I used was nearly the exact opposite setup as my truck except it was a 2011. The part #s are as follows:
1KZ311SDAC - Bezel Instrument Panel Center (w/ power outlet)
5KQ271DVAB - center seat belt buckle half
5KQ361DVAB - center seat belt tip half
55111180AA - center duct, auto transmission
1RT53DX9AA - Floor Console, MAT, Storage Tray
1RT17XDVAA - Floor Console, Tray, Floor Console (this is the small tray that sits directly in front of the center seat. I had to use the VIN lookup to find this)
2. I found the right side 12V outlet connector. That little sucker was tucked up behind the lower glove box. Just as I was about to give up looking for it, I moved a wire bundle and noticed the black connector taped up nice and tight only for those willing not to give up, to find it. So no extra wiring harness is needed.
3. Here are a few of the 3-Digit codes you may need to know and will help when deciphering everything:
CAC - Center Console (bucket seats-what I had)
CBE - w/o center console (center seat-what I now have)
JBY - Instrument Panel Color Keyed Bezel
JKV - 115V Auxiliary Power Outlet
So the codes together for the Bezel I need is JBY, CBE, JKV. I wish there was a full code list of every option available posted somewhere. I think that would have made it a bit easier for me to figure this stuff out when I first started researching.
I have been taking pictures as I have discovered stuff (such as the 12V connectors) to hopefully make it a bit easier for those doing this conversion, to accomplish it w/o too much headache. Once everything arrives next week, I will start the install tutorial.
Have a wonderful day everyone and please be safe with the fireworks!
and for anyone following this, give an update.1. I ordered everything I think I need to complete my conversion. Should be here on Tuesday. I ordered through DodgeParts.com. However, I did a lot of researching on the parts using the Mopar eStore since you can get the part numbers through there. Hint: When doing this conversion, find a VIN that is the exact opposite of your truck (woodgrain, dark slate, brown, etc, 115V outlet, or no outlet, auto vs. manual, etc) and put that in the VIN field of the eStore to minimize results. Also use that VIN when ordering through a Mopar dealer to alleviate any confusion. When ordering the bezel, if you have the 115V outlet, make sure the one you order has it too. The Mopar eStore only gives the 3 digit codes, so I had to reference my build sheet (DodgeParts.com spells out whether it is w/ or w/o power outlet or w/ or w/o center console - however, I did find some discrepancies)
The VIN I used was nearly the exact opposite setup as my truck except it was a 2011. The part #s are as follows:
1KZ311SDAC - Bezel Instrument Panel Center (w/ power outlet)
5KQ271DVAB - center seat belt buckle half
5KQ361DVAB - center seat belt tip half
55111180AA - center duct, auto transmission
1RT53DX9AA - Floor Console, MAT, Storage Tray
1RT17XDVAA - Floor Console, Tray, Floor Console (this is the small tray that sits directly in front of the center seat. I had to use the VIN lookup to find this)
2. I found the right side 12V outlet connector. That little sucker was tucked up behind the lower glove box. Just as I was about to give up looking for it, I moved a wire bundle and noticed the black connector taped up nice and tight only for those willing not to give up, to find it. So no extra wiring harness is needed.
3. Here are a few of the 3-Digit codes you may need to know and will help when deciphering everything:
CAC - Center Console (bucket seats-what I had)
CBE - w/o center console (center seat-what I now have)
JBY - Instrument Panel Color Keyed Bezel
JKV - 115V Auxiliary Power Outlet
So the codes together for the Bezel I need is JBY, CBE, JKV. I wish there was a full code list of every option available posted somewhere. I think that would have made it a bit easier for me to figure this stuff out when I first started researching.
I have been taking pictures as I have discovered stuff (such as the 12V connectors) to hopefully make it a bit easier for those doing this conversion, to accomplish it w/o too much headache. Once everything arrives next week, I will start the install tutorial.
Have a wonderful day everyone and please be safe with the fireworks!
The following users liked this post:
cyruss77 (10-06-2016)
08-12-2012, 10:26 AM
#43
Registered User
Thread Starter
Oh man! I have seriously slacked on getting this done. I was extremely busy trying to get my landscaping done prior to going on vacation (financial incentive from the water district), then I had to head off to training right after (where I am currently at til September).
I'm going to try to finish this write up today if I get my briefing reports done.
To answer your question, no my truck didn't and doesn't have the shake you mentioned. I've never noticed it when riding in the passenger seat and my wife has never complained.
Since you have a Laramie, I'm assuming the passenger side has the power seat? I wonder if that could be the cause of the shaking? It could be an issue with the motors not properly installed and/or the worm screws not attached properly?