Lumbar Support / Air vent
 06-12-2011, 07:59 PM
#1
Registered User
Thread Starter
Lumbar Support / Air vent
Does anyone know how to fix the driver side lumbar support on a 2006 Ram 2500 SLT? It just turns around and around. Also how about any suggestions on how to get one of the directional air vanes in the air vent to get back into it's hole so I can get it to work like the other vanes? I've tried bending it a bit w/ pliers put it just keeps missing the hole (O.K. no sex jokes). LOL
As soon as I get my truck washed I'll post a pic.
As soon as I get my truck washed I'll post a pic.
 06-12-2011, 09:20 PM
#2
Administrator/Jarhead
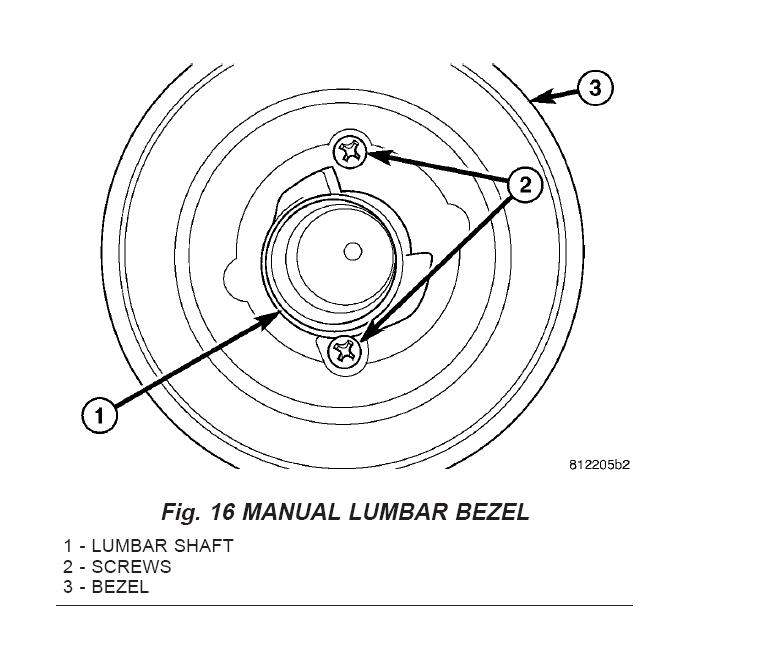
LUMBAR SUPPORT HANDLE/
BEZEL
REMOVAL
CAUTION: Care must be taken not to damage the
handle or bezel surface when removing.
(1) Using a trim stick C-4755 or equivalent, pry
the manual lumbar **** out of the bezel surround.
(2) Remove the bezel retaining screws and remove
the bezel. (Fig. 16)
INSTALLATION
(1) Align the bezel to the seat back and install the
screws.
(2) Snap the manual lumbar **** onto the shaft of
the drive mechanism into the bezel surround.
06-12-2011, 09:32 PM
#4
Registered User
Thread Starter
LUMBAR SUPPORT HANDLE/
BEZEL
REMOVAL
CAUTION: Care must be taken not to damage the
handle or bezel surface when removing.
(1) Using a trim stick C-4755 or equivalent, pry
the manual lumbar **** out of the bezel surround.
(2) Remove the bezel retaining screws and remove
the bezel. (Fig. 16)
INSTALLATION
(1) Align the bezel to the seat back and install the
screws.
(2) Snap the manual lumbar **** onto the shaft of
the drive mechanism into the bezel surround.
BEZEL
REMOVAL
CAUTION: Care must be taken not to damage the
handle or bezel surface when removing.
(1) Using a trim stick C-4755 or equivalent, pry
the manual lumbar **** out of the bezel surround.
(2) Remove the bezel retaining screws and remove
the bezel. (Fig. 16)
INSTALLATION
(1) Align the bezel to the seat back and install the
screws.
(2) Snap the manual lumbar **** onto the shaft of
the drive mechanism into the bezel surround.
Trending Topics
06-13-2011, 09:17 AM
#9
Registered User
Join Date: Jan 2006
Location: Bay Area, CA
Posts: 888
Likes: 0
Received 0 Likes
on
0 Posts
I remembered this from before and did a search on "lumbar" in the 3rd gen forums, this should help you out...especially post #19...
https://www.dieseltruckresource.com/...ghlight=lumbar
https://www.dieseltruckresource.com/...ghlight=lumbar
Last edited by AkitaSumo; 06-13-2011 at 09:19 AM. Reason: forgot to add link
06-14-2011, 08:42 PM
#11
Registered User
Thread Starter
Thanks for all the help guys. I will have to try to fix it this weekend if I have time. I've been real busy driving for my church in their bus for our youth group (they are doing mission work). From 7am till 4pm w/ little to no a/c in near 100 degree heat make be a very tired bus driver! So after getting home I crash. I have this pic because a fellow Knight from the Knights of Columbus helped me add the signage to the bus last winter. We never had done this before!
Church Bus


Church Bus
07-07-2011, 07:59 PM
#12
Registered User
Thread Starter
O.K.,
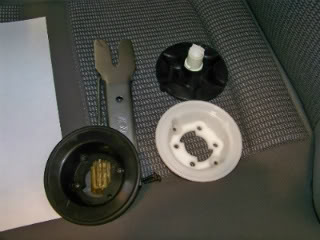
I got most of this text from somewhere on the internet and changed some of the sentences. I also went a step further and took some pics as I was doing this step by step to go along w/ the directions. Having pics w/ directions will make it go easier. I have to post the pics in two different posts cause I too many pics. B.T.W. it helps to have something cold to drink while working to your garage when it's 102 degrees outside!
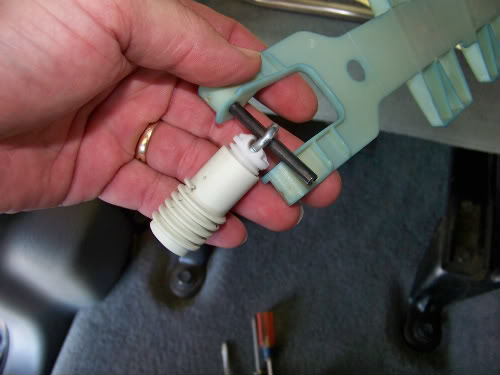
When I bought my truck I noticed that the lumbar didn't work. The problem was that the white plastic spinner inside the black housing broke at the point where it surrounds the tension pin (you'll understand exactly where all these points are once you see them).
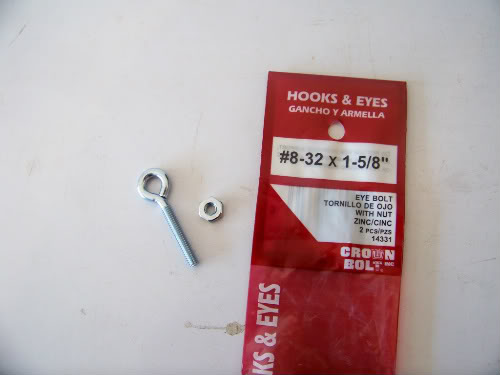
This problem can be fixed simply with an eye bolt and nut... more specifically: a $0.99 pack from Home Depot or Lowes: #8-32 x 1-5/8" eye bolt.
All you're doing is creating a new hole for the tension pin with the eye bolt.
Don't be shy when disassembling the lumbar mechanism because it's not a difficult fix. Here's how i did it on my 2006 Ram.
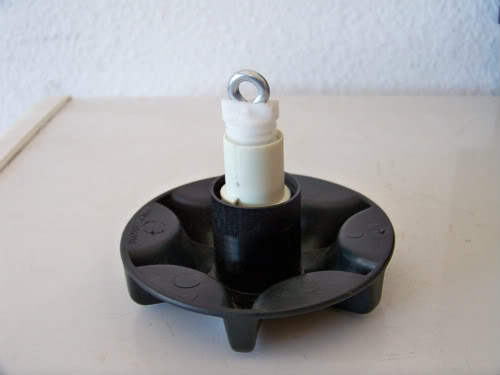
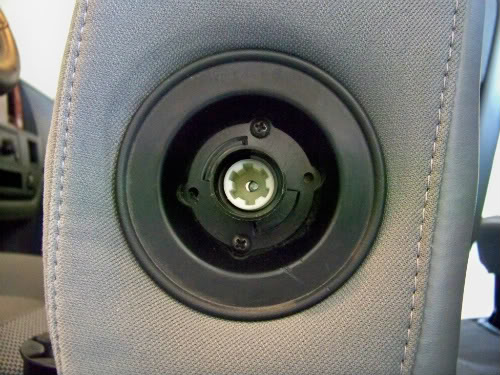
-Remove the adjustment ****.
-Remove the black trim under the **** (2 screws).
-Carefully remove the white housing (2 screws; this will be under the seat fabric, so carefully remove).
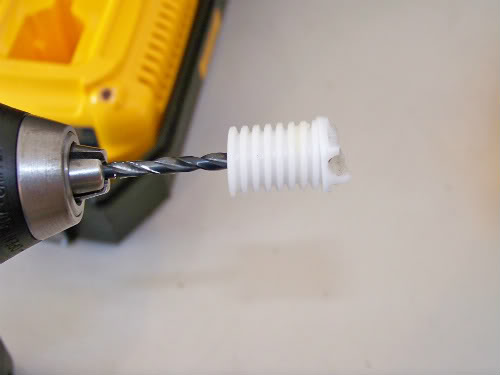
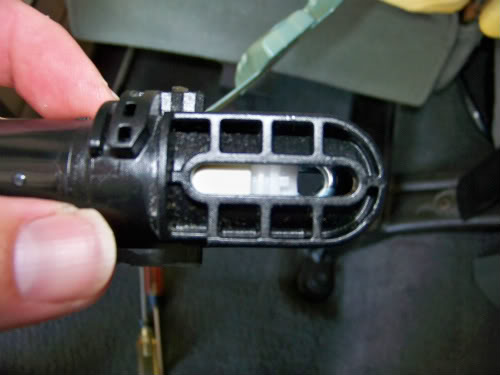
-Twist the white, plastic tension screw. This is actually a two-piece mechanism. If it twists freely until it comes out, then you've found your problem. You'll see the end of this plastic hardware broken and missing half the housing that surrounds the tension pin.
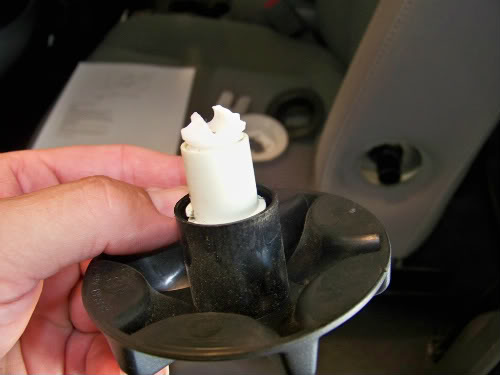
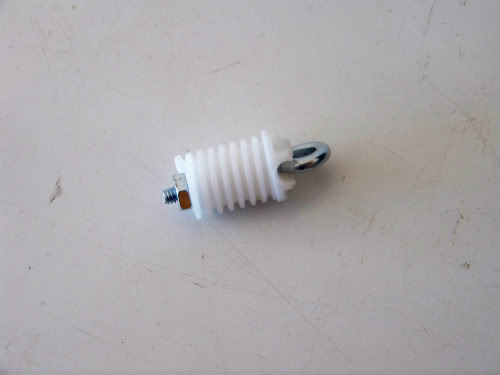
-HERE'S WHERE YOU USE THE EYE BOLT: Unscrew the two white plastic screws. In the middle of the groove where the tension pin rests, drill a hole (large enough for the bolt, I used a 5/32" bit) straight through the broken plastic screw. Insert the eye bolt until the eye portion rests along the groove in the screw. Place and tighten the nut on the other end of the eye bolt that's protruding from the end of the plastic screw. Reconnect the two plastic screws.
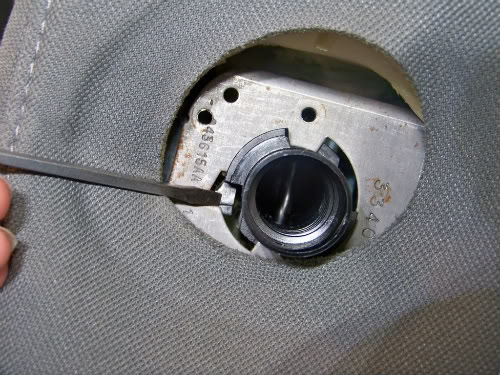
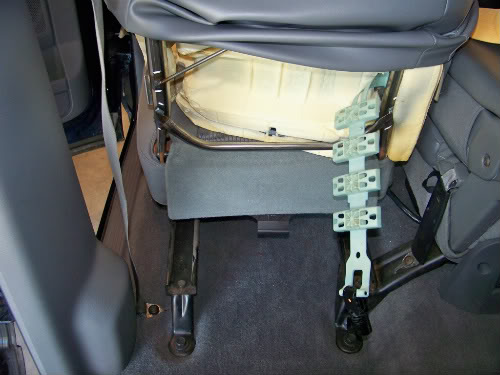
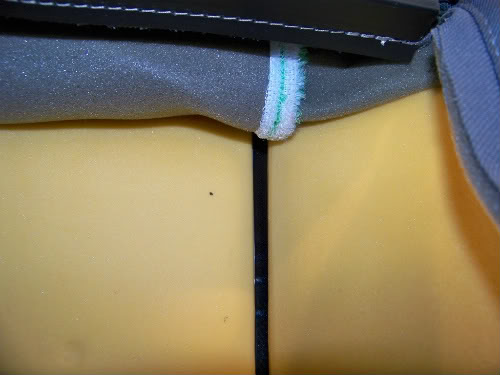
-Tilt the seat as far forward as you can. Under the back portion of the seat you'll find an access point to the seat guts. Carefully pull or twist the locking strip apart and fold the fabric up until you can clearly see the lumbar mechanism on the backside.
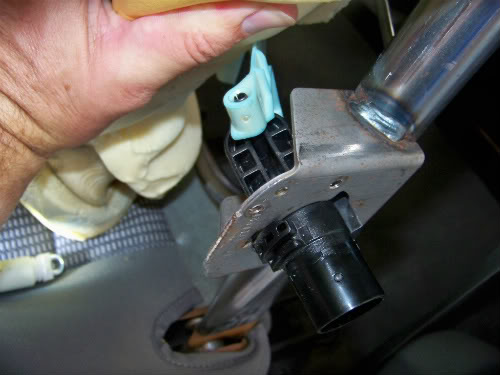
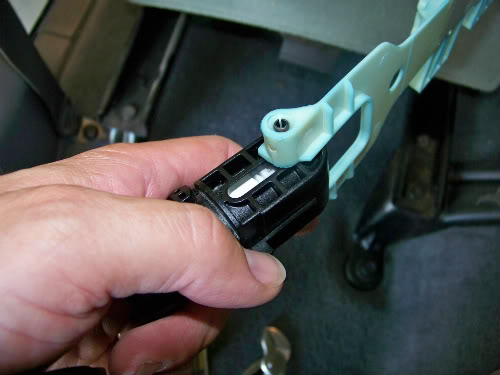
-From the side of the seat where you've removed the adjustment mechanism, push the release tab and twist the black cylindrical mechanism so that you now can access this part from the back of the seat.
-Push the tension pin out of one side of the lumbar strap and fully out of the black housing.
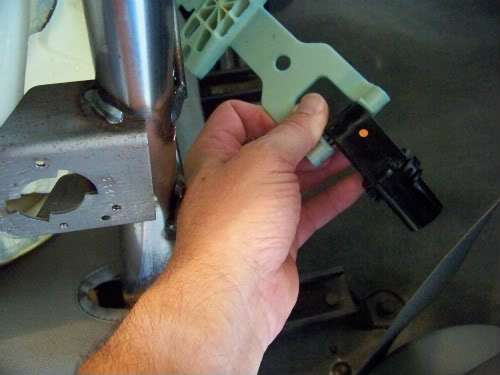
-Insert the plastic screw mechanism with new eye bolt into the black housing (eye bolt first).
-Push the tension pin back through the black housing, MAKING SURE IT FINDS ITS WAY THROUGH ITS NEW, METAL RIGID HOME, and back through the lumbar strap.
-Push and twist the black mechanism back into the seat housing.
-Fold the seat fabric down and reconnect strips.
-Replace white housing, making sure to carefully push it under the fabric.
-Replace black trim.
-Replace ****.
-Enjoy a few more beers!
Push tab in so you can unlock it and then twist.

I got most of this text from somewhere on the internet and changed some of the sentences. I also went a step further and took some pics as I was doing this step by step to go along w/ the directions. Having pics w/ directions will make it go easier. I have to post the pics in two different posts cause I too many pics. B.T.W. it helps to have something cold to drink while working to your garage when it's 102 degrees outside!
When I bought my truck I noticed that the lumbar didn't work. The problem was that the white plastic spinner inside the black housing broke at the point where it surrounds the tension pin (you'll understand exactly where all these points are once you see them).
This problem can be fixed simply with an eye bolt and nut... more specifically: a $0.99 pack from Home Depot or Lowes: #8-32 x 1-5/8" eye bolt.
All you're doing is creating a new hole for the tension pin with the eye bolt.
Don't be shy when disassembling the lumbar mechanism because it's not a difficult fix. Here's how i did it on my 2006 Ram.
-Remove the adjustment ****.
-Remove the black trim under the **** (2 screws).
-Carefully remove the white housing (2 screws; this will be under the seat fabric, so carefully remove).
-Twist the white, plastic tension screw. This is actually a two-piece mechanism. If it twists freely until it comes out, then you've found your problem. You'll see the end of this plastic hardware broken and missing half the housing that surrounds the tension pin.
-HERE'S WHERE YOU USE THE EYE BOLT: Unscrew the two white plastic screws. In the middle of the groove where the tension pin rests, drill a hole (large enough for the bolt, I used a 5/32" bit) straight through the broken plastic screw. Insert the eye bolt until the eye portion rests along the groove in the screw. Place and tighten the nut on the other end of the eye bolt that's protruding from the end of the plastic screw. Reconnect the two plastic screws.
-Tilt the seat as far forward as you can. Under the back portion of the seat you'll find an access point to the seat guts. Carefully pull or twist the locking strip apart and fold the fabric up until you can clearly see the lumbar mechanism on the backside.
-From the side of the seat where you've removed the adjustment mechanism, push the release tab and twist the black cylindrical mechanism so that you now can access this part from the back of the seat.
-Push the tension pin out of one side of the lumbar strap and fully out of the black housing.
-Insert the plastic screw mechanism with new eye bolt into the black housing (eye bolt first).
-Push the tension pin back through the black housing, MAKING SURE IT FINDS ITS WAY THROUGH ITS NEW, METAL RIGID HOME, and back through the lumbar strap.
-Push and twist the black mechanism back into the seat housing.
-Fold the seat fabric down and reconnect strips.
-Replace white housing, making sure to carefully push it under the fabric.
-Replace black trim.
-Replace ****.
-Enjoy a few more beers!
Push tab in so you can unlock it and then twist.
07-07-2011, 08:05 PM
#13
Registered User
Thread Starter
Part 2 of Lumbar Support
What it should look like when you are almost done.
Velcro seat. I thought I was ripping my foam that was glued together!
 09-27-2011, 10:44 PM
#15
Registered User
Thread Starter