CFM+ install

Thread Starter
Registered User
Joined: Sep 2007
Posts: 234
Likes: 0
From: Phoenix, Arizona
CFM+ install
With all the talk lately on the boards about intakes, I decided to upgrade my stock intake.
I decided on the CFM+ Carbon Fiber look alike with the three ports tapped in the back.

Due to my work, and personal life, I was a little slow in getting it installed.
I had some time today, so I decided to tackle the project.
The kit from CFM+ was VERY complete.
It comes with everything needed to do the install and Hand tool requirements are minimum.

There are 3 plugged pre-tapped ports on the back available for use.

After a quick inventory, and reading the installation instructions, it was time to get busy.
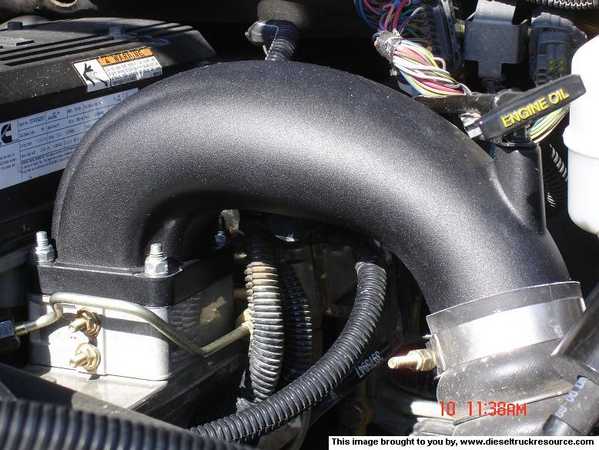
This installation was done on a 2007 5.9L. Here�s a before picture.

First step is to remove the negative leads on both batteries. 10mm
Then remove the dipstick bolt, and rotate it out of the way. 10mm.
Remove the nut and washer that holds the wiring harnesses on the back of the stock intake, and remove the harnesses from the stock intake. A screwdriver may help.

Loosen the boost hose clamp. 11mm

Remove the 4 bolts holding the stock intake in place. 10mm

Remove the stock intake from the truck. The wiring harness stud will be used in the new CFM+ intake, now is a good time to swap it over.


I was able to leave the wiring to the heater block intact, and swing it out of the way.
Remove the Graphite gasket, and scrape any remaining gasket material from the mating surface.

I decided on the CFM+ Carbon Fiber look alike with the three ports tapped in the back.
Due to my work, and personal life, I was a little slow in getting it installed.
I had some time today, so I decided to tackle the project.
The kit from CFM+ was VERY complete.
It comes with everything needed to do the install and Hand tool requirements are minimum.
There are 3 plugged pre-tapped ports on the back available for use.
After a quick inventory, and reading the installation instructions, it was time to get busy.
This installation was done on a 2007 5.9L. Here�s a before picture.
First step is to remove the negative leads on both batteries. 10mm
Then remove the dipstick bolt, and rotate it out of the way. 10mm.
Remove the nut and washer that holds the wiring harnesses on the back of the stock intake, and remove the harnesses from the stock intake. A screwdriver may help.
Loosen the boost hose clamp. 11mm
Remove the 4 bolts holding the stock intake in place. 10mm
Remove the stock intake from the truck. The wiring harness stud will be used in the new CFM+ intake, now is a good time to swap it over.
I was able to leave the wiring to the heater block intact, and swing it out of the way.
Remove the Graphite gasket, and scrape any remaining gasket material from the mating surface.
Thread Starter
Registered User
Joined: Sep 2007
Posts: 234
Likes: 0
From: Phoenix, Arizona
Loosening the bolts closest to the block caused some rust and debris to fall into the intake, plus a little gasket material invariably finds it�s way in there, so I used a Shop Vac to clean up the intake before proceeding.

Place the new Factory Graphite gasket on the manifold, then the heater block, and to save trouble fitting it on later, (Clearance to the valve cover is tight.) the Aluminum reinforced gasket on top of the heater block. Install the studs by hand at first to get the threads started. Then use the 2 13mm nuts tightened against each other to tighten each stud into the manifold.

Before installing the CFM+ check the tightness of the 3 port plugs (3/16 allen wrench) or install fittings to the ports you wish to use. Your wiring harness stud should also be installed before this step.
Install the CFM+ on the studs, and start the end into the boost hose

Using the provided Flat washers and self locking nuts (13mm) snug the CFM+ down, then torque evenly to 140 in. lbs.

Place the wiring harnesses and washer on the wiring harness stud, and tighten nut.

Rotate the dipstick tube to its new mounting point. Start the dipstick-mounting bolt by hand to keep from cross threading, and then tighten with wrench.

Tighten boost hose clamp to 100 in. lbs.

Reconnect negative battery leads.

Finished install

Any questions, post them up here, or PM me!!
Place the new Factory Graphite gasket on the manifold, then the heater block, and to save trouble fitting it on later, (Clearance to the valve cover is tight.) the Aluminum reinforced gasket on top of the heater block. Install the studs by hand at first to get the threads started. Then use the 2 13mm nuts tightened against each other to tighten each stud into the manifold.
Before installing the CFM+ check the tightness of the 3 port plugs (3/16 allen wrench) or install fittings to the ports you wish to use. Your wiring harness stud should also be installed before this step.
Install the CFM+ on the studs, and start the end into the boost hose
Using the provided Flat washers and self locking nuts (13mm) snug the CFM+ down, then torque evenly to 140 in. lbs.
Place the wiring harnesses and washer on the wiring harness stud, and tighten nut.
Rotate the dipstick tube to its new mounting point. Start the dipstick-mounting bolt by hand to keep from cross threading, and then tighten with wrench.
Tighten boost hose clamp to 100 in. lbs.
Reconnect negative battery leads.
Finished install
Any questions, post them up here, or PM me!!
Thread Starter
Registered User
Joined: Sep 2007
Posts: 234
Likes: 0
From: Phoenix, Arizona
Registered User
Joined: Apr 2007
Posts: 512
Likes: 0
From: Stephenville/Llano, TX

Registered User
Joined: Apr 2005
Posts: 1,222
Likes: 69
From: Old Norte Mexico
Trending Topics

Registered User
Joined: Feb 2008
Posts: 331
Likes: 0
From: Baldwin, Kansas
Great write-up and pics.
Only thing I don't like about the CFM is the studs on the valve side.
Tends to scrape your wrist when doing injector #2.
Wonder if a guy could use the original bolts on that side?
J.D.
Only thing I don't like about the CFM is the studs on the valve side.
Tends to scrape your wrist when doing injector #2.
Wonder if a guy could use the original bolts on that side?
J.D.
Registered User
Joined: Nov 2006
Posts: 504
Likes: 0
From: MD
for the grid delete just remove the two + battery cables and leave the relay and ecm wires in place. then when it gets cold out simply plug in your block heater and you wont get any codes.
what triggers the code is if the wait to start light comes on when it gets cold, that triggers the heater grid to cycle and if its not hooked up the ecm wont see the voltage drop from it so it sets a code.
simply keep the wait to start light from coming on and you wont have any codes.
what triggers the code is if the wait to start light comes on when it gets cold, that triggers the heater grid to cycle and if its not hooked up the ecm wont see the voltage drop from it so it sets a code.
simply keep the wait to start light from coming on and you wont have any codes.
Registered User
Joined: Mar 2007
Posts: 4,813
Likes: 2
From: LaGrange, Texas
Nice writeup...I love my CFM+... the main thing I enjoy about it is how quickly the egts drop when coasting to a stop to kill the truck. Before I would have to wait for the egts to go below 350*, but now I sit at 275* by the time I stop the truck to kill it. Noticed slightly better spoolup, nice egts cruising, and i've had no issues whatsoever...good choice!
Registered User
Joined: Apr 2005
Posts: 1,222
Likes: 69
From: Old Norte Mexico
what triggers the code is if the wait to start light comes on when it gets cold, that triggers the heater grid to cycle and if its not hooked up the ecm wont see the voltage drop from it so it sets a code.
simply keep the wait to start light from coming on and you wont have any codes.
simply keep the wait to start light from coming on and you wont have any codes.
No codes, no electrical smoke, no truth from the ecm driven voltage gauge.


Registered User
Joined: Dec 2005
Posts: 47
Likes: 0
From: Wasilla, Ak
Yes, you can. That's what I did when I changed injectors. Those studs are a pain to get back out, once they're in.