
Pyro thermocouple placement??

Thread Starter
Registered User
Joined: Oct 2006
Posts: 1,641
Likes: 0
From: Harpers Ferry WV
Pyro thermocouple placement??
well a question for everyone out there that has put a pyrometer on their generation 3 cummins where did you place it in the manifold?? what type of drill did you use or did you remove the manifold? i have heard that the back to cylinders are the hotter ones and should be the ones to take the reading of and i have also seen them in the down tube and in the top. if you have pictures of the placement either send me a link or post the picture please.
thanks guys
thanks guys
Chapter President
Joined: Aug 2004
Posts: 3,481
Likes: 2
From: Kingsville, MD
here is a link for you that is very good.
https://www.dieseltruckresource.com/...highlight=pyro
https://www.dieseltruckresource.com/...highlight=pyro

Registered User
Joined: May 2004
Posts: 569
Likes: 0
From: Mountains of Western NM
Just put mine in two weeks ago and all I did was buy a tap of the appropriate size and it stated what size of drill bit to use. I bought the nitrite coated drill bit and then drilled the exhaust manifold just above where the turbo bolts up. I drilled to the back half as I heard there is a divider in the center. I drilled with an electric drill and did not remove any fender liners or anything else. I drilled and got a very fine dust of filings. I checked the hole depth frequently and when I had a very small hole into the inside of the manifold I had my son start the engine and then drilled on into the manifold. Of course I put on welding gloves and googles to keep from getting burned or something in my eyes. Once I was finished drilling I greased the tap and then tapped the hole. I would take somewhere between 1/2 and 1 full turn on the tap, remove it, clean the filings and grease off it and then grease it up again. I repeated the process until I had the hole properly tapped. It was suggested to not run the tap all the way into the hole as it is a tapered tap and it helps seal better if the hole is slightly tapered.
I actually thought the guage installation and wiring for the light and boost gauge were harder to do than the actual drilling and tapping for both.
I have since made a 1600 mile trip with the gauge and it was very interesting to see the temps change and the boost in different situations.
I actually thought the guage installation and wiring for the light and boost gauge were harder to do than the actual drilling and tapping for both.
I have since made a 1600 mile trip with the gauge and it was very interesting to see the temps change and the boost in different situations.

Registered User
Joined: Mar 2005
Posts: 6,259
Likes: 1
From: Utah


Chapter President
Joined: Aug 2004
Posts: 3,481
Likes: 2
From: Kingsville, MD
Trending Topics

Registered User
Joined: Jun 2006
Posts: 2,423
Likes: 1
From: Forest Grove, Oregon
I was told to install it on or close to #6 on the exhaust manifold. I think your location just above the turbo may also be a good location. Got to get time to get one installed on mine.

Registered User
Joined: Dec 2004
Posts: 220
Likes: 0
From: Ft Walton Beach, Fl
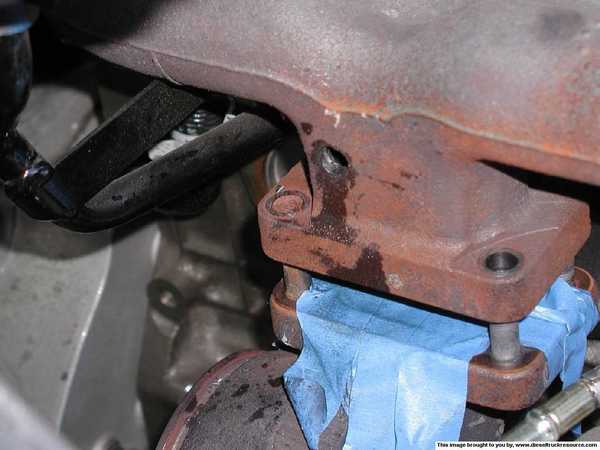
I put mine in the same location as the pic. I just coated my drillbit and my tap with silicone. Drill a little wipe it off, recoat, tap a little pull it out, wipe it off, recoat and so on and so forth. That was about 15,000 miles ago no problems.
Registered User

Joined: Apr 2006
Posts: 5,777
Likes: 0
From: Alta Loma, CA
I just did mine a couple days ago. I just popped the hood, stood on the tire and with the engine running drilled through the top of the manifold with a 1/8" greased bit (I used trailer ball lithium grease because it was handy). Then I grabbed a 21/64" bit, greased it, and drilled through the 1/8" pilot hole, again with the engine running. Finally, grabbed my 1/8" NPT tap and tapped the the hole. I did it by hand and checked the depth frequently with the probe to make sure I didn't go too deep. Took about 30 mins. total, mainly because turning the tap by hand was a bit slow. Its really easy to do. That was my first one and could probably do the 2nd in half the time.

Thread
Thread Starter
Forum
Replies
Last Post
scjfly
Performance and Accessories 2nd gen only
9
May 19, 2011 12:53 AM
Diesel fitter
3rd Gen High Performance and Accessories (6.7L Only)
19
Jan 12, 2009 10:19 PM
CamperAndy
3rd Gen High Performance and Accessories (5.9L Only)
7
Apr 3, 2007 09:43 AM
C Schomer
3rd Gen High Performance and Accessories (5.9L Only)
23
Oct 5, 2006 03:39 PM
Shootist
3rd Gen High Performance and Accessories (5.9L Only)
3
Mar 5, 2005 01:27 PM