
Chasing P0340, P0341 Camshaft Position Sensor

Thread Starter
Administrator / Free Time Specialist
Joined: Nov 2005
Posts: 7,707
Likes: 16
From: Birmingham, Alabama
Chasing P0340, P0341 Camshaft Position Sensor
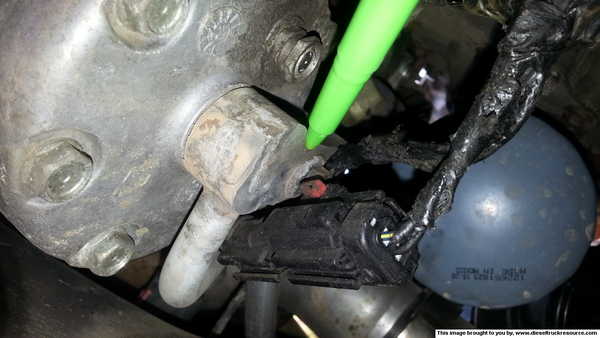
Lately I've been getting the codes for a cam sensor malfunction. I picked up the sensor but before installing it I wanted to check another likely cause for the codes, the wiring harness that wraps around the back of the a/c compressor. In my research here I found several folks have reported chaffed wires in that location. The other 2 items that hit the list is the cam position sensor it's self and the thrust washer at the end of the camshaft. Because the codes are intermittent, meaning they show up with only the CEL and nothing else noticeable going on to a violent stumble and nothing else. In the first case the CEL will sometimes go away after a few run cycles, sometimes not. In the second case I have to clear the codes with a code reader. Since I only found one picture of the wires in question I figured I'd throw a couple more in the mix and show how easy it is to check and/or repair the wires.
I would recommend you do this work on a cold vehicle since you'll be working around the engine and a/c unit. First, you'll need a minimum of supplies. You will need about 1 foot of 3/8" plastic wire loom, some good quality electrical tape and a blade. I used a small lock blade knife I carry. I would also recommend clear safety glasses or a face shield since you will get some dirt and grit dropped on you. No need to add a trip to the eye doctor into the day. Next you'll need to raise the front passenger's side of the truck enough so you can slide under from the front and work comfortably. If you're using a jack to raise the truck don't forget, work on a level, hard surface and use an appropriately rated jack stand(s). In case you don't know the weight of these trucks start around #7200 and you're working on the heavy end. Once you have the truck raised and secured locate the a/c compressor on the passenger's side of the engine, below the oil filter.

On the back of the compressor you'll see some wires and a large plug. You'll also see a small group of wires running up and wrapping around a metal a/c line (green pointer), that's our target for today. If you lean slightly toward the wheel you'll notice they run to a plug on that metal a/c line. You'll need to unplug that plug to gain the working space you need.

I'm going to show you the plug and explain it's operation because all these automotive connections are a PITA, especially in tight spaces. Notice the red horseshoe looking piece of the plug, slide that toward the rear. It will move about 1/4", then press hard in the area between the square red dot and the center of the horseshoe. Pull back with a slight rocking motion and the plug should come right off.

Once you have the plug out you can drop the wire down to access it more easily.

Next you'll want to carefully inspect the wire for chaffing or breaks. In my case the wires were rubbing in 2 locations and the outer wrap was damaged but I did not appear the have any wire damage. The green pointer shows the locations of the damage to the outer wrap.
Now that you have the wires down, CAREFULLY remove the outer wrap and inspect again for damage. There's 3 wires in that wrap, try not to nick the insulation on them.

After you finish the inspection, wrap each with tape and then wrap the bundle.

Next, install them in that piece of plastic wire loom.

I would recommend you do this work on a cold vehicle since you'll be working around the engine and a/c unit. First, you'll need a minimum of supplies. You will need about 1 foot of 3/8" plastic wire loom, some good quality electrical tape and a blade. I used a small lock blade knife I carry. I would also recommend clear safety glasses or a face shield since you will get some dirt and grit dropped on you. No need to add a trip to the eye doctor into the day. Next you'll need to raise the front passenger's side of the truck enough so you can slide under from the front and work comfortably. If you're using a jack to raise the truck don't forget, work on a level, hard surface and use an appropriately rated jack stand(s). In case you don't know the weight of these trucks start around #7200 and you're working on the heavy end. Once you have the truck raised and secured locate the a/c compressor on the passenger's side of the engine, below the oil filter.
On the back of the compressor you'll see some wires and a large plug. You'll also see a small group of wires running up and wrapping around a metal a/c line (green pointer), that's our target for today. If you lean slightly toward the wheel you'll notice they run to a plug on that metal a/c line. You'll need to unplug that plug to gain the working space you need.
I'm going to show you the plug and explain it's operation because all these automotive connections are a PITA, especially in tight spaces. Notice the red horseshoe looking piece of the plug, slide that toward the rear. It will move about 1/4", then press hard in the area between the square red dot and the center of the horseshoe. Pull back with a slight rocking motion and the plug should come right off.
Once you have the plug out you can drop the wire down to access it more easily.
Next you'll want to carefully inspect the wire for chaffing or breaks. In my case the wires were rubbing in 2 locations and the outer wrap was damaged but I did not appear the have any wire damage. The green pointer shows the locations of the damage to the outer wrap.
Now that you have the wires down, CAREFULLY remove the outer wrap and inspect again for damage. There's 3 wires in that wrap, try not to nick the insulation on them.
After you finish the inspection, wrap each with tape and then wrap the bundle.
Next, install them in that piece of plastic wire loom.
Thread Starter
Administrator / Free Time Specialist
Joined: Nov 2005
Posts: 7,707
Likes: 16
From: Birmingham, Alabama
Next, look up behind the a/c lines and you'll see another group of wires that run from the large plug on the back of the compressor toward the top of the engine. That group of wires is held in place by a small clip. I couldn't access the screw on that clip but I was able to insert a long flat blade screwdriver under the edge of it and pry it slightly up to release the wires. They have a cover on them to prevent them from getting pinched and chaffed. Inspect this section as well for damage and if you find any, repair it in a similar manner. Put the wire back in the clip when you finish and bend the clip back in place to secure the wires.
Now route the first group of wires back up and around the a/c line and plug them back in. Don't forget to slide the red locking clip back into place.

That's it, you're done. The total time for this was just under an hour. All you have left to do is clean up your tools and let the truck back down but, while you're under there take a look around. I found a coolant drip and the rack has a wet spot on the passenger's side. Not that this is good news but it's a sign that more articles like this are on the horizon.
Now route the first group of wires back up and around the a/c line and plug them back in. Don't forget to slide the red locking clip back into place.
That's it, you're done. The total time for this was just under an hour. All you have left to do is clean up your tools and let the truck back down but, while you're under there take a look around. I found a coolant drip and the rack has a wet spot on the passenger's side. Not that this is good news but it's a sign that more articles like this are on the horizon.
Thread Starter
Administrator / Free Time Specialist
Joined: Nov 2005
Posts: 7,707
Likes: 16
From: Birmingham, Alabama
A little follow up. After I wrapped these wires I drove about 500 miles with no issue. I loaded the Smarty back on the truck at that point and 5 miles later the codes were back. I guess the next step is to replace the sensor unless someone has any other ideas.
Cummins Guru


Joined: Feb 2008
Posts: 4,191
Likes: 65
From: Sunny Southern California Land of Fruits and Nuts
I hate to say it but you most likely have a bad camshaft. For some reason the 3500 were more prone to have this problem. I had two in the last few months come in with cam shaft code setting. After chasing my tail around doing all the wiring tests, cam sensor replace, PCM replace I finally contacted the engineers at Chrysler (STAR). They confirmed camshaft problems with the 3500 was common issue . I replaced camshaft under warranty and owner happily drove away without the code ever resetting again. If you check end play spec. you will need to remove all the pushrods first, then remove front timing cover. Install dial indicator and check camshaft endplay. End Play 0.12 - 0.5 mm 0.005 - 0.020 in.
You can swap cam sensor first with the crank sensor since they are both the same sensor, If the code switches to crank sensor then you just have a bad sensor. Which would be great for you, or just try a new sensor first since the cam sensor is not the easiest to get at.
When the cam shaft has too much end play the cam gear will move forward increasing air gap between sensor and cam gear causing sensor to drop out setting code. If you still get same code after replacing sensor then a lab scope could prove to be the best way to confirm cam shaft end play issue. That way you wouldn't need to pull cover and push rods to check.
Here is diagnostics for code p0341
Thread Starter
Administrator / Free Time Specialist
Joined: Nov 2005
Posts: 7,707
Likes: 16
From: Birmingham, Alabama
I hate to say it but you most likely have a bad camshaft. For some reason the 3500 were more prone to have this problem. I had two in the last few months come in with cam shaft code setting. After chasing my tail around doing all the wiring tests, cam sensor replace, PCM replace I finally contacted the engineers at Chrysler (STAR). They confirmed camshaft problems with the 3500 was common issue . I replaced camshaft under warranty and owner happily drove away without the code ever resetting again. If you check end play spec. you will need to remove all the pushrods first, then remove front timing cover. Install dial indicator and check camshaft endplay. End Play 0.12 - 0.5 mm 0.005 - 0.020 in.
I have read several of your posts on the subject and appreciate you're input! In the case of the bad camshafts, did any of the customers report a dramatic drop in fuel economy?
Cummins Guru
Joined: Feb 2008
Posts: 4,191
Likes: 65
From: Sunny Southern California Land of Fruits and Nuts
no they didn't at the time. But definitely had me going for a while. Insurance company wouldn't drop any more money into repair after they paid for cam sensor and PCM. I was lucky that Chrysler footed the bill. Paid 8 hrs. to replace camshaft, not bad for warranty.
Trending Topics
Thread Starter
Administrator / Free Time Specialist
Joined: Nov 2005
Posts: 7,707
Likes: 16
From: Birmingham, Alabama
I didn't notice it being that close but I will check it again, thanks. As to the fuel economy I changed the air filter and added some Lucas to the tank. It might just need a little tlc.

Registered User
Joined: Jan 2006
Posts: 5,902
Likes: 5
From: Claxton, GA
If the cam sensor pick-up gets too far away from the cam you will through a cam sensor code. So, if an aftermarket cam was installed and they didn't press the gear on all the way you will get a code. Ask me how I know....
So, if your cam gear is walking off the cam or the cam retainer get's worn allowing the cam to walk back and forth far enough away from the cam sensor to not register the pickups on the back of the gear, you will through a code. The cam sensor and crank sensor are the same. If it is a sensor issue you can swap these 2 sensors to see if the code follows to a crank sensor code.
So, if your cam gear is walking off the cam or the cam retainer get's worn allowing the cam to walk back and forth far enough away from the cam sensor to not register the pickups on the back of the gear, you will through a code. The cam sensor and crank sensor are the same. If it is a sensor issue you can swap these 2 sensors to see if the code follows to a crank sensor code.
Cummins Guru
Joined: Feb 2008
Posts: 4,191
Likes: 65
From: Sunny Southern California Land of Fruits and Nuts
I was also going to try before Chrysler decided to foot the bill for a new camshaft. Remove sensor and using micrometer measure thickness of spacer on sensor. From this picture you can see the metal spacer. .005 isn't much but it may be enough to prevent code from setting. If you remove too much from spacer thickness possible problem of sensor hitting camshaft gear and damaging sensor. Swap sensors first before you do anything and see if code follows the sensor to the crankshaft. Just like Spooler said
Thread Starter
Administrator / Free Time Specialist
Joined: Nov 2005
Posts: 7,707
Likes: 16
From: Birmingham, Alabama
I haven't been able to make the time to look at it yet but I was considering looking at how to make the sensor sit deeper in the mounting hole. As long as the gear doesn't walk back into it all is good, in the short term. The bad side is I would still be looking at pulling the cam I guess. I'll bet that wore out washer is probably all the way in the back huh?
Registered User
Joined: Jan 2006
Posts: 5,902
Likes: 5
From: Claxton, GA
Noop, it's in the front. Have to pull the cam and press off the gear. It's a half moon and rests in a slot between the cam gear and cam itself. It won't slip over the cam, so it needs to be in place before you press the cam gear on. It's call the thrust washer/retainer. A cam job is about 7-8 hr job. If you are going to pull the cam, go with an aftermarket one. I really like my 188/208 Hamilton cam.
Thread Starter
Administrator / Free Time Specialist
Joined: Nov 2005
Posts: 7,707
Likes: 16
From: Birmingham, Alabama
Noop, it's in the front. Have to pull the cam and press off the gear. It's a half moon and rests in a slot between the cam gear and cam itself. It won't slip over the cam, so it needs to be in place before you press the cam gear on. It's call the thrust washer/retainer. A cam job is about 7-8 hr job. If you are going to pull the cam, go with an aftermarket one. I really like my 188/208 Hamilton cam.
Registered User
Joined: Jan 2006
Posts: 5,902
Likes: 5
From: Claxton, GA
Gained 1mpg at 69mph. I trialed the cam for Hamilton. My comparison route was 107 mile round trip interstate driving. Test were done with fuel filled to the top of the filler neck where I could see it. The slower I go the better I can get. Better low end torque. It's awesome towing. I'll never go back to a stock cam. I have 4.10 gears and to get that mileage increase at those interstate speeds was awesome. I was getting 19.6 mpg.
Registered User
Joined: Nov 2012
Posts: 9
Likes: 1
From: Eastern NC
Just fixed my cam code. Cam gear was not pressed all the way to the shoulder on the shaft. Pressed the cam gear on and everything is fine. I had the code for a little while, until the bolts broke in the thrust washer dropped into the gears and destroyed the crank, cam and fuel pump gears. replaced all of them myself without pulling the cam shaft. Heated the gears cooled the shafts and thought it was fixed. All of this after changing the wire harness and ECM because local cummins shop said I had a short. When the smoke finally cleared I still had a cam code! This is when I pulled the cam and realized the cam gear still needed to be pressed on an 1/8 of an inch. The shaft was sticking out past the cam gear an 1/8 when it was pressed to the shoulder. Finally no cam code!! Should have checked the end play of the cam shaft after I ruled out it was not a short. End play tolerance is very small. 06 engine just installed in my 05 3500