
YES! Headlight Adjust Screws Fixed!

Thread Starter
Chapter President
Joined: Oct 2002
Posts: 4,983
Likes: 1
From: Sedalia, Texas
YES! Headlight Adjust Screws Fixed!
The torx screws on both of my headlights stripped out a long time ago. When I posted about it here a long time ago, it was suggested that I use a Dremel to cut a groove in them and adjust them with a straight blade screwdriver. At that time, I tried and tried to get the headlight assemblies out, but couldn't get the top to come loose.
A couple of days ago, I looked at some old post and found out that the top is held by a screw that is pressed into a clip. They were right, it popped right out. The post also talked about dropping the bumper down or your would scratch it up getting the light assembly out. They were right about that too. Not bad, but a few little gouges.") Well, after I got it out and the screws "dremel'd", I couldn't get it back in! Finally I removed the little clips that hold the screws in place and that allowed me to seperate the light frame and the lens assembly. This worked....it was a little tricky getting the clips back on, but fortunatly, when you drop one, it drops straight thru to the ground. All this took about two hours, and it was too dark to do the drivers side last night.
Well, after I got it out and the screws "dremel'd", I couldn't get it back in! Finally I removed the little clips that hold the screws in place and that allowed me to seperate the light frame and the lens assembly. This worked....it was a little tricky getting the clips back on, but fortunatly, when you drop one, it drops straight thru to the ground. All this took about two hours, and it was too dark to do the drivers side last night.
Now, all I have to do is go out and adjust them after dark.
Today I done the drivers side by removing the turn signal assembly, taking the three screws that hold the housing out, and popping it out of the pressed in screw. I then removed the clips and then the headlight lens cover. After removing the light cover, the frame came out too. "Dremel'd" the screws and reassembled it without scratching or lowering the bumper . Took about 30 minutes.
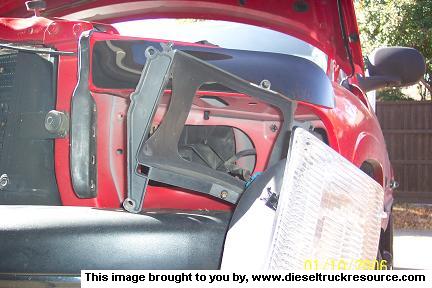
Dis-assembled Headlight Frame
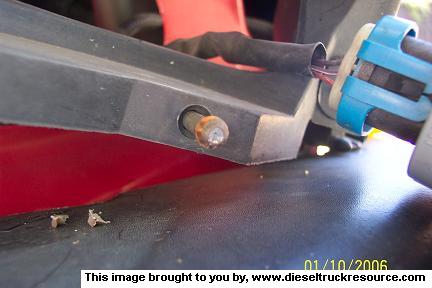
Old Screw
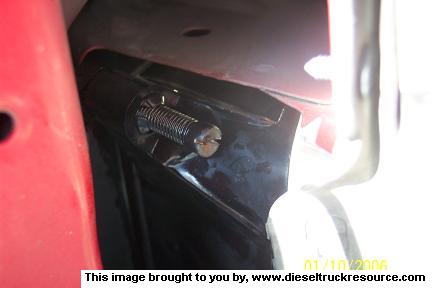
"Dremel'd" Screw
A couple of days ago, I looked at some old post and found out that the top is held by a screw that is pressed into a clip. They were right, it popped right out. The post also talked about dropping the bumper down or your would scratch it up getting the light assembly out. They were right about that too. Not bad, but a few little gouges.
Well, after I got it out and the screws "dremel'd", I couldn't get it back in! Finally I removed the little clips that hold the screws in place and that allowed me to seperate the light frame and the lens assembly. This worked....it was a little tricky getting the clips back on, but fortunatly, when you drop one, it drops straight thru to the ground. All this took about two hours, and it was too dark to do the drivers side last night.Now, all I have to do is go out and adjust them after dark.
Today I done the drivers side by removing the turn signal assembly, taking the three screws that hold the housing out, and popping it out of the pressed in screw. I then removed the clips and then the headlight lens cover. After removing the light cover, the frame came out too. "Dremel'd" the screws and reassembled it without scratching or lowering the bumper . Took about 30 minutes.
Dis-assembled Headlight Frame
Old Screw
"Dremel'd" Screw

Registered User
Joined: Apr 2005
Posts: 279
Likes: 0
From: Northport, Wa
They are a treat arn't they!! I finally got mine working alright only to bump a deer a week later. Of course it popped the bracket off the lower adjuster. I think this time I can do it in an hour!!

Registered User

Joined: Sep 2004
Posts: 2,888
Likes: 1
From: St Paul , MN.
I look at this as just anouther scam by the manufactures , I'ld like to go back to the sealed beam headlites , by the time the bulb goes out you need a new lense anyway . Funny thing is every time its spouse to be better it somehow seems to cost a lot more , not so funny.

Registered User
Joined: Jul 2002
Posts: 2,242
Likes: 16
From: Celina, TX
Here's the procedure from the FSM, I just adjusted mine this way the other night and it seems to have improved my low beam field of coverage. Before I adjusted, I was real low and right of center.
LAMP ALIGNMENT SCREEN PREPARATION
(1) Position vehicle on a level surface perpendicular to a flat wall 7.62 meters (25 ft) away from front of headlamp lens.
(2) If necessary, tape a line on the floor 7.62 meters (25 ft) away from and parallel to the wall.
(3) Up 1.27 meters (5 feet) from the floor, tape a line on the wall at the centerline of the vehicle. Sight along the centerline of the vehicle (from rear of vehicle forward) to verify accuracy of the line placement.
(4) Rock vehicle side-to-side three times to allow suspension to stabilize.
(5) Jounce front suspension three times by pushing downward on front bumper and releasing.
(6) Measure the distance from the center of headlamp lens to the floor. Transfer measurement to the alignment screen (with tape). Use this line for up/down adjustment reference.
(7) Measure distance from the centerline of the vehicle to the center of each headlamp being aligned. Transfer measurements to screen (with tape) to each side of vehicle centerline. Use these lines for left/right adjustment reference.

VEHICLE PREPARATION FOR HEADLAMP ALIGNMENT
(1) Verify headlamp dimmer switch and high beam indicator operation.
(2) Verify headlamps are set for low beam operation.
(3) Correct defective components that could hinder proper headlamp alignment.
(4) Verify proper tire inflation.
(5) Clean headlamp lenses.
(6) Verify that luggage area is not heavily loaded.
(7) Fuel tank should be FULL. Add 2.94 kg (6.5lbs.) of weight over the fuel tank for each estimated gallon of missing fuel.
HEADLAMP ADJUSTMENT
Headlamps can be aligned using the screen methodprovided or alignment tool C-4466�A or equivalent can be used. refer to the instructions provided with
the tool for proper procedures. A properly aimed low beam headlamp will project top edge of high intensity pattern on screen from 50 mm (2 in.) above to 50 mm (2 in.) below headlamp centerline. The side-to-side outboard edge of high intensity pattern should be from 50 mm (2 in.) left to 50 mm (2 in.) right of headlamp centerline. The preferred headlamp alignment is 1� down for the up/down adjustment and 0 for the left/right adjustment. The high beam pattern should be correct when the low beams are aligned properly. To adjust headlamp aim, rotate alignment screws to achieve the specified high intensity pattern.
LAMP ALIGNMENT SCREEN PREPARATION
(1) Position vehicle on a level surface perpendicular to a flat wall 7.62 meters (25 ft) away from front of headlamp lens.
(2) If necessary, tape a line on the floor 7.62 meters (25 ft) away from and parallel to the wall.
(3) Up 1.27 meters (5 feet) from the floor, tape a line on the wall at the centerline of the vehicle. Sight along the centerline of the vehicle (from rear of vehicle forward) to verify accuracy of the line placement.
(4) Rock vehicle side-to-side three times to allow suspension to stabilize.
(5) Jounce front suspension three times by pushing downward on front bumper and releasing.
(6) Measure the distance from the center of headlamp lens to the floor. Transfer measurement to the alignment screen (with tape). Use this line for up/down adjustment reference.
(7) Measure distance from the centerline of the vehicle to the center of each headlamp being aligned. Transfer measurements to screen (with tape) to each side of vehicle centerline. Use these lines for left/right adjustment reference.
VEHICLE PREPARATION FOR HEADLAMP ALIGNMENT
(1) Verify headlamp dimmer switch and high beam indicator operation.
(2) Verify headlamps are set for low beam operation.
(3) Correct defective components that could hinder proper headlamp alignment.
(4) Verify proper tire inflation.
(5) Clean headlamp lenses.
(6) Verify that luggage area is not heavily loaded.
(7) Fuel tank should be FULL. Add 2.94 kg (6.5lbs.) of weight over the fuel tank for each estimated gallon of missing fuel.
HEADLAMP ADJUSTMENT
Headlamps can be aligned using the screen methodprovided or alignment tool C-4466�A or equivalent can be used. refer to the instructions provided with
the tool for proper procedures. A properly aimed low beam headlamp will project top edge of high intensity pattern on screen from 50 mm (2 in.) above to 50 mm (2 in.) below headlamp centerline. The side-to-side outboard edge of high intensity pattern should be from 50 mm (2 in.) left to 50 mm (2 in.) right of headlamp centerline. The preferred headlamp alignment is 1� down for the up/down adjustment and 0 for the left/right adjustment. The high beam pattern should be correct when the low beams are aligned properly. To adjust headlamp aim, rotate alignment screws to achieve the specified high intensity pattern.
Trending Topics
Registered User
Joined: Jul 2002
Posts: 2,242
Likes: 16
From: Celina, TX
Now that you're an experienced head light repair technician, I'll have to bring mine over to you and let you fix my driver's side adjuster. I think that the screw is bent and I'm missing the metal clip from the bottom. So when you turn, you have to make a full revolution so that it bends upward to the light to engage the clip. It's holding for now, but just another project to add to the list.
I think that the screw is bent and I'm missing the metal clip from the bottom. So when you turn, you have to make a full revolution so that it bends upward to the light to engage the clip. It's holding for now, but just another project to add to the list.
Thread Starter
Chapter President
Joined: Oct 2002
Posts: 4,983
Likes: 1
From: Sedalia, Texas
Not a problem. Let me know when, and we'll get together.
The screw being bent is a problem, but it can probably be straightened somewhat. Are you talking about the "U" shaped clip that holds the screw head in place? Since those little suckers hold the aliginment screw in place, you might want to try and find one.
The screw being bent is a problem, but it can probably be straightened somewhat. Are you talking about the "U" shaped clip that holds the screw head in place? Since those little suckers hold the aliginment screw in place, you might want to try and find one.
Registered User
Joined: Jul 2002
Posts: 2,242
Likes: 16
From: Celina, TX
The U shaped part looks to be molded into the plastic of the headlamp unit. But underneath that is a metal clip that goes across both legs of the U to retain the head of the adjusting screw in the U, the metal piece is missing on mine. But for now, as long as the screw bends upward, the head is retained in the U by the upward force.

Registered User
Joined: May 2019
Posts: 1
Likes: 0
Lost headlight adjusting screw
Anyone know what to do if I lost the adjusting screw or where I might find one?
I�ve tried all the ones they sell at autozone and advanced and nothing works. Called the dealership and they don�t sell it separately.
I�ve tried all the ones they sell at autozone and advanced and nothing works. Called the dealership and they don�t sell it separately.


Thread
Thread Starter
Forum
Replies
Last Post