
vacuum pods

Thread Starter
Registered User
Joined: Mar 2008
Posts: 4,389
Likes: 114
From: Orange County, California
vacuum pods
does anybody have some close shots of the lower vacuum pod on a non i/c'd motor? i'm thinking about removing mine altogether since i can't find a formed hose for it. i've read older threads and found out that a 2nd pod is almost useless since one of them pulls sufficient vacuum for the brakes and heater controls. i've got a sheet of 1/8" aluminum i could cut a block of plate out of. i'd just like to see closer pictures and know if i can remove the pod fairly easy without having to remove the vacuum and power steering pump assembly. thanks for any help in advance.

Administrator


Joined: Nov 2004
Posts: 4,084
Likes: 235
From: Southern California
Here are some pictures from when I repaired my vacuum pump.
https://www.dieseltruckresource.com/....html?t=165546
https://www.dieseltruckresource.com/....html?t=165546
Thread Starter
Registered User
Joined: Mar 2008
Posts: 4,389
Likes: 114
From: Orange County, California
awesome pictures. is it easier to remove the pods with the pump out of the engine? really, the only reason i contemplated removing the lower pod is because in place of what should be a formed hose, there was a braided rubber fuel hose that became kinked because of such a hard turn and it has been leaking forever. i can't find a replacement formed hose anywhere. as much experience and knowledge as i'm sure you have, do you have any good sources mr. lane? i've looked through napa's catalog of formed coolant hoses, but turned up with no such luck, other than having to buy one that's close to what i need and cutting it to length. i may end up just buying an external spring that slips over standard rubber hoses to keep them from kinking.
Administrator
Joined: Nov 2004
Posts: 4,084
Likes: 235
From: Southern California
The first problem is you need to use vacuum rated hose or a good heavy wall hose like Push Lok.
It would probably be easier to use longer sections of hose and then tee it off higher up on its way to the brake booster.
My intentions are to reroute the hoses from the chambers and isolate them using check valves in each line, this way if one fails it would isolate the failed unit from the working one and I would not loose my brakes.
Been there and it was a very uneasy feeling.
Jim
Thread Starter
Registered User
Joined: Mar 2008
Posts: 4,389
Likes: 114
From: Orange County, California
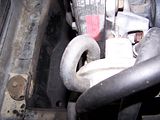
just to clarify we're talking about the same hose. it's the u-shaped hose that runs from the bottom to the top-side of the pod. i wanna say that i've heard it's an oil supply of some sort? this hose...

Administrator
Joined: Nov 2004
Posts: 4,084
Likes: 235
From: Southern California
There is no oil supplied to any part of the chamber, the only place there is any oil is at the backside of the plunger and the O-ring is all that stops it from leaking out.
I believe that hose only supplies clean air through a filter screen on the backside of the housing but I could take a closer look if you wish.
If you have oil leaking I would check and replace the small o-ring between the chamber and the housing.
Jim
I believe that hose only supplies clean air through a filter screen on the backside of the housing but I could take a closer look if you wish.
If you have oil leaking I would check and replace the small o-ring between the chamber and the housing.
Jim
Trending Topics
Thread Starter
Registered User
Joined: Mar 2008
Posts: 4,389
Likes: 114
From: Orange County, California
jim if you don't mind taking the time out of your busy schedule to look closer at it, i'd really appreciate it. it may be just that, i need a new o-ring. is there a seal kit from cummins that i could get for it? and do you know the size of the bolt and stud handy that you used for removing and reinstalling the pump gear? i may just remove mine and go through it and could probably prevent the problem you had with yours.

Registered User


Joined: Oct 2005
Posts: 6,457
Likes: 95
From: KENTUCKY
Due to cross-member clearance issues when I installed the Cummins in my Ford, I had to remove and block off the bottom pod.
I made a simple aluminum plate to seal the hole, held in place by the pod mounting screws.
Had I not removed the pod, I may never ever have known that the operating-rod for the bottom pod was missing in action; that bottom pod had been just going along for the ride the whole 67,000-miles that were on the donor truck.
I am sort of a self-proclaimed expert on vacuum-pump pods and I still have no idea just what function those rubber hoses perform.
The pods are readily available for numerous applications, all having the same exact bolt-pattern, and all interchangeable, regardless of having that hose or not.
There is no rhyme or reason as to which pods any particular application gets; I have seen them on Fords, Dodges, some Chevys, and all vacuum-over-hydraulic trailer kits, one will have the hose and the next not have it.
If that hose is the only offense, I would repair the hose and keep the pod.
Administrator
Joined: Nov 2004
Posts: 4,084
Likes: 235
From: Southern California
jim if you don't mind taking the time out of your busy schedule to look closer at it, i'd really appreciate it. it may be just that, i need a new o-ring. is there a seal kit from cummins that i could get for it? and do you know the size of the bolt and stud handy that you used for removing and reinstalling the pump gear? i may just remove mine and go through it and could probably prevent the problem you had with yours.
The line that connects the front and back of the chamber is only a vent line so the diaphragm can draw clean air; the side opposite of the pushrod is open to the atmosphere.
If there were oil leaking I would clean it off with Simple Green or brake cleaner and try and see where it is coming from.
The o-ring can be replaced by removing the 4 nuts and dropping the chamber, the o-ring sits inside the bore but it could also be leaking from the behind the adapter plate or even the gasket to the back of the timing cover but there should be no oil in that hose.
Sorry I do not know the size of the o-ring but I understand that there is a repair kit from the dealer.
I will have to try and find where I left the studs to get a measurement, sorry.
Jim
Thread Starter
Registered User
Joined: Mar 2008
Posts: 4,389
Likes: 114
From: Orange County, California
i think it may only be the hose. but i had oil dripping from it for the longest time. i'm thinking the o-ring is also suspect. if that's the case then all i need is the gasket between the pump and timing case cuz i've got a collection of all different sized o-rings that i could search through for a matching replacement.
Registered User
Joined: Oct 2005
Posts: 6,457
Likes: 95
From: KENTUCKY
When I had mine off, I was careful not to damage the gasket no more than necessary.
I put it back together with the old gasket and a light coat of black RTV.
It never has leaked.
Another little gasket trick that I have used for years that works really well especially on new gaskets is to coat both sides of the gasket with non-hardening Form-a-Gasket Sealant #2.
Two days or twenty years later, the part can be removed without damaging the gasket and no gasket scraping.
Thread Starter
Registered User
Joined: Mar 2008
Posts: 4,389
Likes: 114
From: Orange County, California
i do have some black rtv. i also have some sensor-safe ultra copper high temp rtv silicone gasket maker. i would imagine it could work just as well as black rtv.
97catintenn, i'm betting on the o-ring too. especially since there shouldn't be any oil in that breather hose. or maybe like on BK's whose didn't even have the plunger in it at all, mine could very well be the same and oil is just filling up the pod. guess we'll see. so would you guys recommend removing the pump for the ease of working on it?
97catintenn, i'm betting on the o-ring too. especially since there shouldn't be any oil in that breather hose. or maybe like on BK's whose didn't even have the plunger in it at all, mine could very well be the same and oil is just filling up the pod. guess we'll see. so would you guys recommend removing the pump for the ease of working on it?
Registered User
Joined: Nov 2003
Posts: 503
Likes: 2
From: Columbia, TN
Hardened pin or drill bit 5/16" diameter 2" long
Hardened M14 bolt 13 threads per inch about 2 1/8" long
For installation:
SAE hardened 3/8" diameter bolt, 16 threads per inch*, 2 3/4"s (or longer with spacers/washers) long.
Also, just before separating, and prior to dropping in the removal pin, take your calipers and measure the depth inside. Write that down, and during installation, if you are not sure that you have seated it all the way, you can take another measurement for confirmation.
*I know the FSM calls for a 3/8-18, but I just put my steering pump on last week and still have the bolts all together sitting in my tray. I measured the threads using my Mitutoyo Pitch Gauge.
We I did the seperation, instead of using a hardened pin, I just cut off some 5/16" all thread...while it worked, the all thread was bent when I removed it, can thankfully, it didn't damage my internal threads needed for installation.

