Service your Rear Bearings/Seals
 04-29-2007, 09:24 PM
#1
1st Generation Admin
Thread Starter
Once again this is an attempt to repay all the information you good folks have afforded me.
In this thread, I'm in the midst of upgrading my rear drum brakes to discs. Regardless, the usual bearing inspection and hub resealing is in order and that's what's illustrated here.
This is by no means "The Authorities How-To" for servicing your rear bearings and seals. There's at least one instance where I'm not using the FSM recommended tools for simply not having them.
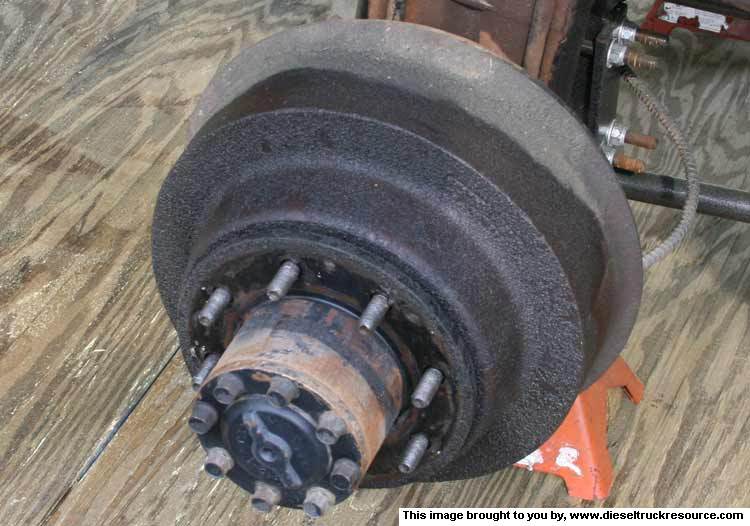
As it stands, I'm working on a 1993 W250 with the typical Dodge OEM issue DANA70 rear axle using OEM drum brakes (initially anyway). Pretend the discs are drums in the later images.
Finally, I'm gonna pretty-much fast forward through the truck set-up & disassembly and concentrate on the re-assembly. Understanding how to put it together will make disassembly a breeze.
READ ALL THESE INSTRUCTIONS BEFORE ATTEMPTING THIS WORK.
With that, let's get started.
As always ~ SAFETY FIRST!
- Chock the front wheels
- Disconnect the Negative battery cable from the battery.
- Have a known good fire extinguisher within sight.
- Have a clean, uncluttered work area.
- Have good lighting.
- Considering you'll be lifting/holding the vehicle with a jack and safety stands, be sure they're rated for the load with a good safety factor. Don't cut any corners here. Cinder-blocks WILL kill you! When considering all this, don't forget to include a strong, level area to park the truck.
- With any work I do, I usually power wash everything the night before. If you don't have the means at home, the local car-wash works well. If you don't walk away soaking wet with gritty/grime on your face, you need to strike it again.
- All right. Chock the front wheels. Go ahead and loosen the rear wheel lug nuts while the truck is still on the ground.
- Safely raise and firmly support the rear of the truck. I found about an inch clearance under the rear tires worked well. It certainly made putting the tires back on much easier. I used two 3-ton capacity safety stands set so that the hand of each stand supported the axle where the axle tube meets the bracket for the shock absorbers
- Go ahead and remove the rear wheels. It wouldn't hurt to place them under the truck frame rails as another means of catching the truck should a safety stand fail. Under the rear of the cab works.
OK so step back and here's what we have ~
OK, since I'm converting to rear disc brakes, I'm gonna have to skip the rear brake service work all together. You may actually be doing something similar. You'll most likely find useful info in "The Sticky" found at the top of these forums. Here's a link ~ https://www.dieseltruckresource.com/...56&postcount=5
- Unbolt the rear axle from the hub and set aside so as not to get it dirty. Have a peek at the splines that plug into the differential looking for any weird wear patterns and such. In removing the axle, be careful of the metal gasket and don't damage it since it's often reusable. There will be a small amount of lube oil drain out so be prepared with an appropriate catch-pan.
- Remove the little lock widget that is jambed in between the axle tube and the adjustment nut. Pliers work fine. Don't loose the lock though it's recommended to replace it.
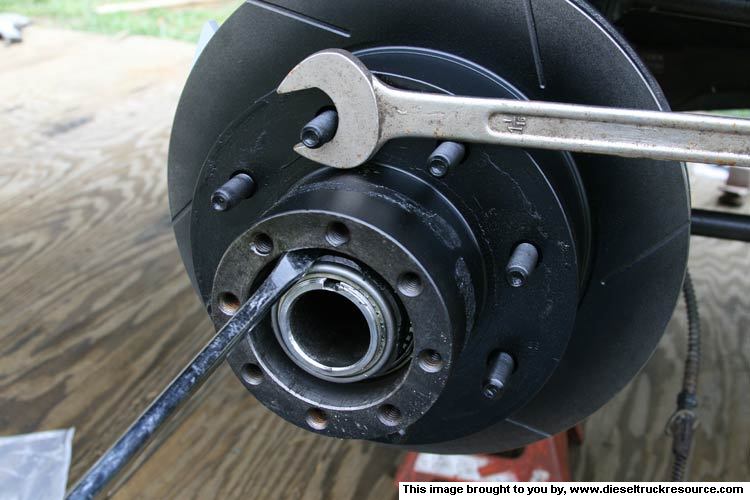
- Now we need to remove the adjustment nut itself. This is where I didn't have the correct socket at the time and have since seen them at the local parts house for around $20. I used a large flat-blade screw driver to wedge in between the hub and a flat of the adjustment nut. Set the blade so it will push on the leading edge of a flat of the nut with the other edge of the blade pressing against the hub's interior. Now take a large wrench and hook a lug bolt and push against the hub while twisting the screw driver. The nut will be pushed on around. ~
- Remove the adjustment nut and set aside.
- Now remove the drum/hub assembly being prepared to catch the outer bearing should it fall out. If you have difficulty removing the assembly due to the drum catching on the shoes, check "The Sticky' as there's a thread about dealing with such.
- Remove the outer bearing (if it's not on the floor) and set aside. Flip the drum/hub assembly over. If you've got a seal puller, pry out the inner wheel seal (NOTE: See axle groove notes below before removing old seal). I can't find my puller so I used a block of wood to reach through the outer bearing side and drifted the bearing and seal out with light taps of a mallet. You don't want to damage the bearings roller cage so go easy. If you can drift the seal exclusively, go for it.
- Thoroughly clean the two bearings and the hub's interior. Closely inspect the bearings and associated races for signs of abnormal wear and replace as needed.
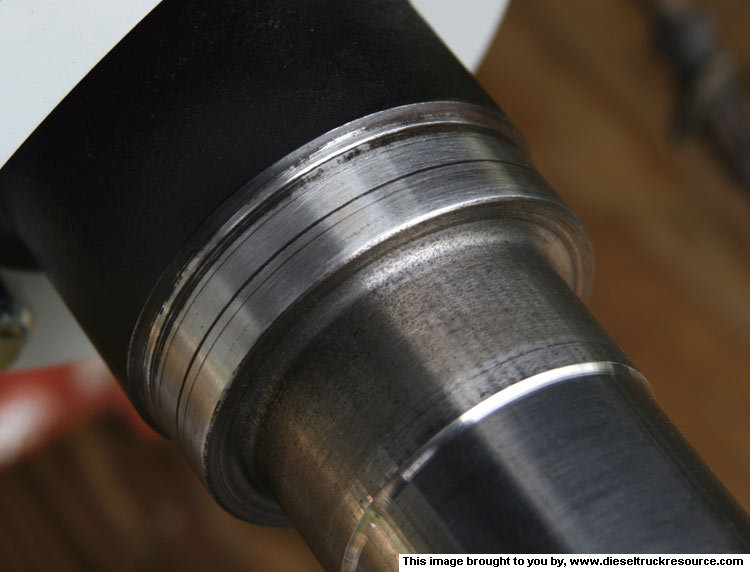
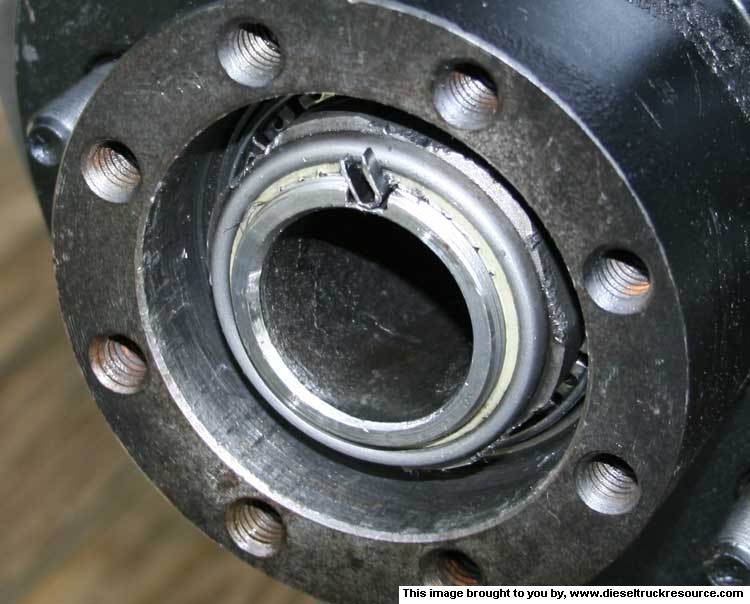
- Look real close at the surface of the axle tube where the wheel seal rides. Specifically for a groove that would be a result of the seal cutting into the metal with the years of service. You can clearly see a groove in my mess. ~
If you find a groove as such, a new seal will most likely not work should its lip ride in that groove. You can get around this by installing a "Speedy-Sleeve" which is basically a thin steel sleeve that is driven over the axle tube and provides a new surface to work with. OR, you can simply install the new seal such that the lip rides somewhere other than the groove. I simply set the new seal so it's a little proud of its normal installed position, or just the opposite, set a little deep. You can read more about that here ~ Fixing a grooved spindle without a speedi-sleeve (Link). Having read all this you'll do good to note where the old seal is installed in the hub before removing. Driven to the bottom of the hub's bore, or set flush?
OK
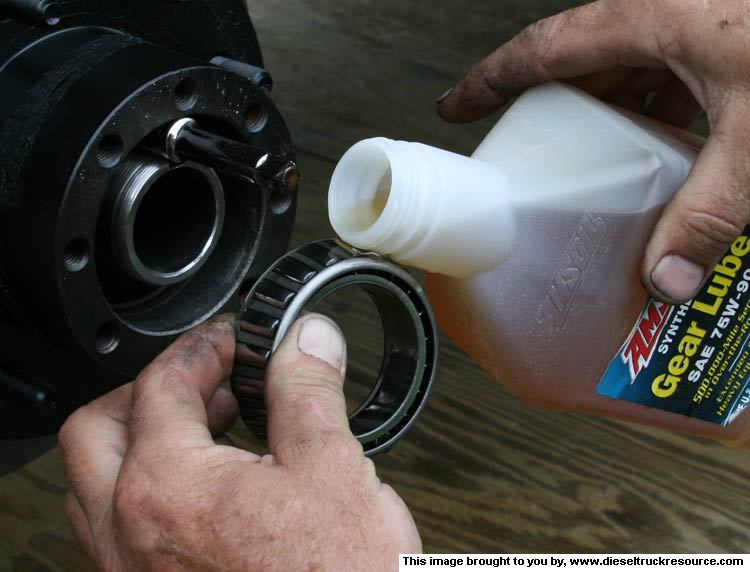
- Thoroughly saturate the inner bearing with the appropriate lube oil and place in the hub.
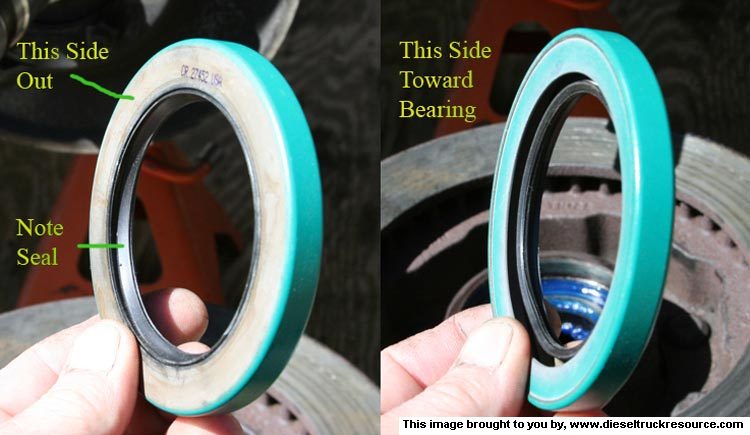
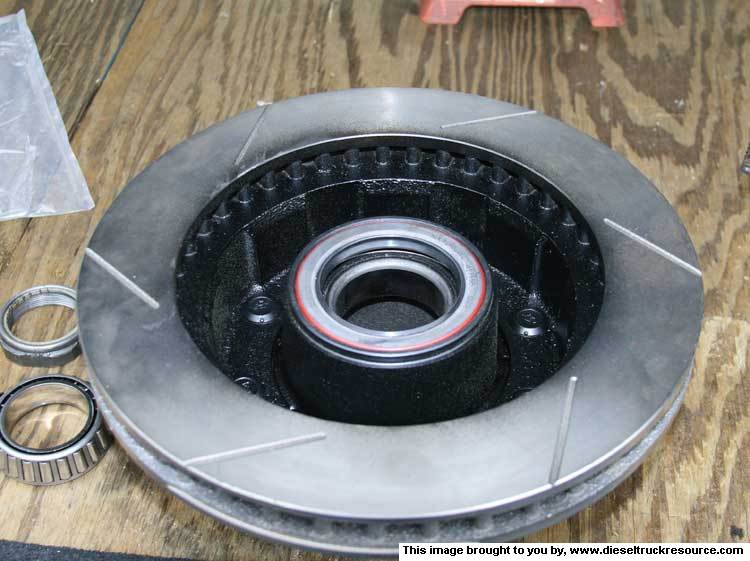
- Look real hard at the new seal and understand how the lip faces into the hub. ~
I've always used a block of wood with a maul to set the new seals. Just be sure to drive it in square to it's bore (Again, pretend the rotor is a drum).. ~

As such the seal is set flush to the hub. ~
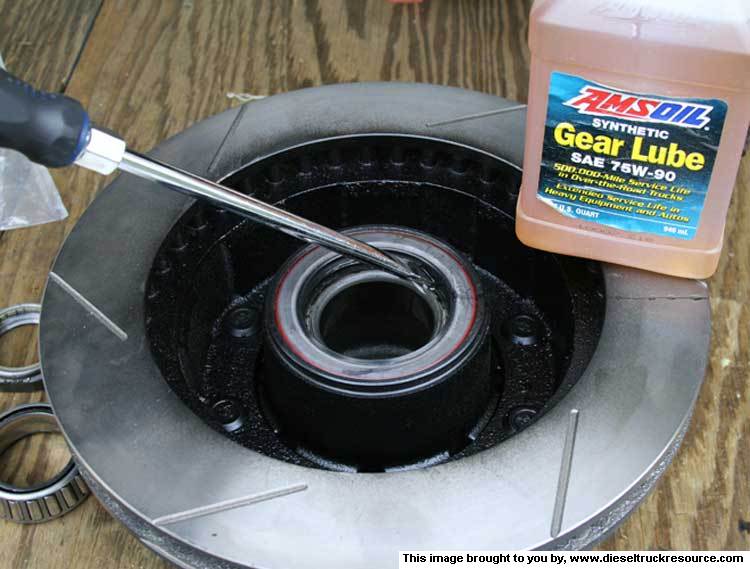
- Now lubricate it all again including the new seal. I used that big screw driver to get the lube to run into the bearing. ~
In this thread, I'm in the midst of upgrading my rear drum brakes to discs. Regardless, the usual bearing inspection and hub resealing is in order and that's what's illustrated here.
This is by no means "The Authorities How-To" for servicing your rear bearings and seals. There's at least one instance where I'm not using the FSM recommended tools for simply not having them.
As it stands, I'm working on a 1993 W250 with the typical Dodge OEM issue DANA70 rear axle using OEM drum brakes (initially anyway). Pretend the discs are drums in the later images.
Finally, I'm gonna pretty-much fast forward through the truck set-up & disassembly and concentrate on the re-assembly. Understanding how to put it together will make disassembly a breeze.
READ ALL THESE INSTRUCTIONS BEFORE ATTEMPTING THIS WORK.
With that, let's get started.
As always ~ SAFETY FIRST!
- Chock the front wheels
- Disconnect the Negative battery cable from the battery.
- Have a known good fire extinguisher within sight.
- Have a clean, uncluttered work area.
- Have good lighting.
- Considering you'll be lifting/holding the vehicle with a jack and safety stands, be sure they're rated for the load with a good safety factor. Don't cut any corners here. Cinder-blocks WILL kill you! When considering all this, don't forget to include a strong, level area to park the truck.
- With any work I do, I usually power wash everything the night before. If you don't have the means at home, the local car-wash works well. If you don't walk away soaking wet with gritty/grime on your face, you need to strike it again.
- All right. Chock the front wheels. Go ahead and loosen the rear wheel lug nuts while the truck is still on the ground.
- Safely raise and firmly support the rear of the truck. I found about an inch clearance under the rear tires worked well. It certainly made putting the tires back on much easier. I used two 3-ton capacity safety stands set so that the hand of each stand supported the axle where the axle tube meets the bracket for the shock absorbers
- Go ahead and remove the rear wheels. It wouldn't hurt to place them under the truck frame rails as another means of catching the truck should a safety stand fail. Under the rear of the cab works.
OK so step back and here's what we have ~
OK, since I'm converting to rear disc brakes, I'm gonna have to skip the rear brake service work all together. You may actually be doing something similar. You'll most likely find useful info in "The Sticky" found at the top of these forums. Here's a link ~ https://www.dieseltruckresource.com/...56&postcount=5
- Unbolt the rear axle from the hub and set aside so as not to get it dirty. Have a peek at the splines that plug into the differential looking for any weird wear patterns and such. In removing the axle, be careful of the metal gasket and don't damage it since it's often reusable. There will be a small amount of lube oil drain out so be prepared with an appropriate catch-pan.
- Remove the little lock widget that is jambed in between the axle tube and the adjustment nut. Pliers work fine. Don't loose the lock though it's recommended to replace it.
- Now we need to remove the adjustment nut itself. This is where I didn't have the correct socket at the time and have since seen them at the local parts house for around $20. I used a large flat-blade screw driver to wedge in between the hub and a flat of the adjustment nut. Set the blade so it will push on the leading edge of a flat of the nut with the other edge of the blade pressing against the hub's interior. Now take a large wrench and hook a lug bolt and push against the hub while twisting the screw driver. The nut will be pushed on around. ~
- Remove the adjustment nut and set aside.
- Now remove the drum/hub assembly being prepared to catch the outer bearing should it fall out. If you have difficulty removing the assembly due to the drum catching on the shoes, check "The Sticky' as there's a thread about dealing with such.
- Remove the outer bearing (if it's not on the floor) and set aside. Flip the drum/hub assembly over. If you've got a seal puller, pry out the inner wheel seal (NOTE: See axle groove notes below before removing old seal). I can't find my puller so I used a block of wood to reach through the outer bearing side and drifted the bearing and seal out with light taps of a mallet. You don't want to damage the bearings roller cage so go easy. If you can drift the seal exclusively, go for it.
- Thoroughly clean the two bearings and the hub's interior. Closely inspect the bearings and associated races for signs of abnormal wear and replace as needed.
- Look real close at the surface of the axle tube where the wheel seal rides. Specifically for a groove that would be a result of the seal cutting into the metal with the years of service. You can clearly see a groove in my mess. ~
If you find a groove as such, a new seal will most likely not work should its lip ride in that groove. You can get around this by installing a "Speedy-Sleeve" which is basically a thin steel sleeve that is driven over the axle tube and provides a new surface to work with. OR, you can simply install the new seal such that the lip rides somewhere other than the groove. I simply set the new seal so it's a little proud of its normal installed position, or just the opposite, set a little deep. You can read more about that here ~ Fixing a grooved spindle without a speedi-sleeve (Link). Having read all this you'll do good to note where the old seal is installed in the hub before removing. Driven to the bottom of the hub's bore, or set flush?
OK
- Thoroughly saturate the inner bearing with the appropriate lube oil and place in the hub.
- Look real hard at the new seal and understand how the lip faces into the hub. ~
I've always used a block of wood with a maul to set the new seals. Just be sure to drive it in square to it's bore (Again, pretend the rotor is a drum).. ~
As such the seal is set flush to the hub. ~
- Now lubricate it all again including the new seal. I used that big screw driver to get the lube to run into the bearing. ~
 04-29-2007, 09:25 PM
#2
1st Generation Admin
Thread Starter
- Lubricate the wheel seal's surface of the axle tube.
- Lift and Carry the drum/hub assembly onto the axle tube so as not to snag the wheel seal on the way. Take it all the way to its installed position and hold it so that it does not droop damaging the new seal. With you free hand, place the big end of a short 3/8" drive socket extension in between the top of the hub's bore and the axle tube. Let the outer end of the hub rest on the socket extension as shown in the following image.
- Thoroughly lubricate the outer bearing. ~
EDIT: The FSM actually has you pack the bearings with regular axle grease.
- Install the outer bearing while not letting the drum/hub droop too much (thinking of the new seal) and push it all the way to its installed position.
- Install the adjustment nut. Using the correct socket, the FSM has you tighten the adjustment nut to 120 to 140 ft/lbs while rotating the drum/hub assembly. Once again not having that socket, I wedged the flat blade screw driver in there again and turned the drum/hub assembly "Good-N-Tight" with the big wrench. ~
- Having tightened the adjustment nut as such, we now want to loosen the nut 1/3 of a turn so as to provide 0.001" to 0.008" wheel bearing end play.
- With that we can now tap the nut lock into the axle tube keyway and the adjustment nut. ~
- Now clean the metal gasket and associated surfaces of the axle flange and hub.
- Install the gasket and axle shaft into the axle tube. You may have to rotate the hub a bit to get the bolt holes to line up. Install the axle bolts much like you would the lug nuts of the wheel, alternating while tightening to 70ft/lbs.
- Reassemble the wheels, etc as needed.
- Now check the axle vent tube as is described in this thread ~ Axle Vent Clean Out (Link).
- To complete the job after proving your brakes work, drive the truck onto a hill so that you're sure some lube oil from the differential runs into each end of the axle tubes thus replenishing the lubricant held in the hubs.
I hope this proves helpful to those wondering what they're in for while addressing the rear axle seals and such.
The following users liked this post:
Chazman1970 (11-24-2017)
 04-29-2007, 09:38 PM
#4
1st Generation Admin
Thread Starter
LOL!! If the world comes to an end and I have to sell the truck, should a prospective buyer ever wonder if/how the truck was serviced, I'll have a decent record I think. 

Trending Topics
08-13-2009, 10:17 AM
#9
Registered User
Figured I'd add part numbers so someone doesn't have to go through what I did.
Spindle nut 81035
Spindle nut retainer 81036
Outer bearing LM104949
Outer race LM104910 or LM104911
Outer bearing and race set, NAPA BR38
Inner bearing 28682
Inner race 28622
Seal 417158
Spindle nut 81035
Spindle nut retainer 81036
Outer bearing LM104949
Outer race LM104910 or LM104911
Outer bearing and race set, NAPA BR38
Inner bearing 28682
Inner race 28622
Seal 417158
02-11-2015, 11:06 AM
#11
Registered User

One can upgrade the rear nuts to the same as the front and only have to carry one socket.
PMD60SN D60 NUT KIT HUB TO SPINDLE
PMD60SN D60 NUT KIT HUB TO SPINDLE


Thread
Thread Starter
Forum
Replies
Last Post
nvr-enuf
3rd Gen Engine and Drivetrain -> 2003-2007
10
04-11-2013 09:27 PM
Artcabinets
3rd Gen Engine and Drivetrain -> 2003-2007
2
01-25-2013 06:07 PM
Bill Tomlinson
1st Gen. Ram - All Topics
4
05-27-2004 06:50 AM