
Painless wiring brand aux fuse block

Thread Starter
Registered User
Joined: May 2005
Posts: 2,867
Likes: 536
Painless wiring brand aux fuse block
Genos garage carries this line of fuse blocks in their catalog, in a weatherproof set up for around $80. It has 4 ignition hot and 3 always hot or for $96 a 7 circuit all ignition hot. I have nothing to compare to for price or evaluation. My goals are to swap out my positive and negative cables to the battery soon, and while I was at it I was going to clean up my taps that I have controlling items such as a remote tranny cooler fan, fog lights, aux cigarette type 12 v socket in the cab for charging electronics, etc. although I have those items individually fused, I now realize that clean and proper wiring is king in electrical longetivity and at the time I did it I thought I knew what I was doing and I somewhat do but didn't know any better on keeping things tidy. As of late, I am noticing electrical bugs popping up due to loose connections and such, so I want to do things right. Along with input on the painless wiring kit, can you offer other suggestions to upgrade the stock set up? I read somewhere that some of you upgraded the ground wire in size, the one that comes off of the neg. terminal and mounts to the sheet metal ledge to the right of the radiator. Others have added a ground to the alternator. If you have pics to share, please do. Thnx

Registered User


Joined: Oct 2005
Posts: 6,457
Likes: 95
From: KENTUCKY
Myself, my favorite fuse-blocks come from Del City.
They are a six-fuse affair that are pre-wired with a 8-AWG input cable and have individual screw-terminals for each of the six circuits; you can splice longer wire to the provided 8-AWG cable if it is not long enough to suit your application.
I have used these fuse-blocks for years on dozens of projects and they are the best I have found yet.
There are at least eight of them doing service on my F-350 as this is being typed, along with probably that many more various other designs that I had employed prior to discovering these good ones.
http://www.delcity.net/store/ATC-&-A...-Block/p_10960
Looks like they are about twelve bucks each.
My favorite thing about these fuse-blocks is the individual screw terminals.
To source full-time battery-HOT, I use a remote-mounted insulated "stud" that has a large cable connecting it to the battery; thus, everything that gets connected to the battery gets connected to this HOT stud instead and the only thing that is connected to the corrosive battery is the short cable that connects the HOT stud to the battery --- that is a lot of connecting there in that sentence.
For ignition-HOT power, I like a big constant-duty solenoid/relay that is triggered by the ignition side of the factory fuse-block; a cable connects this solenoid to the HOT stud we already talked about; one or more of the six-position fuse-blocks get connected to the remaining terminal on the solenoid; turn ON the key = the solenoid energizes and makes the connection between battery-HOT and the fuse-block(s) and all your accessories now have power. {I don't want to confuse anyone, but on my own stuff, I have all the ignition-HOT stuff controlled by a simple toggle-switch --- the key has absolutely nothing to do with it --- in fact, the key-switch in my F-350 does absolutely nothing except plug the hole in the column where it resides and I love it that way.}
You can then, one by one, rewire all the ignition-HOT circuits that are currently in the factory fuse-block to this solenoid-controlled fuse-block system and take the entire truck-burning load away from the factory key-switch.
I highly recommend the power-windows be rewired to always-HOT, instead of ignition-HOT; they are just so much handier that way; I always thought it was ridiculous to have to turn ON the key to open or close a window.
GROUNDs are one piece of the simple puzzle where many people get bogged down; the GROUND is simply the electricity's return path to the source, which in our case is the battery.
Some penny-pinching brain-storm years ago got the not-so-bright idea that, seeing as how vehicles are (used to be) made out of conductive metal, 50% of the wire could be saved by making the vehicles frame and body do the job instead.
At first, they tried POSITIVE-GROUND, but someone decided that the electricity travelling in that direction promoted more rapid oxidation of the steel components of the vehicle; one-by-one, the manufacturers then changed to NEGATIVE-GROUND, like we still have today.
For what it's worth, NEGATIVE-GROUND promotes oxidation, just not hardly so rapidly as POSITIVE-GROUND.
Actually, the vehicle's frame, chassis, body, etc. is a very poor means of providing a path for electricity; one would be far better served by simply running copper wire of the same or bigger AWG as that used on the POSITIVE side of things.
In fact, when I wire the marker-lights on a truck or trailer, that is just exactly what I do; I run individual GROUND wires right along with the HOT wires, to each and every light; I also GROUND these lights to the metal structure, just because it is there anyway. On the things I have wired thus, when you flip ON the lights, the lights come ON --- every last single one of them. A trailer I have wired can sit un-used for five years and everything will still work as if I had wired it the day before.
Be assured that the vehicle manufacturer put as few GROUND straps, wires, and cables as was possible when your vehicle was manufactured, and used as small AWG wire as they could get away with.
Your vehicles electrical system will benefit from each and every extra GROUND wire, strap, and cable that you screw onto it.
I like to route a 12-AWG or bigger wire from the voltage-regulator all the way to that "body-GROUND" up front near the battery, connecting it to the GROUND of every other electrical instrument along the way.
Also, remember the remote HOT stud we already talked about; fix one also for the GROUND; thus, all of your nice clean GROUNDs can remain nice and clean while the only cable getting eat up by acid is the short one that connects the remote stud to battery-negative.
I can go on and on, but that should give you a few ideas to consider.
That is just the way I have been doing things; it may not suit anybody else, but it suits me.
Thanks for reading.
Registered User
Joined: Oct 2005
Posts: 6,457
Likes: 95
From: KENTUCKY
Regarding the remote GROUND stud I mentioned, it need not be insulated/isolated like the HOT stud must be.
Seeing as the frame/chassis is GROUND anyway, the GROUND stud can be a plain old bolt fastened to whatever is convenient.
You can have as few or as many HOT and GROUND studs as needed to make wiring more convenient.
A good plan is to have one big HOT and one big GROUND stud somewhere relatively close to the battery, and the only reason I say "close to the battery" is so that the big cables connecting these studs to the battery are not so long and expensive.
Then, smaller cables/wires can branch from the big stud to smaller studs located wherever convenient.
These smaller wires, if they be HOT, should be protected by either fuses or circuit-breakers located close as feasible to their connection point at the big stud; Maxi-Fuses or self-resetting circuit-breakers are what I use, choice depending on what the breaker/fuse is protecting.
This plan keeps one from having to route every single circuit through the fire-wall; a single 6- or 8-AWG wire can start at the big stud under the hood, pass through the fire-wall (or floor or back of cab) and attach to another smaller stud located convenient to wherever you place the fuse-blocks or GROUND, whichever the case may be.
One other point, if you are learning as you go, alter one circuit/accessory at a time; that way, if you see something you wish had been done a bit differently, you can choose to either change it, or leave it for now and try the new plan on the next circuit.
Keep a note-book where you document every detail of what you have done, noting such things as wire colors and AWG (American Wire Gauge), where each accessory is GROUND-ed, where each accessory is fused, and any other bit of information that may become vital ten years later.
Is there anyway one can turn OFF this annoying automatic spell checking mess ??? It sometimes changes entire words when I don't want them changed.

Registered User
Joined: Nov 2011
Posts: 4,479
Likes: 211
From: Isanti, MN
Eye halve a spelling chequer
It came with my pea sea
It plainly marques four my revue
Miss steaks eye kin knot sea.
Seriously, there should be a box to uncheck in the options section of your browser. In FireFox it's tools ->options->advanced->general->check my spelling as I type.
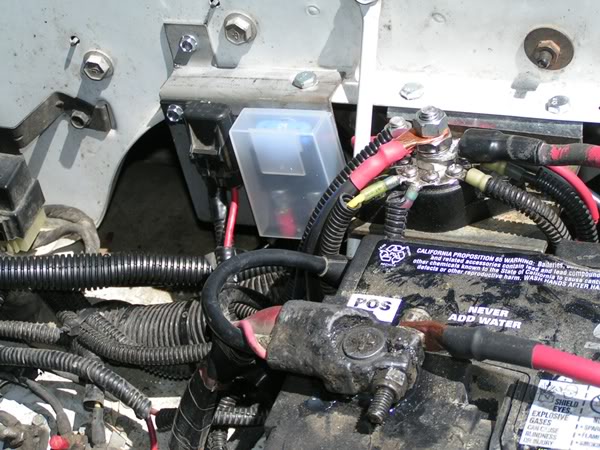
Here's a power stud and a ground stud on my D350.
Got the power stud from DelCity.net Ground stud is just a stainless bolt.
It came with my pea sea
It plainly marques four my revue
Miss steaks eye kin knot sea.
Seriously, there should be a box to uncheck in the options section of your browser. In FireFox it's tools ->options->advanced->general->check my spelling as I type.
Here's a power stud and a ground stud on my D350.
Got the power stud from DelCity.net Ground stud is just a stainless bolt.
Regarding the remote GROUND stud I mentioned, it need not be insulated/isolated like the HOT stud must be.
Seeing as the frame/chassis is GROUND anyway, the GROUND stud can be a plain old bolt fastened to whatever is convenient.
You can have as few or as many HOT and GROUND studs as needed to make wiring more convenient.
A good plan is to have one big HOT and one big GROUND stud somewhere relatively close to the battery, and the only reason I say "close to the battery" is so that the big cables connecting these studs to the battery are not so long and expensive.
Then, smaller cables/wires can branch from the big stud to smaller studs located wherever convenient.
These smaller wires, if they be HOT, should be protected by either fuses or circuit-breakers located close as feasible to their connection point at the big stud; Maxi-Fuses or self-resetting circuit-breakers are what I use, choice depending on what the breaker/fuse is protecting.
This plan keeps one from having to route every single circuit through the fire-wall; a single 6- or 8-AWG wire can start at the big stud under the hood, pass through the fire-wall (or floor or back of cab) and attach to another smaller stud located convenient to wherever you place the fuse-blocks or GROUND, whichever the case may be.
One other point, if you are learning as you go, alter one circuit/accessory at a time; that way, if you see something you wish had been done a bit differently, you can choose to either change it, or leave it for now and try the new plan on the next circuit.
Keep a note-book where you document every detail of what you have done, noting such things as wire colors and AWG (American Wire Gauge), where each accessory is GROUND-ed, where each accessory is fused, and any other bit of information that may become vital ten years later.
Is there anyway one can turn OFF this annoying automatic spell checking mess ??? It sometimes changes entire words when I don't want them changed.
Seeing as the frame/chassis is GROUND anyway, the GROUND stud can be a plain old bolt fastened to whatever is convenient.
You can have as few or as many HOT and GROUND studs as needed to make wiring more convenient.
A good plan is to have one big HOT and one big GROUND stud somewhere relatively close to the battery, and the only reason I say "close to the battery" is so that the big cables connecting these studs to the battery are not so long and expensive.
Then, smaller cables/wires can branch from the big stud to smaller studs located wherever convenient.
These smaller wires, if they be HOT, should be protected by either fuses or circuit-breakers located close as feasible to their connection point at the big stud; Maxi-Fuses or self-resetting circuit-breakers are what I use, choice depending on what the breaker/fuse is protecting.
This plan keeps one from having to route every single circuit through the fire-wall; a single 6- or 8-AWG wire can start at the big stud under the hood, pass through the fire-wall (or floor or back of cab) and attach to another smaller stud located convenient to wherever you place the fuse-blocks or GROUND, whichever the case may be.
One other point, if you are learning as you go, alter one circuit/accessory at a time; that way, if you see something you wish had been done a bit differently, you can choose to either change it, or leave it for now and try the new plan on the next circuit.
Keep a note-book where you document every detail of what you have done, noting such things as wire colors and AWG (American Wire Gauge), where each accessory is GROUND-ed, where each accessory is fused, and any other bit of information that may become vital ten years later.
Is there anyway one can turn OFF this annoying automatic spell checking mess ??? It sometimes changes entire words when I don't want them changed.
Registered User
Joined: Oct 2005
Posts: 6,457
Likes: 95
From: KENTUCKY

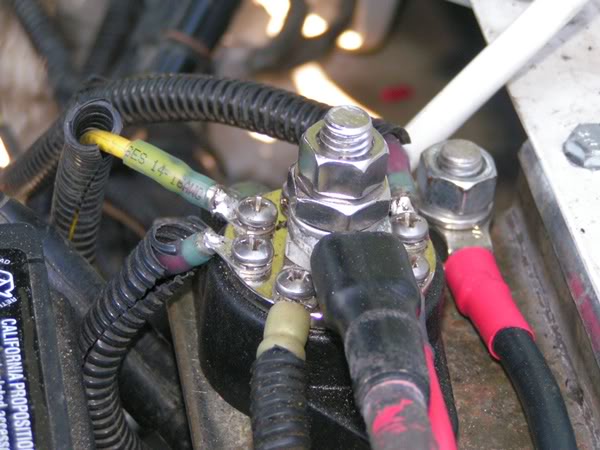
Now, see that BLACK 4-ish AWG cable molded into the HOT lead terminal in the picture jmartin was so good to provide; that wire supplies battery-HOT to everything else in the truck, save for that little PINK molded-in wire that powers the starter-solenoid; whenever you ever replace the big starter cable, you can move both of those wires, the bigger black one and the pink one, over to the remote HOT stud (junction).
On an un-altered factory-original truck, there will also be the two black wires that power the grid-heaters connected via ring-terminals onto the terminal clamp-bolt; I just dis-connect them and tuck them out of sight; I have never missed them.
The ONLY thing the big fat red cable powers is the starter; once the engine fires, you could cut that cable out, sling it over in the briar thicket, and drive until the wheels ran off, without the truck or the electrical system ever knowing of it's absence.
If my eyes don't deceive me, immediately to the left of the pictured HOT stud, with the clear plastic cover, is a MAXI-Fuse in it's holder.
Whenever it is battery replacement time, it is my own preference to buy threaded-stud-post batteries, instead of the pictured lead-post style; there is a reason why big trucks, farm-tractors, and just about everything else come standard with the threaded-stud. The Group-31 can be had in either configuration; in fact, many manufacturers now only make the threaded-stud and then attach a lead screw-on adapter for those applications that use the lead-post style.
I have cut away the lead clamp on many a cable and replaced it with a crimped-on ring terminal; the 20-plus-year-old cables are usually still good as new.
Trending Topics
Thread Starter
Registered User
Joined: May 2005
Posts: 2,867
Likes: 536
Bearkiller, got a couple of questions on that link you sent me on the type you are using: does it finish off the install with a waterproof type enclosure? Second, what type of fuses does it use, and what is the max rating for fuse? The painless one I believe has a max of 20 amp fuses to be used. I like yours, but weather proofing is gold for me
Registered User
Joined: Oct 2005
Posts: 6,457
Likes: 95
From: KENTUCKY
I took a look at those Painless units and they don't impress me, especially for what they cost.
They are using generic stackable $3 fuse-blocks with some sort of relay piggy-backed onto them.
From what I am seeing, it would be a stretch to call them weather-resistant, let alone weather-proof; and, Painless is calling them "weather-proof, NOT water-proof, which is a horse of an entirely different bloodline.
Regardless of whichever fuse-blocks you use, you can weather-proof them by flooding hot-melt glue into all the bottom cavities and using the snap-on cover that most come with.
HOWEVER, when you seal up fuse holding devices, if there is much amperage passing through them, the resistance that makes a fuse a fuse will soon cause the fuse to over-heat, melt, and swell up; it probably won't "blow" and when a crisis occurs where it had better "blow", the housing will have melted such that it cannot separate, thus the circuit is not protected.
Any of those in-line fuse-holders that have the neat little cover tethered onto them are notoriously bad for this; I have found that, if they are going to carry much load at all, one had better leave that little cover open/off.
Having a rather open fuse-block, where air can easily circulate completely through is far better and what little rain or snow that may find it's way in there will quickly drain out the bottom.
I have learned this by experience and personal observation.
As for amperage and fuses, the fuses used in the Del City block are standard-size, just like those used in the factory fuse-block, ATO or ATC or somesuch.
I use 30-amp fuses in some of the circuits on the ones I have.
Actually, fuse amp rating is more to do with what the wire AWG can stand, rather than the actual amp draw of the accessory.
A 30-amp fuse might be protecting a circuit that will seldom see over a 10-amp load, but the wire be heavy enough to carry 40-amps sustained.
So, just because you have (for instance) two = 30-amp fuses and four = 20-amp fuses in a six-position block, does not necessarily mean that there will ever be even half of the 140-amp total of the fuses passing through the block.
On edit: I just had a look at the Del City description and it states 30-amp max for each of the six branch circuits with a total max of 65-amps for the whole block; that 65-amps is pretty close to the half of 140-amps I used in my example above.
Thread Starter
Registered User
Joined: May 2005
Posts: 2,867
Likes: 536
Bearkiller- thnx for the del city fuse block link! Got that in and all wires tidied up along with new battery cables. Did you tie in that 6 circuit fuse block directly to the positive terminal on your battery or put an overload self tripping fuse in between the battery and the del city fuse block?
Registered User
Joined: Oct 2005
Posts: 6,457
Likes: 95
From: KENTUCKY
bigragu- it all depends on just where I located a fuse-block.
On my own stuff, I never connect anything directly to a battery; I always implement a remote HOT junction, thus keeping all my connections isolated from the possibility of corrosive damage, plus the advantage of not having to mess with a bunch of extra connections when changing batteries.
On most of my stuff, I have went a step further and added a big Cole-Hersee cut-off switch between battery-HOT and everything else; thus, if I need to "remove the battery cable", I instead simply turn the switch to OFF.
Enough about that; back to your question:
If the fuse-block is relatively close to the HOT junction/stud, then I see no need to fuse/breaker the big feed wire.
However, if the big wire feeding the block runs through the fire-wall or such, then it is protected either by a circuit-breaker or a maxi-fuse.
I hope that helps.
Registered User
Joined: Nov 2011
Posts: 4,479
Likes: 211
From: Isanti, MN
On my picture, the 30 amp fuse holder goes directly to the battery, as does several small circuit breakers mounted to the inner fender below the picture. The 60 amp maxi-fuse feeds a fuse block in the trailer wiring/relay box mounted under the cab box through a 6 gauge wire.
That box has all the trailer lighting circuits in it, plus a 40 amp switched battery feed for the trailer.
That box has all the trailer lighting circuits in it, plus a 40 amp switched battery feed for the trailer.
Registered User
Joined: Oct 2005
Posts: 6,457
Likes: 95
From: KENTUCKY
After years of procrastination, a couple weeks ago I stumbled through BC847's excellent tutorial on posting pictures and managed to get my first ever pictures to work.
That article is in our "stickies".
The wife had Photoshop Elements 7 on our computer and it had a means of resizing.
If I can do it, anyone can.
Thread Starter
Registered User
Joined: May 2005
Posts: 2,867
Likes: 536
Pics are going to be another day- tried loading them from my iPhone and too complicated! Kept getting a message saying invalid link check with admin. Anyway, tomorrow evening I am wiring in an auxiliary 12v power socket under my rear bumper to power up tire pump compressors, hand held flood lights,etc. I've had this power socket for awhile now and lost the box/ instructions for it. Going to tap into my fuse block for power source. What size fuse would be proper for that you think?