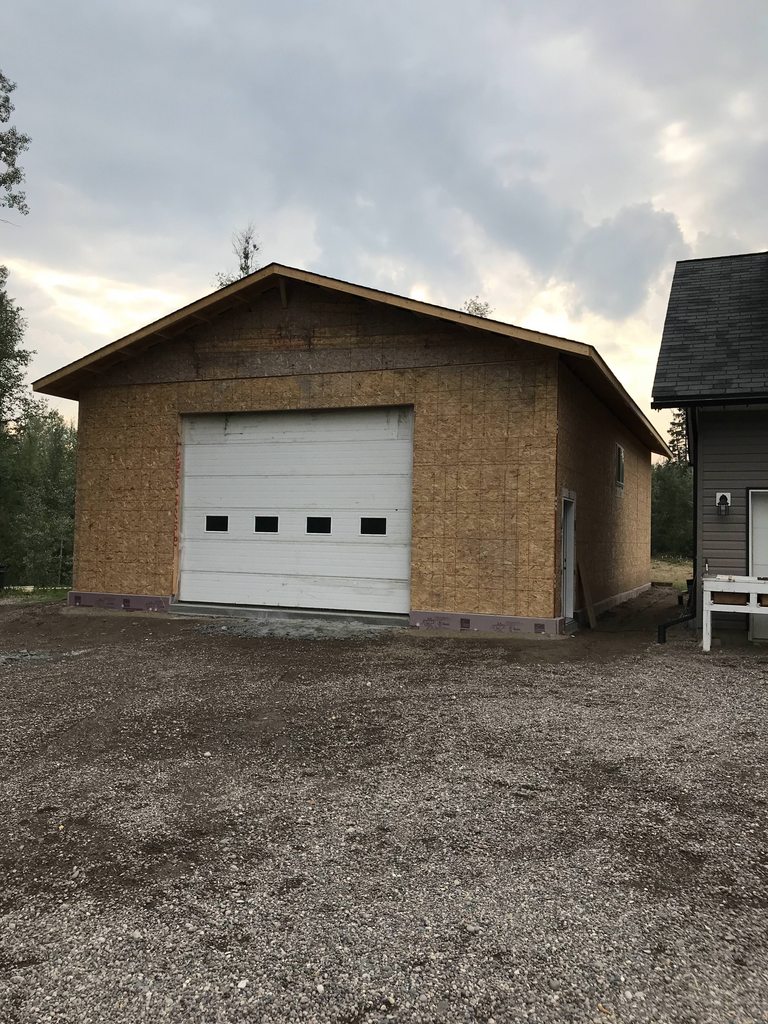
My new 32x48 1st Gen Storage Facility.... ;)
 08-01-2018, 03:58 PM
#76
Registered User
I think the electrical issue is because that's all he can get from the existing house service, that happened to me, all I had to do was upgrade my transformer and put a separate service to the shop.
Granted this is in Washington State I'm not sure what the laws and codes are in the Great White North
Granted this is in Washington State I'm not sure what the laws and codes are in the Great White North

The following users liked this post:
thrashingcows (08-01-2018)
08-01-2018, 06:28 PM
#77
Registered User
Did the guys just leave the rebar resting on the foam board when they poured the concrete?
I alway block it up so it is in the center of the concrete rather than at the bottom as it is much stronger that way.
Looking great other than that!
I alway block it up so it is in the center of the concrete rather than at the bottom as it is much stronger that way.
Looking great other than that!
The following users liked this post:
thrashingcows (08-01-2018)
08-01-2018, 06:59 PM
#78
Registered User
Thread Starter

And as Nonrev stated that was all I could have short of running in another separate service to the shop...and that aint cheap and not within my budget right now. Something I can consider down the road if I find the 100 amp is not enough.
08-01-2018, 07:02 PM
#79
Registered User
The following users liked this post:
thrashingcows (08-01-2018)
The following users liked this post:
nonrev (08-02-2018)
08-02-2018, 06:00 AM
#81
Registered User
Yeah they blocked up the rebar before the pour.
And as Nonrev stated that was all I could have short of running in another separate service to the shop...and that aint cheap and not within my budget right now. Something I can consider down the road if I find the 100 amp is not enough.
And as Nonrev stated that was all I could have short of running in another separate service to the shop...and that aint cheap and not within my budget right now. Something I can consider down the road if I find the 100 amp is not enough.

I drove concrete truck for 12 years and most of the older finishers just left the rebar laying on the ground, and then as they poured they would use a homemade tool that looked kinda like a hayhook (anyone remember using those) to lift the rebar up so it was about the middle of the slab
08-02-2018, 07:11 AM
#82
Registered User
Join Date: Dec 2010
Location: Land of the Toxic Avenger
Posts: 6,770
Received 1,637 Likes
on
1,112 Posts
That makes more sense to me, as you can control positioning of the rebar. IIRC, the rebar is best suited at the 1/3rd from the bottom of the pour, where it provides the most strength. It also prevents drilling through the rebar when mounting something to the floor.
Read this: https://www.concreteconstruction.net...orcing-steel_o
08-02-2018, 08:10 AM
#83
Registered User
I have seen some of the rebar spacers for sale but I laughed out loud at the price of them.
I bought a rack of my favorite beer, with some of the money I saved, and made some myself. I took some chipped, recycled cylinder blocks I have around and my trusty sledge hammer. I then smashed them into the right shape, wear safety glasses or at least sunglasses. I smashed them until I ended up with a piece that was flat on one side with a valley on the other side for the rebar to sit in. I aimed for roughly 2 inches up in a 5 inch slab. Captain Caveman would be proud.
I bought a rack of my favorite beer, with some of the money I saved, and made some myself. I took some chipped, recycled cylinder blocks I have around and my trusty sledge hammer. I then smashed them into the right shape, wear safety glasses or at least sunglasses. I smashed them until I ended up with a piece that was flat on one side with a valley on the other side for the rebar to sit in. I aimed for roughly 2 inches up in a 5 inch slab. Captain Caveman would be proud.
The following 4 users liked this post by oliver foster:
The following users liked this post:
thrashingcows (08-08-2018)
08-08-2018, 03:16 PM
#86
Registered User
Join Date: Dec 2010
Location: Land of the Toxic Avenger
Posts: 6,770
Received 1,637 Likes
on
1,112 Posts
Just did repair work to my home made bbq/fireplace. Cement /concrete full strength in 28 days, and ill seal it then. I think sealing a,garage floor should help with staining the, concrete. I was looking into concrete coatings, which give you a finished look. Some have glitter, sand particles, or other colorants to make it pretty. I did a garage or two myself, but the pro applied polyurethane is supposed to be,more,durable.
Coated floors release little to no dust, which concrete tends to do over time.
Coated floors release little to no dust, which concrete tends to do over time.
The following 4 users liked this post by NJTman:
08-09-2018, 06:26 AM
#87
Registered User

I'm sure there are a ton of reasons, that was something we had experience with. If we did it from the start I think we would have saved the $500 in concrete and labor/tool rental.
The following users liked this post:
nonrev (08-10-2018)
09-11-2018, 01:42 AM
#88
Registered User
Thread Starter
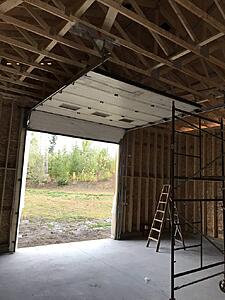
Well been working on the shop when I have time, now that it's up and roofed not such a big pressure to get things done. I have got all the windows in, man door in place and just finished installing the big roll up doors.
I bought the roll up doors used from a company that was doing a demolition at the college here in town, I got a killer deal on the complete units.....$1200 for both doors and all the tracks and hardware!! They are 1.75" thick insulated panels with a R rating of just over R16.....not bad for a door.
Layed out for assembly to begin.
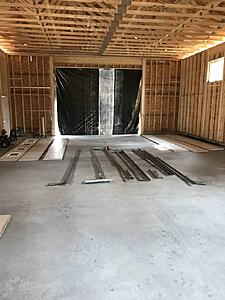

Took me a couple days to get them up and in place....
16' front door....

11' rear door...
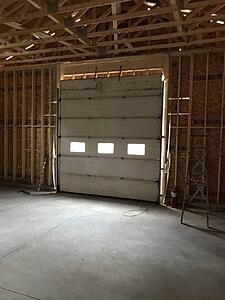
Was short a couple hinges and a bunch of the metal screws, but really pretty complete.
The following 2 users liked this post by thrashingcows:
Blue Goose (09-11-2018),
NJTman (09-11-2018)
09-11-2018, 01:50 AM
#89
Registered User
Thread Starter
If you didn't spot them I already have two big fire extinguishers in the shop....can't be too safe....
Another couple days to get the upper tracks up and in place, and then lots of research to figure out how to load those big springs safely....and I was paranoid to the max about those. I screwed a big heavy welding blanket over the springs, then purchased the proper 1/2" cold rolled steel bars, wore super heavy coveralls with a sweater under neath just in case the spring was to shatter and a shard fly at me. Also wore my Quad riding full helmet with safety goggles, and of course heavy leather gloves. On the doors themsleves I had the tracks C-clamped, vise-gripped and other means to hold the door in the "down" position...again can never have too much safety.
It was a long hot and sweaty day (even with cool temperatures. ) to get the springs loaded up, but glad I took the time to do things safely.
Anyway here they are all functioning now.
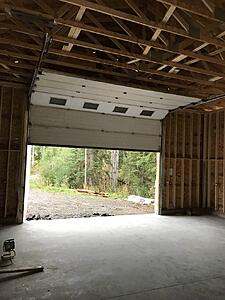
I also picked up two new chain drives to open and close them.
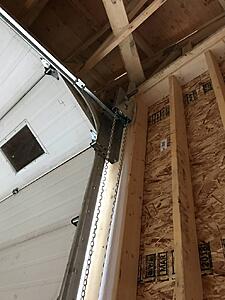
Another couple days to get the upper tracks up and in place, and then lots of research to figure out how to load those big springs safely....and I was paranoid to the max about those. I screwed a big heavy welding blanket over the springs, then purchased the proper 1/2" cold rolled steel bars, wore super heavy coveralls with a sweater under neath just in case the spring was to shatter and a shard fly at me. Also wore my Quad riding full helmet with safety goggles, and of course heavy leather gloves. On the doors themsleves I had the tracks C-clamped, vise-gripped and other means to hold the door in the "down" position...again can never have too much safety.
It was a long hot and sweaty day (even with cool temperatures.
) to get the springs loaded up, but glad I took the time to do things safely.Anyway here they are all functioning now.


I also picked up two new chain drives to open and close them.