How to replace your lock cylinder
 04-28-2009, 05:49 AM
#1
Administrator
Thread Starter

Part-1
This will show you how to replace the lock cylinder on your 1st.Gen with a tilt column.
First you will need to remove all of the plastic covers around the steering column, to do this you need to remove the screws recessed into the bottom of the cover there will be 1 in the center and 2 towards the end of the housing, NOTE these 2 screws are T-20 Security Torx and will require a LONG bit, something that is not in most tool kits, You can get this in a kit at Harbor Freight for a cheap one and I believe is about $11.00.
You will need the long bit because it is recessed deep into the housing.
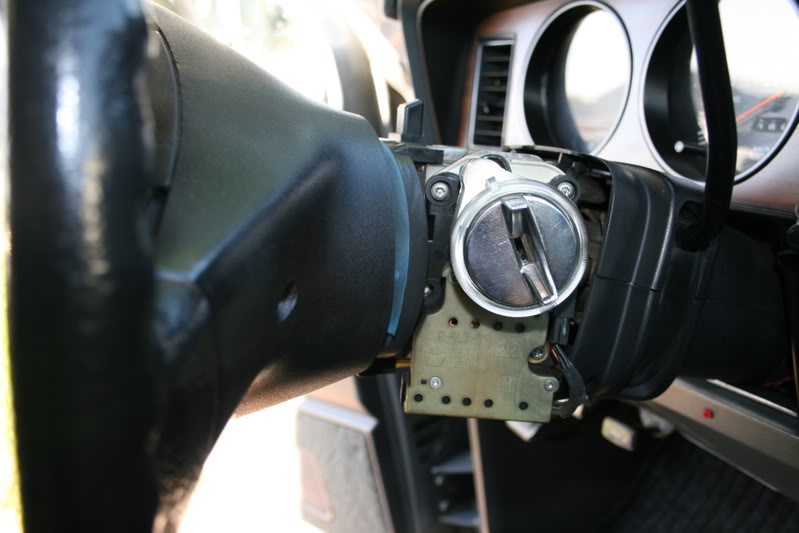
First thing that you need to do is to remove the 3) T-20 Security Torx head screws that secure the ignition switch and cylinder assembly to the tilt mechanism.
At this time you should disconnect the electrical connector from the bottom of the switch.
Release the locking tabs on each side first.
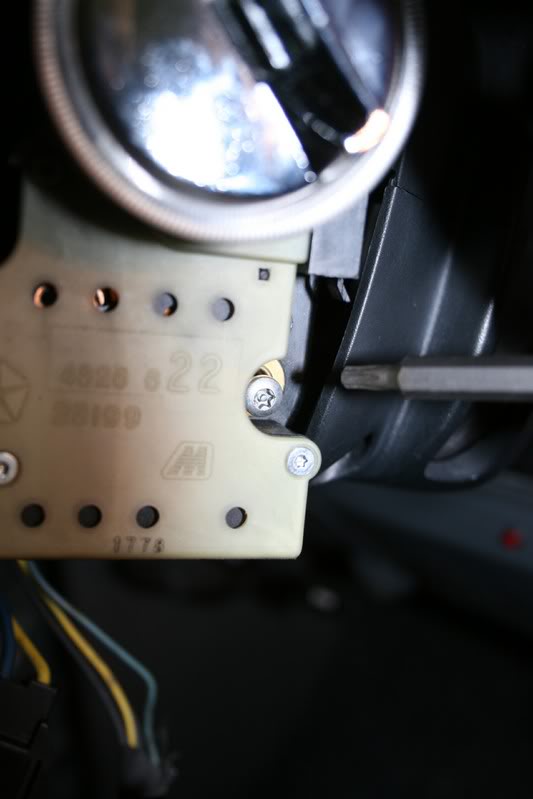
Swing the assembly away from the column.
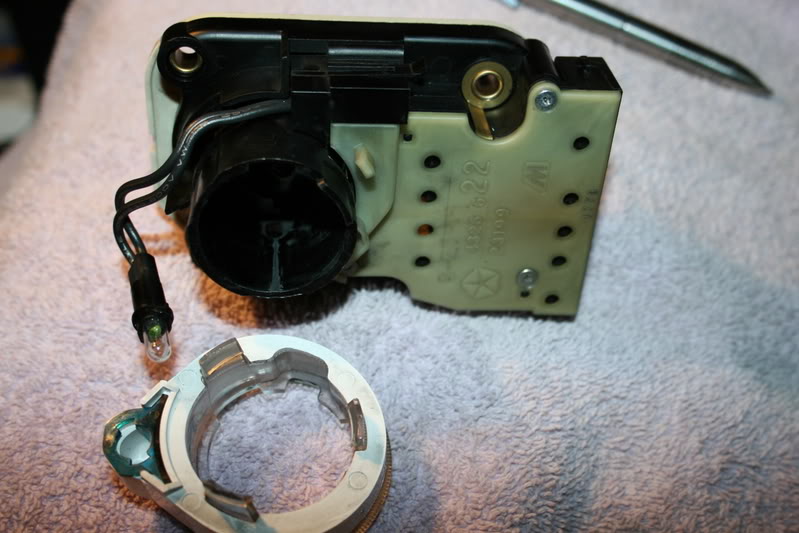
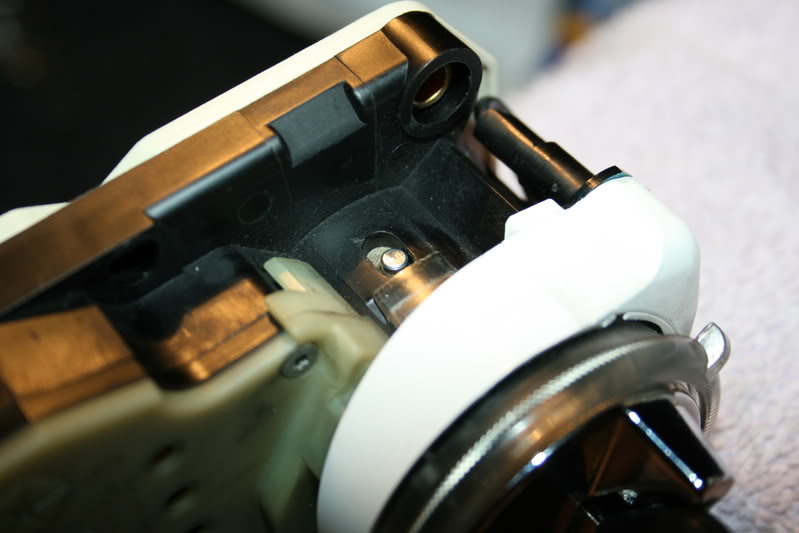
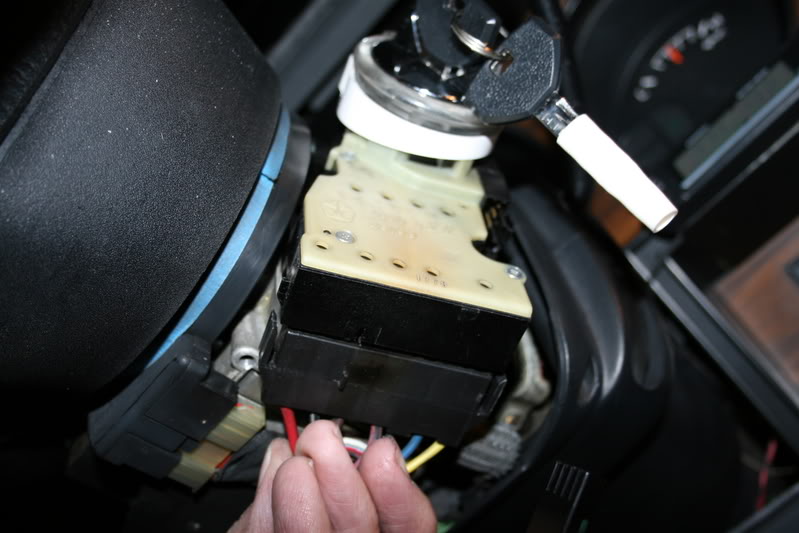
Here is the backside of the switch assembly, besides controlling the ignition circuits it also locks the steering wheel and secures the shifter.
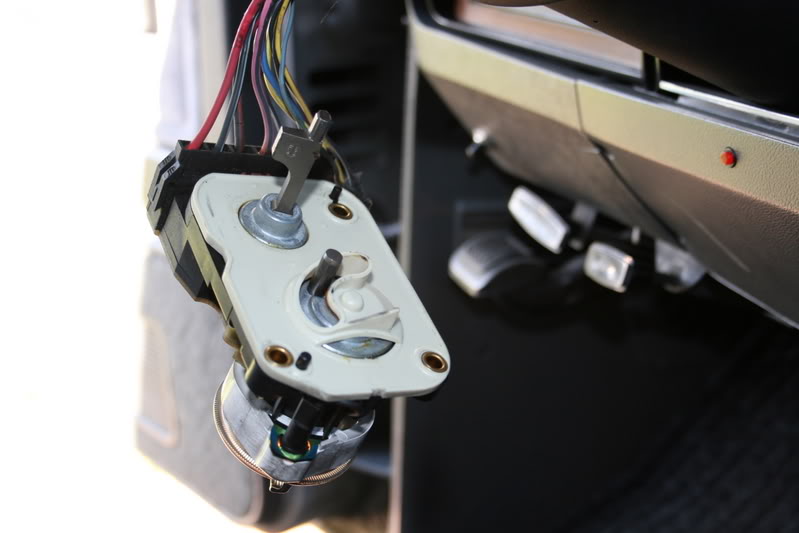
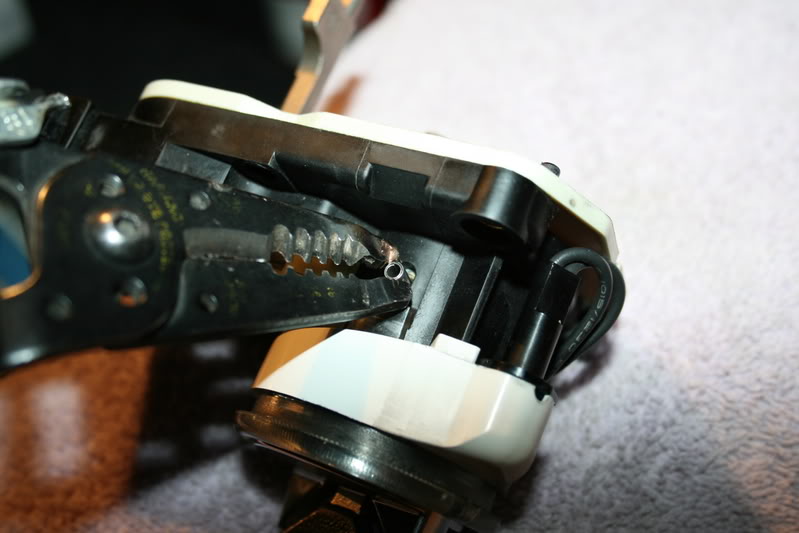
Here you can see the roll pin that retains the lock cylinder into the switch assembly, sometimes it might be a solid pin.
To remove the lock cylinder if it has a roll pin you need to remove it and the cylinder should come out easly, This is how my old one was, the cylinder just popped out, I don�t know if this was an aftermarket or factory cylinder.
The replacement from Napa had the solid pin.
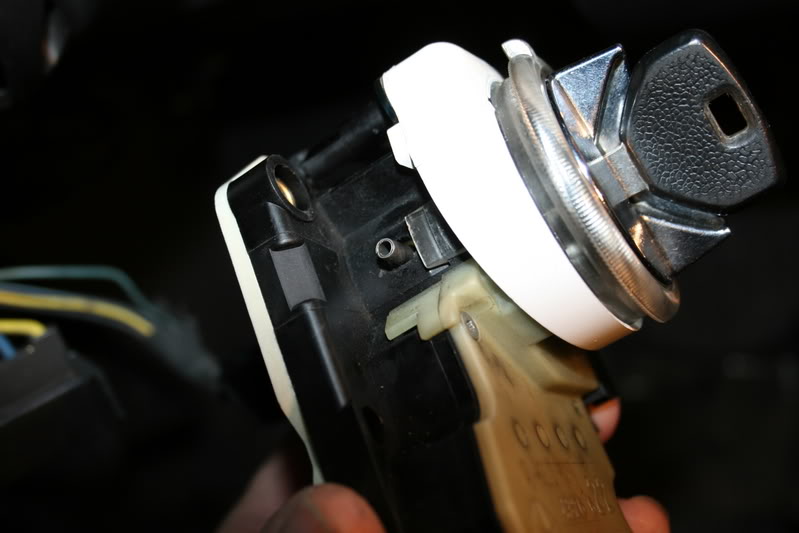
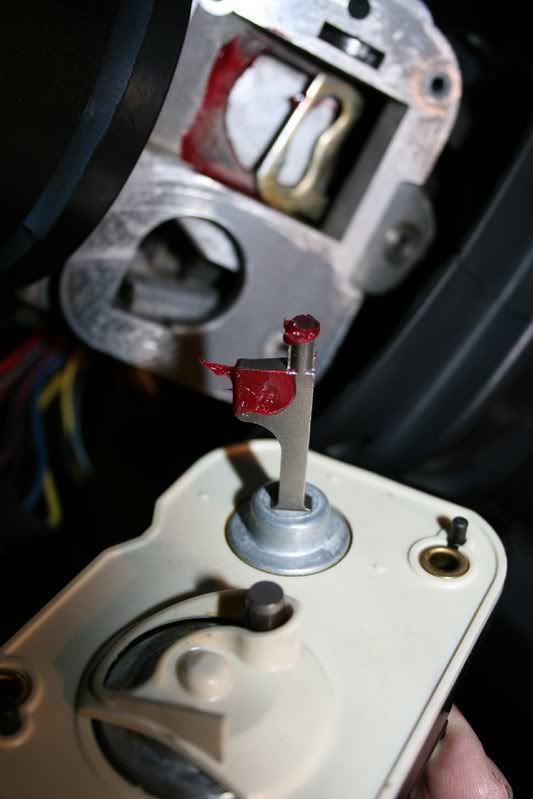
If it has a solid pin then you need to insert the key and have the ignition switch in the lock position, Use a small screwdriver to push the key cylinder retaining pin flush with the key cylinder.
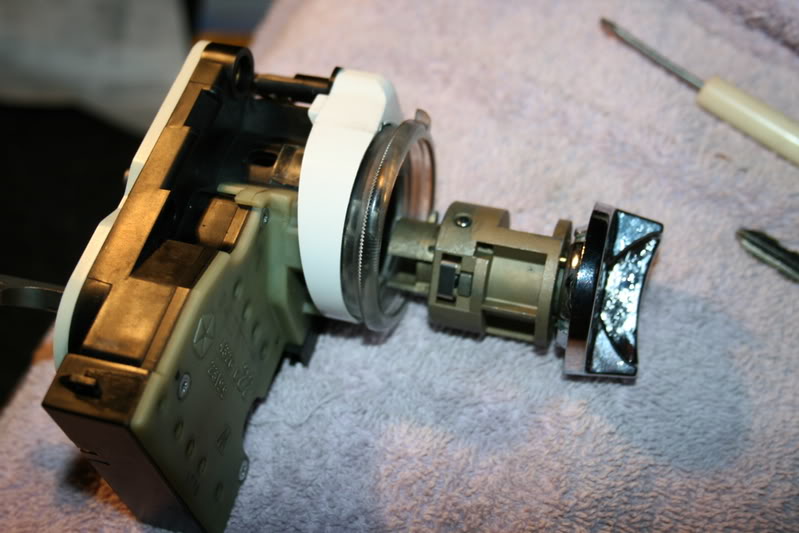
Turn the key clockwise to the OFF position. The cylinder should now be unseated from the ignition switch assembly.
With the key cylinder in unseated position (the cylinder will be about 1/8" above ignition switch halo ring), Rotate the key counterclockwise to the lock position and remove the key.
Remove the lock cylinder.
If you want to remove the Halo Ring from the switch you need to release the 3 plastic clips first.
Then it simply lifts off the switch assembly; here you can get to the small incandescent lamp.
Up to this point it would be the same disassembly required to replace the Ignition Switch Assembly
To install the new lock cylinder first you would reinstall the Halo Ring onto the switch assembly and then you would simply reverse the procedure.
Once the cylinder is back in you will turn the key and the pin should automatically extend and retain the cylinder in place.
This will show you how to replace the lock cylinder on your 1st.Gen with a tilt column.
First you will need to remove all of the plastic covers around the steering column, to do this you need to remove the screws recessed into the bottom of the cover there will be 1 in the center and 2 towards the end of the housing, NOTE these 2 screws are T-20 Security Torx and will require a LONG bit, something that is not in most tool kits, You can get this in a kit at Harbor Freight for a cheap one and I believe is about $11.00.
You will need the long bit because it is recessed deep into the housing.
First thing that you need to do is to remove the 3) T-20 Security Torx head screws that secure the ignition switch and cylinder assembly to the tilt mechanism.
At this time you should disconnect the electrical connector from the bottom of the switch.
Release the locking tabs on each side first.
Swing the assembly away from the column.
Here is the backside of the switch assembly, besides controlling the ignition circuits it also locks the steering wheel and secures the shifter.
Here you can see the roll pin that retains the lock cylinder into the switch assembly, sometimes it might be a solid pin.
To remove the lock cylinder if it has a roll pin you need to remove it and the cylinder should come out easly, This is how my old one was, the cylinder just popped out, I don�t know if this was an aftermarket or factory cylinder.
The replacement from Napa had the solid pin.
If it has a solid pin then you need to insert the key and have the ignition switch in the lock position, Use a small screwdriver to push the key cylinder retaining pin flush with the key cylinder.
Turn the key clockwise to the OFF position. The cylinder should now be unseated from the ignition switch assembly.
With the key cylinder in unseated position (the cylinder will be about 1/8" above ignition switch halo ring), Rotate the key counterclockwise to the lock position and remove the key.
Remove the lock cylinder.
If you want to remove the Halo Ring from the switch you need to release the 3 plastic clips first.
Then it simply lifts off the switch assembly; here you can get to the small incandescent lamp.
Up to this point it would be the same disassembly required to replace the Ignition Switch Assembly
To install the new lock cylinder first you would reinstall the Halo Ring onto the switch assembly and then you would simply reverse the procedure.
Once the cylinder is back in you will turn the key and the pin should automatically extend and retain the cylinder in place.
 04-28-2009, 05:50 AM
#2
Administrator
Thread Starter
Part-2
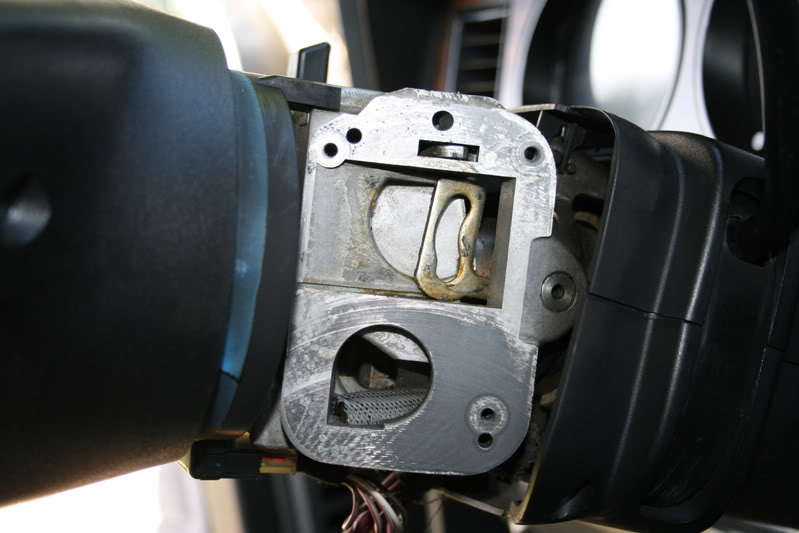
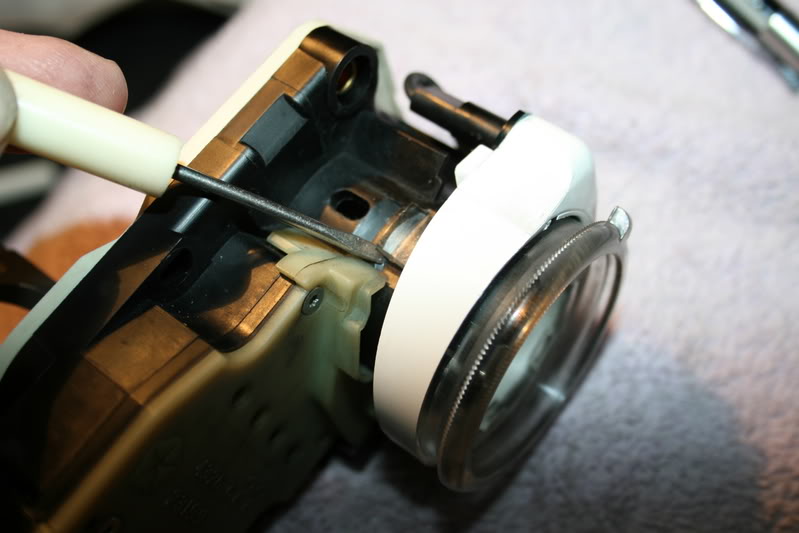
Here you can see what the tilt mechanism looks like from the passenger�s side.
In the center of the picture you can see the detents or stops for the shifter selector.
Any of the grease that was there was all dried out and there was not much where it needed to be.
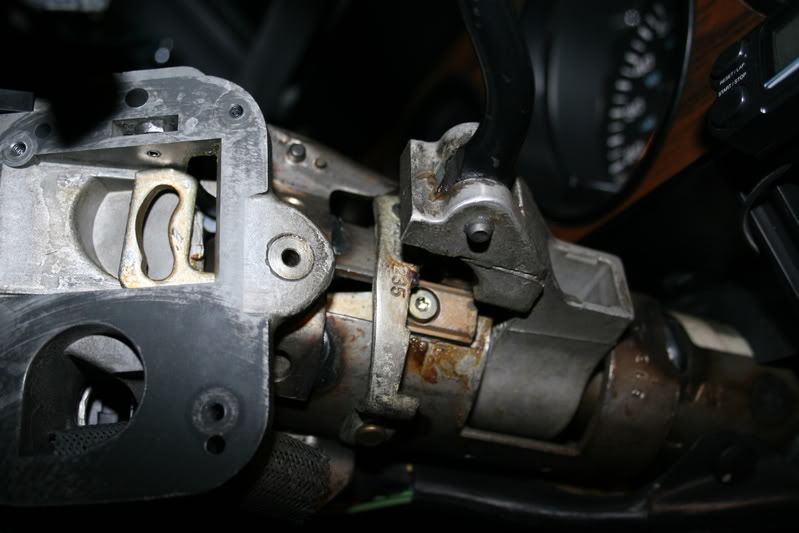
Here are the stops that lock it in different positions, as you can see there all dry.

I used lacquer thinner on a rag and I cleaned up all of the old grease and then I used a good quality grease and lubricated everything that moves, This really made a difference in the way it now feels when you pull the wheel down to lock it.
Apply some grease to all of the parts that move for the steering and shifter lock before you reinstall the switch assembly into its original location.
Note. You need to pay particular attention to the shifter lock and it position (top assembly) if the pin on the switch does not engage in the slot, the shifter will remain locked so check this before you get too far into the reassembly.
After it is back against the side of the column you can reinstall the 3 screws and tighten them using your T-20 Torx bit. Again make sure you can move your shifter.
Last you need to reconnect your connector and reinstall all of the plastic covers, and then you are finished.
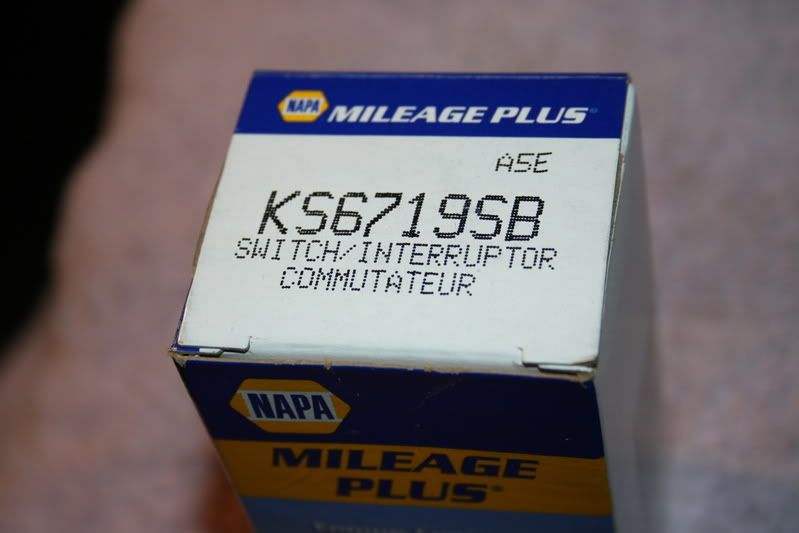
I bought the lock cylinder from my local Napa dealer.
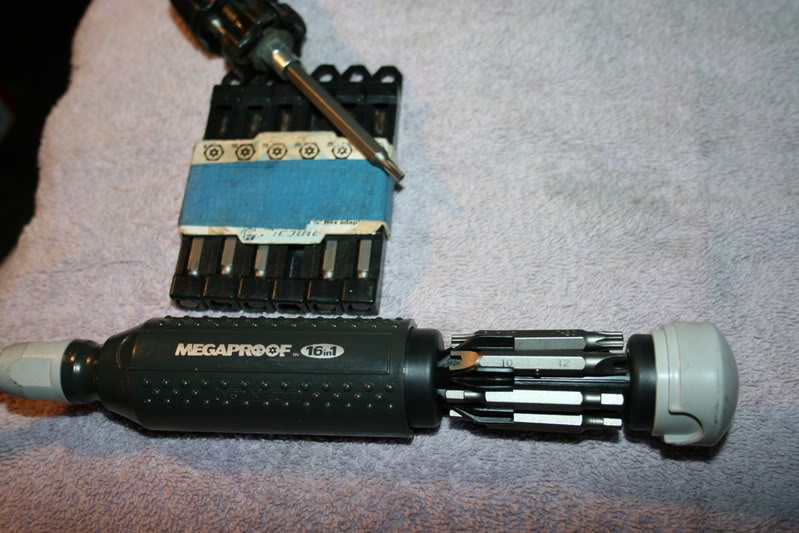
Here is one of my specialty tools, this contains 16 security bit you will need for most commercial application besides security Torx it also has Hex, Square, Spanner, Snake Eyes, Tri-Wing and more and it is all in a neat package, this cost me about $40.00 from my local Electrical Whosale Supply House.
Also in the background you can see some of my �Picquic� specialty bits, they are made in Canada and are of a very high quality unlike the ones from Harbor Freight that will also serve their function if you do not need to use them for a living.
I hope that this article will be of some help when you need to replace your ignition switch or lock cylinder.
Thanks Jim
Here you can see what the tilt mechanism looks like from the passenger�s side.
In the center of the picture you can see the detents or stops for the shifter selector.
Any of the grease that was there was all dried out and there was not much where it needed to be.
Here are the stops that lock it in different positions, as you can see there all dry.
I used lacquer thinner on a rag and I cleaned up all of the old grease and then I used a good quality grease and lubricated everything that moves, This really made a difference in the way it now feels when you pull the wheel down to lock it.
Apply some grease to all of the parts that move for the steering and shifter lock before you reinstall the switch assembly into its original location.
Note. You need to pay particular attention to the shifter lock and it position (top assembly) if the pin on the switch does not engage in the slot, the shifter will remain locked so check this before you get too far into the reassembly.
After it is back against the side of the column you can reinstall the 3 screws and tighten them using your T-20 Torx bit. Again make sure you can move your shifter.
Last you need to reconnect your connector and reinstall all of the plastic covers, and then you are finished.
I bought the lock cylinder from my local Napa dealer.
Here is one of my specialty tools, this contains 16 security bit you will need for most commercial application besides security Torx it also has Hex, Square, Spanner, Snake Eyes, Tri-Wing and more and it is all in a neat package, this cost me about $40.00 from my local Electrical Whosale Supply House.
Also in the background you can see some of my �Picquic� specialty bits, they are made in Canada and are of a very high quality unlike the ones from Harbor Freight that will also serve their function if you do not need to use them for a living.
I hope that this article will be of some help when you need to replace your ignition switch or lock cylinder.
Thanks Jim
The following users liked this post:
Federic (02-23-2020)
04-28-2009, 09:52 AM
#5
Registered User

Join Date: Nov 2005
Location: Land of milk and honey.
Posts: 1,971
Likes: 0
Received 1 Like
on
1 Post
I've had mine apart before too. I hate those torx screws with the little dot in the center, prevents you from using a standard torx driver. I took all those security screws with me to the hardware store and matched them up to stainless Philips screws to re-install.
Chrysler was so cheap on the wire too, absolutely no extra slack for all the tilt positions.
Sticky!
Chrysler was so cheap on the wire too, absolutely no extra slack for all the tilt positions.
Sticky!
04-28-2009, 05:09 PM
#6
Registered User

Thanks Jim, You must have seen my desperate post yesterday! I had some difficulty removing the cylinder but finally got it out. Then I had problems
  installing new cylinder but figured it out. I finally got everything reassembled went out to truck to install and that's when I realized I left my keys to my truck in my wife's car
 I drove her car to work today (she had already left to run an errand) so here I sit waiting for her to return and install my new ignition switch
 Oh Well! What would life be without some hiccup's. Thanks for the write up it will help me in the event I didn't make repair properly.
I had some difficulty removing the cylinder but finally got it out. Then I had problems installing new cylinder but figured it out. I finally got everything reassembled went out to truck to install and that's when I realized I left my keys to my truck in my wife's car I drove her car to work today (she had already left to run an errand) so here I sit waiting for her to return and install my new ignition switch Oh Well! What would life be without some hiccup's. Thanks for the write up it will help me in the event I didn't make repair properly.


Trending Topics
04-28-2009, 06:52 PM
#8
Administrator
Thread Starter
Thanks Jim, You must have seen my desperate post yesterday! I had some difficulty removing the cylinder but finally got it out. Then I had problems installing new cylinder but figured it out. I finally got everything reassembled went out to truck to install and that's when I realized I left my keys to my truck in my wife's car I drove her car to work today (she had already left to run an errand) so here I sit waiting for her to return and install my new ignition switch Oh Well! What would life be without some hiccup's. Thanks for the write up it will help me in the event I didn't make repair properly.
I had some difficulty removing the cylinder but finally got it out. Then I had problems installing new cylinder but figured it out. I finally got everything reassembled went out to truck to install and that's when I realized I left my keys to my truck in my wife's car I drove her car to work today (she had already left to run an errand) so here I sit waiting for her to return and install my new ignition switch Oh Well! What would life be without some hiccup's. Thanks for the write up it will help me in the event I didn't make repair properly.I was just going through my Photobucket account trying to find a picture, I have over 800 pictures of some form of work or in the process of teardown that I have preformed on my truck when I saw the ones for the ignition lock so I thought it was not a better time to show you how I did the job.
When you reinstall the lock pay attention the shifter lock, I got it all back together with the covers on and found that I could not take it out of Park.
I rarely make mistakes and I know where it had to go I must have moved it when I applied the grease.
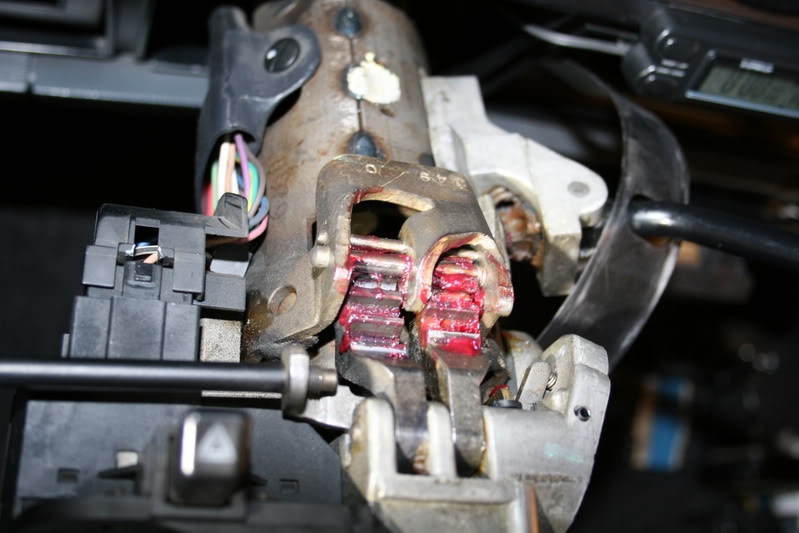
Also look at the front side of the switch and if you see any part where the plastic has discolored, it has overheated because something drawing too much current through the IGN circuit.
This is usually the Blower Motor, mine was burned up and I had to replace the switch.
One time I had turned the key to start and the switch stuck in the start position and I could not stop it from cranking and I had to pull the battery cable.
Also if you look at the bottom plastic cover you might find that it has melted from the wires in the harness getting hot, this was my first clue, I felt it was hot to the touch.
I took the load off the switch and controlled the ignition section of the fuse panel through a relay, soon after this is when I set out to design a circuit to put the blower on relays.
Now that I Start and Stop the engine from a switch on the dash it can never stick in the Start position again.
I guess that I am a bit weird about my truck, I am constantly looking and listening for anything unusual and analyzing where it is coming from, if I know that it is not normal I cannot sleep until I find what it is and fix it.
I have placed contact microphones and remote video cameras under vehicles to listen and watch for problems that are hard to see, I also use them to see into crawl spaces and to inspect the inside of air ducts.
I have looked at new wireless video cameras for your pet, if I could just train a hamster to go where I want them to and to return I think I might have a good diagnostic tool.
Jim
04-28-2009, 09:15 PM
#9
Registered User
Jim,YOU ROCK!! I did have to come back and reference your photo's because when I plugged the wiring harness back in I had it backwards. Truck wouldn't start. So I came back in looked at photo and saw the red wire was in forward position pulled plug and reversed it and VROOOOOM! HOO! HOO! she started. Thanks Jim! Is this in the sticky?? If not can we get it in there? I am getting ready to redo my crew with a fresher 12 V. I have a 92 D250 donor with tilt and cruise so I'm not real concerned with the steering column that's in my truck currently. I will go through the 92 column and look for some of the things you were talking about. I also am putting relays on heater,lights,and anything else that needs it. Thanks again
I did have to come back and reference your photo's because when I plugged the wiring harness back in I had it backwards. Truck wouldn't start. So I came back in looked at photo and saw the red wire was in forward position pulled plug and reversed it and VROOOOOM! HOO! HOO! she started. Thanks Jim! Is this in the sticky?? If not can we get it in there? I am getting ready to redo my crew with a fresher 12 V. I have a 92 D250 donor with tilt and cruise so I'm not real concerned with the steering column that's in my truck currently. I will go through the 92 column and look for some of the things you were talking about. I also am putting relays on heater,lights,and anything else that needs it. Thanks again
04-28-2009, 10:36 PM
#10
Registered User
Join Date: Jan 2008
Location: Colorado
Posts: 517
Likes: 0
Received 0 Likes
on
0 Posts
I smell sticky coming along any time... Thanks again Jim. I wish I could just interface with your brain and suck out all of your experiences with these trucks!!! And I have to agree that being able to pull the key out and lock the truck while it is running is useful. Even though I know that someday I will be referring back to this very thread to change out my lock cylinder... then I will have to do something with the 4 spare keys I got with the truck...
 06-02-2011, 08:56 AM
#13
Registered User

Thank you, JIM LANE; these pictures and information are a big help in my key-switch endeavors. 
Considering how problematic the Dodge key-switch is, and how simple an emergency over-ride for this scenario is to install, we should all install a toggle "KILL"-switch in the starter-solenoid wire at the soonest convenience.
By the way, should one's key-switch stick in the CRANK position, instead of removing the main battery-cable, un-plug the solenoid wires located alongside the main cable and at the top end, near the battery; un-plugging those two wires, PINK and BROWN, will kill power to the solenoid and can be done quickly and without tools.
Now, to add a manual safety over-ride to this circuit, and a pretty good anti-theft device, simply clip the BROWN wire on the RELAY side of that plug, splice wires long enough to reach wherever inside the cab you place the toggle-switch, connect the switch, and mission accomplished.
The same can be accomplished on a manual-transmission truck by splicing the switch-wires into the clutch "safety"-switch circuit.
Here, you can kill two birds with the same rock, adding an over-ride switch and eliminating the silly clutch-switch, by clipping both wires at the clutch-switch and re-routing them instead through a toggle-switch.
06-05-2011, 07:15 PM
#14
Registered User
 Thanks again, Mr JIM LANE, for taking the time to provide this informative and very necessary TECH article.
 One thing I will point out that, if it was already mentioned, I did not see; the upper plastic shroud will not clear the **** on the tilt lever.
The tilt lever rod is threaded and simply un-screws out of the way.
Then, that top plastic shroud lifts right off.
On the wife's truck, the bottom-center shroud screw is plain old T-20 TORX = 8-32 X 1-inch, if one wishes to replace it with a plain old Phillips head screw.
The two outer bottom shroud screws are recessed way up in there, fully three inches deep, and plain old T-20 TORX; it is nigh impossible to find a bit that will reach way up in there.
A plain long-shaft TORX screw-driver will work here better than any removable bit-driver and will be much easier to find.
Lacking either, and not having the luxury of convenient tool sources, nor time to wait on UPS, I went the old tried and true country boy route.
With that bottom-center screw removed, I pried the top and bottom pieces apart until the screw-heads tore out of the plastic, thus letting the two pieces come apart.
Upon removal, I discovered that those two screws were coarse-threaded like a wood-screw.
I had some 3-1/2" dry-wall screws on hand that had identical threads; Phillips head.
I greased the threads with vaseline, added #10 flat-washers, and re-assembled.
Those two screw-heads and washers now reside atop (under) the plastic housing, not recessed at all, and are easily accessed with a plain old #2 Phillips.
As already noted, the three screws that hold the switch mechanism are T-20 SECURITY TORX.
Lacking one of these, and exhausting all endeavors to get these out by some other fashion, I went to the local Advance and found a 75-piece set of bits, $13.47, that did indeed have the needed bit, although a very short one.
These three screws are METRIC M4 x 3/4" long for anyone wishing to source plain old Phillips screws.
