1993 D250 Frame Off Build

The following 2 users liked this post by Rick 12v CTD:
Daytrepper (11-14-2016),
mknittle (09-21-2016)
 09-21-2016, 08:53 PM
#17
Registered User
Thread Starter

I have someone coming out next month to media blast the bed; so the next major step will be getting that into epoxy primer and undercoating it with bedliner. Otherwise I'll be gathering up some parts and going thru all the wiring when I get time.
10-22-2016, 09:11 PM
#18
Registered User
Thread Starter
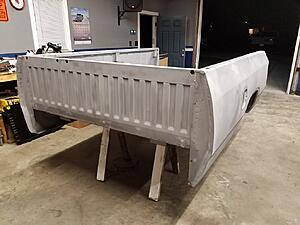
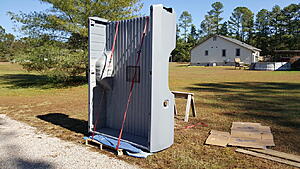
Time for an update; other than the 10,000 small things I have been working on the past few weeks----all wiring repaired/cleaned/retaped/loomed; started rebuilding the heater box; and several other small things; got a pretty big step done today; I got the bed media blasted, cleaned up, and in primer, except for the underside, and inside; thats coming next weekend, we are going to coat it with spray in bedliner...
Next step with the bed after the bedliner application is to put it back on the truck to await the next trip to the body shop; a few dents to fix, then we can put some color on it. I'm going to wait until I get the front end into bare metal and primer and do it all at once; and blend into the cab if necessary.
In the mean time, dash will be going in as soon as the heater box parts arrive, and I can put that back together. Then we will work on getting her running again. Tons of parts sitting here to install, and several more that need to go to the powder coat shop first...more to come...
BTW; if anyone is looking for the trans tower shifter boot; buy one for a G56 on a new Ram; works just fine on the Getrag 360.
10-22-2016, 09:23 PM
#19
Registered User
Join Date: Dec 2010
Location: Land of the Toxic Avenger
Posts: 6,769
Received 1,637 Likes
on
1,112 Posts
The following 2 users liked this post by NJTman:
Daytrepper (10-24-2016),
mknittle (10-22-2016)
10-23-2016, 01:23 AM
#20
Registered User
Nice work! I just got done putting 4 coats of Chassis Saver on my truck. Sand blast and epoxy primer is the way to do it right but not really an option for me. Looks like you're doing it right!
The following users liked this post:
Daytrepper (10-24-2016)
10-23-2016, 07:23 PM
#21
Registered User

Indeed very nice work?
Curious question - when you did the KDP, was the pin still seated correctly or had it started to come out? How about the other bolts?
Again very nice build.
cheers
Doug
Curious question - when you did the KDP, was the pin still seated correctly or had it started to come out? How about the other bolts?
Again very nice build.
cheers
Doug
The following users liked this post:
Daytrepper (11-14-2016)
10-24-2016, 06:09 AM
#22
Registered User
Yeah, I noticed the Wheel Horse too, a good companion to a 1st Gen!
Man you are doing great work. Nice to see a member of the family getting a new lease on life. Amazing you are doing all that work in a little garage or are you farming the paint out?
Great build thread.
Man you are doing great work. Nice to see a member of the family getting a new lease on life. Amazing you are doing all that work in a little garage or are you farming the paint out?
Great build thread.
The following users liked this post:
Daytrepper (11-14-2016)
10-24-2016, 06:34 PM
#23
Registered User
Thread Starter
80% of the body work is being done here in the garage. I'm doing most of the prep and body work, and a good buddy that restores classic cars for a living is doing whatever I cant do here, and the finish body work and painting. I am doing all the mechanical work here. I still have all of my tools and equipment from my former diesel mechanic days.
10-26-2016, 11:11 PM
#25
Registered User
Thread Starter
Dodge 5.9BT Killer Dowel Pin AKA KDP Repair 89-98 Cummins 4BT/6BT Diesel | eBay
Kind of a "while you are there" type of deal for me.
You've got to tear the front gear cover off at minimum to install it; so, "while you're there", figure a front crank seal, fan clutch, radiator hoses, belt, tensioner, can be quite a project. Not difficult really, just a bit of time consuming work to get into it. Throw some red locktite on the kdp blocker bolt just to be safe as well.
My fan clutch was seized solid to the fan hub, and after a ton of time trying to get it all apart and save everything, I ended up pressing the fan hub out of the bearing, and destroying the hub in the process of separating the fan clutch from it to retrieve the fan blade and pulley; (pipe wrench, torch, and breaker bar) had to order a new fan hub from Cummins...all that trying to replace just the clutch, which is original, and worn out. Hub bearing is fine, saved that and the support, but unfortunately that wasnt available separately from the assembly.
This weekend, I'll be finishing the bed prep, and spraying the underside with bedliner coating. After that, the goal is to get the dash and hvac back in, and get her running. Then off to the body shop to let my buddy work his magic.
The following users liked this post:
Daytrepper (11-14-2016)
10-27-2016, 05:01 PM
#28
Registered User
Thread Starter
11-05-2016, 09:11 PM
#29
Registered User
Thread Starter
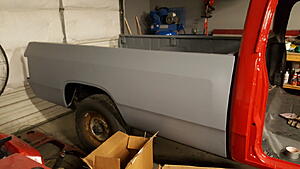
Here we are just shy of a year into this project, almost to the day.
Stuck the bed back on the truck for now; we'll be doing all the body work and getting rid of dents/dings once it heads up to my buddy's body shop:
Aside from that I got the new foam in for my heater box, and began cutting out new gaskets for it:
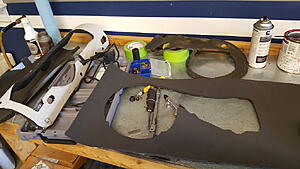
Replaced the evaporator core, had the heater core cleaned and tested, power washed out the mouse nest, and cleaned up and lubricated all the moving parts, replaced all the foam gaskets, and shes ready to install:
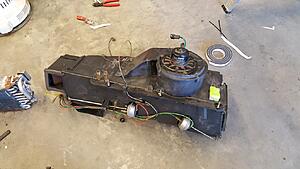
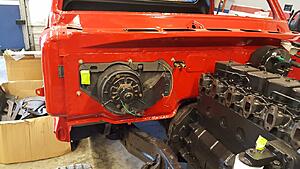
Heater box installed:
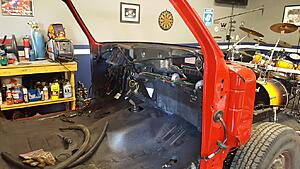
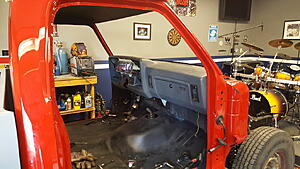
After finishing the heater box rebuild, I decided to stick the dash in:
Stuck the bed back on the truck for now; we'll be doing all the body work and getting rid of dents/dings once it heads up to my buddy's body shop:

Aside from that I got the new foam in for my heater box, and began cutting out new gaskets for it:

Replaced the evaporator core, had the heater core cleaned and tested, power washed out the mouse nest, and cleaned up and lubricated all the moving parts, replaced all the foam gaskets, and shes ready to install:

Heater box installed:


After finishing the heater box rebuild, I decided to stick the dash in:

The following users liked this post:
NJTman (11-05-2016)
11-28-2016, 08:42 PM
#30
Registered User
Thread Starter
So I dropped a ton of small parts and brackets off to be powder coated; which left me with little to do on the truck, so I decided it was time to start to tackle the rat's nest in the front underhood wiring harness.
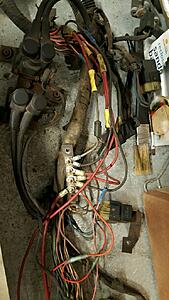
This is the main rats nest; about 13 years ago the triangular rubber junction that used to join the main power cable from the battery and all the fusible links together corroded and caught fire; the buss bar and the mess you see here was merely a quick fix to get the truck running again, as it was way up north in the dead of winter when it happened. I remember being in a parking lot of a restaurant and starting up the truck, turned on the headlights/heat and got a big puff of smoke from under the hood---I assume this was a fusible blowing---lost all power, hurried up and opened the hood to find a small fire on the wiring harness. I put it out with snow and we towed the truck back to the farm and rigged it up to run again with this mess; meaning to fix it as soon as the weather got warm....13 years later, still worked; just looks like :butt:. LOL.
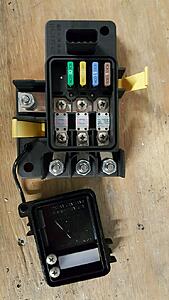
Here is the solution; a PNDB module from a late model Freightliner M2 truck. This will eliminate all the fusible links and provide midi fuse protection to the alternator and all of the circuits that used fusible links. This will be much safer and clean things up nicely. I will re-pin new wires in where the chopped ones are now and make a new power harness to the PNDB. It will also feed the glow plug relays on the main supply lug from the battery. I've got the cable ends and connectors/pins for the PNDB ordered up, just need to figure out the pin part numbers in the main cab connector and get a few of those ordered.
I'll be digging thru wiring diagrams here for the next couple hours so I can size the fuses (the ones included with the module are mostly too big) properly and plan out how to make the harness for it. Stay tuned.
This is the main rats nest; about 13 years ago the triangular rubber junction that used to join the main power cable from the battery and all the fusible links together corroded and caught fire; the buss bar and the mess you see here was merely a quick fix to get the truck running again, as it was way up north in the dead of winter when it happened. I remember being in a parking lot of a restaurant and starting up the truck, turned on the headlights/heat and got a big puff of smoke from under the hood---I assume this was a fusible blowing---lost all power, hurried up and opened the hood to find a small fire on the wiring harness. I put it out with snow and we towed the truck back to the farm and rigged it up to run again with this mess; meaning to fix it as soon as the weather got warm....13 years later, still worked; just looks like :butt:. LOL.

Here is the solution; a PNDB module from a late model Freightliner M2 truck. This will eliminate all the fusible links and provide midi fuse protection to the alternator and all of the circuits that used fusible links. This will be much safer and clean things up nicely. I will re-pin new wires in where the chopped ones are now and make a new power harness to the PNDB. It will also feed the glow plug relays on the main supply lug from the battery. I've got the cable ends and connectors/pins for the PNDB ordered up, just need to figure out the pin part numbers in the main cab connector and get a few of those ordered.

I'll be digging thru wiring diagrams here for the next couple hours so I can size the fuses (the ones included with the module are mostly too big) properly and plan out how to make the harness for it. Stay tuned.

