Water pump R & R, 2004.5 with shortcuts
 02-03-2012, 08:04 PM
#1
Administrator / Free Time Specialist
Thread Starter
Join Date: Nov 2005
Location: Birmingham, Alabama
Posts: 7,707
Likes: 0
Received 14 Likes
on
8 Posts
This R & R isn't exactly by the book, it has a shortcut or two that make the job considerably easier. My first water pump failed at 85k, it was replaced under warranty for $-0- to me. Now I'm at 136k, the second one is going out and the warranty has been gone so I'm wrenching on this one. If any of you have been following the water pump failure poll thread https://www.dieseltruckresource.com/...l-t292083.html you know that there's no rhyme or reason to when yours will go. Some guys change their coolant on time, some don't, some flush etc. so it seems regardless of what you do they just go when they want to go. One thing I noticed in reading the poll thread was when they start to drip, they can go pretty fast so once you notice your ride marking it's territory don't drag your feet about getting on this project.
Some of you have already commented in other threads that the dealers get in the neighborhood of $600 for this job. I'm going to show you how I did it for about $115 and a couple hours of my time. When I started pricing parts I didn't even bother calling the dealer to inquire about the pump but I did call my local Cummins dealer. I was a little surprised by what I was told, $136 plus tax and an $18 core charge. It's a new part, why the core charge? It seems Cummins wants to offer this part in there re-manufactured line but needs the cores to get it started. Napa was next, $49.49 plus tax and the same core charge, Advance Auto $51.93 plus tax, no core charge. I've been doing allot of business with Advance lately and have found an interesting quirk in their system.
Advance always has some kind of internet coupons available and usually never less than 15% off but you have to order on-line or go online and find your coupons and call their toll free line. The quirk I mentioned has to do with their price matching policy. When I called in this time I mentioned to the operator that I was going to order on-line but Napa had a better price so I wanted to see if they'd match it before I applied my coupon. The operator looked it up and said he could do better than my coupon, how about $20 off. Now my $52 part just dropped to $32. While I was there my new serpentine belt went from $45 to $28. You see the pattern, call and ask, all it costs you is a little time. I didn't find any breaks on the coolant though. The only place in Birmingham I could find it at was Napa, $17/gal., I bought 4. Then off to Wally World for 5 gallons of distilled water, just under $5 out the door.
Ok, enough about money, let's get started. Here's the tools you'll need, a 1/2 drive tool to release the tension on the belt, a 13mm wrench, a 10mm socket and ratchet, 3/8 drive in my case, a tapered bar and a good light. Not included here is your choice of tools to deal with your battery cables, a pair of pliers and an 8-10" tall block to stand on.

Remember you want to be working on a cold engine. You do not want to attempt this if your engine is at or near operating temperature. Per the manual, start your vehicle and put the heater temperature control to full hot. Let the truck run for a few seconds after that to give everything time to move. Turn your vehicle off and make sure you've put it in park and set the parking brake. Stick guys are in first or reverse and the parking brake is on. A wheel chock is always a good idea as well because you will be under the truck at times. The next thing the manual calls for you to do is unhook your negative battery cables. You'll be working right at the alternator and there's a direct battery feed there, probably a good idea to pull them.
Once you've dealt with the cables you can slide your catch pan under the truck and start to drain the old coolant. Do not remove the radiator cap. You should plan to catch around 5 gallons, give or take a little. If you're reusing it make sure to use a clean container. My radiator drain was on the driver's side. It's a plastic thumbscrew that turned pretty easy. Remember which way it goes, lefty-loosey righty-tighty.
Once you have the coolant under control lets deal with the serpentine belt. I found it easier to get on the tensioner from the bottom with a 1/2" flex-head ratchet. I have to apologize for this pic. I took one from the bottom but it won't load for some reason so here's one from the top.

Now the manual says to jump the belt at the water pump. My arms aren't that long since I was holding the ratchet under the truck and the water pump is nearer the top so I jumped the belt at the air conditioning compressor and then moved back to the top. Since you've already identified the leaking pump you know where to look but for those who might not be there yet, in the picture above, it's the smooth, shiny pulley to the right of the alternator. For the gasser guys who are new to a Cummins, surprise, you don't have to pull the fan to get to the water pump. Once you're on top work the belt out of your way and remember, be gentle with the fan blades!
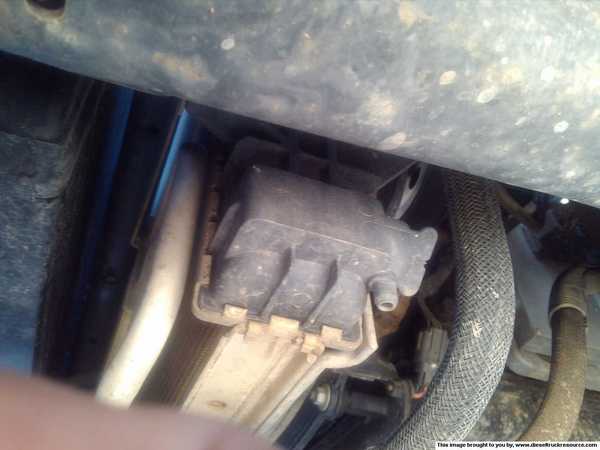
The water pump is held in place by 2 bolts, that's all, but they're a little bit of a pain to work with. In this first picture you can see the lower bolt in the center of the light spot. I backed it out to make it easier to see.

In this picture you'll see 2 bolts in the light spot. The one you want is the one to the left.
Now for your first shortcut. In the pictures below you'll see where I removed one nut holding the fan shroud to the support bar. This is the one right in front of the alternator, on the top. Removing the nut allows you to compress the bellows in the fan shroud. This serves 2 purposes. First, it will give you a little extra working room while trying to get the pump bolts out. Second, and most importantly, this is where you'll remove the water pump from behind the radiator. It's a tight fit but it does come out through that little space. Tip! After you remove this nut, pull the bellows to the front and start the nut back on the stud. You only need to run it in 2 or 3 threads. This will hold the bellows out of your way while you're working.

Here's what you gain by removing the nut.

Now you're ready to take out the pump bolts. They're only suppose to be torqued to 18 foot pounds so they should break loose very easily. Once you've removed both of them it's time to grab the tapered bar you saw in the tool picture previously. Stick the pointed end behind the pump pulley, to the left of the pump shaft and slide it down until it stops. Now give it a very slight pull toward the front of the truck and the pump should pop right out of the block. A word of caution here, don't pull to hard the first time and make sure you don't let the pump hit the radiator or the fan blades. You don't want any collateral damage. Once you've got it loose remove the bar and very carefully work the pump to the top. Be careful around the fan blades! Since you already removed the nut from the radiator support bar just pull the bellows forward with one hand and work the pump out with the other. Like I said, it's tight but it will go through there.
You have now completed the removal phase of your project. Not counting draining the anti-freeze and loosening the belt you should be at about the 20 minute mark.
Some of you have already commented in other threads that the dealers get in the neighborhood of $600 for this job. I'm going to show you how I did it for about $115 and a couple hours of my time. When I started pricing parts I didn't even bother calling the dealer to inquire about the pump but I did call my local Cummins dealer. I was a little surprised by what I was told, $136 plus tax and an $18 core charge. It's a new part, why the core charge? It seems Cummins wants to offer this part in there re-manufactured line but needs the cores to get it started. Napa was next, $49.49 plus tax and the same core charge, Advance Auto $51.93 plus tax, no core charge. I've been doing allot of business with Advance lately and have found an interesting quirk in their system.
Advance always has some kind of internet coupons available and usually never less than 15% off but you have to order on-line or go online and find your coupons and call their toll free line. The quirk I mentioned has to do with their price matching policy. When I called in this time I mentioned to the operator that I was going to order on-line but Napa had a better price so I wanted to see if they'd match it before I applied my coupon. The operator looked it up and said he could do better than my coupon, how about $20 off. Now my $52 part just dropped to $32. While I was there my new serpentine belt went from $45 to $28. You see the pattern, call and ask, all it costs you is a little time. I didn't find any breaks on the coolant though. The only place in Birmingham I could find it at was Napa, $17/gal., I bought 4. Then off to Wally World for 5 gallons of distilled water, just under $5 out the door.
Ok, enough about money, let's get started. Here's the tools you'll need, a 1/2 drive tool to release the tension on the belt, a 13mm wrench, a 10mm socket and ratchet, 3/8 drive in my case, a tapered bar and a good light. Not included here is your choice of tools to deal with your battery cables, a pair of pliers and an 8-10" tall block to stand on.
Remember you want to be working on a cold engine. You do not want to attempt this if your engine is at or near operating temperature. Per the manual, start your vehicle and put the heater temperature control to full hot. Let the truck run for a few seconds after that to give everything time to move. Turn your vehicle off and make sure you've put it in park and set the parking brake. Stick guys are in first or reverse and the parking brake is on. A wheel chock is always a good idea as well because you will be under the truck at times. The next thing the manual calls for you to do is unhook your negative battery cables. You'll be working right at the alternator and there's a direct battery feed there, probably a good idea to pull them.
Once you've dealt with the cables you can slide your catch pan under the truck and start to drain the old coolant. Do not remove the radiator cap. You should plan to catch around 5 gallons, give or take a little. If you're reusing it make sure to use a clean container. My radiator drain was on the driver's side. It's a plastic thumbscrew that turned pretty easy. Remember which way it goes, lefty-loosey righty-tighty.
Once you have the coolant under control lets deal with the serpentine belt. I found it easier to get on the tensioner from the bottom with a 1/2" flex-head ratchet. I have to apologize for this pic. I took one from the bottom but it won't load for some reason so here's one from the top.
Now the manual says to jump the belt at the water pump. My arms aren't that long since I was holding the ratchet under the truck and the water pump is nearer the top so I jumped the belt at the air conditioning compressor and then moved back to the top. Since you've already identified the leaking pump you know where to look but for those who might not be there yet, in the picture above, it's the smooth, shiny pulley to the right of the alternator. For the gasser guys who are new to a Cummins, surprise, you don't have to pull the fan to get to the water pump. Once you're on top work the belt out of your way and remember, be gentle with the fan blades!
The water pump is held in place by 2 bolts, that's all, but they're a little bit of a pain to work with. In this first picture you can see the lower bolt in the center of the light spot. I backed it out to make it easier to see.
In this picture you'll see 2 bolts in the light spot. The one you want is the one to the left.
Now for your first shortcut. In the pictures below you'll see where I removed one nut holding the fan shroud to the support bar. This is the one right in front of the alternator, on the top. Removing the nut allows you to compress the bellows in the fan shroud. This serves 2 purposes. First, it will give you a little extra working room while trying to get the pump bolts out. Second, and most importantly, this is where you'll remove the water pump from behind the radiator. It's a tight fit but it does come out through that little space. Tip! After you remove this nut, pull the bellows to the front and start the nut back on the stud. You only need to run it in 2 or 3 threads. This will hold the bellows out of your way while you're working.
Here's what you gain by removing the nut.
Now you're ready to take out the pump bolts. They're only suppose to be torqued to 18 foot pounds so they should break loose very easily. Once you've removed both of them it's time to grab the tapered bar you saw in the tool picture previously. Stick the pointed end behind the pump pulley, to the left of the pump shaft and slide it down until it stops. Now give it a very slight pull toward the front of the truck and the pump should pop right out of the block. A word of caution here, don't pull to hard the first time and make sure you don't let the pump hit the radiator or the fan blades. You don't want any collateral damage. Once you've got it loose remove the bar and very carefully work the pump to the top. Be careful around the fan blades! Since you already removed the nut from the radiator support bar just pull the bellows forward with one hand and work the pump out with the other. Like I said, it's tight but it will go through there.
You have now completed the removal phase of your project. Not counting draining the anti-freeze and loosening the belt you should be at about the 20 minute mark.
 02-03-2012, 11:22 PM
#2
Administrator / Free Time Specialist
Thread Starter
Join Date: Nov 2005
Location: Birmingham, Alabama
Posts: 7,707
Likes: 0
Received 14 Likes
on
8 Posts
Now let's work on getting ready to go back together. The water pump only uses an O-ring for a seal, no other gasket is needed so all you should have to do is take a clean rag and wipe down the mating surface of the engine block. Once you've got that done let's get our new parts out and compare a couple things.
Here's the pump I got from Advance Auto. This is a new unit but they do offer a reman. I think the difference was less than $10.

You'll notice the impeller has a cardboard collar protecting it. Don't throw that away, it'll come in handy in a few minutes.

The O-ring was in a separate bag.

If you lay the two pumps side by side you'll see a couple differences right away. The first is that the impellers are a little different. On the new unit the impellers have a metal ring welded across the their ends.

The second difference is the weep hole. It's clearly visible on the new unit as compared to the old one.


Now that we're comfortable with our parts let's put this puppy back together. When you put the pump back into the block you'll do good to get one hand in that hole you've been working in. This really isn't a shortcut but more of a tip. First, take that cardboard ring you saved and sit the pump pulley in it. Tip! Then take a tiny bit of red silicone, or any other automotive silicone you may have on hand and put just a little in the groove the O-ring will set in. It will hold the O-ring in place while you get the pump positioned. It's a little hard to see the silicone in the picture but it goes all the way around the groove. Make sure to wipe any excess off the mating surfaces then push your O-ring into the groove. I would recommend you do one other thing now. Tip! Remembering that the weep hole on the new pump goes to the bottom, mark the top of the pump housing with a colored marker or something so you can easily tell how it's oriented once you get it in place. This may save you a few minutes of fumbling and few choice words.

YeeHaw, fun time in River City! Now you have to get that new pump back through the hole the old one just came out of. If you're going to have a problem this is most likely the place it'll happen. As you work the new pump back behind the radiator take care it doesn't slip and fall onto the fan blades. This is a pain and by far the worst part of the job. Get this done without a hiccup and you're home free! Once you get the pump in place you'll find that if yours is like mine it won't stay propped up in the hole. I had to put the bottom bolt in it's hole and just work it around until I got it to start. Once it started I ran it up as far as I could by hand before I started on the upper bolt. Double check that the O-ring is still in place. Now I also found I could not get my torque wrench in position to use it on the bolts. The manual calls for 18 foot pounds of torque, I think it converts to 216 inch pounds. In either case it's not very much. You might have to guess on this one, just don't over tighten these two and break one off.
Once you finish the bolts let's put the belt back on. This can be a little aggravating trying to keep it lined up and over all the pulleys like it's suppose to be but it's doable. Now that you have the top side of the belt in place, crawl back under the truck, pull down on your ratchet and put the belt back on the A/C compressor. Be careful not to pinch a finger here. After you have the belt back on the A/C compressor take a couple minutes and make sure it's seated and centered on all the pulleys, top and bottom. A little care and a triple check here will keep from shredding a belt and possibly doing additional damage. Go ahead and close the drain on the radiator while you're under the truck.
The next step would be to refill the cooling system, right after you close the radiator drain. (Oh wait, you did that already.) If you plan on doing a flush, and it's recommended, you'll need 4 gallons of the distilled water now. I'm going to show you an excerpt from the manual below.
You'll notice it mentions filling the radiator, running the engine through a few heat cycles etc. When I got to this point I followed those instructions but I run into a problem. Even at 65* ambient temperature my truck wouldn't get warm enough to cycle the thermostat. I also could only get about 1.75 gallons of water into the radiator. I had a moment because I was frustrated (and impatient) with my results and decided I'd run the truck up the road to heat cycle it, bad idea. It got an air pocket in the heater core and head and it got hot. When I finally got it cooled down and got back home I had to let it set for a couple hours before it would suck the water out of the over flow tank into the radiator, then it was fine. This is the point where the last shortcut will save you allot of grief and time. Like I said, if you're going to flush add 4 gallons of water in the method I'll describe in a moment, other wise you'll be adding antifreeze and water.
I chose to go back with Zerex G-05. I got a little surprise when I opened the jug because I was expecting a colored fluid inside but it's not, it's nearly clear.

Another interesting discovery was on the back of the jug. If we're to believe Zerex, this is one time when more may be better. You can see by the chart they provide that their product is rated at concentrations up to 70%. We'll discuss this at the end.

Here's the pump I got from Advance Auto. This is a new unit but they do offer a reman. I think the difference was less than $10.
You'll notice the impeller has a cardboard collar protecting it. Don't throw that away, it'll come in handy in a few minutes.
The O-ring was in a separate bag.
If you lay the two pumps side by side you'll see a couple differences right away. The first is that the impellers are a little different. On the new unit the impellers have a metal ring welded across the their ends.
The second difference is the weep hole. It's clearly visible on the new unit as compared to the old one.
Now that we're comfortable with our parts let's put this puppy back together. When you put the pump back into the block you'll do good to get one hand in that hole you've been working in. This really isn't a shortcut but more of a tip. First, take that cardboard ring you saved and sit the pump pulley in it. Tip! Then take a tiny bit of red silicone, or any other automotive silicone you may have on hand and put just a little in the groove the O-ring will set in. It will hold the O-ring in place while you get the pump positioned. It's a little hard to see the silicone in the picture but it goes all the way around the groove. Make sure to wipe any excess off the mating surfaces then push your O-ring into the groove. I would recommend you do one other thing now. Tip! Remembering that the weep hole on the new pump goes to the bottom, mark the top of the pump housing with a colored marker or something so you can easily tell how it's oriented once you get it in place. This may save you a few minutes of fumbling and few choice words.
YeeHaw, fun time in River City! Now you have to get that new pump back through the hole the old one just came out of. If you're going to have a problem this is most likely the place it'll happen. As you work the new pump back behind the radiator take care it doesn't slip and fall onto the fan blades. This is a pain and by far the worst part of the job. Get this done without a hiccup and you're home free! Once you get the pump in place you'll find that if yours is like mine it won't stay propped up in the hole. I had to put the bottom bolt in it's hole and just work it around until I got it to start. Once it started I ran it up as far as I could by hand before I started on the upper bolt. Double check that the O-ring is still in place. Now I also found I could not get my torque wrench in position to use it on the bolts. The manual calls for 18 foot pounds of torque, I think it converts to 216 inch pounds. In either case it's not very much. You might have to guess on this one, just don't over tighten these two and break one off.
Once you finish the bolts let's put the belt back on. This can be a little aggravating trying to keep it lined up and over all the pulleys like it's suppose to be but it's doable. Now that you have the top side of the belt in place, crawl back under the truck, pull down on your ratchet and put the belt back on the A/C compressor. Be careful not to pinch a finger here. After you have the belt back on the A/C compressor take a couple minutes and make sure it's seated and centered on all the pulleys, top and bottom. A little care and a triple check here will keep from shredding a belt and possibly doing additional damage. Go ahead and close the drain on the radiator while you're under the truck.
The next step would be to refill the cooling system, right after you close the radiator drain. (Oh wait, you did that already.) If you plan on doing a flush, and it's recommended, you'll need 4 gallons of the distilled water now. I'm going to show you an excerpt from the manual below.
REFILLING COOLING SYSTEM 5.9L DIESEL
ENGINE
Clean cooling system prior to refilling (Refer to 7 -
COOLING - STANDARD PROCEDURE).
(1) Close radiator drain plug.
CAUTION: Due to the use of the one-way check
valve, the engine must not be operating when refilling
the cooling system.
NOTE: The diesel engine is equipped with two oneway
check valves (jiggle pins). The check valves
are used as a servicing feature and will vent air
when the system is being filled. Water pressure (or
flow) will hold the valves closed.
(2) Fill the cooling system with a 50/50 mixture of
water and antifreeze.
(3) Fill coolant reserve/overflow tank to the FULL
mark.
(4) Start and operate engine until thermostat
opens. Upper radiator hose should be warm to touch.
(5) If necessary, add 50/50 water and antifreeze
mixture to the coolant reserve/overflow tank to maintain
coolant level. This level should be between the
ADD and FULL marks. The level in the reserve/overflow
tank may drop below the ADD mark after three
or four warm-up and cool-down cycles.
I chose to go back with Zerex G-05. I got a little surprise when I opened the jug because I was expecting a colored fluid inside but it's not, it's nearly clear.
Another interesting discovery was on the back of the jug. If we're to believe Zerex, this is one time when more may be better. You can see by the chart they provide that their product is rated at concentrations up to 70%. We'll discuss this at the end.
The following users liked this post:
NISMOramAE86 (08-13-2017)
02-04-2012, 01:13 AM
#3
Administrator / Free Time Specialist
Thread Starter
Join Date: Nov 2005
Location: Birmingham, Alabama
Posts: 7,707
Likes: 0
Received 14 Likes
on
8 Posts
Ok, on to refilling the system. Since I already ran 4 gallons of water through mine I drained the radiator again and prepared to refill it with antifreeze. This time however I added a step to the process.
This is the most important piece on information in this write up.
Shortcut number two. In the picture below you'll notice a long nipple with a hose attached, pointing straight up out of the head between cylinders 4 and 5. That nipple connects to one of the heater lines. If you will take a regular pair of pliers and move the clamp off the nipple you'll be able to twist the hose a little and then slide it up and off the nipple. Once you do that the system will bleed almost all the air out when you refill it. I went from being able to put 1.75 gallons in the radiator to being able to get 4.0 gallons in at the radiator. This filled the block as well and prevented it from getting an air bubble and running hot this time. You'll also see when you get done that the liquid level at the bottom of the neck in the radiator is the same as the top of this nipple.

So here's what I did, pour 3.5 gallons of straight antifreeze into the radiator. Mix the last half gallon with distilled water for a 50/50 mix. Slowly add half of that to the radiator or until the bubbles stop and the level in the radiator and the nipple are full to the top. Place the hose back on the nipple, put the clamp back on, replace the radiator cap and pour the balance of the 50/50 jug into the over flow tank. I added the last half gallon of distilled water to the tank as well. This brought the level in the over flow tank to within an inch of the hot mark. Do a quick leak check, especially if you doing a flush first. If you don't see any leaks put your battery cables back on and fire it up. Run the heat on high with high fan, you should get heat fairly quick. After a few heat cycles, which may require a trip around the block, the fluid level in the over flow tank should drop to near the add line. Mine is now about an inch above the line.
Congratulations! If you're not leaking coolant anywhere and you got about 5 gallons in you're close to being finished. After a couple heat cycles check the coolant level at the overflow tank and maintain as necessary. Not including the coolant drain you should now have about an hour invested in this project. You have a little more if you flush and refill. All in all I'm glad not to give the dealer that $485 in labor I just saved. Don't be afraid of this project, you can do it!!!
I'd like to add an observation and an opinion, feel free to discuss it. My first pump lasted 85k. The dealer changed it and the replacement only went to 136k, that's 29k less. I suspect the dealer just reused my old coolant. Since the pump gets it's lubrication from the coolant I suspect the lubricating ability of the coolant had just been used up. That's why I believe the second pump didn't do as well as the first. Raising the concentration of the coolant to water ratio will, I believe, help improve the longevity of the pump. Only time will tell if I'm on the right track. T'rad
This is the most important piece on information in this write up.
Shortcut number two. In the picture below you'll notice a long nipple with a hose attached, pointing straight up out of the head between cylinders 4 and 5. That nipple connects to one of the heater lines. If you will take a regular pair of pliers and move the clamp off the nipple you'll be able to twist the hose a little and then slide it up and off the nipple. Once you do that the system will bleed almost all the air out when you refill it. I went from being able to put 1.75 gallons in the radiator to being able to get 4.0 gallons in at the radiator. This filled the block as well and prevented it from getting an air bubble and running hot this time. You'll also see when you get done that the liquid level at the bottom of the neck in the radiator is the same as the top of this nipple.
So here's what I did, pour 3.5 gallons of straight antifreeze into the radiator. Mix the last half gallon with distilled water for a 50/50 mix. Slowly add half of that to the radiator or until the bubbles stop and the level in the radiator and the nipple are full to the top. Place the hose back on the nipple, put the clamp back on, replace the radiator cap and pour the balance of the 50/50 jug into the over flow tank. I added the last half gallon of distilled water to the tank as well. This brought the level in the over flow tank to within an inch of the hot mark. Do a quick leak check, especially if you doing a flush first. If you don't see any leaks put your battery cables back on and fire it up. Run the heat on high with high fan, you should get heat fairly quick. After a few heat cycles, which may require a trip around the block, the fluid level in the over flow tank should drop to near the add line. Mine is now about an inch above the line.
Congratulations! If you're not leaking coolant anywhere and you got about 5 gallons in you're close to being finished. After a couple heat cycles check the coolant level at the overflow tank and maintain as necessary. Not including the coolant drain you should now have about an hour invested in this project. You have a little more if you flush and refill. All in all I'm glad not to give the dealer that $485 in labor I just saved. Don't be afraid of this project, you can do it!!!
I'd like to add an observation and an opinion, feel free to discuss it. My first pump lasted 85k. The dealer changed it and the replacement only went to 136k, that's 29k less. I suspect the dealer just reused my old coolant. Since the pump gets it's lubrication from the coolant I suspect the lubricating ability of the coolant had just been used up. That's why I believe the second pump didn't do as well as the first. Raising the concentration of the coolant to water ratio will, I believe, help improve the longevity of the pump. Only time will tell if I'm on the right track. T'rad
The following users liked this post:
NISMOramAE86 (08-13-2017)
02-04-2012, 03:49 PM
#4
Registered User

Join Date: Jan 2012
Posts: 10
Likes: 0
Received 0 Likes
on
0 Posts
Great write up, thanks. I was looking at mine and just thinking it would seem to be easier with the fan shroud and the fan out of the way. How difficult is it to remove the fan and the fan shroud.
02-04-2012, 05:29 PM
#5
Administrator / Free Time Specialist
Thread Starter
Join Date: Nov 2005
Location: Birmingham, Alabama
Posts: 7,707
Likes: 0
Received 14 Likes
on
8 Posts
Thank you but I can't really answer your question. I did mine just as I wrote it up and from the time I popped the belt until the time I put it back was about an hour. I wouldn't remove either the fan or the shroud but having something to stand on really helped.
Trending Topics
02-04-2012, 06:54 PM
#8
Registered User
Join Date: Jan 2007
Location: In Oroville, Ca., same house for past 46 yrs!
Posts: 719
Likes: 0
Received 0 Likes
on
0 Posts
OUTSTANDING write up! You've done something that's dreadfully difficult sounding to the layman, a P.I.T.A. to the everyday mechanic and now a simple 2 beer maintenance thing to most of us owner/mechanics. Good job and I really liked the precautionary statements. When I have to do mine, I'll certainly remember to watch out for the fan blades! LOL
Again, Good job.
Again, Good job.
02-14-2012, 07:40 AM
#9
Administrator / Free Time Specialist
Thread Starter
Join Date: Nov 2005
Location: Birmingham, Alabama
Posts: 7,707
Likes: 0
Received 14 Likes
on
8 Posts
OUTSTANDING write up! You've done something that's dreadfully difficult sounding to the layman, a P.I.T.A. to the everyday mechanic and now a simple 2 beer maintenance thing to most of us owner/mechanics. Good job and I really liked the precautionary statements. When I have to do mine, I'll certainly remember to watch out for the fan blades! LOL
Again, Good job.
Again, Good job.
 02-14-2012, 08:00 AM
#10
Administrator / Free Time Specialist
Thread Starter
Join Date: Nov 2005
Location: Birmingham, Alabama
Posts: 7,707
Likes: 0
Received 14 Likes
on
8 Posts
I wanted to give you all an update albeit an embarrassing one. I mentioned earlier that I got an air bubble in the system because I didn't take my time and get the truck to heat cycle a few times after the flush. I was concerned the water pump might suffer because of this, and it did. I came out of the bank yesterday afternoon and my truck was clearly marking the parking lot so for the second time in 2 weeks I got to practice changing the water pump. I had to get a clean catch can this time because I wasn't wasting $80 in antifreeze and distilled water. I went by Advance Auto and picked up a covered 15 quart oil catch container for about $13 and set to work removing the pump. Advance did their part and swapped the pump.
If the system had been totally full the catch pan would not have held the volume of coolant it would have produced so having a clean 5 gallon bucket handy is a good idea. I also did not open the heat control this time as I wasn't interested in draining and flushing the heater core this time. Again, this is a big embarrassment to me but a chance for you to learn from my mistake. Make sure you pull the hose off the nipple on the top of the head. It'll save you tons of time and additional expense!
I mentioned earlier that I got an air bubble in the system because I didn't take my time and get the truck to heat cycle a few times after the flush. I was concerned the water pump might suffer because of this, and it did. I came out of the bank yesterday afternoon and my truck was clearly marking the parking lot so for the second time in 2 weeks I got to practice changing the water pump. I had to get a clean catch can this time because I wasn't wasting $80 in antifreeze and distilled water. I went by Advance Auto and picked up a covered 15 quart oil catch container for about $13 and set to work removing the pump. Advance did their part and swapped the pump. If the system had been totally full the catch pan would not have held the volume of coolant it would have produced so having a clean 5 gallon bucket handy is a good idea. I also did not open the heat control this time as I wasn't interested in draining and flushing the heater core this time. Again, this is a big embarrassment to me but a chance for you to learn from my mistake. Make sure you pull the hose off the nipple on the top of the head. It'll save you tons of time and additional expense!
The following users liked this post:
DarkLeftArm (05-18-2020)
04-01-2012, 06:03 PM
#12
Registered User

Join Date: Jan 2006
Location: Los Angeles, CA
Posts: 228
Likes: 0
Received 0 Likes
on
0 Posts
Was this even after you did the second trick to fill the block without bubbles?
04-01-2012, 09:47 PM
#13
Administrator / Free Time Specialist
Thread Starter
Join Date: Nov 2005
Location: Birmingham, Alabama
Posts: 7,707
Likes: 0
Received 14 Likes
on
8 Posts
04-23-2012, 10:10 AM
#14

Nice job, wellwritten and documented-thanks
my 04 lasted 78k, my sons 07(6.7) with only 14k miles went out last month.
Water pump seems to be a weak link in an otherwise great engine.
---thanks again for a job well done
my 04 lasted 78k, my sons 07(6.7) with only 14k miles went out last month.
Water pump seems to be a weak link in an otherwise great engine.
---thanks again for a job well done

