Installing Transgo Shift Kit in a 48RE
 03-14-2010, 03:39 PM
#1
Registered User
Thread Starter
Installing Transgo Shift Kit in a 48RE
Here are some tips that will make this go much easier for you:
The instructions are terrible. Total time it took me: 1.5 hours the first night to drain the pan, prepare the work bench, drop the pan and loosen the VB to drain. The next day it took me from 8am to 2pm, so 6 hours. I am sure I could do one now in under 3 hours. Probably two. There's a lot of head scratching and looking that I wouldn't need to do now. Like figuring the TV motor out, and that darn e-clip on that goofy shaft. Okay, here goes:
First of all you will have to drain the trans and remove the pan. Next pull the two bolts that hold the filter on using a #25 torx head bit. Remove the filter. Remove all the 1/2" cap bolts holding the valve body except for two (to hold the valve body in place) and then loosen those last two and let the valve body drain overnight. This will make the job much less messy! Note that there are three lengths of VB bolts. The short ones go where the VB is thinner, the long ones where it is thicker and the 4 real long ones go around the solenoid housing.
Remove the TV motor: This is on the driver's side above the transmission. It has two 1/2" bolts holding it on. Pull those two bolts and the TV motor will rotate away from the trans, let it come away a bit and then lift it straight up. It has a 'D' shaped shaft it connects to in the trans. I just stuffed it above the trans instead of trying to get the electrical connection off.

Under the TV motor is the shift linkage. This comes off easily, just loosen a 1/2" clamp bolt and wiggle the connection up and off the shaft protruding up through the trans.
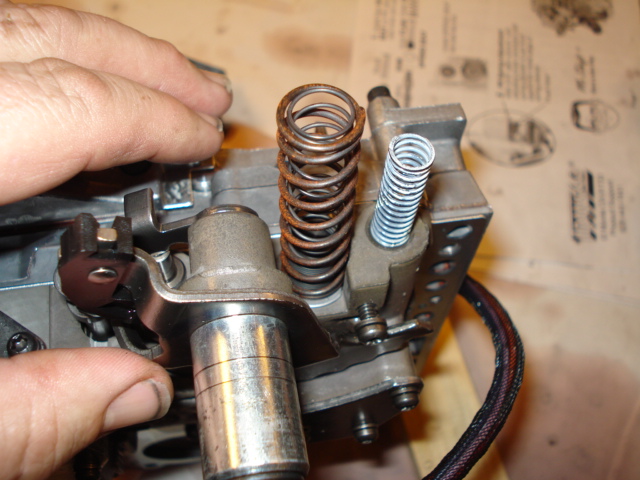
Now look just to the rear of the TV motor for a round black electrical plug. This connects to a stub coming up out of the transmission and needs to come off. There are two tabs that need to be pinched to remove this plug. It isn't easy. In this picture you will see the the plug wires on the right side of the picture, just to the left of where the fluid line is connected. Not the one with the red tab on it! The electrical gizmo (please excuse the high-tech terminology ) is on top of the thing with the 5 bolted black plate on the bottom.

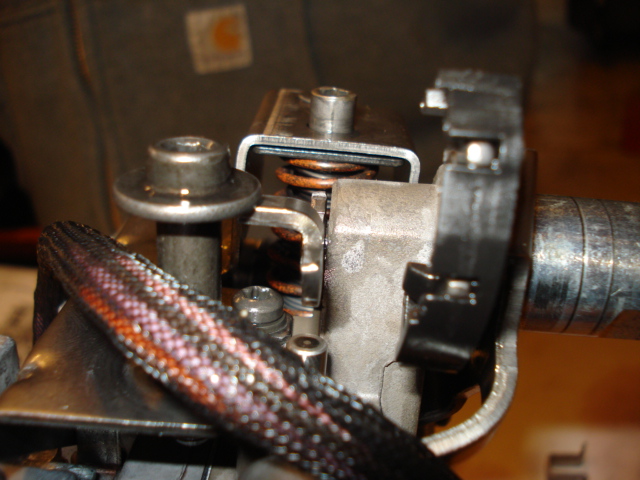
Now here I didn't get a picture ahead of time but this will help... put the truck in low gear and look above the VB on the drivers side. You will see a rod that goes to the rear of the truck. This rod connects to something referred to as a 'rooster comb' and will hold your VB in the trans. Now I just removed the e-clip that held it on. You can reach up in there and pop that off pretty easy. In this picture you can also see the round electrical plug quite easily.

At this point you have removed the TV motor, the shift linkage, the round electrical connection and the rod thingy. Now you can drop the VB. Gently rock it back and forth and wiggle it. There are o-rings you are pulling the shift linkage shaft and the electrical plug through the trans so it will resist a bit. Carry the VB to your cleaned and covered-with-a-sheet workbench. The hard part of the whole job is done!!!
Now let's look at the instructions:
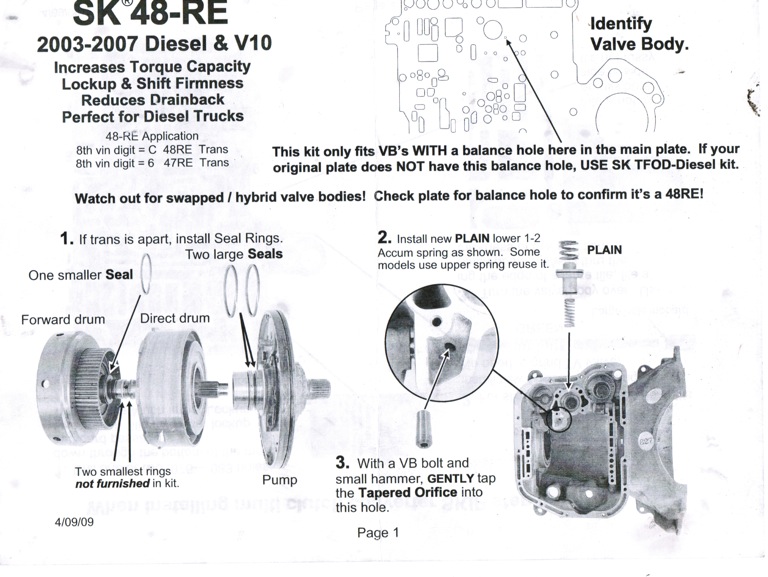
Skip step 1, we don't have the trans out. Step 2 we don't do until we put the VB back in. (again... who wrote these instructions) Step 3 is pretty simple. Gently tap the restrictor plug in the trans, big hole out. This is on the trans housing, not the VB.

Now disassemble the VB by removing all the # 25 torx bit bolts. Watch for stuff falling out. The VB will come apart in three main pieces, hard to mix them up and don't worry about ***** falling out, the instructions do show where all those go. DO watch for valves sliding out!!! I washed over a garbage can with a screen over it, and I would have lost parts if I wasn't watching carefully. There are no springs between the layers of VB.

Page 2.

Drill the hole for firmer lock-up. The instructions call out a .076 - .083 bit. They include two bits, and neither is the right size. I used a 5/64" bit which measures .077 on my micrometer. I drilled one hole and it slaps into fourth pretty firm, not so much when I am on it hard, more when I am easing on the throttle. I'm happy I didn't do two holes, your results may vary, enter at your own risk, etc. I DID NOT do step 2 for later shifts. My shifts are late enough already!
Step three was easier than I thought it would be. This is soft aluminum, just rub a file edge over it then clean all the shavings out with brake cleaner and compressed air.

The instructions are terrible. Total time it took me: 1.5 hours the first night to drain the pan, prepare the work bench, drop the pan and loosen the VB to drain. The next day it took me from 8am to 2pm, so 6 hours. I am sure I could do one now in under 3 hours. Probably two. There's a lot of head scratching and looking that I wouldn't need to do now. Like figuring the TV motor out, and that darn e-clip on that goofy shaft. Okay, here goes:
First of all you will have to drain the trans and remove the pan. Next pull the two bolts that hold the filter on using a #25 torx head bit. Remove the filter. Remove all the 1/2" cap bolts holding the valve body except for two (to hold the valve body in place) and then loosen those last two and let the valve body drain overnight. This will make the job much less messy! Note that there are three lengths of VB bolts. The short ones go where the VB is thinner, the long ones where it is thicker and the 4 real long ones go around the solenoid housing.
Remove the TV motor: This is on the driver's side above the transmission. It has two 1/2" bolts holding it on. Pull those two bolts and the TV motor will rotate away from the trans, let it come away a bit and then lift it straight up. It has a 'D' shaped shaft it connects to in the trans. I just stuffed it above the trans instead of trying to get the electrical connection off.
Under the TV motor is the shift linkage. This comes off easily, just loosen a 1/2" clamp bolt and wiggle the connection up and off the shaft protruding up through the trans.
Now look just to the rear of the TV motor for a round black electrical plug. This connects to a stub coming up out of the transmission and needs to come off. There are two tabs that need to be pinched to remove this plug. It isn't easy. In this picture you will see the the plug wires on the right side of the picture, just to the left of where the fluid line is connected. Not the one with the red tab on it! The electrical gizmo (please excuse the high-tech terminology
) is on top of the thing with the 5 bolted black plate on the bottom.Now here I didn't get a picture ahead of time but this will help... put the truck in low gear and look above the VB on the drivers side. You will see a rod that goes to the rear of the truck. This rod connects to something referred to as a 'rooster comb' and will hold your VB in the trans. Now I just removed the e-clip that held it on. You can reach up in there and pop that off pretty easy. In this picture you can also see the round electrical plug quite easily.
At this point you have removed the TV motor, the shift linkage, the round electrical connection and the rod thingy. Now you can drop the VB. Gently rock it back and forth and wiggle it. There are o-rings you are pulling the shift linkage shaft and the electrical plug through the trans so it will resist a bit. Carry the VB to your cleaned and covered-with-a-sheet workbench. The hard part of the whole job is done!!!
Now let's look at the instructions:
Skip step 1, we don't have the trans out. Step 2 we don't do until we put the VB back in. (again... who wrote these instructions) Step 3 is pretty simple. Gently tap the restrictor plug in the trans, big hole out. This is on the trans housing, not the VB.
Now disassemble the VB by removing all the # 25 torx bit bolts. Watch for stuff falling out. The VB will come apart in three main pieces, hard to mix them up and don't worry about ***** falling out, the instructions do show where all those go. DO watch for valves sliding out!!! I washed over a garbage can with a screen over it, and I would have lost parts if I wasn't watching carefully. There are no springs between the layers of VB.
Page 2.
Drill the hole for firmer lock-up. The instructions call out a .076 - .083 bit. They include two bits, and neither is the right size. I used a 5/64" bit which measures .077 on my micrometer. I drilled one hole and it slaps into fourth pretty firm, not so much when I am on it hard, more when I am easing on the throttle. I'm happy I didn't do two holes, your results may vary, enter at your own risk, etc. I DID NOT do step 2 for later shifts. My shifts are late enough already!
Step three was easier than I thought it would be. This is soft aluminum, just rub a file edge over it then clean all the shavings out with brake cleaner and compressed air.
 03-14-2010, 04:01 PM
#2
Registered User
Thread Starter
Page 3.

Be careful pulling the part throttle body off! These springs are ready to fly.

Even though the instructions say no need to remove these springs, they are going to come out anyway. I took out the springs to wash the VB and left in the valves.
Step 1 replace the spring is easy.

I did put the gold spacer in

and tapped the plug pin in where it is shown.

Be careful pulling the part throttle body off! These springs are ready to fly.
Even though the instructions say no need to remove these springs, they are going to come out anyway. I took out the springs to wash the VB and left in the valves.
Step 1 replace the spring is easy.
I did put the gold spacer in
and tapped the plug pin in where it is shown.
03-14-2010, 04:32 PM
#3
Registered User
Thread Starter
Page 4.

This page is easy, and by now you are well past your fears and are quick to catch springs. The mumbly peg just wedges the ball and spring in the hole and holds them in place while you put the rooster comb back on. It will be forced out by the rooster comb.
Do not do step 2 yet. You will be flipping the VB around for a while and cleaning, just remember when it all goes back together, the cherry bomb replaces one of the *****. Here's a shot of where the ***** were...

Step three - grinding the switch valve. I have a bench mounted belt sander that took this part down in about 2 seconds. Quite easy actually.

And step 4. I didn't have to bend anything. You want to be sure the new thinner valve still seals partition A as you apply outward pressure with the trans in park.
This page is easy, and by now you are well past your fears and are quick to catch springs. The mumbly peg just wedges the ball and spring in the hole and holds them in place while you put the rooster comb back on. It will be forced out by the rooster comb.
Do not do step 2 yet. You will be flipping the VB around for a while and cleaning, just remember when it all goes back together, the cherry bomb replaces one of the *****. Here's a shot of where the ***** were...
Step three - grinding the switch valve. I have a bench mounted belt sander that took this part down in about 2 seconds. Quite easy actually.
And step 4. I didn't have to bend anything. You want to be sure the new thinner valve still seals partition A as you apply outward pressure with the trans in park.
03-14-2010, 04:50 PM
#4
Registered User
Thread Starter
Page 5.
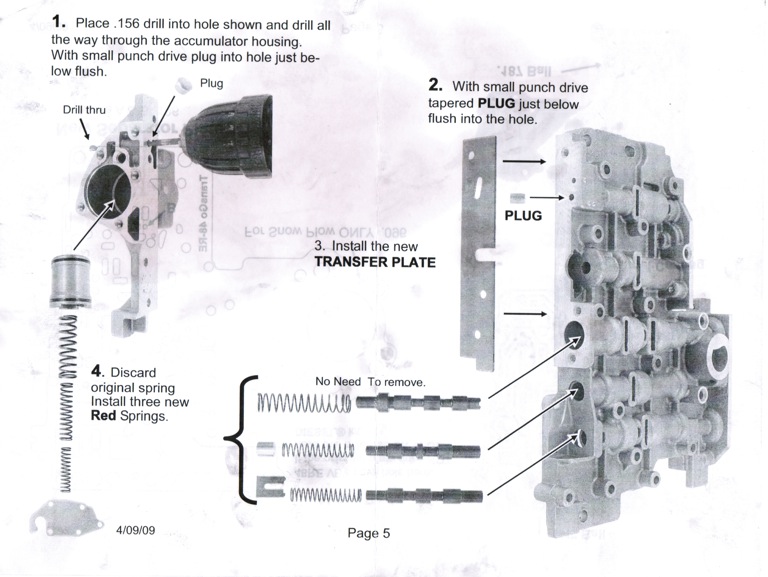
Step 1, Drill the hole shown straight through the VB, right out the far side with the larger of the two included bits. Plug the hole at the mating surface with the supplied plug. Drive this plug below flush. In the picture it is proud yet, just for illustration.


Step 2, Put another plug in.

And in step 3 you'll have to deal with the one spring as you put the new transfer plate on.
Step 4, remove the pretty purple spring and put three new springs in. The package comes with four. ??? You can discern which one by fitting them and then counting coils and comparing to the pictures in the instructions. I'll just tell you it's the heavier spring.

Step 1, Drill the hole shown straight through the VB, right out the far side with the larger of the two included bits. Plug the hole at the mating surface with the supplied plug. Drive this plug below flush. In the picture it is proud yet, just for illustration.
Step 2, Put another plug in.
And in step 3 you'll have to deal with the one spring as you put the new transfer plate on.
Step 4, remove the pretty purple spring and put three new springs in. The package comes with four. ??? You can discern which one by fitting them and then counting coils and comparing to the pictures in the instructions. I'll just tell you it's the heavier spring.
03-14-2010, 05:00 PM
#5
Registered User
Thread Starter
Page 6.
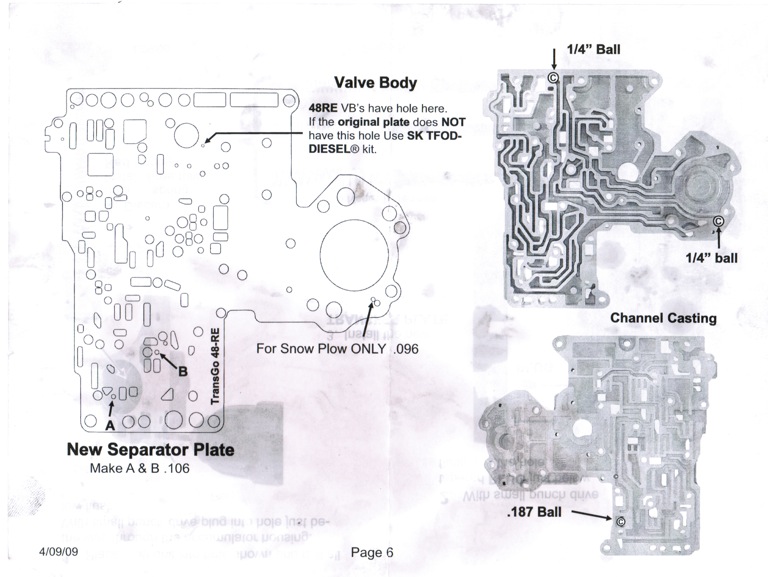
Page 6 just makes you mad. Why do they wait until now to tell you that maybe you have the wrong kit?
I didn't drill the hole for a snow plow. This would be using the smaller bit in the kit which actually measures .105"
There are some good ball locations on page 6. The top picture shows two *****, but you never remove the plate holding them in, so no worries. The bottom picture you will need to be sure the .187 ball is in the right spot.
03-14-2010, 05:08 PM
#6
Registered User
Thread Starter
Page 7

Pretty simple. Install springs, re-using the white one and nesting two others.
Step 2, adjust the PR spring, just back it off until it just bottoms out away from the VB, so it's at the maximum looseness.
Step 3, super easy, no surprises here. I don't even know why we replace this....

Pretty simple. Install springs, re-using the white one and nesting two others.
Step 2, adjust the PR spring, just back it off until it just bottoms out away from the VB, so it's at the maximum looseness.
Step 3, super easy, no surprises here. I don't even know why we replace this....
03-14-2010, 05:30 PM
#7
Registered User
Thread Starter
Now you can put it all back together however it works best for you, but I put it together upside down to make sure all my plates matched, then flipped everything back over so the screws were on top and I could tighten them. I couldn't find any torque specs so I got them really snug. If I had to guess, I'd say 5 to 7 foot pounds. Using a 1/4" ratchet it was firmly tight. Or about as tight as you could go with a screwdriver socket set.


Now reverse the removal for putting it back in the truck. Get the shift shaft and the electrical plug in their holes and don't worry about the shift linkage thingy just yet. Put a couple bolts in just to hang the VB in place. You need to get the e-clip back on that linkage. Once you get that (remember you can get at it by moving the rooster comb to low gear) you are home free. Bolt up the VB, put the electrical plug back on. Put the VB in park (fully in the direction you can't get at the e-clip and the position sensor on the rooster comb is fully depressed) and now you can wiggle the shifter linkage back on the shift shaft and tighten the compression bolt. Drop the TV motor back on the shift shaft making sure you have the D shaft lined up. You can turn this from inside the VB. It will drop on and you can reinstall the two bolts that hold that on. Mine was VERY loose from the factory, maybe just inch pounds tight, but I snugged those bolts up anyway.
I turned on the key and ran the shifter through its range of motion and made sure the reverse lights were on when I was was in reverse. Reinstall the filter or put in a new one if it has been a while. Bolt the pan back up, I don't have those specs.... I went 15 foot pounds. Please post if you know. I added 10.5 quarts of fluid and that was perfect. (horseshoe up my wazoo I think )
Start the truck, look for fluid loss. Put it in gear with your foot on the brake. I guess the most important thing is to be sure you are in park when you are supposed to be. I think that compression fitting on the shift shaft is adjustable and if you weren't in park when you bolted it up, you may not get in park now.
Road test. If all checks out, buy yourself a beer!
Now reverse the removal for putting it back in the truck. Get the shift shaft and the electrical plug in their holes and don't worry about the shift linkage thingy just yet. Put a couple bolts in just to hang the VB in place. You need to get the e-clip back on that linkage. Once you get that (remember you can get at it by moving the rooster comb to low gear) you are home free. Bolt up the VB, put the electrical plug back on. Put the VB in park (fully in the direction you can't get at the e-clip and the position sensor on the rooster comb is fully depressed) and now you can wiggle the shifter linkage back on the shift shaft and tighten the compression bolt. Drop the TV motor back on the shift shaft making sure you have the D shaft lined up. You can turn this from inside the VB. It will drop on and you can reinstall the two bolts that hold that on. Mine was VERY loose from the factory, maybe just inch pounds tight, but I snugged those bolts up anyway.
I turned on the key and ran the shifter through its range of motion and made sure the reverse lights were on when I was was in reverse. Reinstall the filter or put in a new one if it has been a while. Bolt the pan back up, I don't have those specs.... I went 15 foot pounds. Please post if you know. I added 10.5 quarts of fluid and that was perfect. (horseshoe up my wazoo I think
)Start the truck, look for fluid loss. Put it in gear with your foot on the brake. I guess the most important thing is to be sure you are in park when you are supposed to be. I think that compression fitting on the shift shaft is adjustable and if you weren't in park when you bolted it up, you may not get in park now.
Road test. If all checks out, buy yourself a beer!
Trending Topics
03-14-2010, 05:39 PM
#8
Registered User
Thread Starter
Pictures I couldn't fit in my story due to sequencing or just plain poor storytelling....
This cover holds in the servo. Just take the bolts out and pull up on the cover and it will pull the servo out with it.

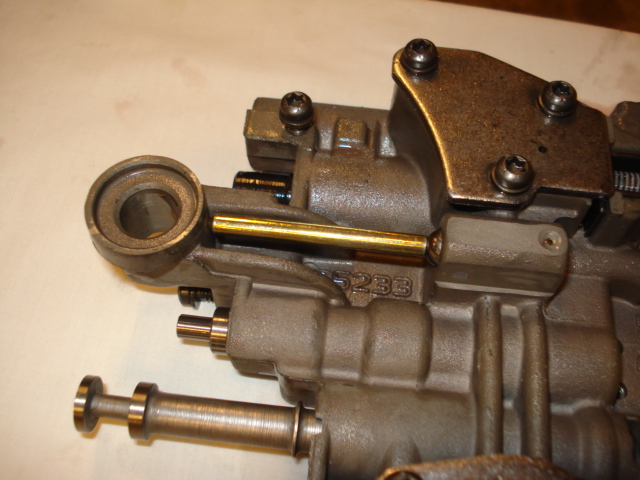
This tube is in your way to pull 3 bolts holding the VB together. It looks like you have to bend it or something. The instructions again say nothing.
Just pull the tube out! I put a screwdriver behind the tube where it goes into the VB and gently pried and it pops right out. The metal bracket on top kind of holds it in the VB I guess.


This cover holds in the servo. Just take the bolts out and pull up on the cover and it will pull the servo out with it.
This tube is in your way to pull 3 bolts holding the VB together. It looks like you have to bend it or something. The instructions again say nothing.
Just pull the tube out! I put a screwdriver behind the tube where it goes into the VB and gently pried and it pops right out. The metal bracket on top kind of holds it in the VB I guess.
03-14-2010, 06:39 PM
#9
Registered User

Join Date: Jul 2009
Location: AL
Posts: 227
Likes: 0
Received 0 Likes
on
0 Posts
Great write up !! I wish you could have gotten the pics. in there.. To me a pic is worth a thousand words... How many hrs did it take u ???
I think you deserved atleast 2 beers
It will take me a few months to recover from the new tires b-4 I can get 1. some here are made of $ I got left out somewhere
Did you also install the billet servo , etc, ?
I think you deserved atleast 2 beers
It will take me a few months to recover from the new tires b-4 I can get 1. some here are made of $ I got left out somewhere
Did you also install the billet servo , etc, ?
03-14-2010, 07:39 PM
#10
Registered User
Thread Starter
Great write up !! I wish you could have gotten the pics. in there.. To me a pic is worth a thousand words... How many hrs did it take u ???
I think you deserved atleast 2 beers
It will take me a few months to recover from the new tires b-4 I can get 1. some here are made of $ I got left out somewhere
Did you also install the billet servo , etc, ?
I think you deserved atleast 2 beers
It will take me a few months to recover from the new tires b-4 I can get 1. some here are made of $ I got left out somewhere
Did you also install the billet servo , etc, ?
I installed nothing except the kit. I still have the 1-2 shuttle shift after I tried to clean out the servo, so I guess I'll need to get the new servo set up soon.
03-14-2010, 08:07 PM
#12
Registered User
Thread Starter
03-14-2010, 08:48 PM
#13
Registered User

Join Date: Nov 2009
Location: West-Central NJ
Posts: 29
Likes: 0
Received 0 Likes
on
0 Posts
 03-14-2010, 08:56 PM
#14
Registered User
Join Date: Jul 2009
Location: AL
Posts: 227
Likes: 0
Received 0 Likes
on
0 Posts
70 bucks. I was told you need to replace servo, the steel arm ( what ever it's called) for the band & a billet anchor, etc, for 300 +
Did you have to drill the small hole or was that an option ?? I kinda hate to go drlling in the vb or tranny case. I'm scared. The only thing I comfortable tackling was the GM solenoid conversion kit
Ok I saved this post to my favorites incase I ever get the nerve

O' and again good job ! Now go have another beer on ME
03-14-2010, 09:11 PM
#15

Nice write up and explanation.