Repair leaking fuel pin.
 05-30-2007, 07:18 AM
#1
Administrator
Thread Starter

How to fix another leak. Part 1
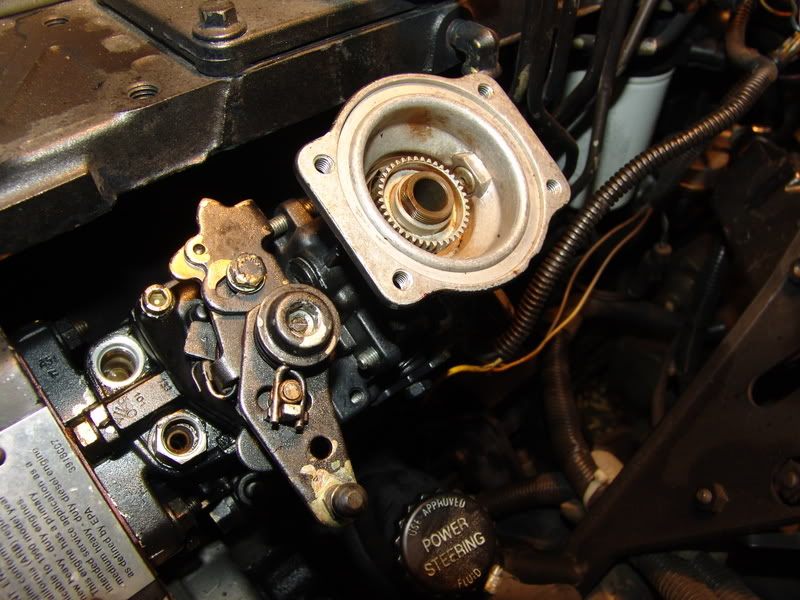
If you have fuel leaking from the rubber vent tube on the rear on the injection pump and there is fuel in the well below the AFC diaphragm then your fuel pin is leaking.
This is to show you how to replace the o-ring on the fuel pin; the top of the pump must be removed to gain access to the internals of the pump.
First thing most important is to be sure you index the throttle shaft so it will be returned to its original position. If it is not it can lead to a world of frustration wondering why it won�t run right.
This will start with the top of the pump removed; you can follow the 3200 spring instructions to get to this point. When I get time I might add them to these instructions for a complete package.
Move your pump top to a clean location where you can work and not have to go looking for your parts and somewhere that is solid because we will do some light pounding.
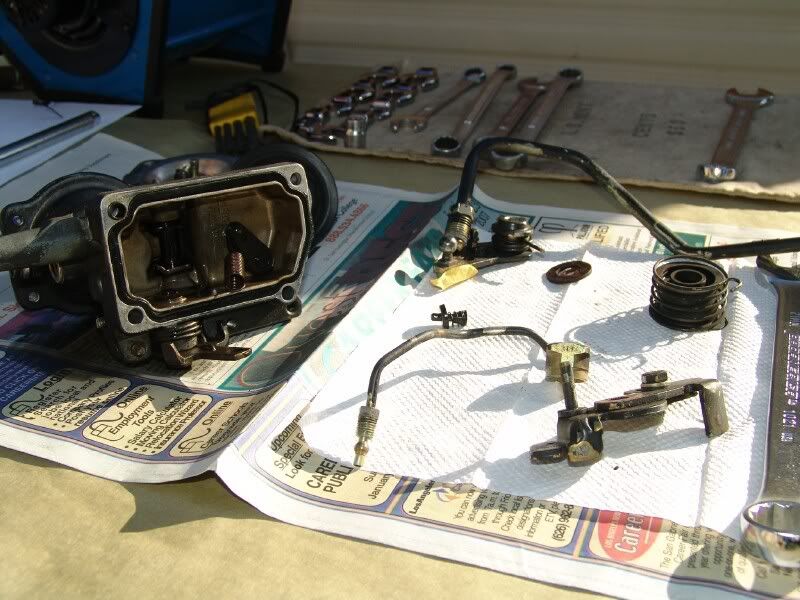
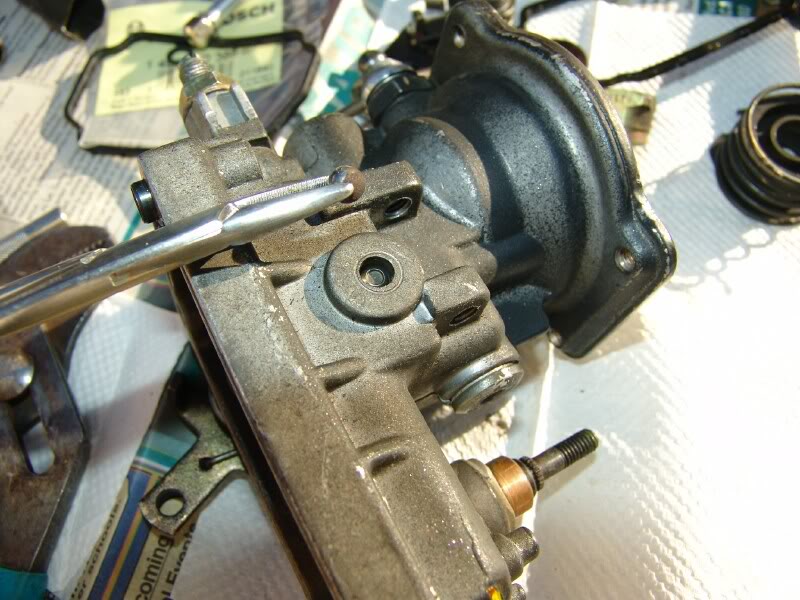
The fuel pin lies horizontally behind the lever assembly in the center of the housing. There is a pin that needs to be removed that this lever pivots on, it is a slip fit but it is held in by 2 small ball bearings that are pressed into the ends of the pin bore.
To the upper left you see the infamous fuel screw everyone is talking about as well as the governor spring.
Rest the pump housing on this side on your work area, you will want a firm area so it does not bounce and send small parts flying.
Using a small brass drift punch carefully tap on the end of the ball bearing enough to cause the one on the opposite side to pop out. Do not try to drive the ball all of the way through, just enough to pop it out.
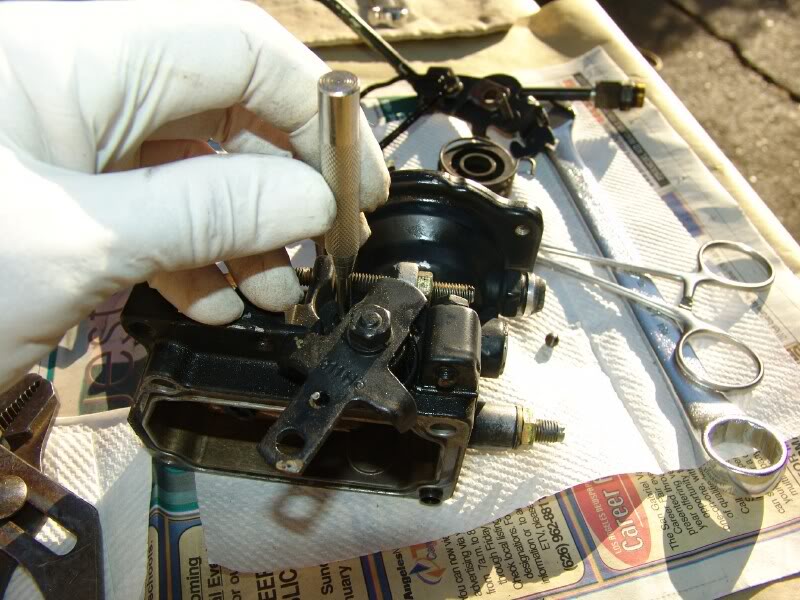
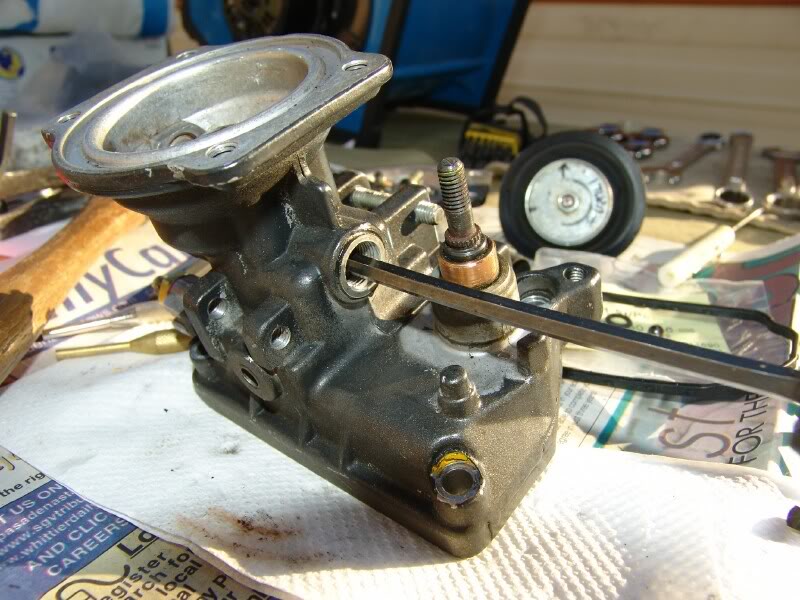
Now turn the housing over and using the drift punch now drive the pin back down to release the ball on the first side.
See the plug with the hex head socket next to the throttle shaft?
We will be removing this in a minuet.
Don�t forget, this pump is METRIC.
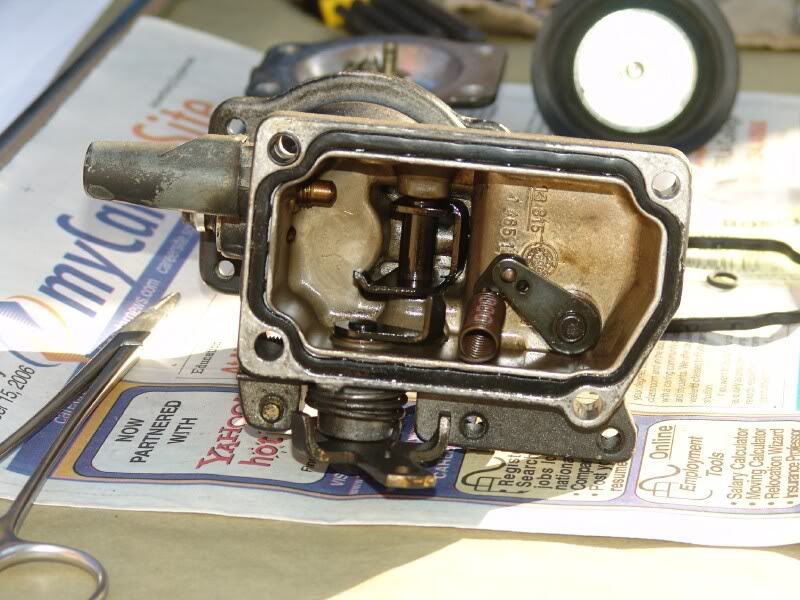
Now before you do anything else, study the picture of the internals of the top and their relative locations.
Now carefully push the pin out of the bore and remove the lever and set it to a clean location.
I always have a big rare earth magnet close by and stick all of the small parts to it.
If you have fuel leaking from the rubber vent tube on the rear on the injection pump and there is fuel in the well below the AFC diaphragm then your fuel pin is leaking.
This is to show you how to replace the o-ring on the fuel pin; the top of the pump must be removed to gain access to the internals of the pump.
First thing most important is to be sure you index the throttle shaft so it will be returned to its original position. If it is not it can lead to a world of frustration wondering why it won�t run right.
This will start with the top of the pump removed; you can follow the 3200 spring instructions to get to this point. When I get time I might add them to these instructions for a complete package.
Move your pump top to a clean location where you can work and not have to go looking for your parts and somewhere that is solid because we will do some light pounding.
The fuel pin lies horizontally behind the lever assembly in the center of the housing. There is a pin that needs to be removed that this lever pivots on, it is a slip fit but it is held in by 2 small ball bearings that are pressed into the ends of the pin bore.
To the upper left you see the infamous fuel screw everyone is talking about as well as the governor spring.
Rest the pump housing on this side on your work area, you will want a firm area so it does not bounce and send small parts flying.
Using a small brass drift punch carefully tap on the end of the ball bearing enough to cause the one on the opposite side to pop out. Do not try to drive the ball all of the way through, just enough to pop it out.
Now turn the housing over and using the drift punch now drive the pin back down to release the ball on the first side.
See the plug with the hex head socket next to the throttle shaft?
We will be removing this in a minuet.
Don�t forget, this pump is METRIC.
Now before you do anything else, study the picture of the internals of the top and their relative locations.
Now carefully push the pin out of the bore and remove the lever and set it to a clean location.
I always have a big rare earth magnet close by and stick all of the small parts to it.
 05-30-2007, 07:20 AM
#2
Administrator
Thread Starter
Part 2
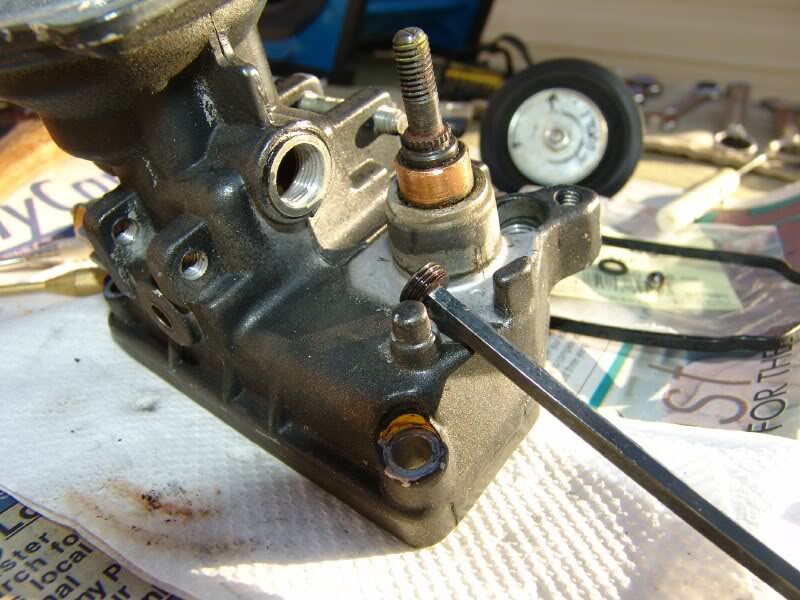
Now you need to remove the plug in the housing so you can expose the fuel pin, be careful and do not loose the aluminum washer.
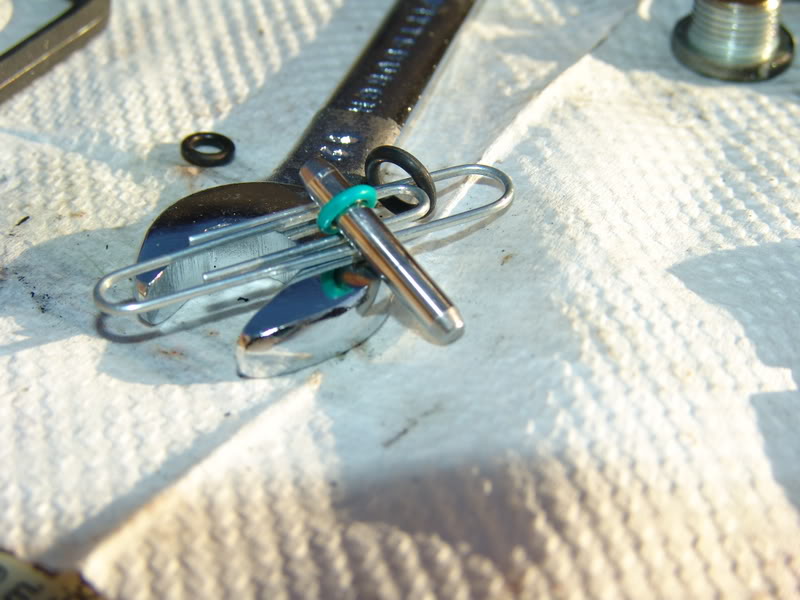
Using a pair of hemostats or tweezers remove the pin from the bore; you can also push it from the backside with a small screwdriver. BE CAREFUL you do not want to nick or scar this pin as if you grabbed it with pliers.
Set it aside and then inside where the pin was in a small retainer with a hex head, using a METRIC hex key remove this retainer and set it aside, there should also be a protective cap between the retainer and the o-ring you need to remove first.
This retainer is what secures the o-ring that is causing so many problems.
Now using a small pick or bent paper clip reach in and retrieve the o-ring, it is sitting inside a small recess.
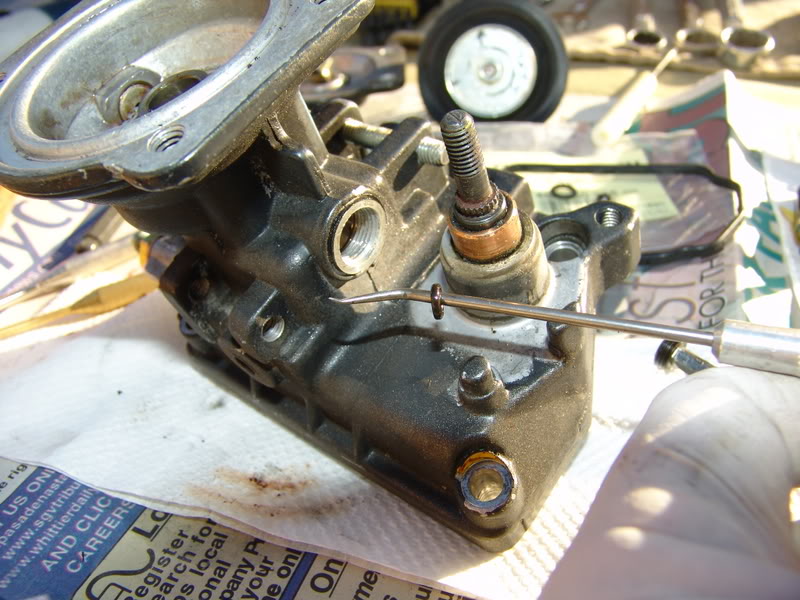
After you get all of the parts out do a close inspection, the fuel pin will probably be dirty and rough. Clean it up and lightly polish it.
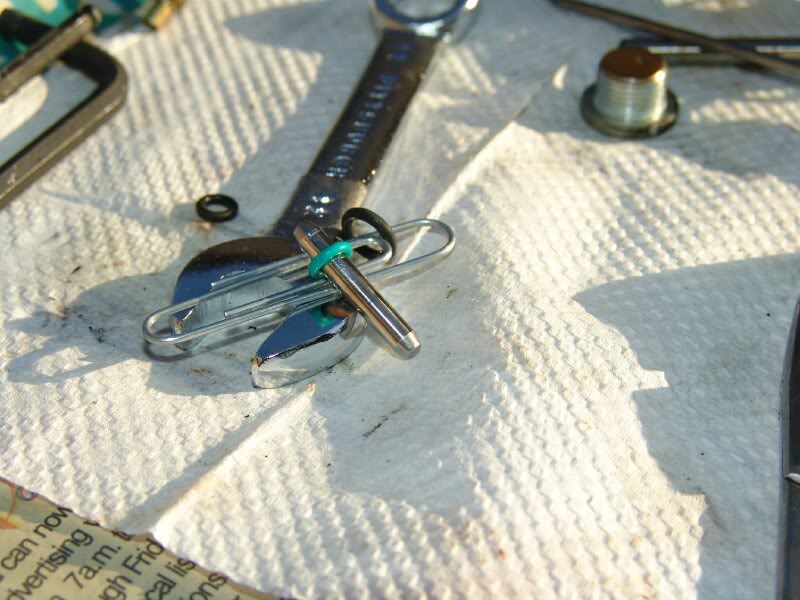
You will want to polish it along the length of the pin as the same way it will ride as it operates. This is the pin that moves up and down the cone according to your boost varying your fuel, so you want it moving as easily as possible.
The specs. on this o-ring are: 4mm ID X 7mm OD X 1.5mm cross section and they claim it is made on Nitrile.
Now to reassemble this, find the new o-ring and fit it to the fuel pin, now lubricate the o-ring using STP oil treatment (this is what ADP BECS a Bosch repair shop recommend.)
Now insert it into the recess drop on the protective cap and then start the retainer back on, you can also put it on the pin and then slide the pin into the bore and then start the retainer.
Using the hex key snug it up and check it by inserting the pin back in and make sure it moves easily and is not pinched.
At this point you will want to reassemble the lever back into the housing following the picture if you need it. Insert the pivot pin back in to hold the lever. Now find the ball bearings and carefully place it in the hole and tap them back in to retain the shaft.
ADP recommends sealing them with a dab of 5-minute epoxy but I used nothing and have had NO leaks.
Now re- lubricate the pin with STP and then place it into the bore and push it against the lever. Replace the sealing cap making sure the washer is in place.
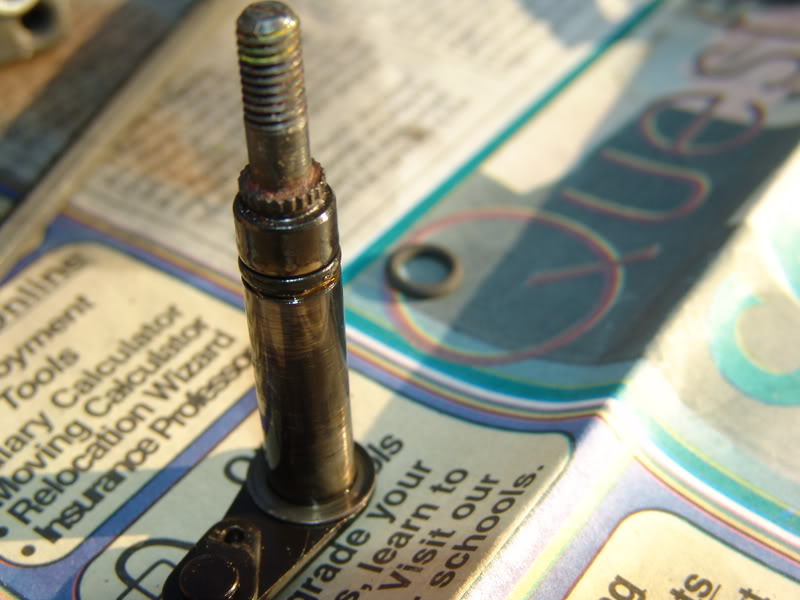
Now we get to the throttle shaft seal, see how grungy this thing looks. Once again take it apart and clean it as if it were in an operating room. Then replace the o-ring with the one from the BOSCH kit.
The rest of the procedure is just reverse of the disassembly.
Now you need to remove the plug in the housing so you can expose the fuel pin, be careful and do not loose the aluminum washer.
Using a pair of hemostats or tweezers remove the pin from the bore; you can also push it from the backside with a small screwdriver. BE CAREFUL you do not want to nick or scar this pin as if you grabbed it with pliers.
Set it aside and then inside where the pin was in a small retainer with a hex head, using a METRIC hex key remove this retainer and set it aside, there should also be a protective cap between the retainer and the o-ring you need to remove first.
This retainer is what secures the o-ring that is causing so many problems.
Now using a small pick or bent paper clip reach in and retrieve the o-ring, it is sitting inside a small recess.
After you get all of the parts out do a close inspection, the fuel pin will probably be dirty and rough. Clean it up and lightly polish it.
You will want to polish it along the length of the pin as the same way it will ride as it operates. This is the pin that moves up and down the cone according to your boost varying your fuel, so you want it moving as easily as possible.
The specs. on this o-ring are: 4mm ID X 7mm OD X 1.5mm cross section and they claim it is made on Nitrile.
Now to reassemble this, find the new o-ring and fit it to the fuel pin, now lubricate the o-ring using STP oil treatment (this is what ADP BECS a Bosch repair shop recommend.)
Now insert it into the recess drop on the protective cap and then start the retainer back on, you can also put it on the pin and then slide the pin into the bore and then start the retainer.
Using the hex key snug it up and check it by inserting the pin back in and make sure it moves easily and is not pinched.
At this point you will want to reassemble the lever back into the housing following the picture if you need it. Insert the pivot pin back in to hold the lever. Now find the ball bearings and carefully place it in the hole and tap them back in to retain the shaft.
ADP recommends sealing them with a dab of 5-minute epoxy but I used nothing and have had NO leaks.
Now re- lubricate the pin with STP and then place it into the bore and push it against the lever. Replace the sealing cap making sure the washer is in place.
Now we get to the throttle shaft seal, see how grungy this thing looks. Once again take it apart and clean it as if it were in an operating room. Then replace the o-ring with the one from the BOSCH kit.
The rest of the procedure is just reverse of the disassembly.
The following users liked this post:
FlyingA (04-01-2022)
05-30-2007, 07:22 AM
#3
Administrator
Thread Starter
Part 3
This kit has all of the parts you will need to replace all of the rubber parts.
Bosch Gasket Kit #DGK-121
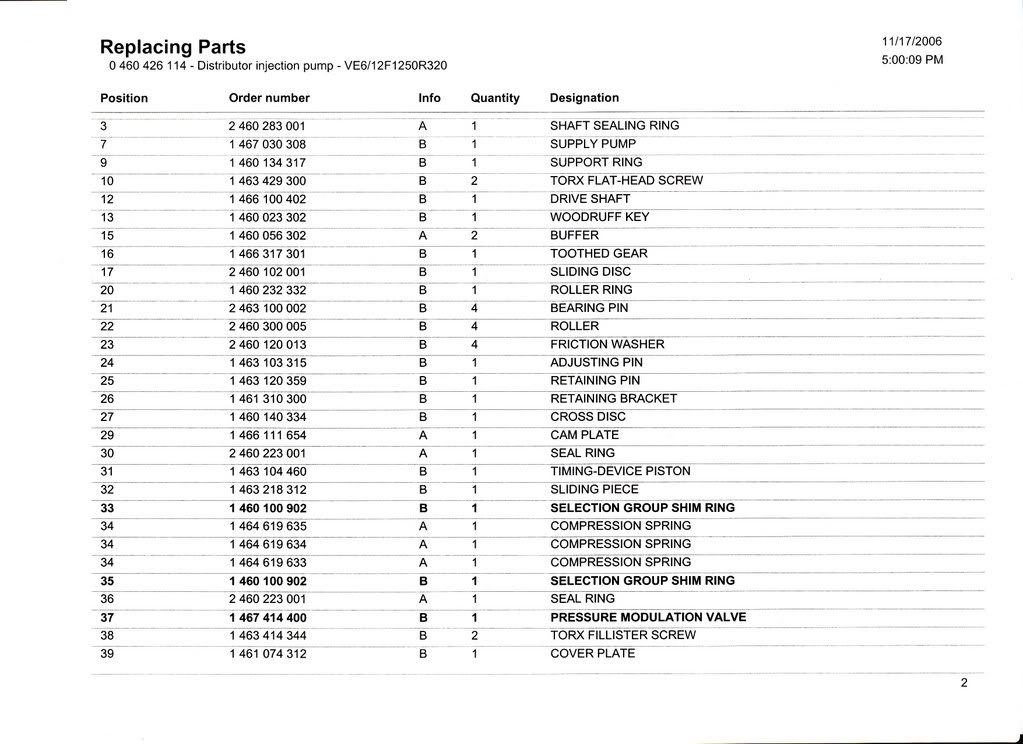
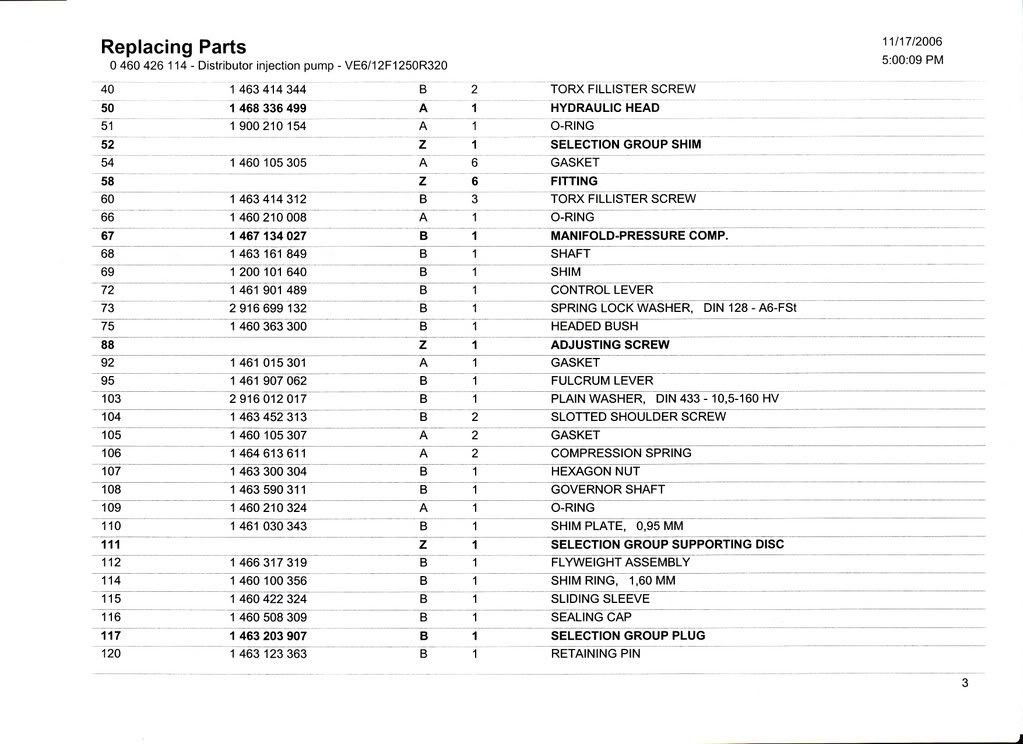
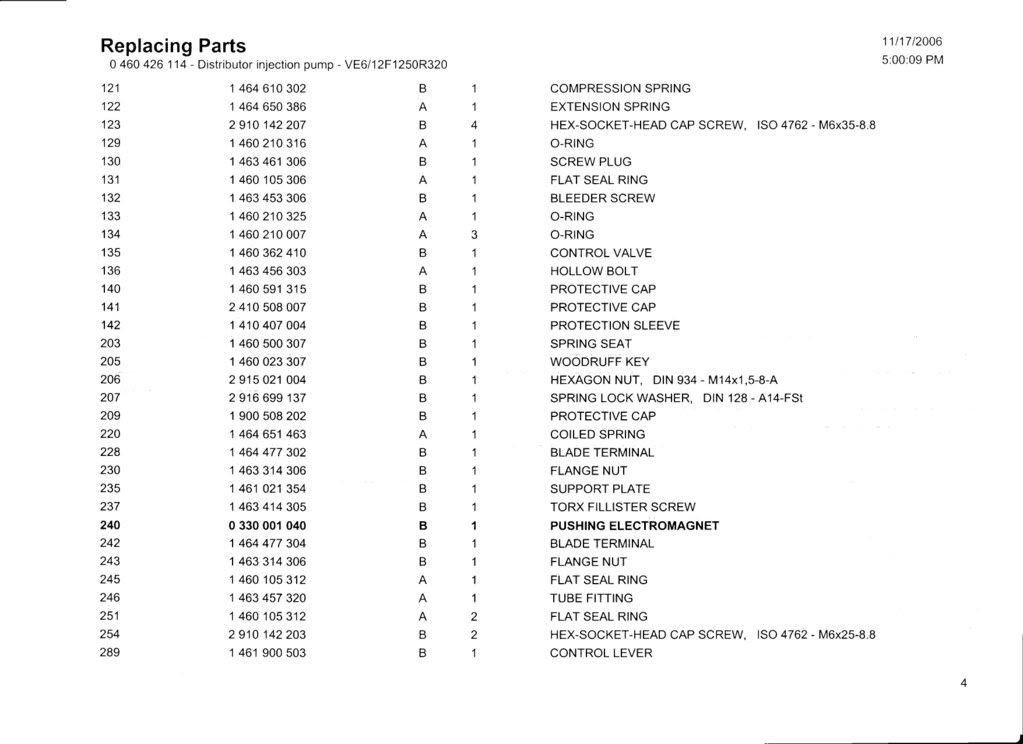
Here is the VE pump breakdown again for your reference.
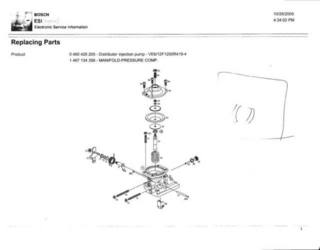
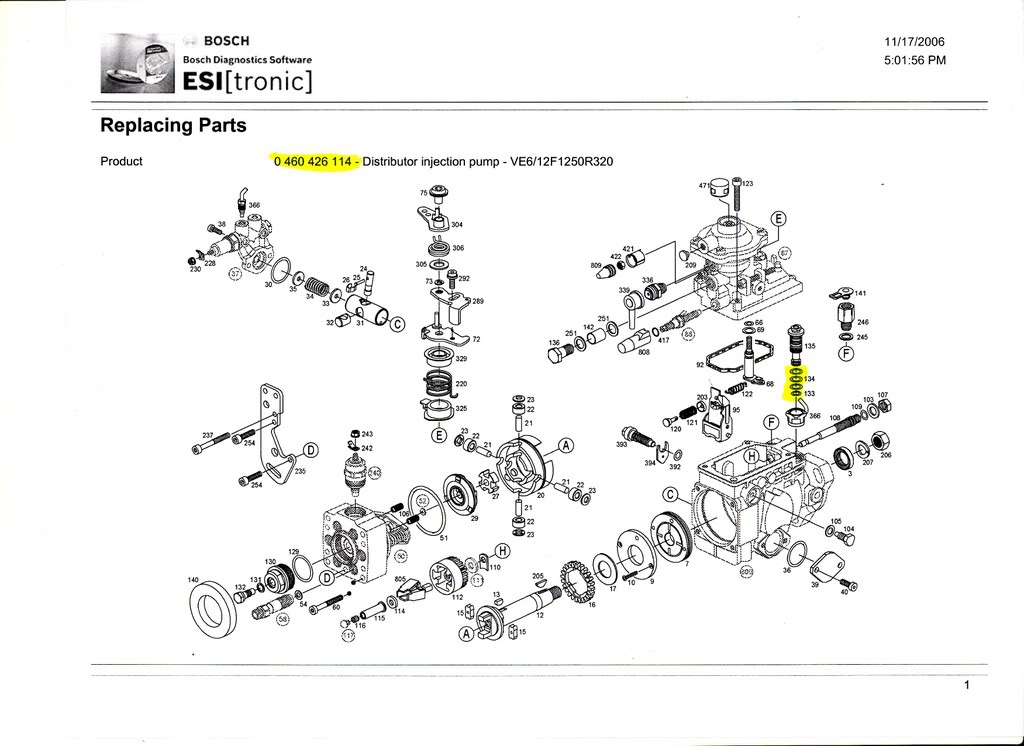
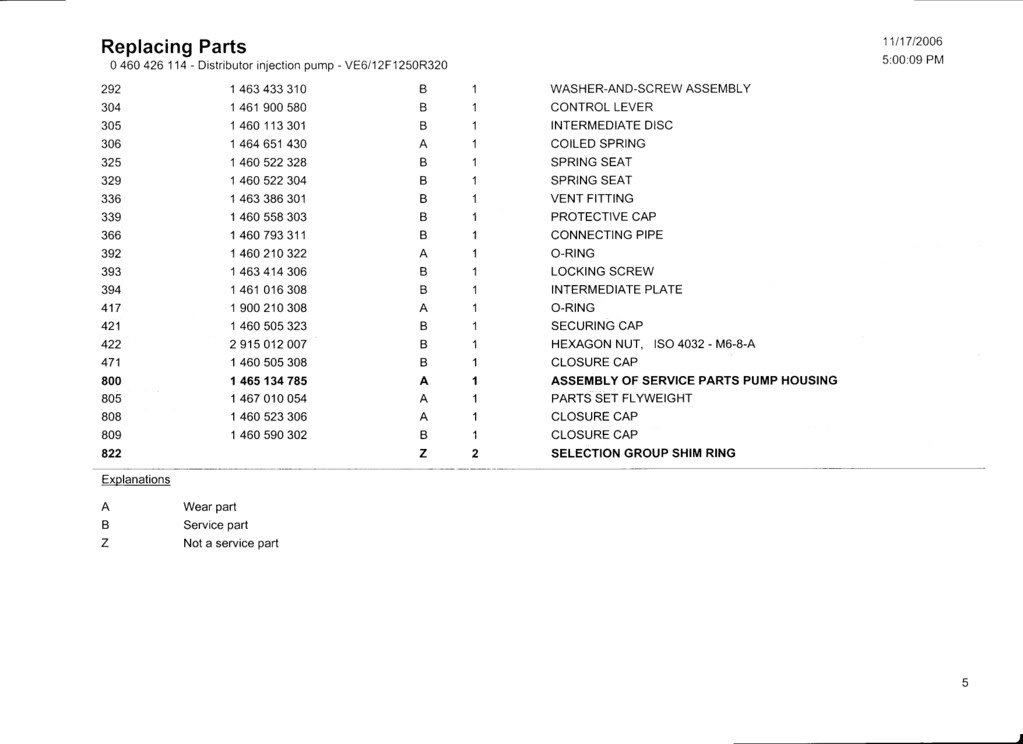
I hope this will be of some help.
Jim in California.
This kit has all of the parts you will need to replace all of the rubber parts.
Bosch Gasket Kit #DGK-121
Here is the VE pump breakdown again for your reference.
I hope this will be of some help.
Jim in California.


Trending Topics

 01-03-2008, 01:15 PM
#11
Registered User

Where, exactly, is this vent that the fuel leaks out of ??
Could someone possibly do a picture with a big red circle, or arrow, pointing it out ??
I have an on again, off again, leak, that sometimes is quite a big leak.
It will be dry for weeks, then for a day or so, it will drip drip drip.
Thanks.
Could someone possibly do a picture with a big red circle, or arrow, pointing it out ??
I have an on again, off again, leak, that sometimes is quite a big leak.
It will be dry for weeks, then for a day or so, it will drip drip drip.
Thanks.
01-03-2008, 04:44 PM
#12
1st Generation Admin
Where, exactly, is this vent that the fuel leaks out of ??
Could someone possibly do a picture with a big red circle, or arrow, pointing it out ??
I have an on again, off again, leak, that sometimes is quite a big leak.
It will be dry for weeks, then for a day or so, it will drip drip drip.
Thanks.
Could someone possibly do a picture with a big red circle, or arrow, pointing it out ??
I have an on again, off again, leak, that sometimes is quite a big leak.
It will be dry for weeks, then for a day or so, it will drip drip drip.
Thanks.
 01-03-2008, 05:27 PM
#13
Registered User
Easy to remember, as they are a fine lever-gun.
In the exploded diagram, the left side faces the fire-wall and the right side faces the radiator, correct ??
The vent points downward, on the driver's side of the main fuel screw, right ??
If that be the case, then my leak must be from something else; as, the fuel drips from around the throttle mechanism, on the front/radiator-facing end of the pump.
I don't think it is coming from the banjo-bolt with the stack of O-rings thingie, as I can see it good and it appears dry around it.
I will look it over more closely, to see if possibly the fuel from that vent could possibly migrate around to the forward end, before dripping.
What are some more possible, likely, points for leaks ??
Thanks.