Rebuild your front D60 4x4 brakes (General)
 03-22-2007, 11:21 PM
#1
1st Generation Admin
Thread Starter
This is another attempt to repay you good folks for all that I've learned here. This is by no means "The Authoritative How-To" regarding fixing your front brakes. These instructions are based solely on my experience with my heap exclusively using the best means I had at the moment.
In this job, I'm gonna replace the front calipers, pads, turn the rotors, and repack the bearings.
NOTE: Keep in mind I'm working on the stock, OEM style front brakes/rotors as installed by Dodge on a 1993 W250 4x4 ClubCab at 220K miles. Specifically the DANA/Spicer 60 4500# axle with OEM manual locking hubs. Another trucks mileage may vary.
NOTE: "Necessity Is The Mother Of Invention". There's at least one instance where I'm not using the recommended tool(s). Work with me.
Finally, I'm gonna pretty-much fast forward through the truck set-up & disassembly and concentrate on the re-assembly. Understanding how to put it together will make disassembly a breeze.
READ ALL THESE INSTRUCTIONS BEFORE ATTEMPTING THIS WORK.
With that, let's get started.
As always ~ SAFETY FIRST!
- Chock the rear wheels
- Set the emergency/parking brake.
- Disconnect the Negative battery cable from the battery.
- Have a known good fire extinguisher within sight.
- Have a clean, uncluttered work area.
- Have good lighting.
- Considering you'll be lifting/holding the vehicle with a jack and safety stands, be sure they're rated for the load with a good safety factor. Don't cut any corners here. Cinder-blocks WILL kill you! When considering all this, don't forget to include a strong, level area to park the truck.
- With any work I do, I usually power wash everything the night before. If you don't have the means at home, the local car-wash works well. If you don't walk away soaking wet with gritty/grime on your face, you need to strike it again.
- All right. Set the parking/emergency brake and chock the rear wheels. Go ahead and loosen the front wheel lug nuts while the truck is still on the ground.
- Safely raise and firmly support the front of the truck. I found about an inch clearance under the front tires worked well. It certainly made putting the tires back on much easier.
I used two 3-ton capacity safety stands set so that the hand of each stand supported the axle where the axle tube meets the knuckle assembly ~
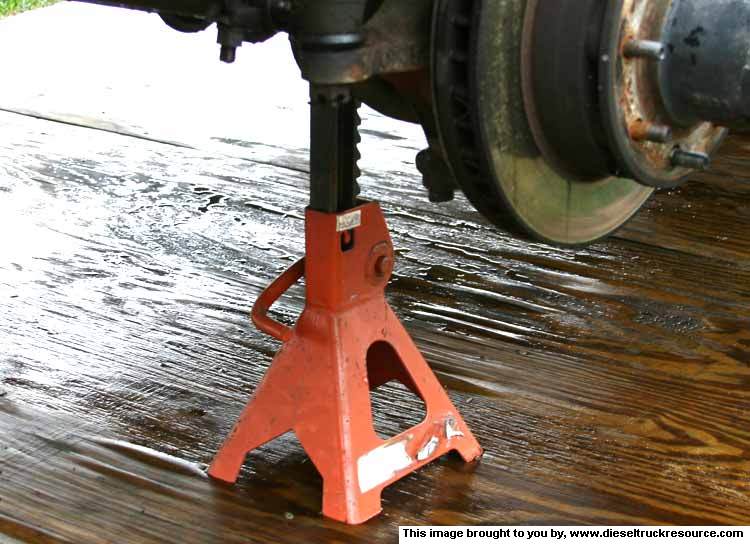
- Go ahead and remove the front wheels. It wouldn't hurt to place them under the truck frame rails as another means of catching the truck should a safety stand fail. Under the doors works.
OK so step back and here's what we have ~
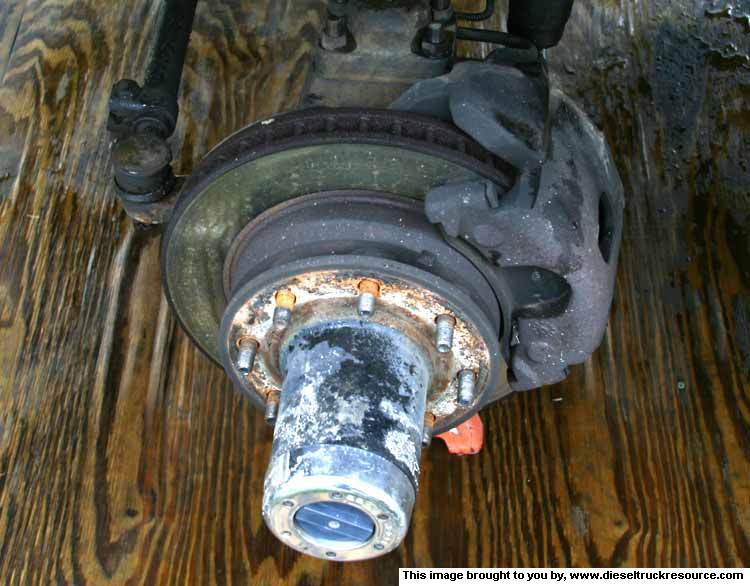
The Dodge FSM presents with an image that's typical of the the front hub assembly ~

- If you're gonna reuse the original calipers, remove the Allen screw that locks the caliper assembly in its holder, slide out the lock, lift off the caliper assembly, and support the assembly with some coat-hanger wire so as not to place any weight on the brake fluid hose. Don't do like I present in the following images and have the caliper hang by the hose (I'm replacing the hoses so that's another thread).
- If you're gonna replace the calipers, disconnect the brake fluid hose from the top of the caliper. Catch any fluid in something so you don't have to sit in it. Brake fluid ruins automotive paint so be smart. The connection is the typical banjo-bolt deal so don't wring the bolt in two.
- Knowing you've read all this mess before starting, you'll have a good idea as to how to: Remove the manual hub cover, remove the set-screw, remove the manual lock gear, remove the spring, remove the small and large C-clips, remove the manual lock-out housing, remove the axle jamb-nut, remove the lock-washer, remove the axle-nut, and pull the hub off the axle.
Step back and here's what you've got ~
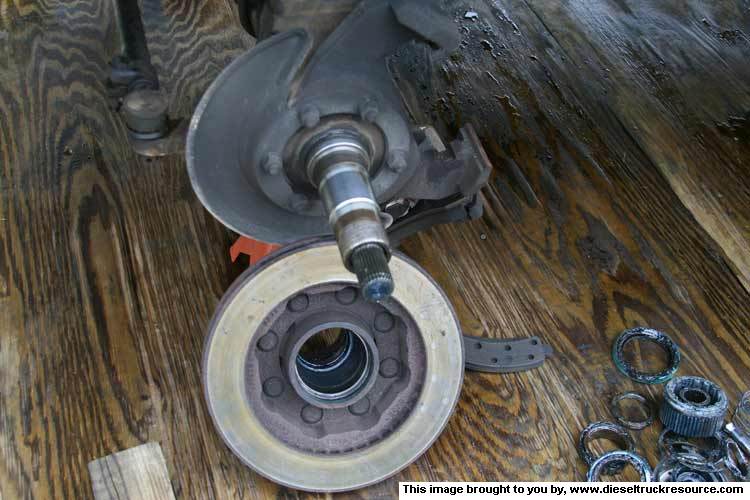
- Reach in the wheel hub and remove the outer bearing. Flip the hub over. If you've got a seal puller, pry out the inner wheel seal. I can't find my puller so I used a block of wood to reach through the outer bearing side and drifted the bearing and seal out with light taps of a mallet. You don't want to damage the bearings roller cage so go easy. If you can drift the seal exclusively, go for it.
- Now clean the stinky out of it all. I soaked the majority in kerosene and pressure washed it all throughly. Pay attention to the bearings getting all the mess out. Wipe out the interior of the hub and wash it as well.
- Clean the axle stump paying attention to the area where the inner wheel seal rides. I struck it all again with the pressure washer getting all the grease cakes from the joints. Blew a tie-rod boot off. DOH!! ~
~

The Dodge FSM says you generally don't have to turn the front rotors unless you've got big gouges or they're warppided. If they're too thin to turn, replace the rotor.
It seems most do well with lightly breaking the shine with the likes of a Scotch-Brite pad on a drill. Not knowing any better in the past, I've always turned mine when replacing the pads. As it happened in this job, turning mine revealed the rotors were still true except for the last 3/4" of the outer diameter. A single mild pass cleaned them right up.
- So back at the house, I washed the rotor/hub assemblies again and painted the portion that shows. ~

- If you've got any goofed-up lug threads, now's a good time to chase them with a die. If a lub bolt is flat stripped, replace it.
- With all the small parts clean, laying them all out as they were removed shows us this (I inadvertently omitted the set screw. Oops!) ~

- Thoroughly inspect the bearings and associated races and replace as required. Mine were OK.
In this job, I'm gonna replace the front calipers, pads, turn the rotors, and repack the bearings.
NOTE: Keep in mind I'm working on the stock, OEM style front brakes/rotors as installed by Dodge on a 1993 W250 4x4 ClubCab at 220K miles. Specifically the DANA/Spicer 60 4500# axle with OEM manual locking hubs. Another trucks mileage may vary.
NOTE: "Necessity Is The Mother Of Invention". There's at least one instance where I'm not using the recommended tool(s). Work with me.
Finally, I'm gonna pretty-much fast forward through the truck set-up & disassembly and concentrate on the re-assembly. Understanding how to put it together will make disassembly a breeze.
READ ALL THESE INSTRUCTIONS BEFORE ATTEMPTING THIS WORK.
With that, let's get started.
As always ~ SAFETY FIRST!
- Chock the rear wheels
- Set the emergency/parking brake.
- Disconnect the Negative battery cable from the battery.
- Have a known good fire extinguisher within sight.
- Have a clean, uncluttered work area.
- Have good lighting.
- Considering you'll be lifting/holding the vehicle with a jack and safety stands, be sure they're rated for the load with a good safety factor. Don't cut any corners here. Cinder-blocks WILL kill you! When considering all this, don't forget to include a strong, level area to park the truck.
- With any work I do, I usually power wash everything the night before. If you don't have the means at home, the local car-wash works well. If you don't walk away soaking wet with gritty/grime on your face, you need to strike it again.
- All right. Set the parking/emergency brake and chock the rear wheels. Go ahead and loosen the front wheel lug nuts while the truck is still on the ground.
- Safely raise and firmly support the front of the truck. I found about an inch clearance under the front tires worked well. It certainly made putting the tires back on much easier.
I used two 3-ton capacity safety stands set so that the hand of each stand supported the axle where the axle tube meets the knuckle assembly ~
- Go ahead and remove the front wheels. It wouldn't hurt to place them under the truck frame rails as another means of catching the truck should a safety stand fail. Under the doors works.
OK so step back and here's what we have ~
The Dodge FSM presents with an image that's typical of the the front hub assembly ~
- If you're gonna reuse the original calipers, remove the Allen screw that locks the caliper assembly in its holder, slide out the lock, lift off the caliper assembly, and support the assembly with some coat-hanger wire so as not to place any weight on the brake fluid hose. Don't do like I present in the following images and have the caliper hang by the hose (I'm replacing the hoses so that's another thread).
- If you're gonna replace the calipers, disconnect the brake fluid hose from the top of the caliper. Catch any fluid in something so you don't have to sit in it. Brake fluid ruins automotive paint so be smart. The connection is the typical banjo-bolt deal so don't wring the bolt in two.
- Knowing you've read all this mess before starting, you'll have a good idea as to how to: Remove the manual hub cover, remove the set-screw, remove the manual lock gear, remove the spring, remove the small and large C-clips, remove the manual lock-out housing, remove the axle jamb-nut, remove the lock-washer, remove the axle-nut, and pull the hub off the axle.
Step back and here's what you've got ~
- Reach in the wheel hub and remove the outer bearing. Flip the hub over. If you've got a seal puller, pry out the inner wheel seal. I can't find my puller so I used a block of wood to reach through the outer bearing side and drifted the bearing and seal out with light taps of a mallet. You don't want to damage the bearings roller cage so go easy. If you can drift the seal exclusively, go for it.
- Now clean the stinky out of it all. I soaked the majority in kerosene and pressure washed it all throughly. Pay attention to the bearings getting all the mess out. Wipe out the interior of the hub and wash it as well.
- Clean the axle stump paying attention to the area where the inner wheel seal rides. I struck it all again with the pressure washer getting all the grease cakes from the joints. Blew a tie-rod boot off. DOH!!
~The Dodge FSM says you generally don't have to turn the front rotors unless you've got big gouges or they're warppided. If they're too thin to turn, replace the rotor.
It seems most do well with lightly breaking the shine with the likes of a Scotch-Brite pad on a drill. Not knowing any better in the past, I've always turned mine when replacing the pads. As it happened in this job, turning mine revealed the rotors were still true except for the last 3/4" of the outer diameter. A single mild pass cleaned them right up.
- So back at the house, I washed the rotor/hub assemblies again and painted the portion that shows. ~
- If you've got any goofed-up lug threads, now's a good time to chase them with a die. If a lub bolt is flat stripped, replace it.
- With all the small parts clean, laying them all out as they were removed shows us this (I inadvertently omitted the set screw. Oops!) ~
- Thoroughly inspect the bearings and associated races and replace as required. Mine were OK.
 03-22-2007, 11:22 PM
#2
1st Generation Admin
Thread Starter
OK so now we've got all these nice clean parts and new inner wheel seals. ~

With that, let's put it all together.
- To start with, we need to address the inner wheel seals mating surface of the axle stump. I've always lightly sanded (400 grit) the surface so as to allow a new seal to mate with it. Here, I struck it with some used plumbers tape (long narrow strip of fine sand-cloth stuff).
- Once again, clean it all thoroughly.
NOTE: With time, the rotating rubber seal cuts into the steel of the mating surface creating a groove. It gets to the point where a new seal can't do its job. It's my understanding there are service kits available that allows one to sleeve the existing metal so as to fit an appropriately over-sized seal.
You can clearly see where mine is starting a groove. ~

- OK. Take the hub and place it in front of you inner side up.
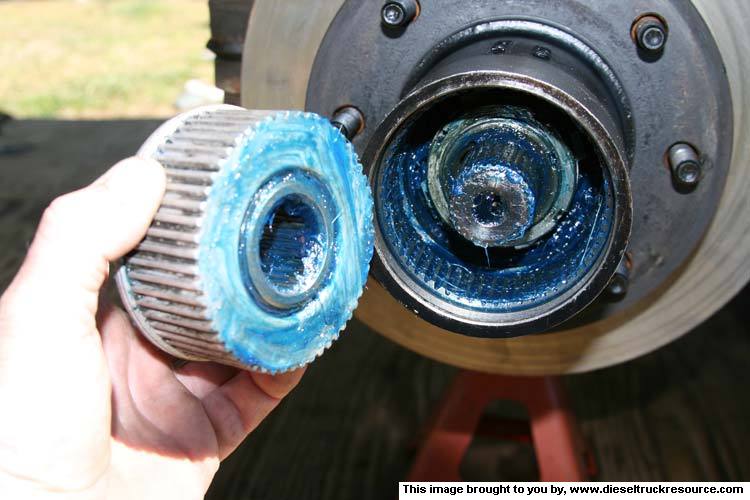
- I used a 1" disposable paint brush to thoroughly saturate the clean inner wheel bearing (the larger of the two) with Kendal Super-Blue Extreme Pressure/High Temp grease. Go ahead a fill that boy. ~

- Use the same brush to apply a thin layer (1/4" maybe) to the inside diameter of the hub in the space between the two wheel bearing races. You do not have to fill the space. From that side, reach all the way to the inner side of the outer bearing race. Include the inner bearing race itself (that facing you) with a light coating. ~

- Now place the greased bearing in its race in the hub. Add more grease to the bearing so its well lubed but not so much as to fill the space in there completely.
- Wipe clean the area where the wheel seal goes. It doesn't have to be spotless. ~

- Now look real hard at the new wheel seal. Notice how the rubber seal itself angles and faces one direction. You want to install the seal so its lip is facing the bearing. ~
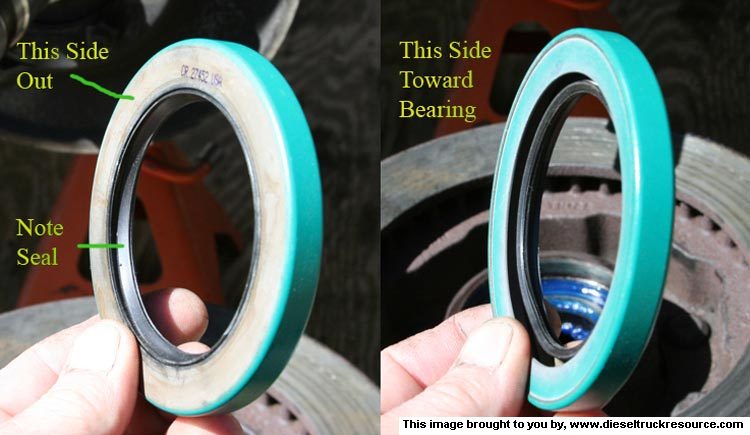
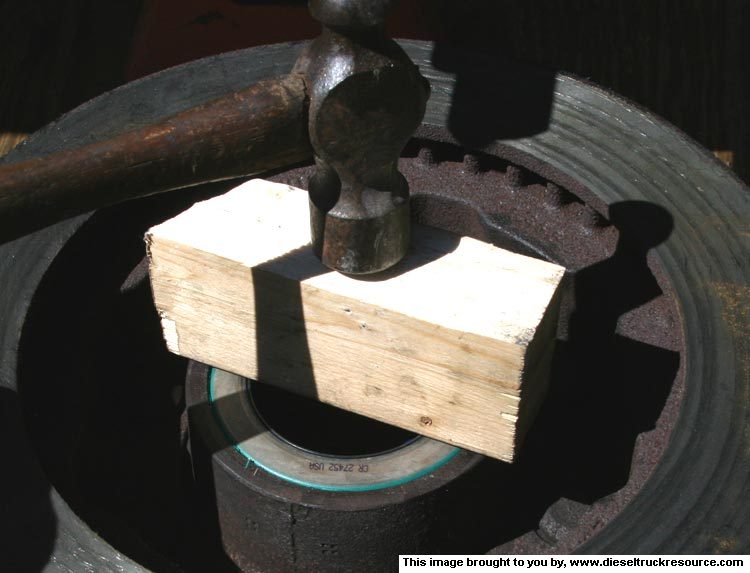
- Correctly place the new seal in the hub flat and square to the hole. I used a broad block of wood to evenly and squarely drive the seal home with a hammer. Try not to drive it in sideways. ~
NOTE: In the past I've always lightly coated the hubs seal area with some gasket shellac. But it appears my new seals have a coating of sealant on them so I left it at that. (When I disassembled things, I could see where the shellac had been pushed to the side and the seals sealant left its grip mark if you will).
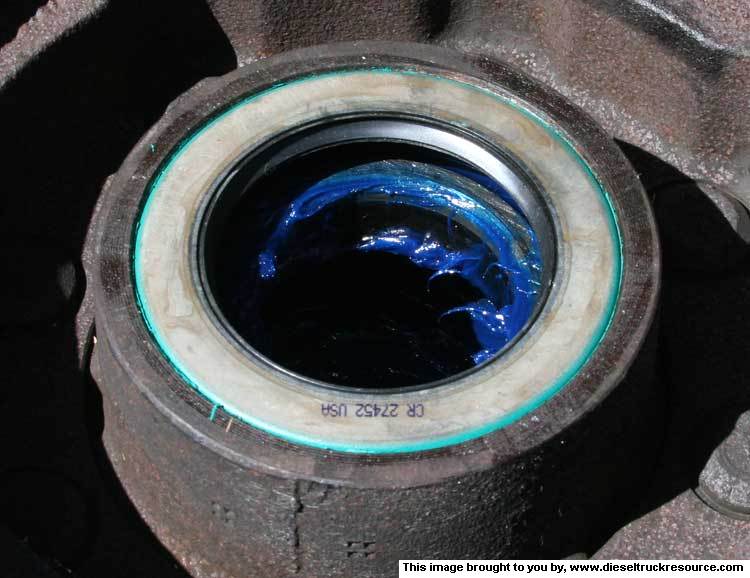
- With driving the seal flush in the hub, you should see this. ~
With that, let's put it all together.
- To start with, we need to address the inner wheel seals mating surface of the axle stump. I've always lightly sanded (400 grit) the surface so as to allow a new seal to mate with it. Here, I struck it with some used plumbers tape (long narrow strip of fine sand-cloth stuff).
- Once again, clean it all thoroughly.
NOTE: With time, the rotating rubber seal cuts into the steel of the mating surface creating a groove. It gets to the point where a new seal can't do its job. It's my understanding there are service kits available that allows one to sleeve the existing metal so as to fit an appropriately over-sized seal.
You can clearly see where mine is starting a groove. ~
- OK. Take the hub and place it in front of you inner side up.
- I used a 1" disposable paint brush to thoroughly saturate the clean inner wheel bearing (the larger of the two) with Kendal Super-Blue Extreme Pressure/High Temp grease. Go ahead a fill that boy. ~
- Use the same brush to apply a thin layer (1/4" maybe) to the inside diameter of the hub in the space between the two wheel bearing races. You do not have to fill the space. From that side, reach all the way to the inner side of the outer bearing race. Include the inner bearing race itself (that facing you) with a light coating. ~
- Now place the greased bearing in its race in the hub. Add more grease to the bearing so its well lubed but not so much as to fill the space in there completely.
- Wipe clean the area where the wheel seal goes. It doesn't have to be spotless. ~
- Now look real hard at the new wheel seal. Notice how the rubber seal itself angles and faces one direction. You want to install the seal so its lip is facing the bearing. ~
- Correctly place the new seal in the hub flat and square to the hole. I used a broad block of wood to evenly and squarely drive the seal home with a hammer. Try not to drive it in sideways. ~
NOTE: In the past I've always lightly coated the hubs seal area with some gasket shellac. But it appears my new seals have a coating of sealant on them so I left it at that. (When I disassembled things, I could see where the shellac had been pushed to the side and the seals sealant left its grip mark if you will).
- With driving the seal flush in the hub, you should see this. ~
03-22-2007, 11:23 PM
#3
1st Generation Admin
Thread Starter
- Wipe a thin film of grease on the rubber portion of the wheel seal itself.
- Now take the grease brush and coat the axle tube stump thing. Include a light layer on the wheel seal mating surface. ~

- Just as you did with the inner wheel bearing, pack the outer bearing with grease. Get it good.
- Flip the hub over so the lugs are facing you. stick the grease brush in there so as to thoroughly coat the inside of the installed inner bearing. Coat all the spots in there you missed from the other side.
- OK, wipe your hands clean of grease.
- Now lift the rotor/hub assembly and being mindful of the wheel seal rubber component, center the hub/rotor onto the axle tube. Carry the hub/rotor all the way to its normal installed position without hooking the wheel seal on anything along the way.
- With one hand, hold the hub/rotor assembly so it's centered on the axle. The point here is we don't want to damage the new wheel seal by letting things get c0cked sideways. ~

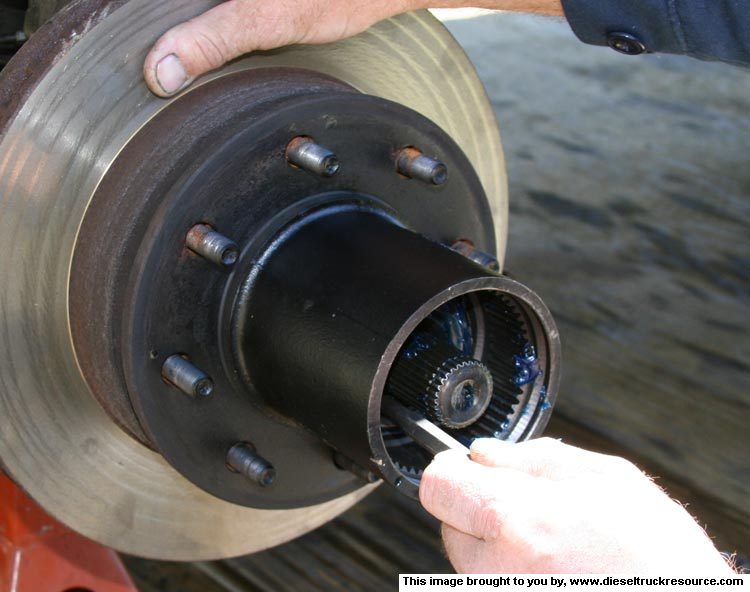
- Now take the newly greased outer wheel bearing and place it onto the axle. ~

- Push the outer bearing all the way to its normally installed position with a screw driver or the like. ~
You can let go of the hub/rotor assembly now as it will rest on the bearings.
- Lightly grease all the remaining small components. ~
- While you're doing that, you'll notice the axle nut that actually presses against the installed outer bearing has a small pin on one side. That pin engages a hole in the lock-washer. When it's all properly installed, the lock-washer holds the axle nut in place by way of holding that pin.
- Place the axle nut on the axle and run it on up to the outer wheel bearing.
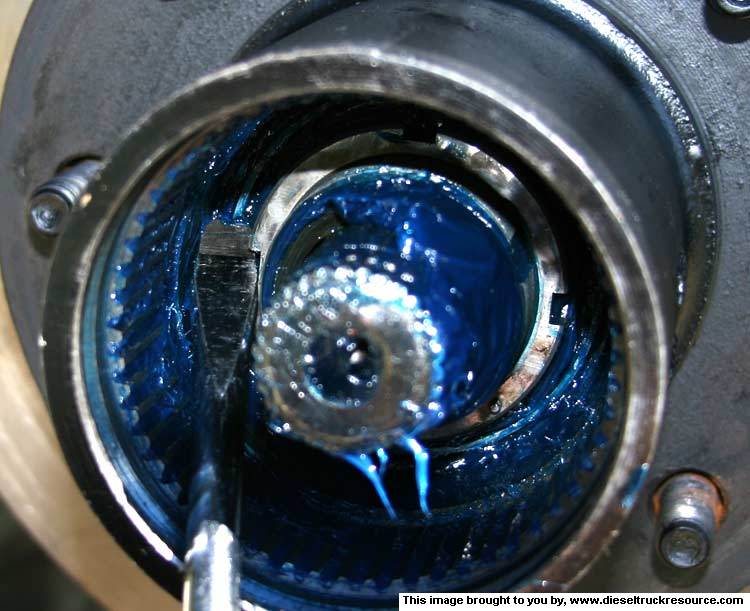
* Now here's where I didn't have the correct socket/tool to tighten the axle nut per the FSM instruction. I took a large flat-blade screw driver and wedged it in there so that one side of the blade was in a notch of the axle nut. I twisted the screw driver so the other side of the blade would wedge against the inside of the hub. I then rotated the rotor/hub assembly so the whole would turn the nut on good and tight. Do this in small doses alternating to rotating the rotor/hub on the bearings. The goal here is to firmly seat the bearing/race assemblies on the axle and in the hub.
The FSM wants you to (using the correct tool) tighten the axle nut to 240 to 300 in/lbs. Again I just snugged the nut up tight with the screw driver till I was confident the bearing assemblies were well set. Using the screw driver deal, you don't want to turn so hard that the driver skids inside the hub. Don't want to gouge things in there. ~
- Now reverse the twist of the screw driver and loosen the axle nut 1/4 turn.
- Now turn around and tighten the axle nut again . . . Hand Tight.
- Remember the pin on the axle nut? With your finger, locate it and wipe that area so you can see it good. ~

- Place the greased lock-washer on the axle so one of the holes fits down around the axle nut pin. You may find you need to rotate the axle nut to align the pin with the installed lock-washer. If you do have to move the axle nut, move it so as to tighten the nut on the axle. Just move it forward enough to fit into one of the lock-washers holes. ~

- Now place the jamb-nut on the axle and run it on up against the lock-washer.
* The Dodge FSM wants you to tighten the jamb-nut to 160 to 205 ft/lbs.
Lacking the correct socket/tool, I used a blunt chisel in one of the notches and set (rotating) the jamb-nut firmly with a maul. No need in pounding things. We just want to lock the assembly.
- Now take the grease brush and coat the axle tube stump thing. Include a light layer on the wheel seal mating surface. ~
- Just as you did with the inner wheel bearing, pack the outer bearing with grease. Get it good.
- Flip the hub over so the lugs are facing you. stick the grease brush in there so as to thoroughly coat the inside of the installed inner bearing. Coat all the spots in there you missed from the other side.
- OK, wipe your hands clean of grease.
- Now lift the rotor/hub assembly and being mindful of the wheel seal rubber component, center the hub/rotor onto the axle tube. Carry the hub/rotor all the way to its normal installed position without hooking the wheel seal on anything along the way.
- With one hand, hold the hub/rotor assembly so it's centered on the axle. The point here is we don't want to damage the new wheel seal by letting things get c0cked sideways. ~
- Now take the newly greased outer wheel bearing and place it onto the axle. ~
- Push the outer bearing all the way to its normally installed position with a screw driver or the like. ~
You can let go of the hub/rotor assembly now as it will rest on the bearings.
- Lightly grease all the remaining small components. ~
- While you're doing that, you'll notice the axle nut that actually presses against the installed outer bearing has a small pin on one side. That pin engages a hole in the lock-washer. When it's all properly installed, the lock-washer holds the axle nut in place by way of holding that pin.
- Place the axle nut on the axle and run it on up to the outer wheel bearing.
* Now here's where I didn't have the correct socket/tool to tighten the axle nut per the FSM instruction. I took a large flat-blade screw driver and wedged it in there so that one side of the blade was in a notch of the axle nut. I twisted the screw driver so the other side of the blade would wedge against the inside of the hub. I then rotated the rotor/hub assembly so the whole would turn the nut on good and tight. Do this in small doses alternating to rotating the rotor/hub on the bearings. The goal here is to firmly seat the bearing/race assemblies on the axle and in the hub.
The FSM wants you to (using the correct tool) tighten the axle nut to 240 to 300 in/lbs. Again I just snugged the nut up tight with the screw driver till I was confident the bearing assemblies were well set. Using the screw driver deal, you don't want to turn so hard that the driver skids inside the hub. Don't want to gouge things in there. ~
- Now reverse the twist of the screw driver and loosen the axle nut 1/4 turn.
- Now turn around and tighten the axle nut again . . . Hand Tight.
- Remember the pin on the axle nut? With your finger, locate it and wipe that area so you can see it good. ~
- Place the greased lock-washer on the axle so one of the holes fits down around the axle nut pin. You may find you need to rotate the axle nut to align the pin with the installed lock-washer. If you do have to move the axle nut, move it so as to tighten the nut on the axle. Just move it forward enough to fit into one of the lock-washers holes. ~
- Now place the jamb-nut on the axle and run it on up against the lock-washer.
* The Dodge FSM wants you to tighten the jamb-nut to 160 to 205 ft/lbs.
Lacking the correct socket/tool, I used a blunt chisel in one of the notches and set (rotating) the jamb-nut firmly with a maul. No need in pounding things. We just want to lock the assembly.
03-22-2007, 11:24 PM
#4
1st Generation Admin
Thread Starter
- Take the grease brush and smear a layer of grease against the outer side of the installed outer wheel bearing. Lightly coat the nuts and washer. Lightly coat the inside of the hub where the Lock-Out housing goes.
- Place the lightly greased Lock-Out housing in the axle hub seating it as far in as it will go. ~
- Install the greased large C-clip. ~
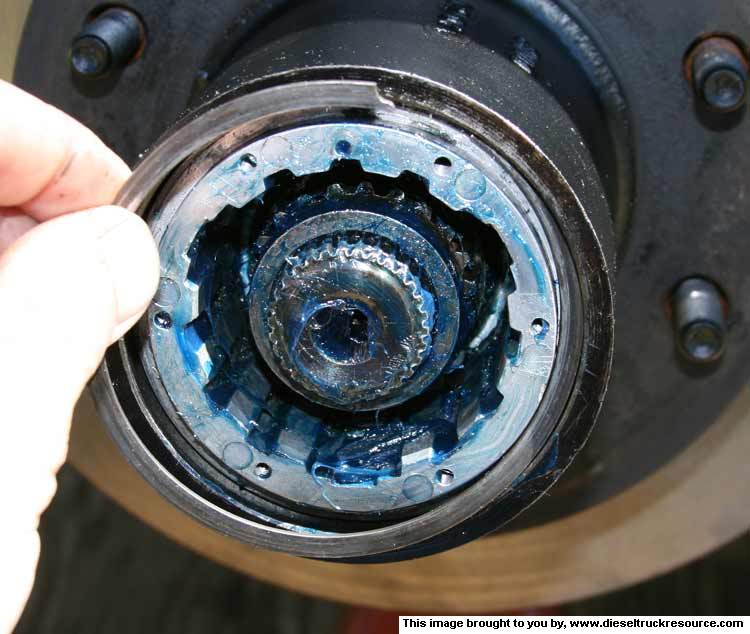
- Install the greased small C-clip. NOTE: You may have to pull the splined shaft out of the axle tube so as to find the C-clips groove. ~

- Install the lightly greased spring into the Lock-Out housing.
- Install the lightly greased Manual Lock Gear and secure it with the set-screw.

- Lightly grease the workings of the Manual Locking Hub Cover.
- Install the cleaned O-Ring seal in its groove of the cover assembly. ~

- Install the Manual Hub cover itself.
- Work the Manual Hub Handle while rotating the rotor/hub assembly so as to ensure all the internal components are moving like they should. LOCK engages the axle so with rotating things, you should see the other hub rotate as you turn the one in front of you. If you put way too much grease in there, the locking gear won't be completely free to move as it should. UN-LOCK should have the locking gear back out, freeing the hub from the axle.
Now we're getting to the short rows.
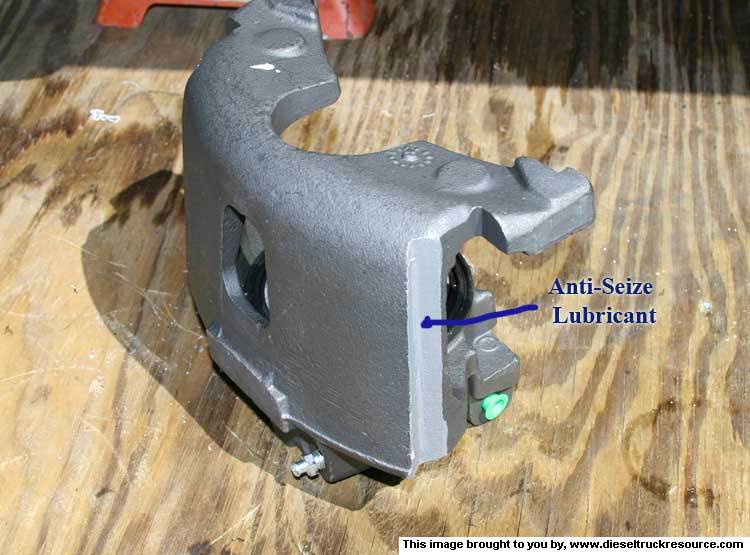
- Take some high temperature anti-seize compound and lightly coat the surfaces of the caliper where it would ride in its mounts (both ends). If you've not disconnected the brake fluid hose, be thoughtful of the hose and don't yank or twist on it. ~
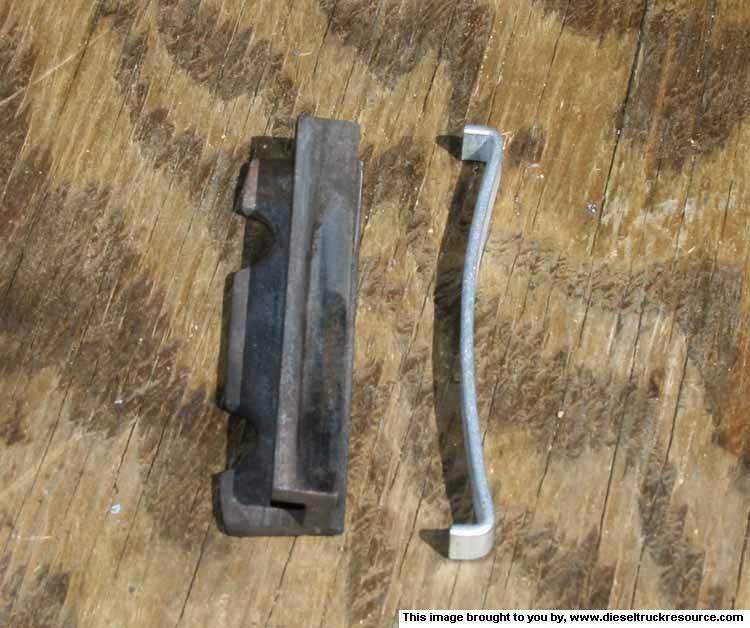
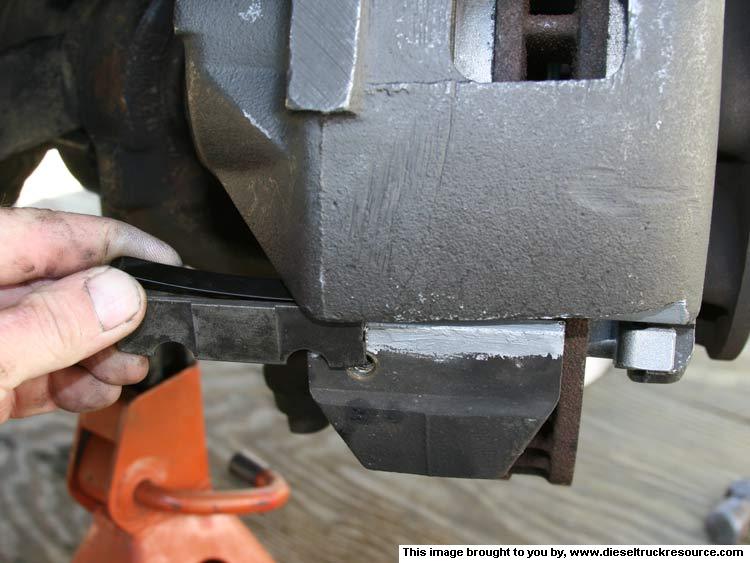
- Coat the sliding surfaces of the calipers mount locking components with the anti-seize compound. The image presents with the lock parts as they go together (I failed to coat them before this pic. Oops!). ~
- Finally, coat the caliper mount sliding surfaces as well as the two slide spots where the inner brake pad goes. ~

- Install the inner brake pad into the appropriate slots of the caliper mount. ~
- Place the lightly greased Lock-Out housing in the axle hub seating it as far in as it will go. ~
- Install the greased large C-clip. ~
- Install the greased small C-clip. NOTE: You may have to pull the splined shaft out of the axle tube so as to find the C-clips groove. ~
- Install the lightly greased spring into the Lock-Out housing.
- Install the lightly greased Manual Lock Gear and secure it with the set-screw.
- Lightly grease the workings of the Manual Locking Hub Cover.
- Install the cleaned O-Ring seal in its groove of the cover assembly. ~
- Install the Manual Hub cover itself.
- Work the Manual Hub Handle while rotating the rotor/hub assembly so as to ensure all the internal components are moving like they should. LOCK engages the axle so with rotating things, you should see the other hub rotate as you turn the one in front of you. If you put way too much grease in there, the locking gear won't be completely free to move as it should. UN-LOCK should have the locking gear back out, freeing the hub from the axle.
Now we're getting to the short rows.
- Take some high temperature anti-seize compound and lightly coat the surfaces of the caliper where it would ride in its mounts (both ends). If you've not disconnected the brake fluid hose, be thoughtful of the hose and don't yank or twist on it. ~
- Coat the sliding surfaces of the calipers mount locking components with the anti-seize compound. The image presents with the lock parts as they go together (I failed to coat them before this pic. Oops!). ~
- Finally, coat the caliper mount sliding surfaces as well as the two slide spots where the inner brake pad goes. ~
- Install the inner brake pad into the appropriate slots of the caliper mount. ~
03-22-2007, 11:25 PM
#5
1st Generation Admin
Thread Starter
- If you've not disconnected the original caliper you'll have to manually retract the caliper piston back into its bore so that with the new brake pads, it'll fit onto the brake rotor. Being careful of the rubber bellows around the piston, I've used a large C-clamp to drive the piston back into the bore. NOTE: Before pushing the piston around, note the brake fluid level in the master cylinder. You may have to remove some of the fluid so as to not overflow when pushing the caliper pistons in. Be careful of the paint!
- If you're replacing the calipers, you should find the piston fully seated in its bore of the new/rebuilt caliper assembly.
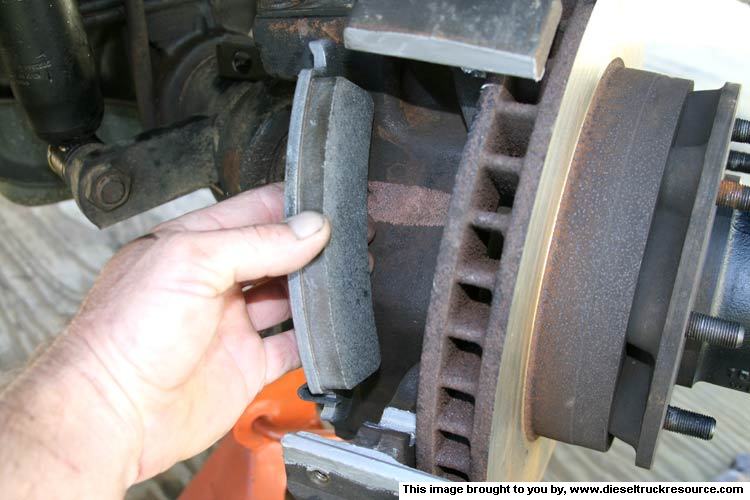
- With that, you can install the outer brake pad. ~

- Holding the outer brake pad in place and ensuring the inner pad's where it should be, place the caliper over the rotor with the top going in first. If it's in there right, the bottom of the caliper should slide right into place. You may have to fidget with it to get it to cooperate.
- Once in place, you can then reinstall the caliper locking pieces with finally torquing the Allen screw to the proper value. ~
- If you've not opened the brake fluid circuit (hoses, etc), you should be able to get into the truck (without knocking the truck of the safety stands) and pump the brake pedal back up. Assuming all's correct it should stay there. Check the master cylinder brake fluid level and top as needed.
- If you have opened the brake fluid circuit, you'll now have to reconnect the original front brake line using new sealing washers on either side of the banjo fitting. Without wringing the bolt in two, torque to the correct value.
- With the help of a friend (or the appropriate brake bleeding tools), bleed all the air from the front brakes starting with the passengers side first. Use the correct brake fluid.
- Reinstall the tires and torque the lug nuts to the correct value.
- Safely take the truck back down from the safety stands and reconnect the Negative cable to the battery.
- Clean and put away all your tools and get a cool Mountain Dew.
- Look long and hard at where you've been so as to ensure everything is where it should be. Correct it if it's not.
- Start the truck and without going anywhere, pump the brake pedal repeatedly assuring all works correctly. If not, fix it.
- Your new brake pads should have written instruction as to how to go about seating/curing them. It typically involves taking the truck up to about 35 to 40mph and firmly bringing the truck to a stop. Do this three times. This will allow the new pads to seat to the rotor while the heat generated will burn off any components of the friction material that might otherwise produce gasses that would possibly cause green-brake fade (The initial smoke acts as a lubricant).
- Take it back to the house and check thoroughly for any brake fluid leaks, etc.
- Re-torque the wheel lug nuts.
You should be good to go.
I hope this proves helpful to all interested. It's not that big a deal so don't be intimidated by the lock-out hubs and all.
Thanks,
David (BC)
A huge thanks to Dave (wannadiesel) for hosting my images used in this thread.
- If you're replacing the calipers, you should find the piston fully seated in its bore of the new/rebuilt caliper assembly.
- With that, you can install the outer brake pad. ~
- Holding the outer brake pad in place and ensuring the inner pad's where it should be, place the caliper over the rotor with the top going in first. If it's in there right, the bottom of the caliper should slide right into place. You may have to fidget with it to get it to cooperate.
- Once in place, you can then reinstall the caliper locking pieces with finally torquing the Allen screw to the proper value. ~
- If you've not opened the brake fluid circuit (hoses, etc), you should be able to get into the truck (without knocking the truck of the safety stands) and pump the brake pedal back up. Assuming all's correct it should stay there. Check the master cylinder brake fluid level and top as needed.
- If you have opened the brake fluid circuit, you'll now have to reconnect the original front brake line using new sealing washers on either side of the banjo fitting. Without wringing the bolt in two, torque to the correct value.
- With the help of a friend (or the appropriate brake bleeding tools), bleed all the air from the front brakes starting with the passengers side first. Use the correct brake fluid.
- Reinstall the tires and torque the lug nuts to the correct value.
- Safely take the truck back down from the safety stands and reconnect the Negative cable to the battery.
- Clean and put away all your tools and get a cool Mountain Dew.
- Look long and hard at where you've been so as to ensure everything is where it should be. Correct it if it's not.
- Start the truck and without going anywhere, pump the brake pedal repeatedly assuring all works correctly. If not, fix it.
- Your new brake pads should have written instruction as to how to go about seating/curing them. It typically involves taking the truck up to about 35 to 40mph and firmly bringing the truck to a stop. Do this three times. This will allow the new pads to seat to the rotor while the heat generated will burn off any components of the friction material that might otherwise produce gasses that would possibly cause green-brake fade (The initial smoke acts as a lubricant).
- Take it back to the house and check thoroughly for any brake fluid leaks, etc.
- Re-torque the wheel lug nuts.
You should be good to go.
I hope this proves helpful to all interested. It's not that big a deal so don't be intimidated by the lock-out hubs and all.
Thanks,
David (BC)
A huge thanks to Dave (wannadiesel) for hosting my images used in this thread.


Trending Topics
03-23-2007, 05:46 PM
#8
1st Generation Admin
Thread Starter
 <
03-23-2007, 06:18 PM
<
03-23-2007, 06:18 PM
#9
Adminstrator-ess
03-23-2007, 06:56 PM
#10
Registered User

Join Date: Aug 2004
Location: MA USA
Posts: 201
Likes: 0
Received 0 Likes
on
0 Posts
Nice writeup but I would not use a brush to pack the bearings. I think there is too much chance of getting a bristle in there and not seeing it. So I use the palm of my clean hand to pack bearings.
Dean
Dean
09-12-2008, 02:47 PM
#12
Registered User

Dana 60 Disc Brake Dust Shields
Front disc brake dust sheilds are discontinued from Mopar according to my dealer, so I bought a set from GM. They are slightly different from the dodge sheilds, but fit. Part numbers: Left: 00462813; Right: 00462814. As far as GM is concerned, they fit a 1986 K30.
10-22-2008, 09:42 PM
#13
Registered User

Join Date: Oct 2008
Location: knoxville tn
Posts: 22
Likes: 0
Received 0 Likes
on
0 Posts
ok call me stupid!!!
Maybe I am stupid but I am new at this.... it seems to me that the bearings are all part of the hub. so here is my dump question if I put warn lockout hubs on will they come already put together with new bearings already? Or do I have to do this and get new hubs? Thank you
10-23-2008, 12:26 AM
#14
DTR's "Cooler than ice cubes 14 miles North of North Pole" member
Join Date: Oct 2006
Location: 14mi North of North Pole
Posts: 1,797
Likes: 0
Received 9 Likes
on
8 Posts
After you put the bearings and locknuts inplace and set them up the inner part of the lock-outs go in next and are hel in place by 2 snap rings. after the snaprings are in place, the outer part of the lock-out is installed using the 6 allen head bolts.
