Piston Lift Pump Install
 02-25-2006, 08:04 PM
#1
1st Generation Admin
Thread Starter
In a continuing effort to repay the help afforded me by the good folks of these forums, I'm posting this thread detailing the install of a new piston lift pump in my mess. 
NOTE: This is geared more toward the new CTD owner who might not be well versed under the hood, so you old-timers bear with me.
While this install revolves around a 1993 W250 4X4 ClubCab w/Auto trans, it's my understanding the work is very similar in the older trucks, so your mileage may vary.
Before we begin, remember: . . . . . . SAFETY FIRST!
You're gonna be working around fuel lines, spilled diesel, and 12vdc power wires.
Go ahead and disconnect the negative cable from your battery. Chock the wheels, and set the parking brake. Place a dry chemical (preferably) fire extinguisher close by. Weather permitting, do this work outside so as not to worry about fumes in the house.
To do this work, I used:
A 10mm, 14mm, and 17mm open end wrench.
A 9/16" open end wrench.
A medium adjustable wrench (12" or there abouts).
A 10mm socket.
A 3/8" ratchet.
A 3/8" 3" extension.
A 3/8" 6" extension.
A 3/8" 12" extension.
A torque wrench.
A gasket scraper tool.
Some brush on gasket shellac.
Some liquid pipe sealant.
A couple of paper towels.
A little electrical tape.
A good stool to stand on.
A good work light.
A garden hose with adequate pressure.
It's a good idea to clean the engine bay the night before with a good solvent and high pressure water, paying attention to the area surrounding the lift pump.
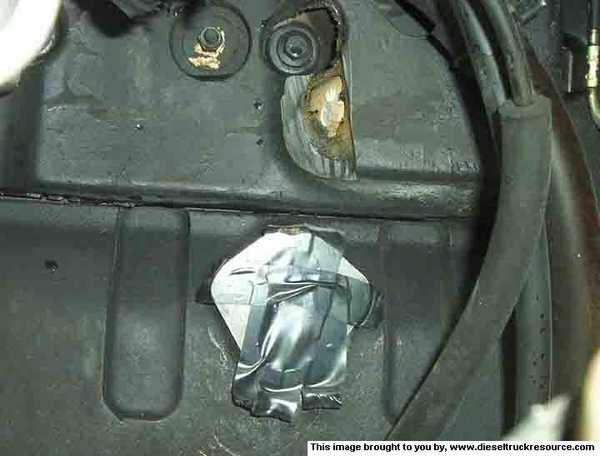
To start with, let's understand where we're working.
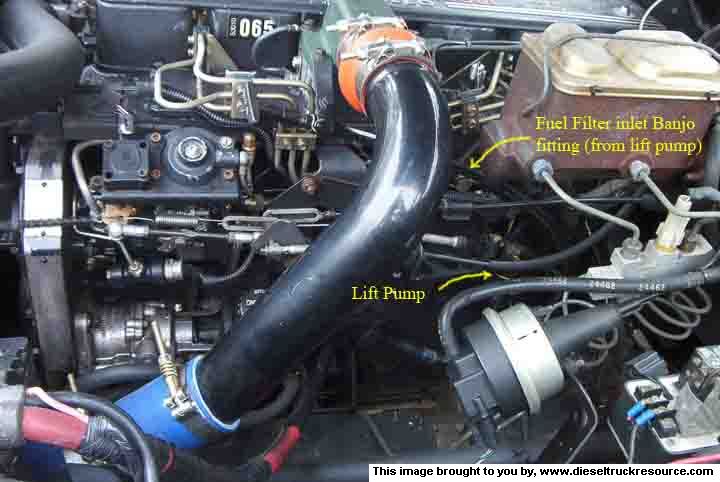
As you can see, there's plenty of stuff that's gonna be in the way. Pay attention to what you're leaning on so as not to brake anything (cruise control servo, brake lines, etc).
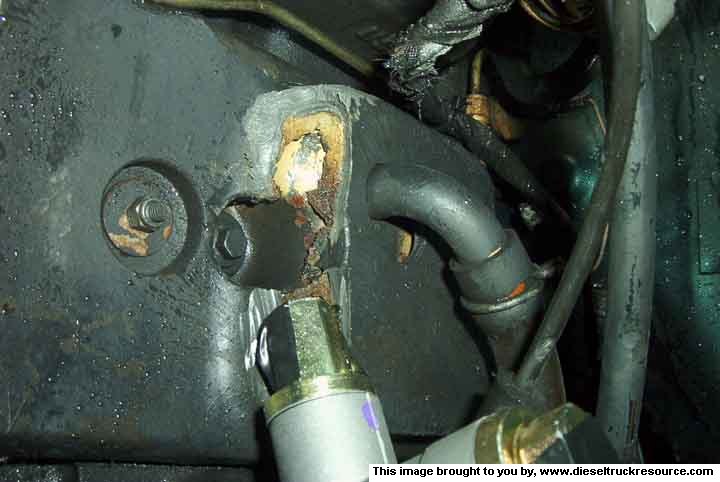
Here's a close up of what we're messing with up top.

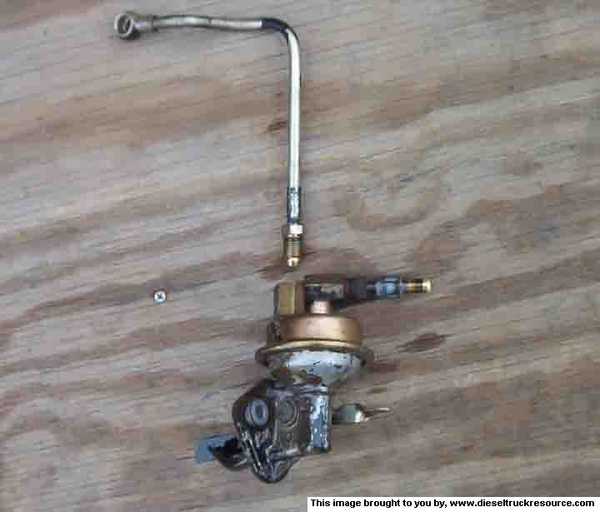
And the old fuel pump itself. (I cleaned that thing last night!)

I started by first removing the banjo bolt at the fuel filter end of the fuel line (17mm open end).
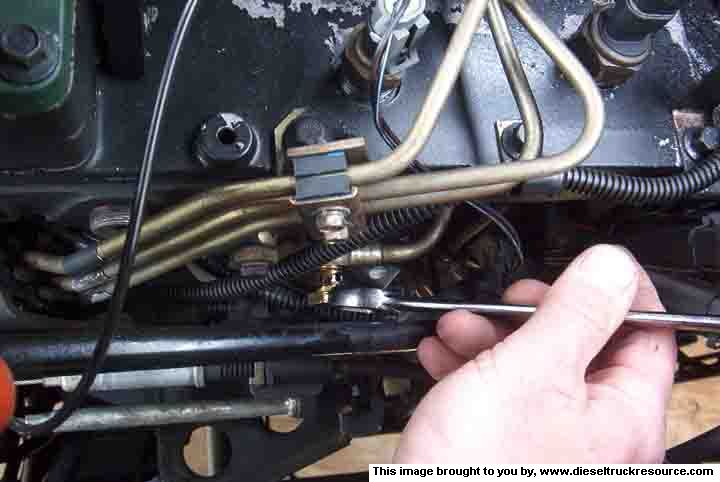
From there, I removed the old fuel line from the old lift pump (14mm open end). Be sure to use a back-up wrench (17mm open end) when working with fittings as such. You'll be less likely to rotate the wrong part, or worse.
My mess uses the plastic supply fuel line and with that, the fitting simply unplugs from the pump.
You can now remove the two (2) lift pump mounting bolts (10mm socket on the 3" extension).

NOTE: This is geared more toward the new CTD owner who might not be well versed under the hood, so you old-timers bear with me.
While this install revolves around a 1993 W250 4X4 ClubCab w/Auto trans, it's my understanding the work is very similar in the older trucks, so your mileage may vary.
Before we begin, remember: . . . . . . SAFETY FIRST!
You're gonna be working around fuel lines, spilled diesel, and 12vdc power wires.
Go ahead and disconnect the negative cable from your battery. Chock the wheels, and set the parking brake. Place a dry chemical (preferably) fire extinguisher close by. Weather permitting, do this work outside so as not to worry about fumes in the house.
To do this work, I used:
A 10mm, 14mm, and 17mm open end wrench.
A 9/16" open end wrench.
A medium adjustable wrench (12" or there abouts).
A 10mm socket.
A 3/8" ratchet.
A 3/8" 3" extension.
A 3/8" 6" extension.
A 3/8" 12" extension.
A torque wrench.
A gasket scraper tool.
Some brush on gasket shellac.
Some liquid pipe sealant.
A couple of paper towels.
A little electrical tape.
A good stool to stand on.
A good work light.
A garden hose with adequate pressure.
It's a good idea to clean the engine bay the night before with a good solvent and high pressure water, paying attention to the area surrounding the lift pump.
To start with, let's understand where we're working.
As you can see, there's plenty of stuff that's gonna be in the way. Pay attention to what you're leaning on so as not to brake anything (cruise control servo, brake lines, etc).
Here's a close up of what we're messing with up top.
And the old fuel pump itself. (I cleaned that thing last night!)
I started by first removing the banjo bolt at the fuel filter end of the fuel line (17mm open end).
From there, I removed the old fuel line from the old lift pump (14mm open end). Be sure to use a back-up wrench (17mm open end) when working with fittings as such. You'll be less likely to rotate the wrong part, or worse.
My mess uses the plastic supply fuel line and with that, the fitting simply unplugs from the pump.
You can now remove the two (2) lift pump mounting bolts (10mm socket on the 3" extension).
 02-25-2006, 08:05 PM
#2
1st Generation Admin
Thread Starter
Laying all the old parts on the floor shows us this. Don't toss the pump just yet as we'll need the fuel supply line fitting (9/16" open end).
Now you need to clean all the old gasket material off the pump mount of the engine block. You might consider sticking a wad of paper towels in the pump rod hole so as not to get any trash in there.
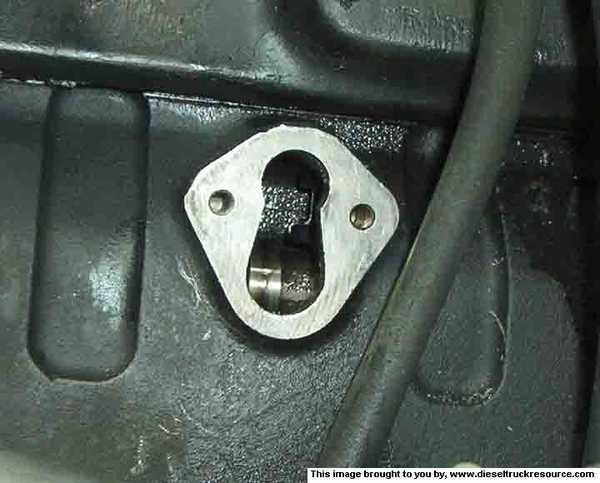
Now we need to cut the lifter valley's noise blanket so the new pump will fit. I just held the new pump in place and eye-balled it. We're gonna cut to the left of the line.

To cut the insulation, I ended up using a metal burr (like for porting), and made room for the pump. Note the tape covering the pump rod opening.
Then I cut where the new fuel line would go.
Now you need to clean all the old gasket material off the pump mount of the engine block. You might consider sticking a wad of paper towels in the pump rod hole so as not to get any trash in there.
Now we need to cut the lifter valley's noise blanket so the new pump will fit. I just held the new pump in place and eye-balled it. We're gonna cut to the left of the line.
To cut the insulation, I ended up using a metal burr (like for porting), and made room for the pump. Note the tape covering the pump rod opening.
Then I cut where the new fuel line would go.
Originally Posted by wannadiesel
One word of caution: If you're going to be trimming the insulation with any sort of power tool, be aware that the return line from the injection pump runs just above the tappet cover insulation. If you grind a hole in that you'll be sorry. I used a utility knife on mine. It ain't pretty, but nobody's looking down there anyway.
02-25-2006, 08:07 PM
#3
1st Generation Admin
Thread Starter
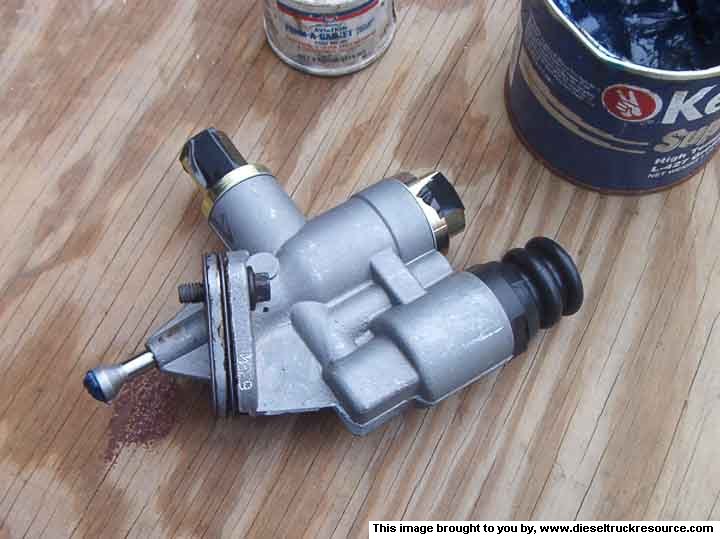
Now we can begin the new pump install. Here's what we need (shown as assembled).

NOTE: The Cummins part numbers listed were good as of Feb. 21, 2006.
I placed a thin coat of gasket shellac on the block pump mount, the lift pump mounting flange, and both sides of the spacer. Letting this dry a moment, I then assembled the spacer and gaskets.
NOTE: Just prior to putting the pump in place, I put a booger of EP grease on the pump rod shoe so as to help in the initial seating of the parts. Also note the tape covering the pump inlet/outlet. Don't need any trash wrecking a new pump!
I found it best to work through the wheel-well opening just above the left-front shock absorber mount. Naturally, my mess was so that the cam's pump lobe was up forcing me to push the pump in place while starting the bolts. I used my 6" and 12" ratchet extensions combined to reach the bolts comfortably with the 10mm socket. Snugging them both hand tight, I then torqued them to 18ft/lbs.
With that, I installed the original fuel supply lines fitting (9/16" open end with the adjustable for back-up). As this is not a flare type fitting, pipe dope is in order. Don't get any on the fuel side of things! Now plug back in the supply line.
Now you can install the new fuel line loosely at the pump using NO pipe dope (14mm open end).

I say install the fuel line at the pump loosely because that will aid in getting the fitting to line up at the fuel filters banjo bolt. I had to tug the line over to make it fit dead-on.
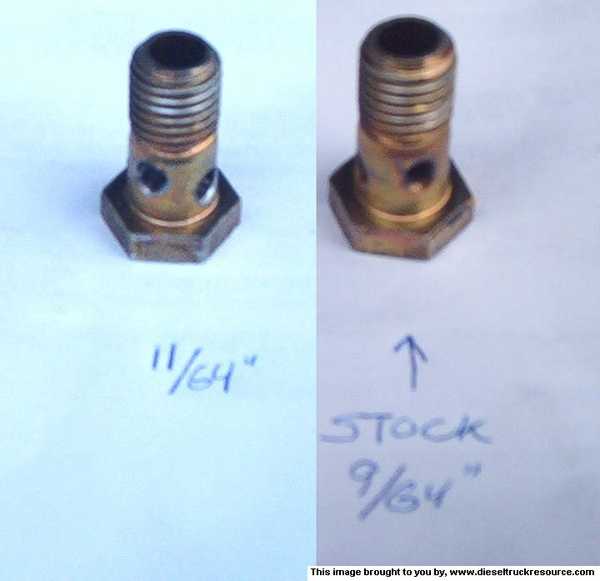
While I was messing with the banjo bolt, I know there's a lot of talk of over-sized banjo bolts. Well, I didn't have any at the moment so I improvised. The stock bolts will just pass a 9/64" drill bit. I opened mine up to 11/64". I felt that was plenty big enough without worrying about the holes overlapping the gasket interface. I then knocked off the sharp edges with a larger bit, and cleaned all the filings.
After tightening the banjo bolt (17mm open end), I then tightened the fitting at the pump (14mm open end with the adjustable for back up).
That completes the new piston lift pump install. For good sport, I went ahead and installed a new fuel filter. Having done that, we need to bleed all the air from the new components.
A little to the left, and above the banjo bolt we were messing with is another that connects a fuel line from the fuel filter, to the injection pump. It's Tapped. By that they mean, it's got a little bolt threaded into it's center that has a small cut up it's side. Loosening this bolt about a half turn (10mm open end), we then push the pump primer **** (it's the thing on the pump with the rubber bellows). Keep pumping this till you see pretty much a solid stream of fuel coming from the tapped bolt with no more air spitting out. Then tighten it up.

That's it!
Go ahead a take a garden hose to flush any fuel spills from the engine, and reconnect the battery. Clean your tools and put them away.
Now crank it up keeping an ear out for any sputtering that might indicate some trapped air has made it's way to the injectors. If so, go ahead and bleed them, again flushing away any spilled fuel. During this initial start-up, check very carefully for any leaks. Take care of any found right away.
Now get a cool Mountain Dew, and tell the Miss's you'll be right back. Take it around the block putting it through it's moves. Bring it straight back, and check for leaks again.
I don't have a fuel pressure gage. In reading all the member's posts here who do, I had a good idea where I might have been, and where the pressure should be now. If I have problems down the road, I'll install something then.
Like others, it seems the 'ol girl's a little more peppy when bumping the throttle. She certainly pulls strong right up to de-fuel. I like it!
I hope this thread proves helpful to all interested and a BIG THANKS to wannadiesel (Dave) for his input.
Part numbers as of 5/4/2010: https://www.dieseltruckresource.com/...s-t269317.html
Here's what we need (shown as assembled).NOTE: The Cummins part numbers listed were good as of Feb. 21, 2006.
I placed a thin coat of gasket shellac on the block pump mount, the lift pump mounting flange, and both sides of the spacer. Letting this dry a moment, I then assembled the spacer and gaskets.
NOTE: Just prior to putting the pump in place, I put a booger of EP grease on the pump rod shoe so as to help in the initial seating of the parts. Also note the tape covering the pump inlet/outlet. Don't need any trash wrecking a new pump!
I found it best to work through the wheel-well opening just above the left-front shock absorber mount. Naturally, my mess was so that the cam's pump lobe was up forcing me to push the pump in place while starting the bolts. I used my 6" and 12" ratchet extensions combined to reach the bolts comfortably with the 10mm socket. Snugging them both hand tight, I then torqued them to 18ft/lbs.
With that, I installed the original fuel supply lines fitting (9/16" open end with the adjustable for back-up). As this is not a flare type fitting, pipe dope is in order. Don't get any on the fuel side of things! Now plug back in the supply line.
Now you can install the new fuel line loosely at the pump using NO pipe dope (14mm open end).
I say install the fuel line at the pump loosely because that will aid in getting the fitting to line up at the fuel filters banjo bolt. I had to tug the line over to make it fit dead-on.
While I was messing with the banjo bolt, I know there's a lot of talk of over-sized banjo bolts. Well, I didn't have any at the moment so I improvised. The stock bolts will just pass a 9/64" drill bit. I opened mine up to 11/64". I felt that was plenty big enough without worrying about the holes overlapping the gasket interface. I then knocked off the sharp edges with a larger bit, and cleaned all the filings.
After tightening the banjo bolt (17mm open end), I then tightened the fitting at the pump (14mm open end with the adjustable for back up).
That completes the new piston lift pump install. For good sport, I went ahead and installed a new fuel filter. Having done that, we need to bleed all the air from the new components.
A little to the left, and above the banjo bolt we were messing with is another that connects a fuel line from the fuel filter, to the injection pump. It's Tapped. By that they mean, it's got a little bolt threaded into it's center that has a small cut up it's side. Loosening this bolt about a half turn (10mm open end), we then push the pump primer **** (it's the thing on the pump with the rubber bellows). Keep pumping this till you see pretty much a solid stream of fuel coming from the tapped bolt with no more air spitting out. Then tighten it up.
That's it!
Go ahead a take a garden hose to flush any fuel spills from the engine, and reconnect the battery. Clean your tools and put them away.
Now crank it up keeping an ear out for any sputtering that might indicate some trapped air has made it's way to the injectors. If so, go ahead and bleed them, again flushing away any spilled fuel. During this initial start-up, check very carefully for any leaks. Take care of any found right away.
Now get a cool Mountain Dew, and tell the Miss's you'll be right back. Take it around the block putting it through it's moves. Bring it straight back, and check for leaks again.
I don't have a fuel pressure gage. In reading all the member's posts here who do, I had a good idea where I might have been, and where the pressure should be now. If I have problems down the road, I'll install something then.
Like others, it seems the 'ol girl's a little more peppy when bumping the throttle. She certainly pulls strong right up to de-fuel. I like it!
I hope this thread proves helpful to all interested and a BIG THANKS to wannadiesel (Dave) for his input.
Part numbers as of 5/4/2010: https://www.dieseltruckresource.com/...s-t269317.html
02-25-2006, 08:08 PM
#4
1st Generation Admin
Thread Starter
Fuel supply line fitting goes here
EDIT: If y'all can think of anything I've missed, let me know and I'll edit what I've got here.
EDIT: If y'all can think of anything I've missed, let me know and I'll edit what I've got here.

 02-25-2006, 08:50 PM
#7
Adminstrator-ess
Excellent work, BC! 
Monty, can you put a link to this thread in the FAQ?
One word of caution: If you're going to be trimming the insulation with any sort of power tool, be aware that the return line from the injection pump runs just above the tappet cover insulation. If you grind a hole in that you'll be sorry. I used a utility knife on mine. It ain't pretty, but nobody's looking down there anyway.
Trending Topics
 02-26-2006, 10:42 AM
#12
1st Generation Admin
Thread Starter
Originally Posted by wannadiesel
Hey BC, that is the wrong style fuel line connector diagram. Those are the ones at the fuel tank. You want pages 14-17 + 14-18.
 02-26-2006, 10:52 AM
#13
Administrator
02-26-2006, 11:48 AM
#14
1st Generation Admin
Thread Starter
KEWL!
I'm tickled y'all find it worth while. I hope to do more as my budget allows.
If you good folks can think of any other topics to detail as such, let me know.
I'm tickled y'all find it worth while. I hope to do more as my budget allows.
If you good folks can think of any other topics to detail as such, let me know.
02-26-2006, 12:02 PM
#15
1st Generation Admin
Thread Starter
Monty, you guys DO keep your server OS and forum software up to date with the latest patches and what not. That and good data back-up where needed . . . . . . . . right?
I'd hate to see some script-kiddy trash this and everyone elses hard work.
I'd hate to see some script-kiddy trash this and everyone elses hard work.