How to remove stubborn injectors easy ! ! ! !
 11-20-2006, 06:02 PM
#1
Registered User
Thread Starter

Join Date: May 2006
Location: Philly PA
Posts: 433
Likes: 0
Received 0 Likes
on
0 Posts
OK. here is what i have.
I had tried to remove the injector with vice grips, wiggiling, I didn't have a slap hammer,
So i decieded to make a tool to remove the injector easially.
I used a 3/4" piece of black pipe (gas line), That cut to 3 1/2", Having a nice shoulder to sit against the head,
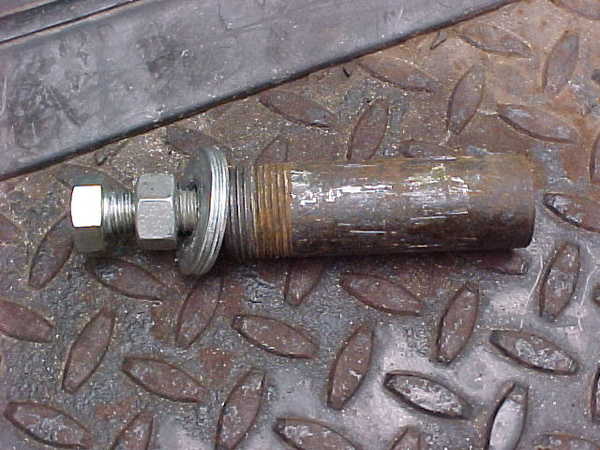
I ran a nut to the top of the bolt, and slid on two thick washers to act as the pulling device, before welding the metric nut on.
I then welded a metric nut (dont know the exact size) (but it is the same size as the injector threads)
to a 7/16 bolt X 3" all threaded,
Then i needed to grind the edges of the metric bolt so it would fit into the 3/4" black pipe,

Here is a referance to how it looks with just the bolt on an injector

So i then have this little package
I placed the NEW TOOL, onto the injector, threaded it onto the injector
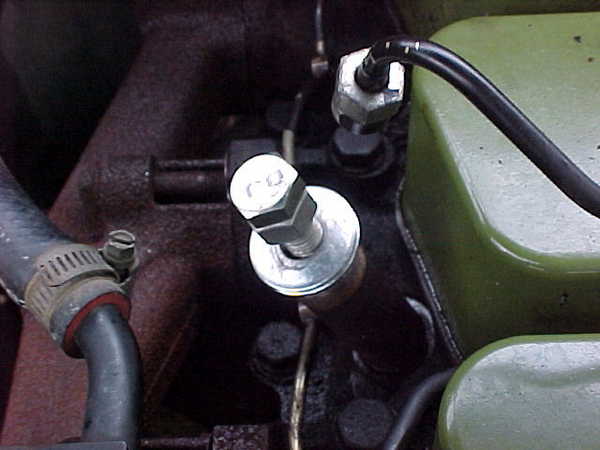
Then wound the loose nut down the threads of the bolt using the orange wrench to hold the assy bach from tightening onto the injector and causing damage

It was so very easy to do, a five year old could have would this out, and the injector came out nice and straight and easy

Part of the reason why i made this tool is that i would have to remove the hood to use a slap hammer on cylinders 5+6
These parts can be gotten at homedepo for just a couple of dollars, And i think it took me about 20 min to make.
I hope that this can be of service to a few of you out there who can utilize this method to remove your stubborn injectors!!! Like Butter!
Peter.

I had tried to remove the injector with vice grips, wiggiling, I didn't have a slap hammer,
So i decieded to make a tool to remove the injector easially.
I used a 3/4" piece of black pipe (gas line), That cut to 3 1/2", Having a nice shoulder to sit against the head,
I ran a nut to the top of the bolt, and slid on two thick washers to act as the pulling device, before welding the metric nut on.
I then welded a metric nut (dont know the exact size) (but it is the same size as the injector threads)
to a 7/16 bolt X 3" all threaded,
Then i needed to grind the edges of the metric bolt so it would fit into the 3/4" black pipe,
Here is a referance to how it looks with just the bolt on an injector
So i then have this little package
I placed the NEW TOOL, onto the injector, threaded it onto the injector
Then wound the loose nut down the threads of the bolt using the orange wrench to hold the assy bach from tightening onto the injector and causing damage
It was so very easy to do, a five year old could have would this out, and the injector came out nice and straight and easy
Part of the reason why i made this tool is that i would have to remove the hood to use a slap hammer on cylinders 5+6
These parts can be gotten at homedepo for just a couple of dollars, And i think it took me about 20 min to make.
I hope that this can be of service to a few of you out there who can utilize this method to remove your stubborn injectors!!! Like Butter!
Peter.

 11-20-2006, 07:49 PM
#4
Muted User

Join Date: Mar 2006
Location: South Orange County
Posts: 169
Likes: 0
Received 0 Likes
on
0 Posts
I am going to have to second that, since I have yet to install some injectors on my truck. Did some the other day on a '01 24v and I am aware that under my hood 5&6 are a lot easier to get to, though anything to get them out easier, on any engine, should be kept for easy access! 
11-20-2006, 07:58 PM
#5
Registered User
Thread Starter
Join Date: May 2006
Location: Philly PA
Posts: 433
Likes: 0
Received 0 Likes
on
0 Posts
When i tried the vice grips, they were so tight, I was afraid of ovaling the injector, There had to be an easier way i thought,,, So i looked at some expensive injector removing tools, $150.00 plus dollars, And realized that i had al the parts lying about to through one together myself. And i needed the injectors out NOW !
Thanks!
Peter.
OH yes, My truck has 315K miles, and the PO told me that the injectors had never been out before, They were in there really good! #6 had some rust and 17 year old goo holding it in!
Thanks!
Peter.
OH yes, My truck has 315K miles, and the PO told me that the injectors had never been out before, They were in there really good! #6 had some rust and 17 year old goo holding it in!
11-20-2006, 08:45 PM
#6
Registered User

Join Date: Sep 2004
Location: mulberry FL
Posts: 151
Likes: 0
Received 0 Likes
on
0 Posts
thats a good one will keep it in mind for next week when i put in the new injectors. that beats taking the hood off and using a slide hammer like i have done the past 4 times .
.
.

Trending Topics
11-21-2006, 05:20 AM
#9
Registered User

Pred, my buddy has one similar to yours only yours is better, nice job. I was supposed to improve it, but I haven't had time yet. Its a must have on a 2nd gen 12 valve, you need to be a contortionist to get to #5 and 6 cylinders.
NukleusX, 24 valve injectors are easier IMO, the hardest hard it getting #6 line loose, stubborn ones are easy, just take one of the short intake horn bolts and use that as a puller with a prybar. Time seems to be a factor and #6 injector on a 1st gen gets the water from the hood/cowl.
 05-19-2007, 05:00 AM
#11
Registered User
Hey Pred, thanks for the home grown puller. I pulled this up doing a search. Made it in no time and got my injectors swapped and running in just a couple hours  .
.
Only mods I did were to get a second nut for the bolt, weld the metric to it, then thread it onto the bolt and welded it. Made that just a little easier to get all lined up since I used 3/8" instead of 7/16". I used fender washers too but then I had to grind a shoulder off them to clear the lift point at the front of the motor.
Anyway, it was great. They popped right out and made it an easy job. Thanks for the tip bro!
BTW, how come your valve covers are green?
.Only mods I did were to get a second nut for the bolt, weld the metric to it, then thread it onto the bolt and welded it. Made that just a little easier to get all lined up since I used 3/8" instead of 7/16". I used fender washers too but then I had to grind a shoulder off them to clear the lift point at the front of the motor.
Anyway, it was great. They popped right out and made it an easy job. Thanks for the tip bro!
BTW, how come your valve covers are green?


