Fix your odometer! (Long)


 07-20-2012, 08:50 PM
#47
Registered User

Join Date: Aug 2008
Location: Alexandria, VA
Posts: 36
Likes: 0
Received 0 Likes
on
0 Posts
So I made it two years and 20k miles with this fix (awesome write up). The whole time my cruise control hadn't worked, but that's okay. Then last few weeks speedo/odo stopped working completely. Now neither work while moving but go crazy and erratic while sitting idling, as in 0-90 in 0.2 seconds all while the odo's rolling along. Any guesses?
01-27-2013, 10:24 AM
#49
Registered User

Join Date: Jul 2009
Posts: 1
Likes: 0
Received 0 Likes
on
0 Posts
Found another source for those gears that you might want to check out: http://www.laspeedometergear.com/Odo...rd%20Dodge.htm
05-10-2013, 05:19 PM
#50
Registered User

Join Date: Feb 2008
Posts: 20
Likes: 0
Received 0 Likes
on
0 Posts
Over and over people talk about thier odometer stopping. Some don't care but others, like myself, need to track mileage for business reasons. The cause is that there are two small gears inside the odometer that get brittle as they get older. The gears tend to crack and lose teeth. The following is a write up on how to repair your odometer.
1. Purchase replacement gears. They are not cheap and I only know of one source. The web link is http://www.carradio.com/gears.html . It is not really all that easy to find the gears you want on there, I feel the 800 number is easier. 1-800-446-2880
You will need:
One 10-011 - 16 tooth gear, currently $28, this is the larger gear
One 10-016 - 20 tooth gear, currently $32, this is the smaller gear
*both may not be broken but if you are gonna take it apart i reccomend just putting both in.
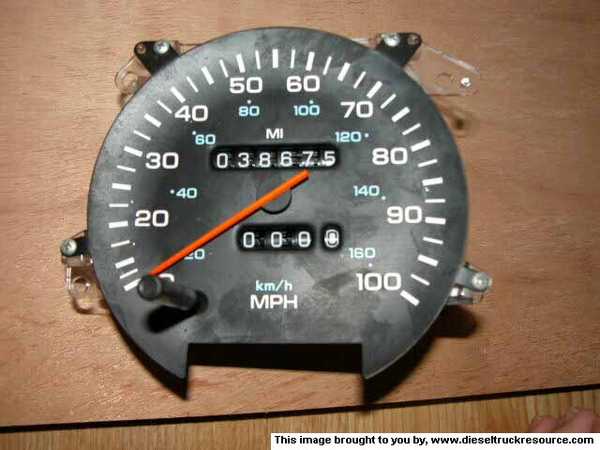
2. Remove and open the odometer
A. Remove the Dash panel
B. Remove the eight screws around the gauge cluster
[photo one]
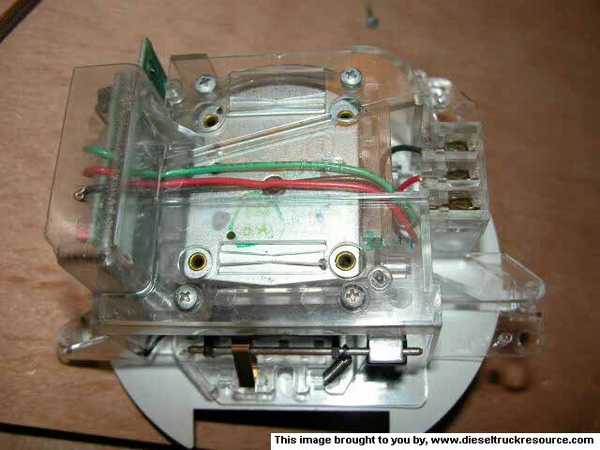
C. Remove the clear plastic and black plastic covers. Be careful, on the back of the black cover there is foam around the blinkers that can be a little messy.
D. Remove the three screws holding in the odometer (Upper left, upper right, and lower left) These are NOT the screws holding the black speedometer background.

E. Put your hands on either side of the odometer and pull it straight out. The connections are on the left side, so you will need to pull a litle harder on that side.
F. Once the odometer is out, flip it over and remove the 4 screws on the center back section.
G. Turn the odometer back over and remove the 4 screws on the face of the gauge.
H. Angle the back peice out to expose the motor and take out the two screws. Before moving the motor (and entire circut board) look at the black wire in the bottom of this photo, there is usually a twist in it that you are going to need to undo before you can move the motor.
I. At this point flip the entire back plastic piece over to the other side of the gauge.
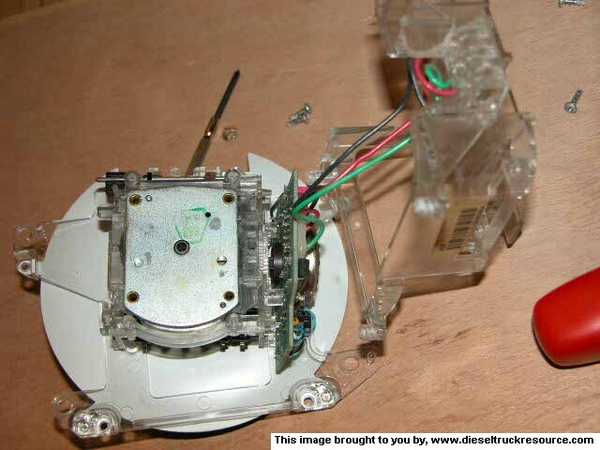
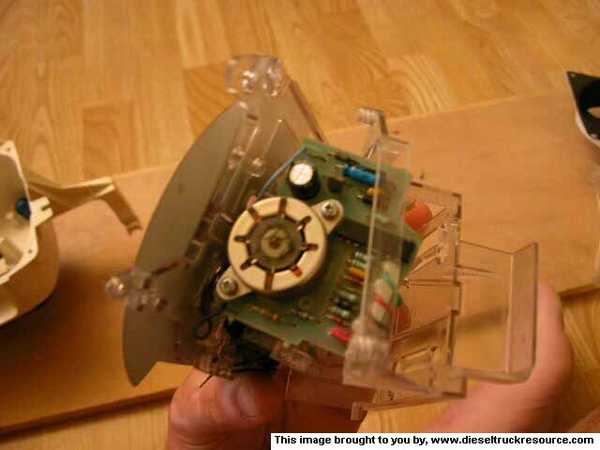
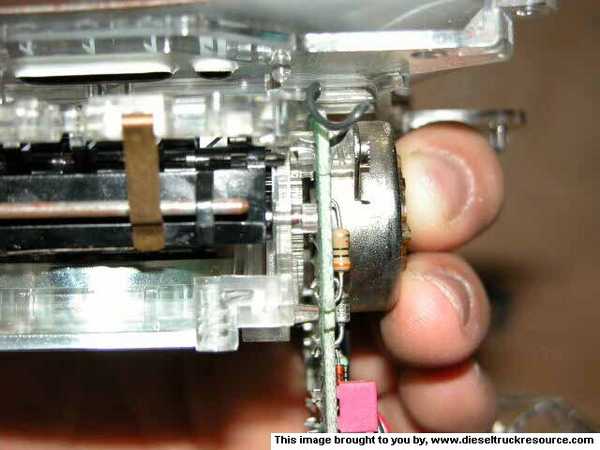
J. Pull the motor and circut board STRAIGHT out.
[photo seven]

K. Slide the small white disc off of the shaft
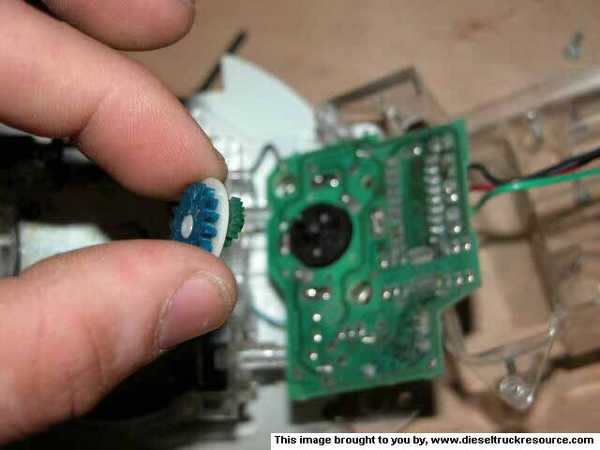
[photo ten]
L. Remove the small gear, it should simply slide off. Flip the disc over and remove the large gear. The large gear can be tougher and in most cases you just need to break off little pieces at a time. The large gear is connected in 4 places!

[photo twelve]
M. When putting the large gear back on BE CAREFUL! On my first attempt I tried to force it on, not the best idea, thankfully I had a spare guage. you may need to sand or trim the spikes on the white disc to get the gear on, just take your time. It is reccomended that you put a drop of super glue on the back of the gear. On my other truck the gear snapped on nice and tight, so i didn't use any. That part is up to you.

N. Once you have the new gears on the white disc put it back on the shaft and make sure the small gear is lined up with the inner teeth. Then carefully slide the assembly back together and put the 2 screws in to hold it in place. To make sure it's all meshed together correctly, I like to take a small awl and spin the mech through this gap, just below the end of the brass looking rod there is a gap that goes straight in to the large gear, you'd be surpised how little it need to spin to turn the trip odometer!
3. Reinstall the odometer
A. At this point you are ready to re-assemble. I've found that the easiest way to line everything back up is to hold the gauge by the black face with that face down. With the plastic piece that is connected by 3 wires still hanging off the side, line up the center piece, then bring the other piece over and line it up. Throw 2 screws diagonal from each other in the back, then turn it over and put 2 in the front. Double check that it is lined up and then put the remaining screws in.
B. At this point you should be ready to slide it back in the cluster. Put those 3 screws in.
C. Put the 2 covers back on, and thier 8 screws.
D. Put the dash panel back on.
E. Take it for a test drive!
I hope this helps all of you that want to get that odometer working again!
Gears not stripped? Check here: https://www.dieseltruckresource.com/...d.php?t=225686
1. Purchase replacement gears. They are not cheap and I only know of one source. The web link is http://www.carradio.com/gears.html . It is not really all that easy to find the gears you want on there, I feel the 800 number is easier. 1-800-446-2880
You will need:
One 10-011 - 16 tooth gear, currently $28, this is the larger gear
One 10-016 - 20 tooth gear, currently $32, this is the smaller gear
*both may not be broken but if you are gonna take it apart i reccomend just putting both in.
2. Remove and open the odometer
A. Remove the Dash panel
B. Remove the eight screws around the gauge cluster
[photo one]
C. Remove the clear plastic and black plastic covers. Be careful, on the back of the black cover there is foam around the blinkers that can be a little messy.
D. Remove the three screws holding in the odometer (Upper left, upper right, and lower left) These are NOT the screws holding the black speedometer background.
E. Put your hands on either side of the odometer and pull it straight out. The connections are on the left side, so you will need to pull a litle harder on that side.
F. Once the odometer is out, flip it over and remove the 4 screws on the center back section.
G. Turn the odometer back over and remove the 4 screws on the face of the gauge.
H. Angle the back peice out to expose the motor and take out the two screws. Before moving the motor (and entire circut board) look at the black wire in the bottom of this photo, there is usually a twist in it that you are going to need to undo before you can move the motor.
I. At this point flip the entire back plastic piece over to the other side of the gauge.
J. Pull the motor and circut board STRAIGHT out.
[photo seven]
K. Slide the small white disc off of the shaft
[photo ten]
L. Remove the small gear, it should simply slide off. Flip the disc over and remove the large gear. The large gear can be tougher and in most cases you just need to break off little pieces at a time. The large gear is connected in 4 places!
[photo twelve]
M. When putting the large gear back on BE CAREFUL! On my first attempt I tried to force it on, not the best idea, thankfully I had a spare guage. you may need to sand or trim the spikes on the white disc to get the gear on, just take your time. It is reccomended that you put a drop of super glue on the back of the gear. On my other truck the gear snapped on nice and tight, so i didn't use any. That part is up to you.
N. Once you have the new gears on the white disc put it back on the shaft and make sure the small gear is lined up with the inner teeth. Then carefully slide the assembly back together and put the 2 screws in to hold it in place. To make sure it's all meshed together correctly, I like to take a small awl and spin the mech through this gap, just below the end of the brass looking rod there is a gap that goes straight in to the large gear, you'd be surpised how little it need to spin to turn the trip odometer!
3. Reinstall the odometer
A. At this point you are ready to re-assemble. I've found that the easiest way to line everything back up is to hold the gauge by the black face with that face down. With the plastic piece that is connected by 3 wires still hanging off the side, line up the center piece, then bring the other piece over and line it up. Throw 2 screws diagonal from each other in the back, then turn it over and put 2 in the front. Double check that it is lined up and then put the remaining screws in.
B. At this point you should be ready to slide it back in the cluster. Put those 3 screws in.
C. Put the 2 covers back on, and thier 8 screws.
D. Put the dash panel back on.
E. Take it for a test drive!
I hope this helps all of you that want to get that odometer working again!
Gears not stripped? Check here: https://www.dieseltruckresource.com/...d.php?t=225686
On Ebay; Kerry,
Owner, American Hot Rod Solutions.
is selling the up-graded set for $24.38 including shipping as of 5/10/2013
http://cgi.ebay.com/ws/eBayISAPI.dll...tchlink:top:en
05-27-2013, 07:15 PM
#51
Registered User

Join Date: Nov 2008
Location: Boston, KY
Posts: 8
Likes: 0
Received 0 Likes
on
0 Posts
Another source for the speedometer gears. About 2/3rds of the way down.
http://www.transmissioncenter.net/sp...n_______va.htm
http://www.transmissioncenter.net/sp...n_______va.htm
06-05-2013, 03:41 PM
#54
Registered User

Join Date: Feb 2013
Posts: 4
Likes: 0
Received 0 Likes
on
0 Posts
I was reading this awhile back when my odometer quit working. Took it all apart and the gears were fine. not a single thing wrong with them. Put it all back together and it just intermittently (For 30 miles or so at a time) stops working. The speedometer has never missed a beat. Anybody have any ideas?

 01-17-2015, 08:31 PM
#59
Registered User

 .. Thanks all..
01-28-2015, 08:15 AM
.. Thanks all..
01-28-2015, 08:15 AM
#60
a little off topic
I'm about to tackle my odometer gear problem but another problem occured... My vehicle distance sensor fell of my truck on my last road trip ... The speedo drive mechanism that sits on the transfer case? It had fallen off before but I guess It decided to leave me once and for all, or I decided not to fix the problem when it first arrived
 Anyone know a part number or have an extra? Thanks, Jesse
... The speedo drive mechanism that sits on the transfer case? It had fallen off before but I guess It decided to leave me once and for all, or I decided not to fix the problem when it first arrived Anyone know a part number or have an extra? Thanks, Jesse