Fix your odometer! (Long)
 12-20-2006, 10:34 AM
#1
Registered User
Thread Starter
Join Date: Jun 2005
Location: Springfield, TN
Posts: 1,737
Likes: 0
Received 0 Likes
on
0 Posts
Over and over people talk about thier odometer stopping. Some don't care but others, like myself, need to track mileage for business reasons. The cause is that there are two small gears inside the odometer that get brittle as they get older. The gears tend to crack and lose teeth. The following is a write up on how to repair your odometer.
1. Purchase replacement gears. They are not cheap and I only know of one source. The web link is http://www.carradio.com/gears.html . It is not really all that easy to find the gears you want on there, I feel the 800 number is easier. 1-800-446-2880
You will need:
One 10-011 - 16 tooth gear, currently $28, this is the larger gear
One 10-016 - 20 tooth gear, currently $32, this is the smaller gear
*both may not be broken but if you are gonna take it apart i reccomend just putting both in.
2. Remove and open the odometer
A. Remove the Dash panel
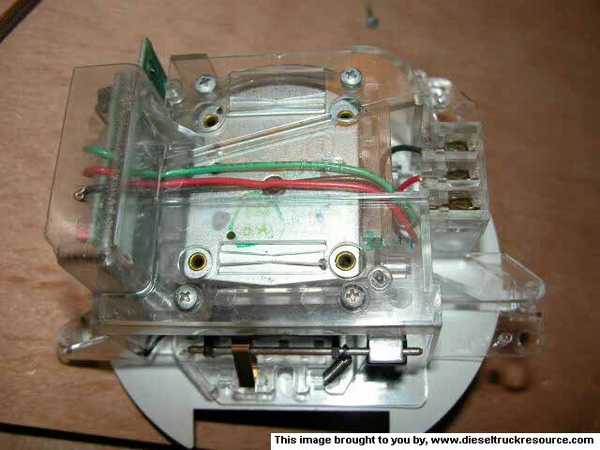
B. Remove the eight screws around the gauge cluster
[photo one]
C. Remove the clear plastic and black plastic covers. Be careful, on the back of the black cover there is foam around the blinkers that can be a little messy.
D. Remove the three screws holding in the odometer (Upper left, upper right, and lower left) These are NOT the screws holding the black speedometer background.

E. Put your hands on either side of the odometer and pull it straight out. The connections are on the left side, so you will need to pull a litle harder on that side.
F. Once the odometer is out, flip it over and remove the 4 screws on the center back section.
G. Turn the odometer back over and remove the 4 screws on the face of the gauge.
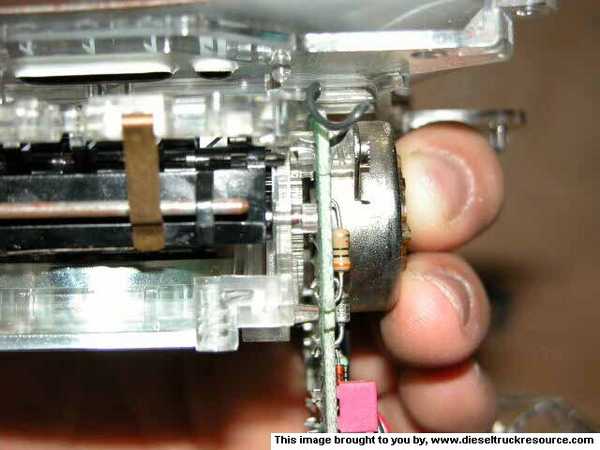
H. Angle the back peice out to expose the motor and take out the two screws. Before moving the motor (and entire circut board) look at the black wire in the bottom of this photo, there is usually a twist in it that you are going to need to undo before you can move the motor.
I. At this point flip the entire back plastic piece over to the other side of the gauge.
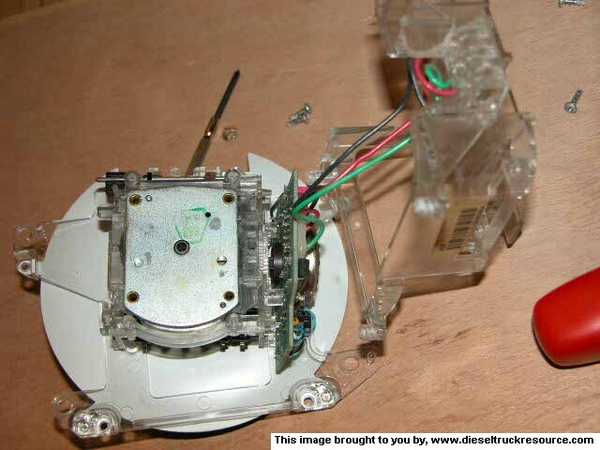
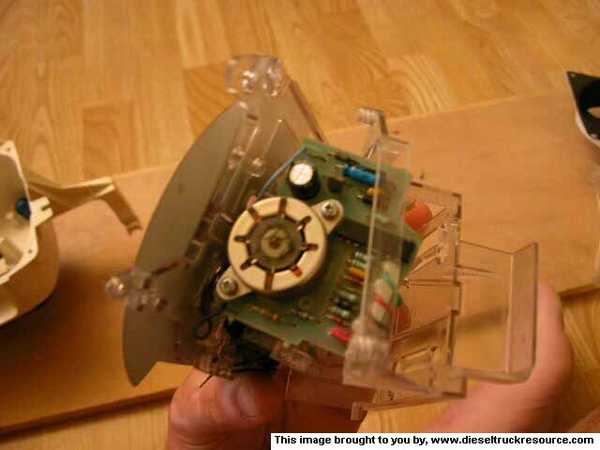
J. Pull the motor and circut board STRAIGHT out.
[photo seven]

K. Slide the small white disc off of the shaft
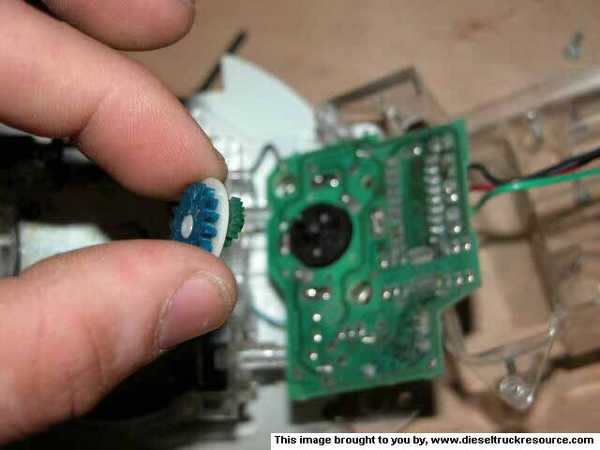
[photo ten]
L. Remove the small gear, it should simply slide off. Flip the disc over and remove the large gear. The large gear can be tougher and in most cases you just need to break off little pieces at a time. The large gear is connected in 4 places!

[photo twelve]
M. When putting the large gear back on BE CAREFUL! On my first attempt I tried to force it on, not the best idea, thankfully I had a spare guage. you may need to sand or trim the spikes on the white disc to get the gear on, just take your time. It is reccomended that you put a drop of super glue on the back of the gear. On my other truck the gear snapped on nice and tight, so i didn't use any. That part is up to you.

N. Once you have the new gears on the white disc put it back on the shaft and make sure the small gear is lined up with the inner teeth. Then carefully slide the assembly back together and put the 2 screws in to hold it in place. To make sure it's all meshed together correctly, I like to take a small awl and spin the mech through this gap, just below the end of the brass looking rod there is a gap that goes straight in to the large gear, you'd be surpised how little it need to spin to turn the trip odometer!
3. Reinstall the odometer
A. At this point you are ready to re-assemble. I've found that the easiest way to line everything back up is to hold the gauge by the black face with that face down. With the plastic piece that is connected by 3 wires still hanging off the side, line up the center piece, then bring the other piece over and line it up. Throw 2 screws diagonal from each other in the back, then turn it over and put 2 in the front. Double check that it is lined up and then put the remaining screws in.
B. At this point you should be ready to slide it back in the cluster. Put those 3 screws in.
C. Put the 2 covers back on, and thier 8 screws.
D. Put the dash panel back on.
E. Take it for a test drive!
I hope this helps all of you that want to get that odometer working again!
Gears not stripped? Check here: https://www.dieseltruckresource.com/...d.php?t=225686
1. Purchase replacement gears. They are not cheap and I only know of one source. The web link is http://www.carradio.com/gears.html . It is not really all that easy to find the gears you want on there, I feel the 800 number is easier. 1-800-446-2880
You will need:
One 10-011 - 16 tooth gear, currently $28, this is the larger gear
One 10-016 - 20 tooth gear, currently $32, this is the smaller gear
*both may not be broken but if you are gonna take it apart i reccomend just putting both in.
2. Remove and open the odometer
A. Remove the Dash panel
B. Remove the eight screws around the gauge cluster
[photo one]
C. Remove the clear plastic and black plastic covers. Be careful, on the back of the black cover there is foam around the blinkers that can be a little messy.
D. Remove the three screws holding in the odometer (Upper left, upper right, and lower left) These are NOT the screws holding the black speedometer background.
E. Put your hands on either side of the odometer and pull it straight out. The connections are on the left side, so you will need to pull a litle harder on that side.
F. Once the odometer is out, flip it over and remove the 4 screws on the center back section.
G. Turn the odometer back over and remove the 4 screws on the face of the gauge.
H. Angle the back peice out to expose the motor and take out the two screws. Before moving the motor (and entire circut board) look at the black wire in the bottom of this photo, there is usually a twist in it that you are going to need to undo before you can move the motor.
I. At this point flip the entire back plastic piece over to the other side of the gauge.
J. Pull the motor and circut board STRAIGHT out.
[photo seven]
K. Slide the small white disc off of the shaft
[photo ten]
L. Remove the small gear, it should simply slide off. Flip the disc over and remove the large gear. The large gear can be tougher and in most cases you just need to break off little pieces at a time. The large gear is connected in 4 places!
[photo twelve]
M. When putting the large gear back on BE CAREFUL! On my first attempt I tried to force it on, not the best idea, thankfully I had a spare guage. you may need to sand or trim the spikes on the white disc to get the gear on, just take your time. It is reccomended that you put a drop of super glue on the back of the gear. On my other truck the gear snapped on nice and tight, so i didn't use any. That part is up to you.
N. Once you have the new gears on the white disc put it back on the shaft and make sure the small gear is lined up with the inner teeth. Then carefully slide the assembly back together and put the 2 screws in to hold it in place. To make sure it's all meshed together correctly, I like to take a small awl and spin the mech through this gap, just below the end of the brass looking rod there is a gap that goes straight in to the large gear, you'd be surpised how little it need to spin to turn the trip odometer!
3. Reinstall the odometer
A. At this point you are ready to re-assemble. I've found that the easiest way to line everything back up is to hold the gauge by the black face with that face down. With the plastic piece that is connected by 3 wires still hanging off the side, line up the center piece, then bring the other piece over and line it up. Throw 2 screws diagonal from each other in the back, then turn it over and put 2 in the front. Double check that it is lined up and then put the remaining screws in.
B. At this point you should be ready to slide it back in the cluster. Put those 3 screws in.
C. Put the 2 covers back on, and thier 8 screws.
D. Put the dash panel back on.
E. Take it for a test drive!
I hope this helps all of you that want to get that odometer working again!
Gears not stripped? Check here: https://www.dieseltruckresource.com/...d.php?t=225686
 12-20-2006, 02:13 PM
#5
Registered User
Thread Starter
Join Date: Jun 2005
Location: Springfield, TN
Posts: 1,737
Likes: 0
Received 0 Likes
on
0 Posts
bruiser, did you stick the little awl or something in to spin it and make sure the teeth are lined up. on an early attempt i put one back together and it didn't work, i had to spin it a little the motor was not stong enough to get it moved so it would all fall into place.
12-20-2006, 03:41 PM
#6
Registered User
Join Date: Jan 2006
Location: Raleigh, NC
Posts: 1,237
Likes: 0
Received 0 Likes
on
0 Posts
bruiser, did you stick the little awl or something in to spin it and make sure the teeth are lined up. on an early attempt i put one back together and it didn't work, i had to spin it a little the motor was not stong enough to get it moved so it would all fall into place.
but no matter what I try i can not get this to work when it is all back together.. I am thinking to get a different gauge cluster and swap them and see if the other one works.. if not then it has to be electrical..
PS: what was wrong with your big gear.. i can see the little one is broke but I do not see that the old big ones is damaged??

Trending Topics
 12-20-2006, 04:55 PM
#9
Registered User

Join Date: Apr 2004
Location: Alberta
Posts: 86
Likes: 0
Received 0 Likes
on
0 Posts
yup I used a very small screw driver to make sure all the gears lined up and that the ODometer would actually move.. and when i did this even the trip odometer worked..
but no matter what I try i can not get this to work when it is all back together.. I am thinking to get a different gauge cluster and swap them and see if the other one works.. if not then it has to be electrical..
PS: what was wrong with your big gear.. i can see the little one is broke but I do not see that the old big ones is damaged??
BTW, greta write up and pics. I might pull mine apart again to check the gears now that I know what I am looking at.
12-20-2006, 05:05 PM
#10
Registered User
Thread Starter
Join Date: Jun 2005
Location: Springfield, TN
Posts: 1,737
Likes: 0
Received 0 Likes
on
0 Posts
bruiser, the top 6 teeth of the big gear are all broken together, if you look closely you will see the seem. i simply pushed it back together for the picture. it was helping to hold the white piece together. i did the write up today and used an old cluster to do it. for your situation... the connections at the back have the spike going through, make sure you are getting a full connection there, maybe it's not quite touching. does your speedometer work?
thanks for the kind words everyone, i was aiming for the sticky!
thanks for the kind words everyone, i was aiming for the sticky!
12-20-2006, 06:42 PM
#11
Registered User
Join Date: Jan 2006
Location: Raleigh, NC
Posts: 1,237
Likes: 0
Received 0 Likes
on
0 Posts
bruiser, the top 6 teeth of the big gear are all broken together, if you look closely you will see the seem. i simply pushed it back together for the picture. it was helping to hold the white piece together. i did the write up today and used an old cluster to do it. for your situation... the connections at the back have the spike going through, make sure you are getting a full connection there, maybe it's not quite touching. does your speedometer work?
I have checked all electrical connectors on tht part as far as I can follow it up into cab.. so that is why I am now thinking it is gauge cluster
12-20-2006, 07:07 PM
#12
Registered User
This would only be for the later trucks with the electronic speedometer I take it right? Mine is cable driven off the transmission so I think its a different setup
12-20-2006, 08:31 PM
#13
Registered User

Join Date: Aug 2006
Location: Lacombe,Alberta
Posts: 216
Likes: 0
Received 0 Likes
on
0 Posts
Mine doesn't start to move until I'm in third gear...@ highway speed's it's fine,in traffic no idea what speed I'm at.Does this sound like the broken gear that Micaiahfied had?
12-20-2006, 08:57 PM
#14
Registered User
Thread Starter
Join Date: Jun 2005
Location: Springfield, TN
Posts: 1,737
Likes: 0
Received 0 Likes
on
0 Posts
lowwag64, i would take a look at where it goes into the tranny, sometimes you the nut works itself loose, you may be able to just tighten it up but sometimes a piece in there gets stripped, bruiser isn't that what happened on the tranny end of yours?
underpsi, i have not looked inside of one of the cable driven units but i would assume it is different. my 91 non ic has the new style so i am not sure where the cut off is... aren't the cable driven only 5 digit as well?
underpsi, i have not looked inside of one of the cable driven units but i would assume it is different. my 91 non ic has the new style so i am not sure where the cut off is... aren't the cable driven only 5 digit as well?
12-21-2006, 10:17 AM
#15
Registered User

Join Date: May 2006
Posts: 697
Likes: 0
Received 0 Likes
on
0 Posts
Thanks, Micaiah, I really needed that tech assist! I'll either be fixing my own or else including a copy of your excellent writeup for the new owner if I sell it first! If I get my price I'll even throw in the gears 