For those of you wanting to know where to hook up your gauge lights...
 06-03-2007, 04:07 AM
#1
Registered User
Thread Starter
Join Date: Mar 2005
Location: Nevada
Posts: 2,615
Likes: 0
Received 0 Likes
on
0 Posts
For those of you wanting to know where to hook up your gauge lights... (With PICS)
If you don't want to "ghetto rig" your gauge lights by sticking the pos wire into a fuse, you can try this method. This will allow your gauge lights to turn on with your parking lights.
Take the headlight switch out:
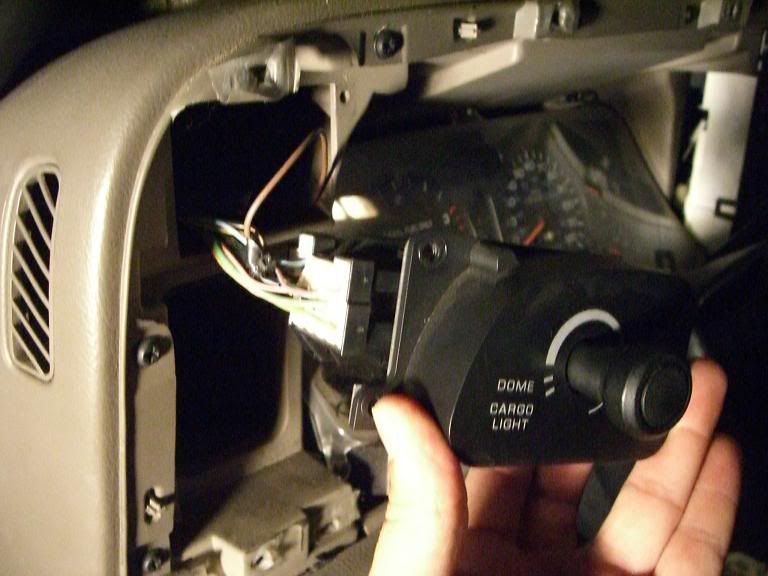
Looking directly at the switch as if it were still in the dash, rotate it 90 degrees clockwise. Now look at where all the wires are attached. You want to splice the black w/ yellow stripe wire:

I soldered some 18 gauge wire to it, wrapped it up in black tape, and put a zip tie on to hold the tape from coming off over time:
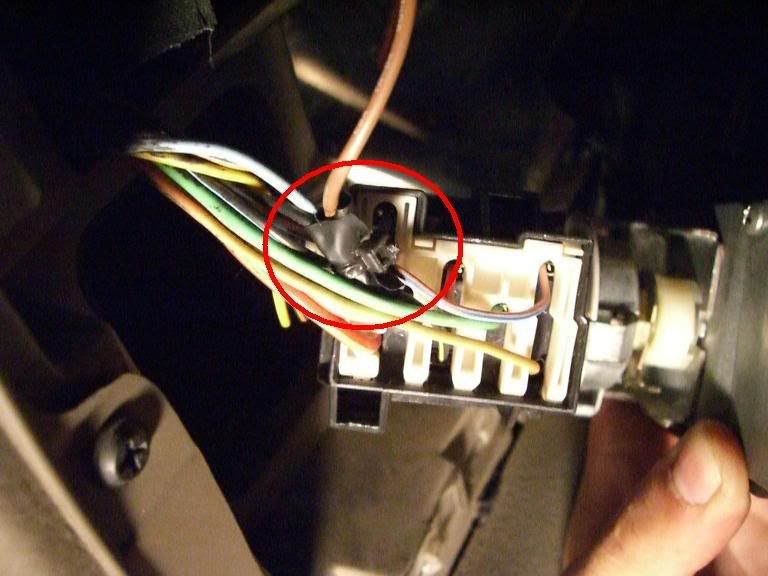
Finished product:
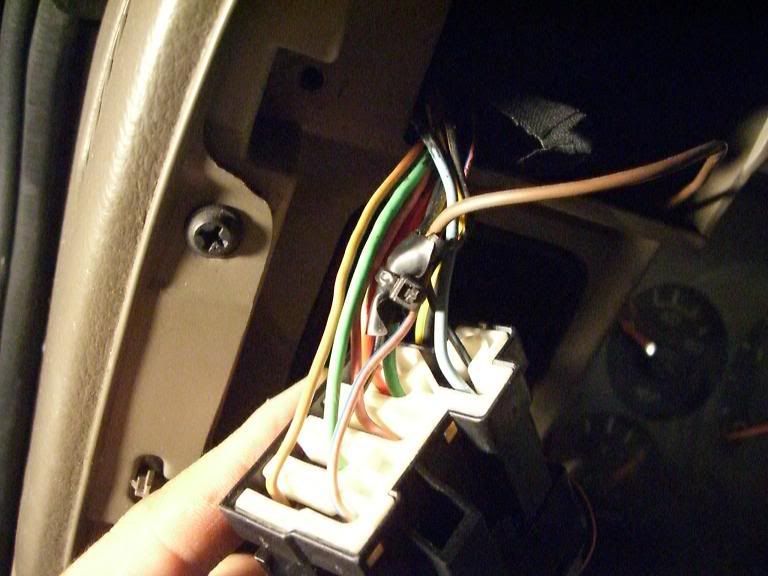
What I'm going to do now is run the other end of the wire I soldered to a relay, which would be connected directly to the pos. battery terminal. Then I could run up to 30 amps off that sucker to power whatever I need when I turn the parking lights on.
You don't have to attach it to a relay like I did. Just wire your gauge lights in parallel to that wire (and ground the other gauge light wire of course).
It does get a little tight trying to solder wires in there. A helper might make things go a little faster. I just shoved some needle nose pliers underneath the wire to keep all the other wires from getting in the way. Soldering is probably not even necessary, but I like things permanent. Finally, I highly recommend you DO NOT completely cut the black/yellow-stripe wire. Just take some of the insulation off with a razor. If you do cut it, have fun trying to bring them back together.
Take the headlight switch out:
Looking directly at the switch as if it were still in the dash, rotate it 90 degrees clockwise. Now look at where all the wires are attached. You want to splice the black w/ yellow stripe wire:
I soldered some 18 gauge wire to it, wrapped it up in black tape, and put a zip tie on to hold the tape from coming off over time:
Finished product:
What I'm going to do now is run the other end of the wire I soldered to a relay, which would be connected directly to the pos. battery terminal. Then I could run up to 30 amps off that sucker to power whatever I need when I turn the parking lights on.
You don't have to attach it to a relay like I did. Just wire your gauge lights in parallel to that wire (and ground the other gauge light wire of course).
It does get a little tight trying to solder wires in there. A helper might make things go a little faster. I just shoved some needle nose pliers underneath the wire to keep all the other wires from getting in the way. Soldering is probably not even necessary, but I like things permanent. Finally, I highly recommend you DO NOT completely cut the black/yellow-stripe wire.
Just take some of the insulation off with a razor. If you do cut it, have fun trying to bring them back together.
 06-03-2007, 08:50 AM
#2
Registered User

Join Date: Jul 2004
Location: va beach, va
Posts: 388
Likes: 0
Received 0 Likes
on
0 Posts
If you just want to run the guage lights, you can buy a $5.00 add-a-circuit, which incorperates a second fuse and just plug it into the fuse box. Your guage lights will also work off the dimmer and light switch. Plus you do not have to take the light switch out of the dash.
 06-03-2007, 01:49 PM
#4
Registered User
Join Date: Jan 2007
Location: Mt.Shasta, Ca
Posts: 17
Likes: 0
Received 0 Likes
on
0 Posts
hey nice write up but one thing to watch out for is that there is a chance that you will melt the switch housing and some of the yellow/black wire. im guessing it is from the extra current being drawn, but it has happened to a few of us here. there was a thread on it a few weeks ago reguarding "headlights flickering"
my suggestion would be to add a switch-like fuse in there so te fuse would break instead of the headlight switch melting.... just my .02 cents
beachboi
my suggestion would be to add a switch-like fuse in there so te fuse would break instead of the headlight switch melting.... just my .02 cents
beachboi
06-03-2007, 02:24 PM
#5
Registered User
Thread Starter
Join Date: Mar 2005
Location: Nevada
Posts: 2,615
Likes: 0
Received 0 Likes
on
0 Posts
hey nice write up but one thing to watch out for is that there is a chance that you will melt the switch housing and some of the yellow/black wire. im guessing it is from the extra current being drawn, but it has happened to a few of us here. there was a thread on it a few weeks ago reguarding "headlights flickering"
my suggestion would be to add a switch-like fuse in there so te fuse would break instead of the headlight switch melting.... just my .02 cents
beachboi
my suggestion would be to add a switch-like fuse in there so te fuse would break instead of the headlight switch melting.... just my .02 cents
beachboi
06-16-2007, 02:09 PM
#6
Registered User
Thread Starter
Join Date: Mar 2005
Location: Nevada
Posts: 2,615
Likes: 0
Received 0 Likes
on
0 Posts
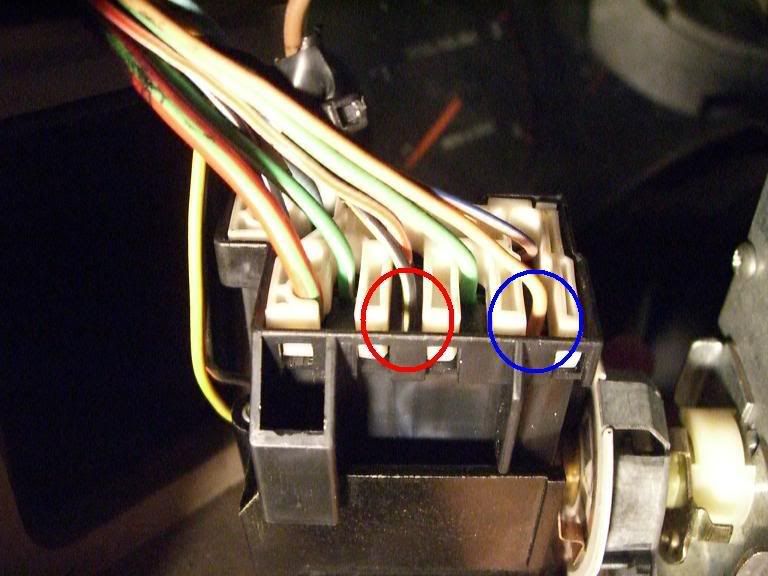
Update: Ok, so I took a look at the back of the switch again and this is what I found. If you want your gauge lights to dim with the rotation of the headlight switch, then tap into the wire circled in BLUE, not red. Red if you're going to run it to a relay, and blue if you're going to run it straight to your gauges so they dim.
Trending Topics
07-10-2007, 08:53 AM
#8
Registered User

Join Date: Jun 2006
Location: south of Kansas City 40 miles
Posts: 428
Likes: 0
Received 0 Likes
on
0 Posts
I needed to power the light to my fuel pressure guage. I got it from a (orange, I think) wire located just behind the ashtray. The guage light come on with the other interior lights, dims and they do and it easy to get to.

 07-11-2007, 10:03 PM
#11
Registered User
Join Date: Nov 2006
Location: Alameda, CA
Posts: 148
Likes: 0
Received 0 Likes
on
0 Posts
I hooked my 4 gauges, fuel pressure, boost, tranny temp, egt to the bulb that illuminates the ash tray. dims with switch and comes on with parking lights. easy access too.
07-23-2007, 09:00 AM
#13
Registered User
Join Date: Nov 2006
Location: lewis center, oh
Posts: 167
Likes: 0
Received 0 Likes
on
0 Posts
well, i hooked my gauge lights to the wire for the cab clearance lights. i mounted the gauges in the A pillar, and the power for the clearance lights is right there, so i figured this would be the easiest for me. they aren't on the dimmer, though, but i have yet to find myself wishing they were.
07-23-2007, 12:15 PM
#14
Registered User
Join Date: Aug 2005
Posts: 385
Likes: 0
Received 0 Likes
on
0 Posts
your doing it the hard way,
As stated, there is a fuse for the " Dimmed" voltage for the dash lights. A
piggy back fuse installed in this position will provide a seperate fused
variable voltage circuit, without taking out any dash components.
Fuse number 5 on the inside fuse block,, 2002 dodge book
As stated, there is a fuse for the " Dimmed" voltage for the dash lights. A
piggy back fuse installed in this position will provide a seperate fused
variable voltage circuit, without taking out any dash components.
Fuse number 5 on the inside fuse block,, 2002 dodge book
02-21-2008, 08:01 AM
#15
Registered User
Join Date: Dec 2006
Location: Greenville, IN
Posts: 839
Likes: 0
Received 0 Likes
on
0 Posts
Man i was searching and searching and found this thread again. THANKS DTR..
I got my gauges wired in last night and i am having problems with the lights not coming on. I need to trouble shoot it today and pickup one of the fuse add a circuit. And try that.
I got my gauges wired in last night and i am having problems with the lights not coming on. I need to trouble shoot it today and pickup one of the fuse add a circuit. And try that.