Big Fuel Line Upgrade
 05-15-2007, 09:04 PM
#1
1st Generation Admin
Thread Starter
Friends, this is another attempt to repay the knowledge afforded me by you good folks. 
As many here, I've been bitten by the power/speed bug and am in the midst of working on the fuel supply system with upgrades here and there. I've tweaked the injection pump to the max, switched to the tall fuel filter, and installed the piston lift-pump. As such, I'm still running the Dodge OEM fuel plumbing the most of which appears in the neighborhood of only 1/4" OD to 5/16" OD be it plastic from the fuel tank or steel from the lift-pump to the injection pump.
With all our concerns of adequate fuel pressure to the injection pump, the basic plumbing itself should not be over looked.
I recently attempted the install of what to me appeared to be the standard/basic over-sized main fuel line replacement.
I confess I've not done exhaustive research on what's available in terms of fuel tanks and conduction (pipes) but that most often referred to amounts to a basic over-sized fuel pick-up assembly along with the expected over-sized piping.

And the above works but just as I was fixing to rip my mess apart to install the above, I thought: "What if I've a 1/4 tank and park nose down while idling for more than a moment or two?" It's gonna suck air leaving me or worse, the wife stuck.
Gotta fix that.
So after cyphering the FSM along with some tinkering, I've come up with a solution that seems to work perfectly. Not only are we gonna install a big fuel line, we're also gonna modify the OEM fuel pick-up assembly to work with the big pipe.
But before we tear into things, let's take a moment to better understand how the OEM fuel pick-up works. It's pretty neat actually.
>> UNDERSTAND << The following thoughts, descriptions, and instruction is based solely on my experience(s) with my heap exclusively using the means and materials available at the moment. My heap amounts to the typical 1993 Dodge W250 ClubCab. Another trucks mileage may vary.
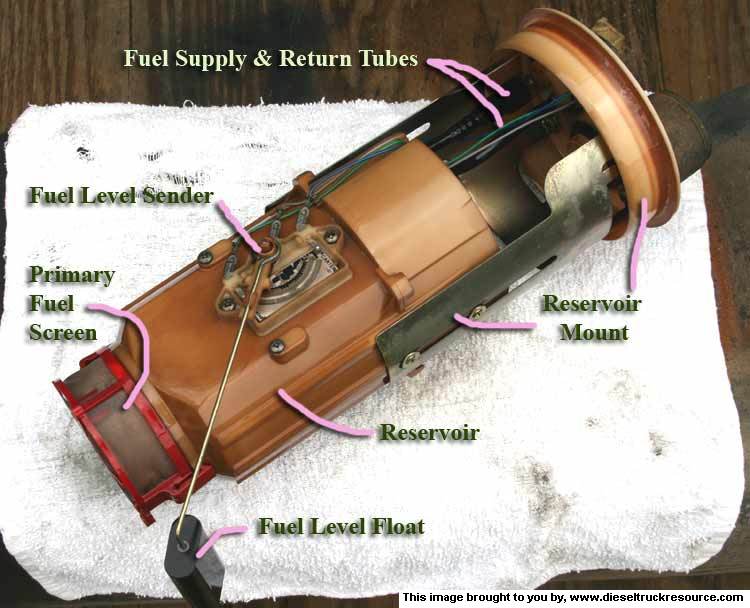
OK, the Dodge/OEM fuel pick-up assembly includes the fuel level sender.
OK so what does it do?
Not only do we want to pick-up fuel. We would really like a continuous supply at that. We could provide the tank a sump for the pick-up but it would be at the expense of ground clearance in my mind. If I were an automobile manufacturer, I'd want the most adaptable parts so as to keep inventory at a minimum.
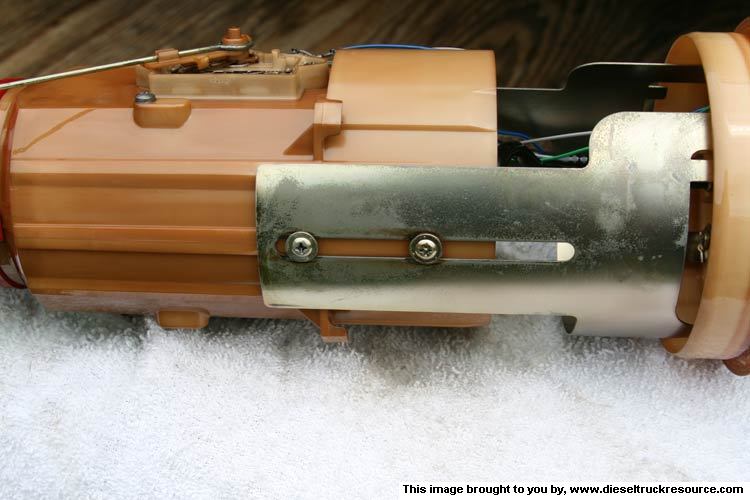
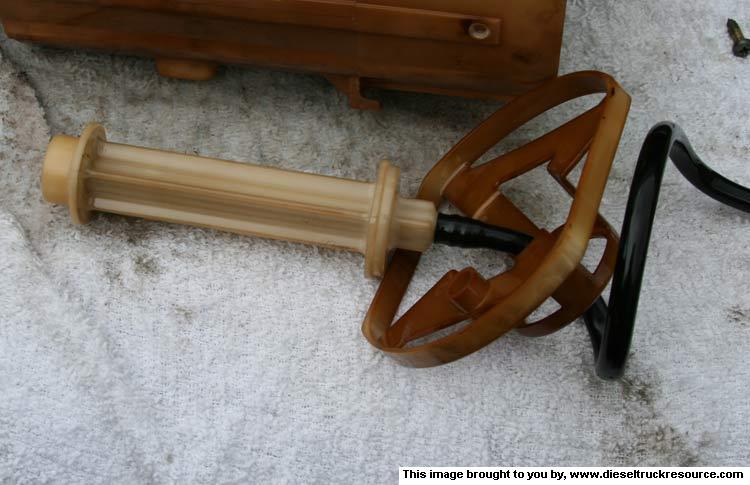
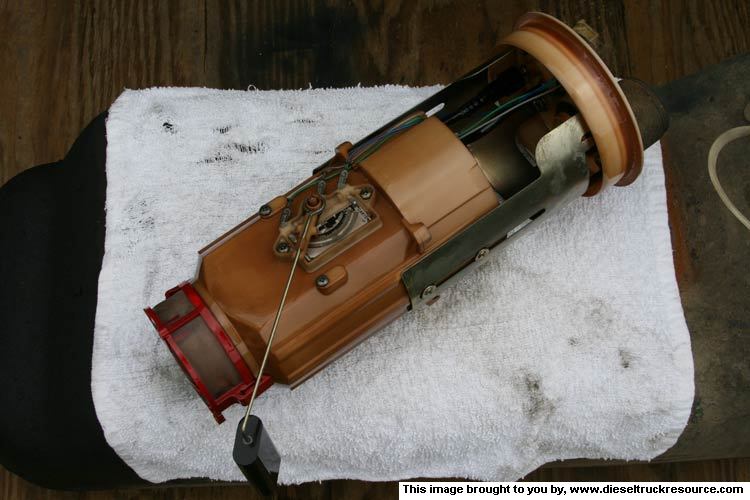
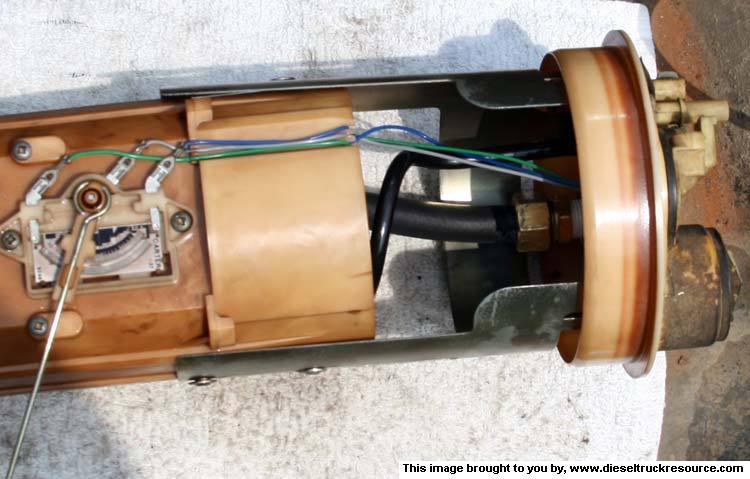
Designed as such, the OEM assembly does the job elegantly. Its design allows the actual point of fuel pick-up to be in a large range of depth pending the tank in use, its sagging with the weight of the fuel as the truck moves about, etc. The OEM pick-up assembly appears capable of stretching or compressing to the tune of about 2 1/2". It's accomplished by built in sliding mounts between the top and bottom half of the assembly. ~
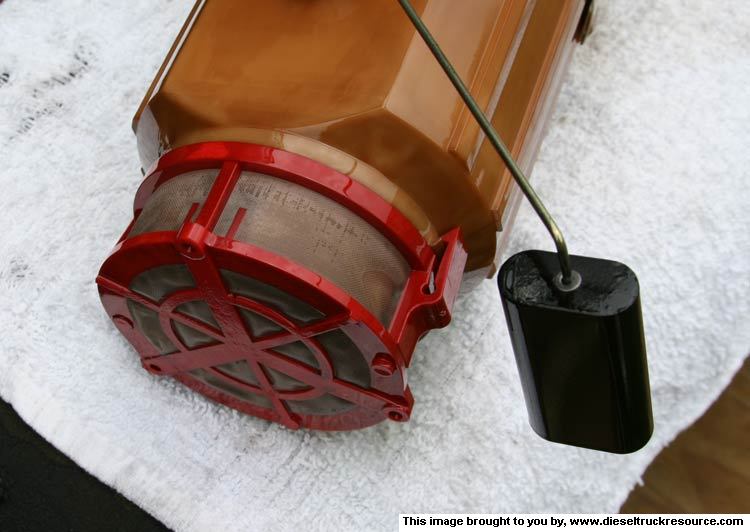
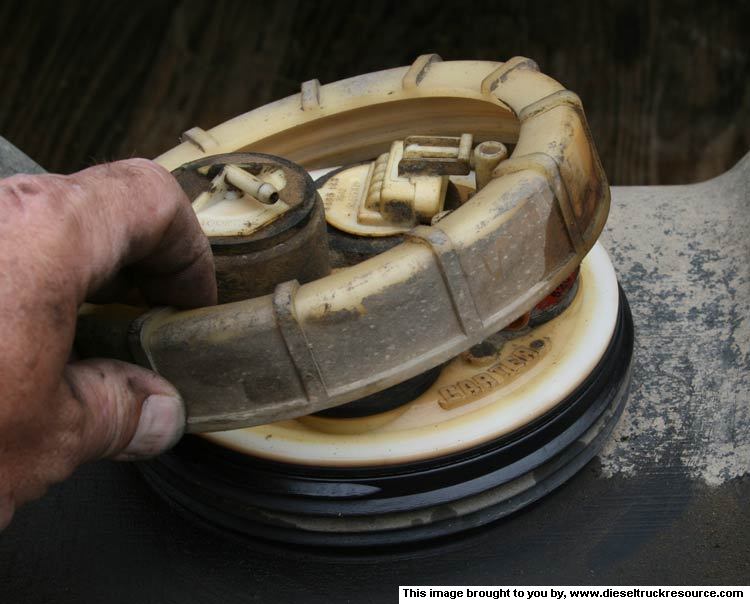
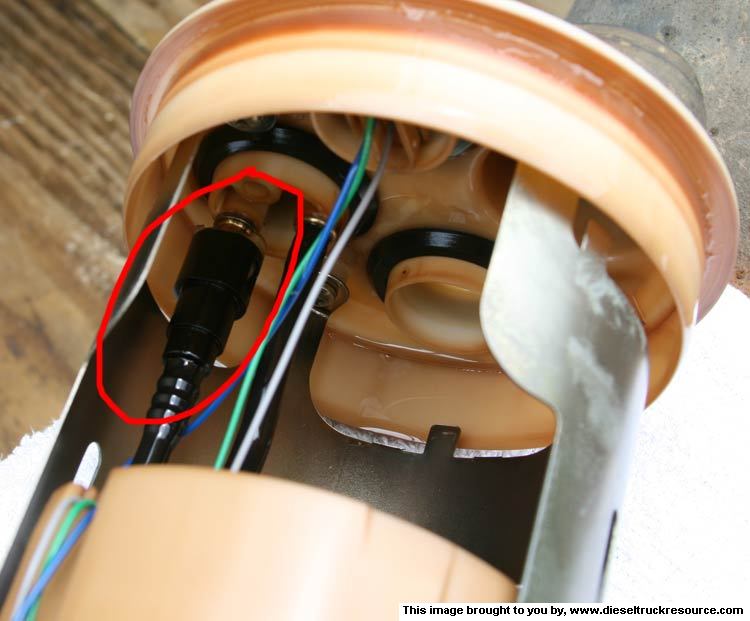
The fuel is normally collected at the very bottom of the assembly through the primary fuel screen. ~
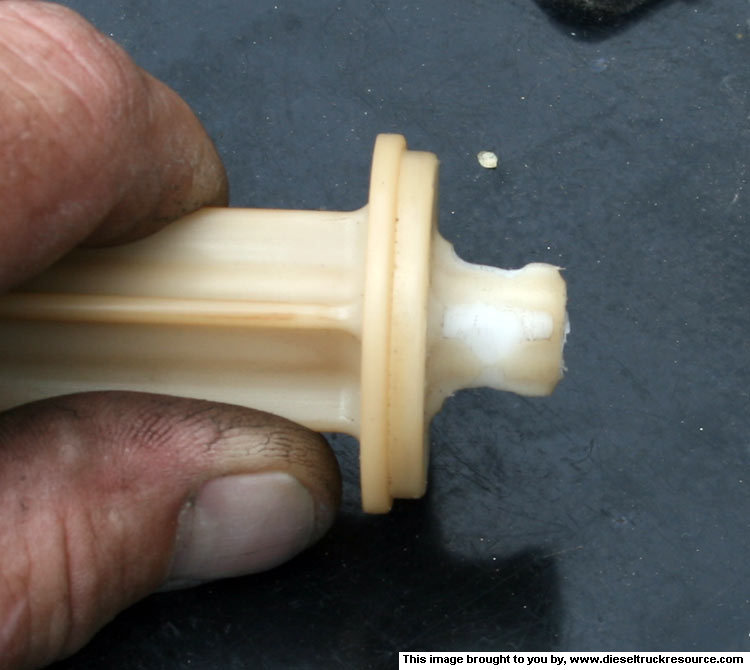
The fuel is then drawn through the center of the bottom of the lower half of the pick-up assembly. This lower half is called the reservoir. ~
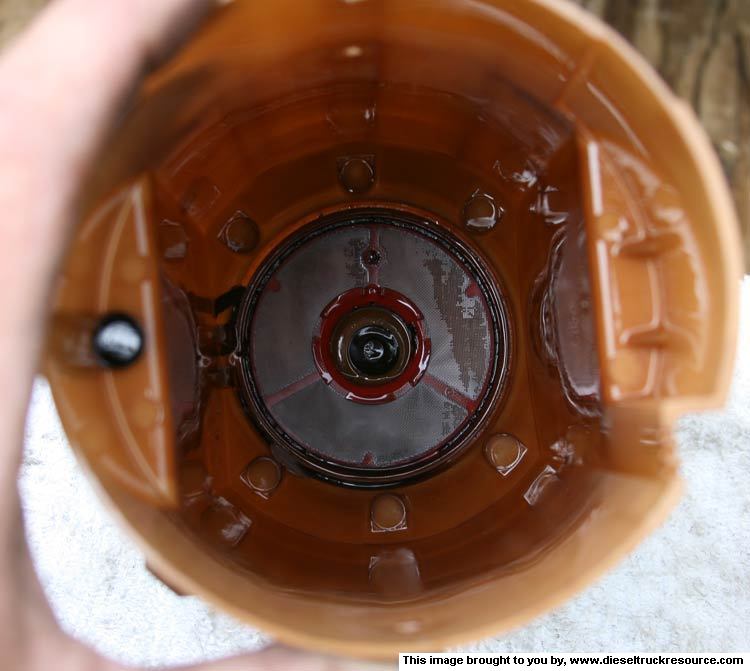
The fuel is drawn through the above (center red ring) by what I'm gonna call the pick-up pipe (this is actually where an electric fuel-pump would go in a different application). It is in turn connected to the top half of the pick-up assembly by a spring-shaped plastic tube. The spring shape accommodates the stretching and compressing of the complete assembly. It's held in the reservoir by the basket looking thing. ~
As many here, I've been bitten by the power/speed bug and am in the midst of working on the fuel supply system with upgrades here and there. I've tweaked the injection pump to the max, switched to the tall fuel filter, and installed the piston lift-pump. As such, I'm still running the Dodge OEM fuel plumbing the most of which appears in the neighborhood of only 1/4" OD to 5/16" OD be it plastic from the fuel tank or steel from the lift-pump to the injection pump.
With all our concerns of adequate fuel pressure to the injection pump, the basic plumbing itself should not be over looked.
I recently attempted the install of what to me appeared to be the standard/basic over-sized main fuel line replacement.
I confess I've not done exhaustive research on what's available in terms of fuel tanks and conduction (pipes) but that most often referred to amounts to a basic over-sized fuel pick-up assembly along with the expected over-sized piping.
And the above works but just as I was fixing to rip my mess apart to install the above, I thought: "What if I've a 1/4 tank and park nose down while idling for more than a moment or two?" It's gonna suck air leaving me or worse, the wife stuck.
Gotta fix that.
So after cyphering the FSM along with some tinkering, I've come up with a solution that seems to work perfectly. Not only are we gonna install a big fuel line, we're also gonna modify the OEM fuel pick-up assembly to work with the big pipe.
But before we tear into things, let's take a moment to better understand how the OEM fuel pick-up works. It's pretty neat actually.
>> UNDERSTAND << The following thoughts, descriptions, and instruction is based solely on my experience(s) with my heap exclusively using the means and materials available at the moment. My heap amounts to the typical 1993 Dodge W250 ClubCab. Another trucks mileage may vary.
OK, the Dodge/OEM fuel pick-up assembly includes the fuel level sender.
OK so what does it do?
Not only do we want to pick-up fuel. We would really like a continuous supply at that. We could provide the tank a sump for the pick-up but it would be at the expense of ground clearance in my mind. If I were an automobile manufacturer, I'd want the most adaptable parts so as to keep inventory at a minimum.
Designed as such, the OEM assembly does the job elegantly. Its design allows the actual point of fuel pick-up to be in a large range of depth pending the tank in use, its sagging with the weight of the fuel as the truck moves about, etc. The OEM pick-up assembly appears capable of stretching or compressing to the tune of about 2 1/2". It's accomplished by built in sliding mounts between the top and bottom half of the assembly. ~
The fuel is normally collected at the very bottom of the assembly through the primary fuel screen. ~
The fuel is then drawn through the center of the bottom of the lower half of the pick-up assembly. This lower half is called the reservoir. ~
The fuel is drawn through the above (center red ring) by what I'm gonna call the pick-up pipe (this is actually where an electric fuel-pump would go in a different application). It is in turn connected to the top half of the pick-up assembly by a spring-shaped plastic tube. The spring shape accommodates the stretching and compressing of the complete assembly. It's held in the reservoir by the basket looking thing. ~
 05-15-2007, 09:05 PM
#2
1st Generation Admin
Thread Starter
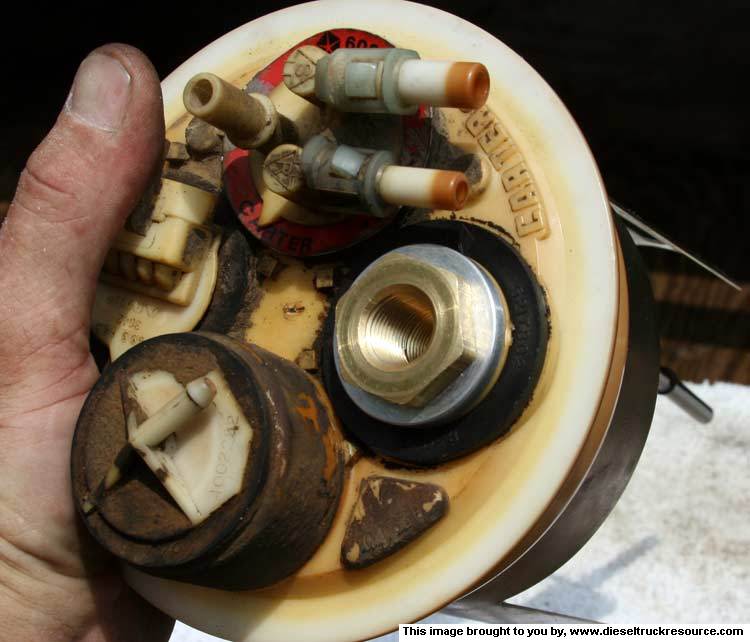
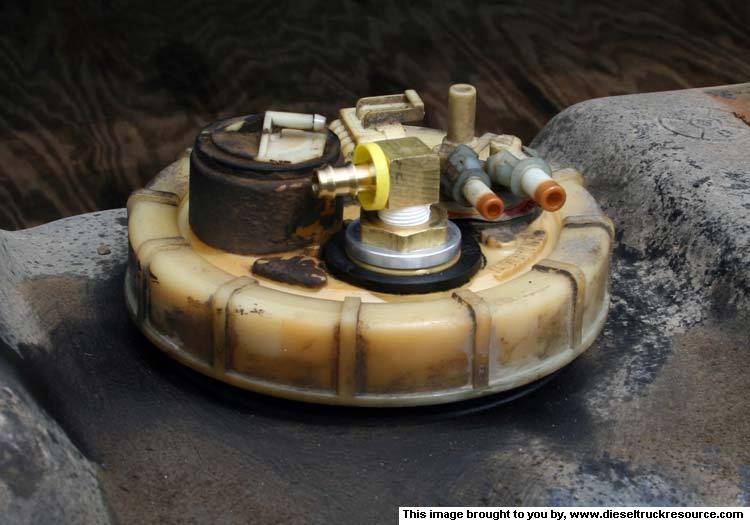
The fuel then flows to the top of the assembly to the connector for the main line to the engine.
There you'll also find the Vehicle Roll-Over Protection Valve, the Fuel Sender Electrical Connector, and the Fuel Return Line Connector. ~
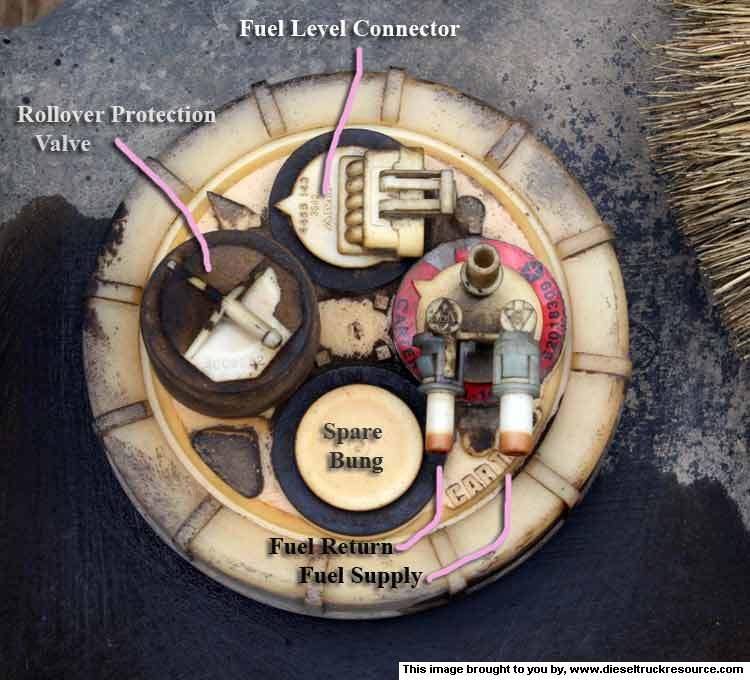
Well that's all nice for picking up fuel in a full tank but what about a partial tank? How can we be more assured of a constant supply?
It starts with the fuel return line. It dumps into the fuel reservoir. That returning fuel is strained before use by the screen in the bottom of the reservoir as seen above (around the center red ring).
So what keeps the returned fuel from running out the bottom of the reservoir?
A Float Valve located just inside the primary fuel screen.
The way I figure it works is:
- When the primary screen is immersed in fuel be it a static fuel level, or a passing wave of fuel, the float lifts the valve allowing fuel from the bottom of the tank to be drawn into the fuel pick-up pipe for delivery to the engine.
- Should the the fuel level be so low as to expose the primary screen to air, the float drops, switching the valve so as to draw fuel from the reservoir that's being filled with return fuel. ~
Any reservoir overflow is conducted back to the tank through the tube on the side of the reservoir as seen above.
Pretty slick huh?
It'd be neat if we could make that work with a big line. It'd be neat if that big line went all the way to the injection pump. Well, I did using the following:
As always ~ SAFETY FIRST!
- No Smoking!
- Try to do this work out of doors for fear of fumes in the house.
- Chock the wheels as needed.
- Disconnect the Negative battery cable from the battery.
- Have a known good fire extinguisher within sight.
- Have a clean, uncluttered work area.
- Have good lighting.
- Have containers rated and properly labeled for the diesel fuel you may remove from the truck.
- With any work I do, I usually power wash everything the night before. If you don't have the means at home, the local car-wash works well. If you don't walk away soaking wet with gritty/grime on your face, you need to strike it again.
OK,
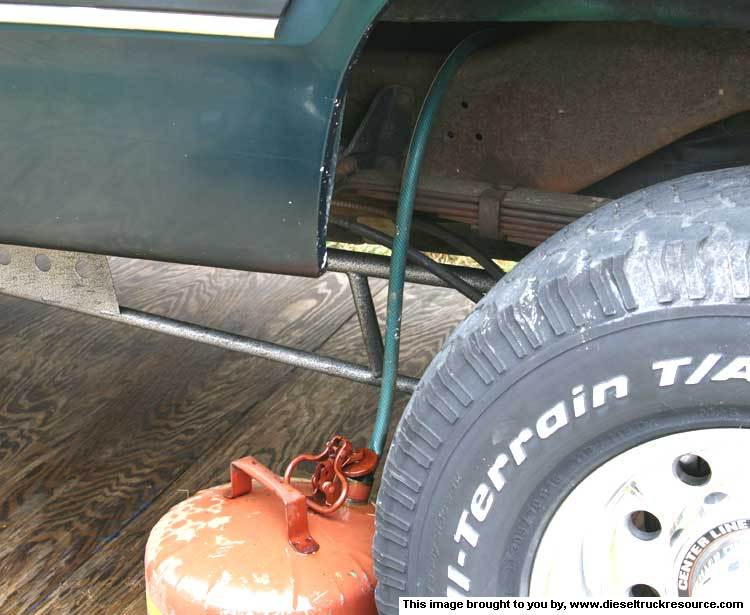
- Reach forward of the rear drivers wheel well and remove the tank fill pipe. I loosened the one screw clamp, removed the pipe from the hose, and then pulled it out of the tank. Be sure to wipe away any grit before doing this. ~

- Having removed the fill pipe, insert the appropriate length of hose to siphon any fuel remaining in the tank. ~
- Be sure to collect the fuel in a container designed and properly labeled. Be careful siphoning and promptly clean up any fuel spills. Plug the hole left in the tank with a clean paper towel.
- Disconnect the fill vent tube from the hose going to the top of the tank. ~
- I used an aluminum floor jack with a 12" piece of 4x4 to support the center of the empty fuel tank. Press up with the jack initially to aid in removing the bolts securing the tank support straps. Having removed the bolts, lower the tank three or four inches so you can reach through and disconnect the fuel supply and return tubes, as well as the fuel level sender connector. (Yes, I have to fix my parking brake cable clamp). ~

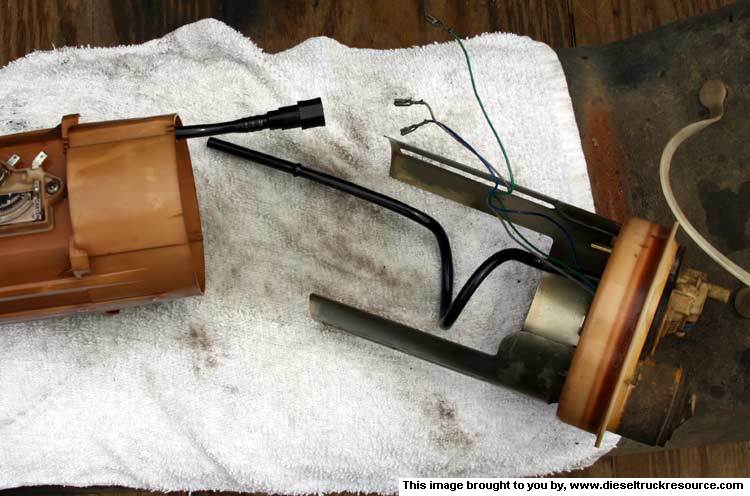
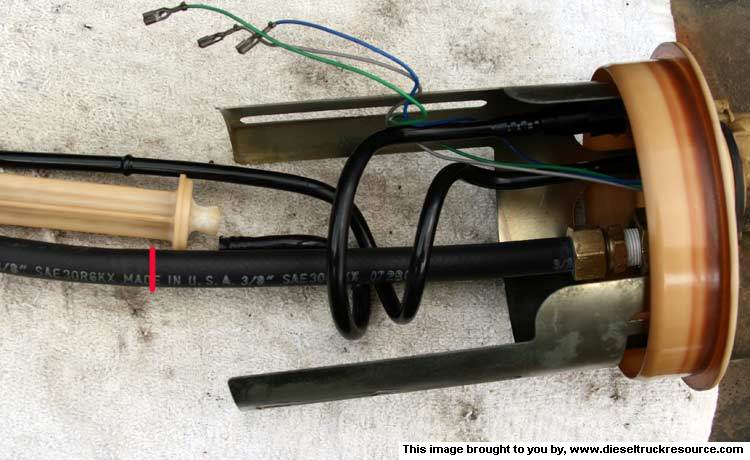
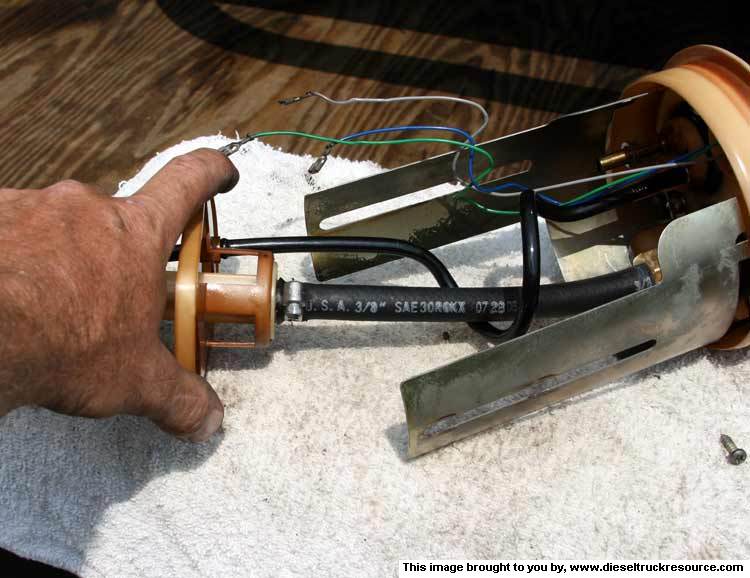
- Now safely lower the fuel tank to the ground, pull it out from under the truck, step back and here's what we have. ~
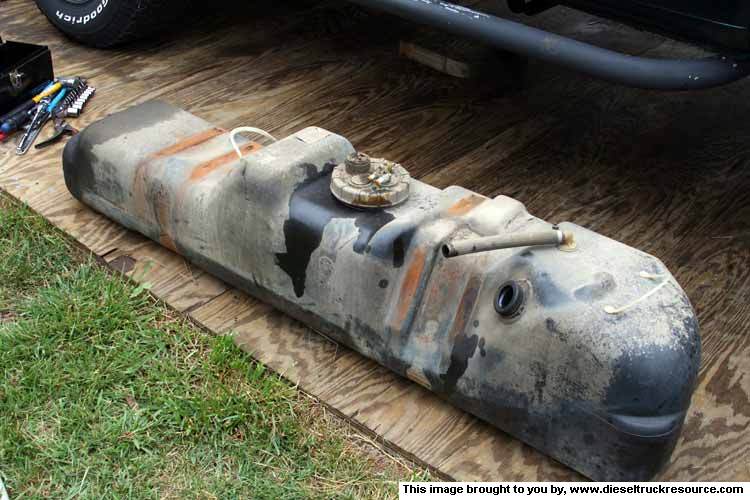
I just left it there next to the truck and placing a clean towel on the far end, used that as a work bench.
There you'll also find the Vehicle Roll-Over Protection Valve, the Fuel Sender Electrical Connector, and the Fuel Return Line Connector. ~
Well that's all nice for picking up fuel in a full tank but what about a partial tank? How can we be more assured of a constant supply?
It starts with the fuel return line. It dumps into the fuel reservoir. That returning fuel is strained before use by the screen in the bottom of the reservoir as seen above (around the center red ring).
So what keeps the returned fuel from running out the bottom of the reservoir?
A Float Valve located just inside the primary fuel screen.
The way I figure it works is:
- When the primary screen is immersed in fuel be it a static fuel level, or a passing wave of fuel, the float lifts the valve allowing fuel from the bottom of the tank to be drawn into the fuel pick-up pipe for delivery to the engine.
- Should the the fuel level be so low as to expose the primary screen to air, the float drops, switching the valve so as to draw fuel from the reservoir that's being filled with return fuel. ~
Any reservoir overflow is conducted back to the tank through the tube on the side of the reservoir as seen above.
Pretty slick huh?
It'd be neat if we could make that work with a big line. It'd be neat if that big line went all the way to the injection pump. Well, I did using the following:
As always ~ SAFETY FIRST!
- No Smoking!
- Try to do this work out of doors for fear of fumes in the house.
- Chock the wheels as needed.
- Disconnect the Negative battery cable from the battery.
- Have a known good fire extinguisher within sight.
- Have a clean, uncluttered work area.
- Have good lighting.
- Have containers rated and properly labeled for the diesel fuel you may remove from the truck.
- With any work I do, I usually power wash everything the night before. If you don't have the means at home, the local car-wash works well. If you don't walk away soaking wet with gritty/grime on your face, you need to strike it again.
OK,
- Reach forward of the rear drivers wheel well and remove the tank fill pipe. I loosened the one screw clamp, removed the pipe from the hose, and then pulled it out of the tank. Be sure to wipe away any grit before doing this. ~
- Having removed the fill pipe, insert the appropriate length of hose to siphon any fuel remaining in the tank. ~
- Be sure to collect the fuel in a container designed and properly labeled. Be careful siphoning and promptly clean up any fuel spills. Plug the hole left in the tank with a clean paper towel.
- Disconnect the fill vent tube from the hose going to the top of the tank. ~
- I used an aluminum floor jack with a 12" piece of 4x4 to support the center of the empty fuel tank. Press up with the jack initially to aid in removing the bolts securing the tank support straps. Having removed the bolts, lower the tank three or four inches so you can reach through and disconnect the fuel supply and return tubes, as well as the fuel level sender connector. (Yes, I have to fix my parking brake cable clamp). ~
- Now safely lower the fuel tank to the ground, pull it out from under the truck, step back and here's what we have. ~
I just left it there next to the truck and placing a clean towel on the far end, used that as a work bench.
05-15-2007, 09:06 PM
#3
1st Generation Admin
Thread Starter
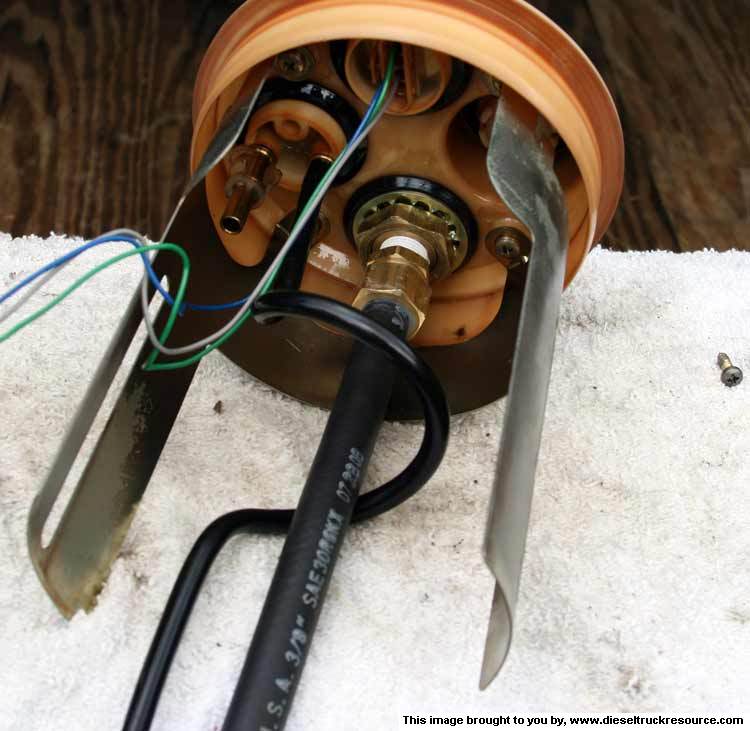
- Now to start, we need to sweep away any mud and dirt from the top of the fuel pick-up assembly.
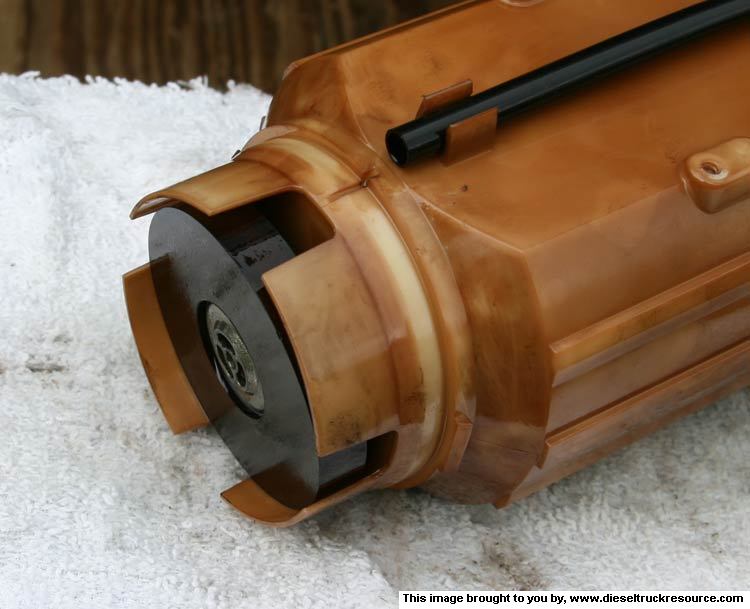
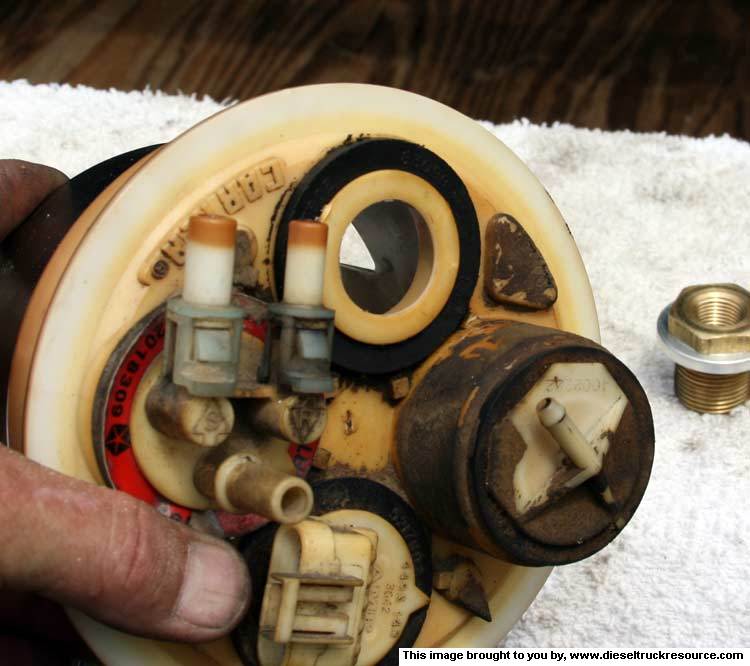
- Having done so, we can now remove the collar that secures the assembly to the tank. Mine was surprisingly loose. ~
- With that, we can now lift the assembly from the tank. Be sure to tilt the assembly toward the front of the tank as you finish removing it from the tank so as to clear the fuel level sender float. Set the assembly on the front of the tank (work bench). ~
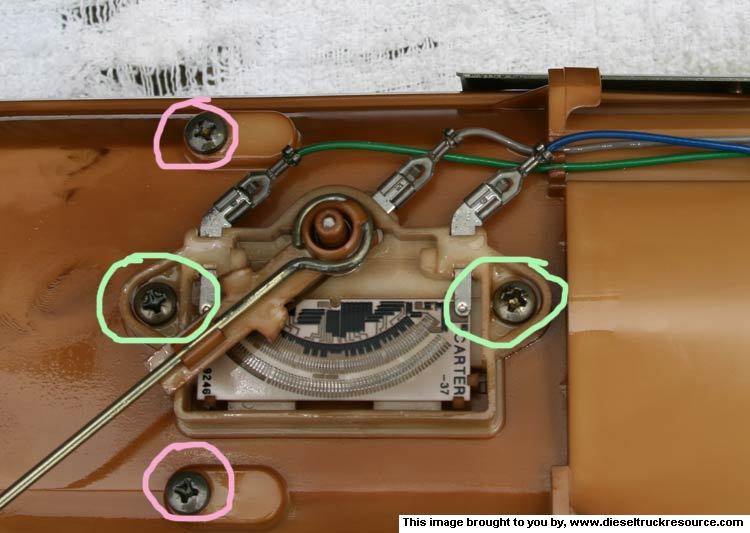
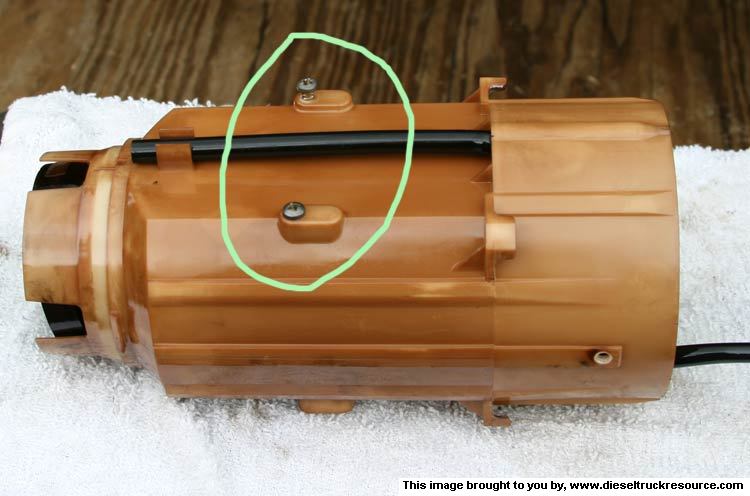
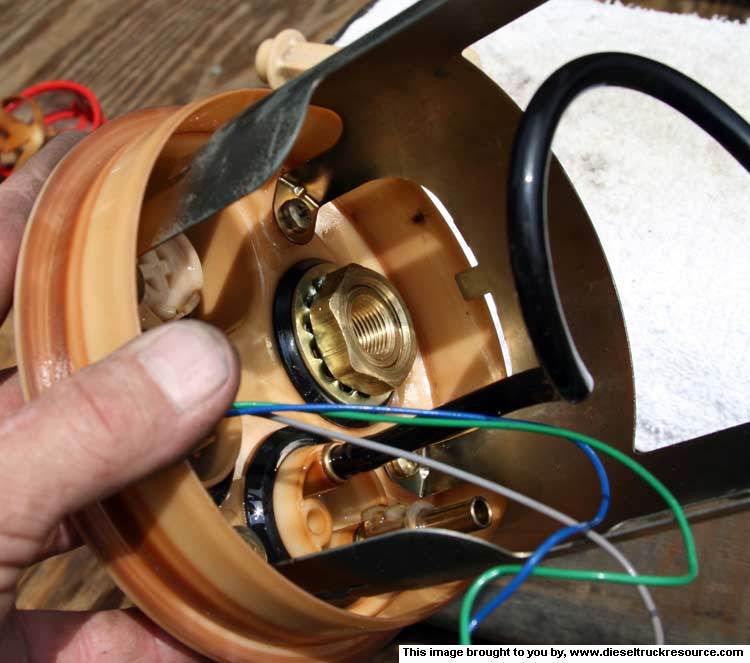
- Now before we brake the blame thing, let's remove the Fuel level Sender and its Float assembly. Do so by first removing the three wires using needle nose pliers. Grab the connectors by its shank and not by the wire. Mine were on there pretty good so be careful.
-Now remove the two screws circled in green and place the sender assembly elsewhere out of harms way. ~
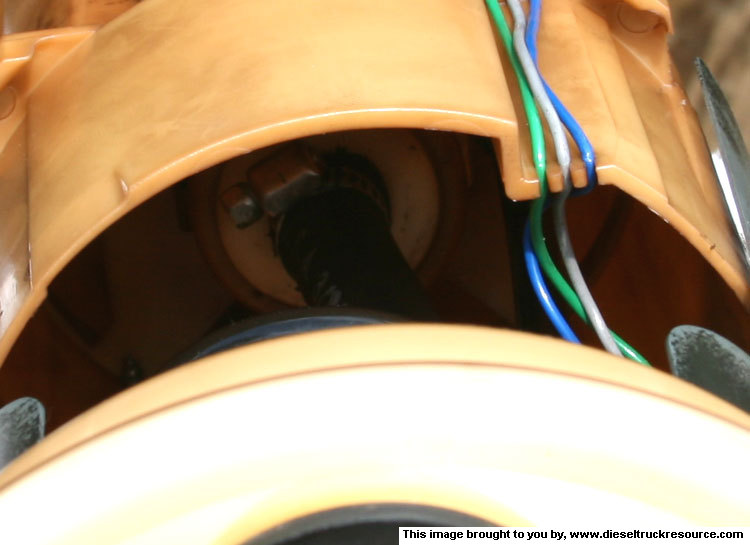
Now, looking up inside the top we can see where the fuel supply tube from the pick-up pipe connects. ~
- My fat fingers wouldn't reach in there so I had to use a couple of screw drivers to work the connector tabs to get it loose. ~
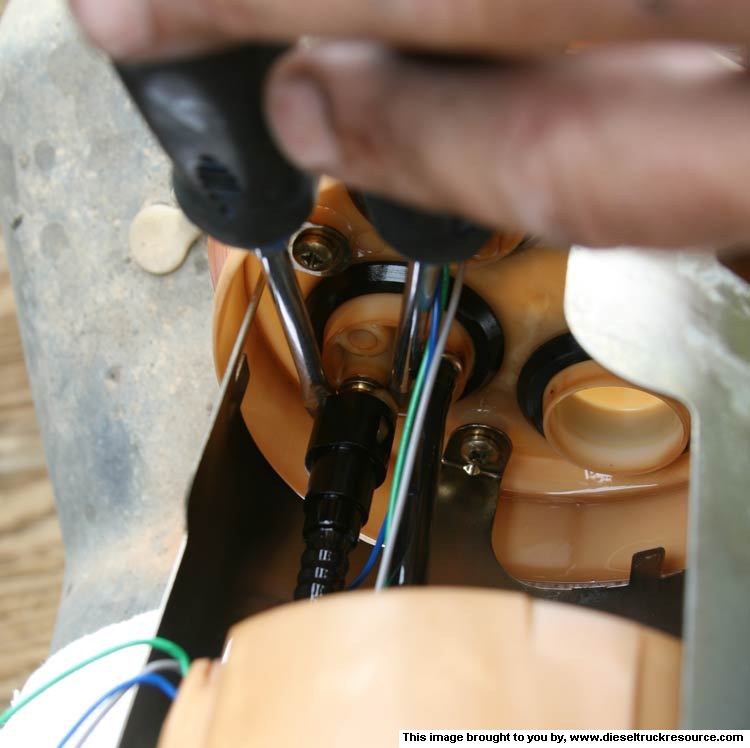
- You'll see that on the side of the reservoir, there are two brackets with slots that connect to the top of the assembly. There are two screws on one side, and a single screw on the other. Remove those. ~
- At this point, you should be able to separate the top from the reservoir. ~
- OK, now go back to where the fuel level sender was mounted to the reservoir and remove the two screws circled in pink. ~
- Roll the reservoir over to the opposite side and remove the two screws from there. ~
- Having done so, we can now remove the collar that secures the assembly to the tank. Mine was surprisingly loose. ~
- With that, we can now lift the assembly from the tank. Be sure to tilt the assembly toward the front of the tank as you finish removing it from the tank so as to clear the fuel level sender float. Set the assembly on the front of the tank (work bench). ~
- Now before we brake the blame thing, let's remove the Fuel level Sender and its Float assembly. Do so by first removing the three wires using needle nose pliers. Grab the connectors by its shank and not by the wire. Mine were on there pretty good so be careful.
-Now remove the two screws circled in green and place the sender assembly elsewhere out of harms way. ~
Now, looking up inside the top we can see where the fuel supply tube from the pick-up pipe connects. ~
- My fat fingers wouldn't reach in there so I had to use a couple of screw drivers to work the connector tabs to get it loose. ~
- You'll see that on the side of the reservoir, there are two brackets with slots that connect to the top of the assembly. There are two screws on one side, and a single screw on the other. Remove those. ~
- At this point, you should be able to separate the top from the reservoir. ~
- OK, now go back to where the fuel level sender was mounted to the reservoir and remove the two screws circled in pink. ~
- Roll the reservoir over to the opposite side and remove the two screws from there. ~
05-15-2007, 09:07 PM
#4
1st Generation Admin
Thread Starter
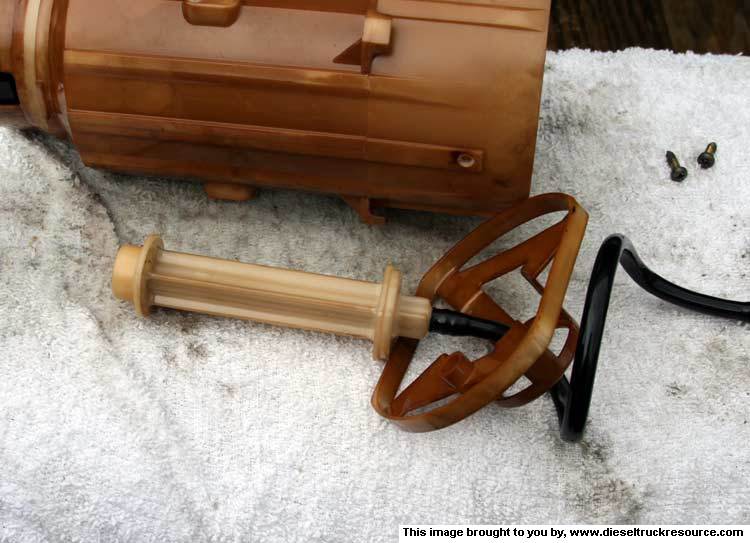
- Now we can withdraw the fuel pick-up pipe and its holder. ~
Now let's see about adapting the big line to it.
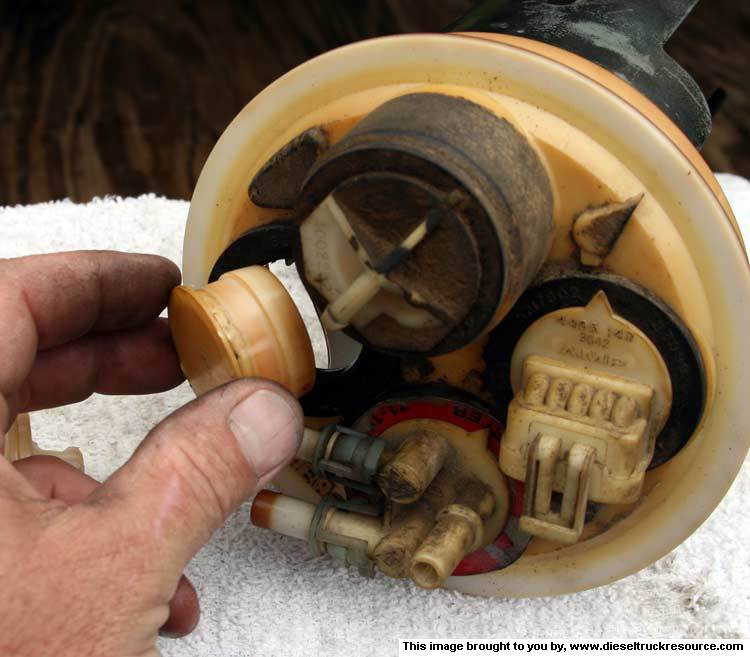
If you go back and look at the top of the fuel pick-up assembly, you'll notice what I call the spare bung. It's nothing more than a plastic plug sticking into a rubber grommeted hole in the top assembly. We can mount the new big line pick-up bulkhead fitting there. ~
We can run the tube from there down to the pick-up pipe.
But wait! What about the springy-shaped OEM fuel pick-up tube? How ca we accomplish that function as the big line pick-up uses fairly ridged tubing? ~
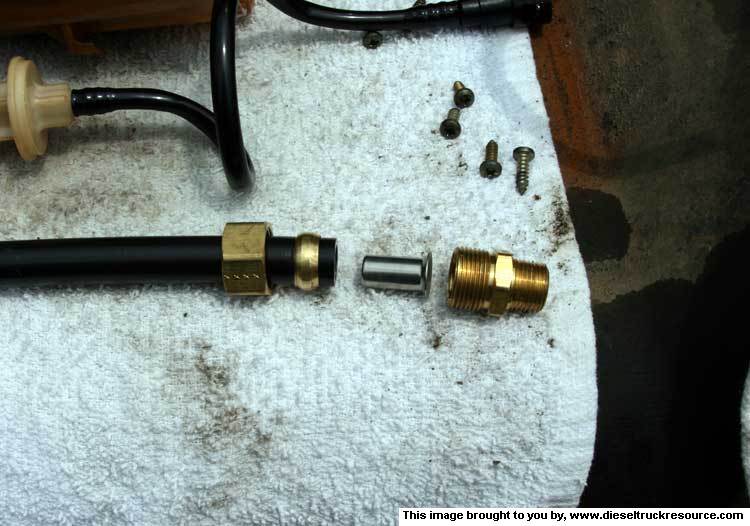
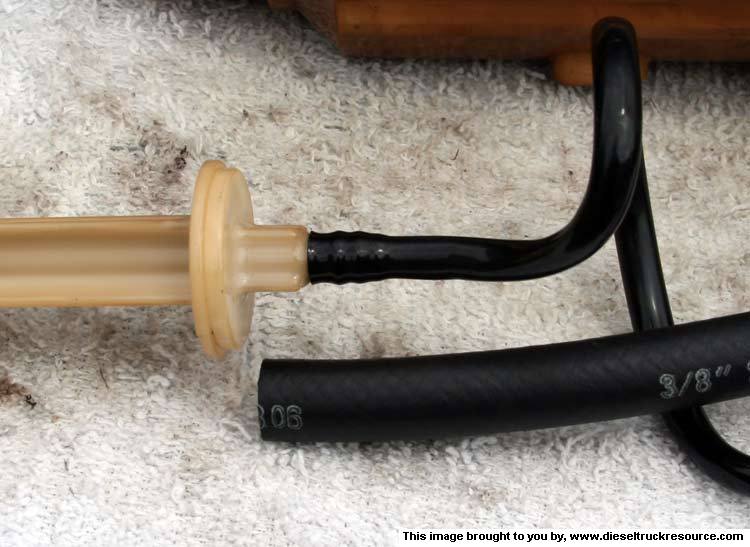
- To get around that, I swapped the ridged tubing with some standard fiber reinforced 3/8" ID rubber fuel hose. Fits like it should using the same inner sleeve, ferrule, and compression nut. ~
Granted, the total assembly is capable of two or so inches of expansion and contraction, but based on the wear marks in my mess, I only need about 1/2" or so of play. The rubber hose will work fine.
Let's install the new bulkhead fitting.
- Start by removing the spare bung plug. ~
- We need to modify it to the extent that it has a hole in its center large enough to accommodate the bulkhead fittings diameter, and it has to be shortened enough to allow the lock nut to be installed on the bulkhead fitting when it's installed in the top assembly. ~
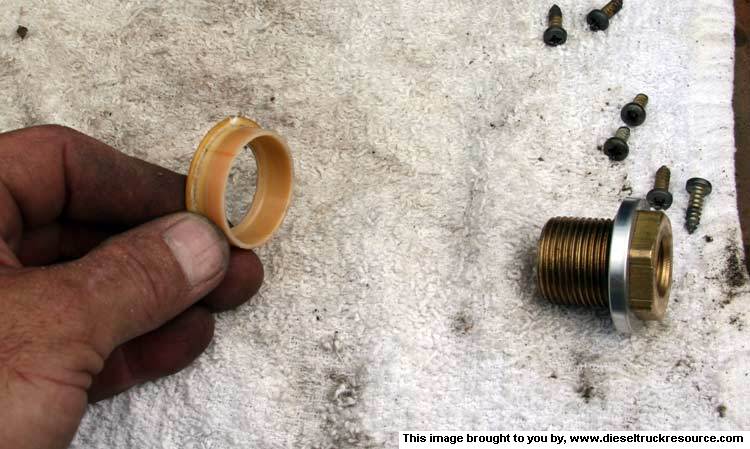
- You'll need to remove enough of the length of the plug so it can fit the bulkhead fitting and have the nut go on as it should. ~
- Once you get it whittled right, you'll be able to put the bung plug back into the top assembly. ~
Now let's see about adapting the big line to it.
If you go back and look at the top of the fuel pick-up assembly, you'll notice what I call the spare bung. It's nothing more than a plastic plug sticking into a rubber grommeted hole in the top assembly. We can mount the new big line pick-up bulkhead fitting there. ~
We can run the tube from there down to the pick-up pipe.
But wait! What about the springy-shaped OEM fuel pick-up tube? How ca we accomplish that function as the big line pick-up uses fairly ridged tubing? ~
- To get around that, I swapped the ridged tubing with some standard fiber reinforced 3/8" ID rubber fuel hose. Fits like it should using the same inner sleeve, ferrule, and compression nut. ~
Granted, the total assembly is capable of two or so inches of expansion and contraction, but based on the wear marks in my mess, I only need about 1/2" or so of play. The rubber hose will work fine.
Let's install the new bulkhead fitting.
- Start by removing the spare bung plug. ~
- We need to modify it to the extent that it has a hole in its center large enough to accommodate the bulkhead fittings diameter, and it has to be shortened enough to allow the lock nut to be installed on the bulkhead fitting when it's installed in the top assembly. ~
- You'll need to remove enough of the length of the plug so it can fit the bulkhead fitting and have the nut go on as it should. ~
- Once you get it whittled right, you'll be able to put the bung plug back into the top assembly. ~
05-15-2007, 09:08 PM
#5
1st Generation Admin
Thread Starter
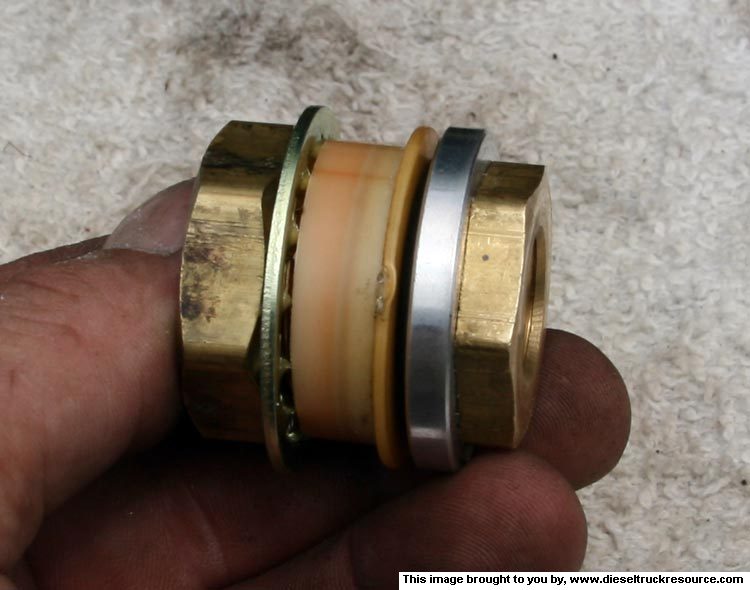
- Now slip the threaded portion of the bulkhead fitting through the top. ~

If you shortened the bung plug enough, you should have ample threads showing on the bottom side. ~
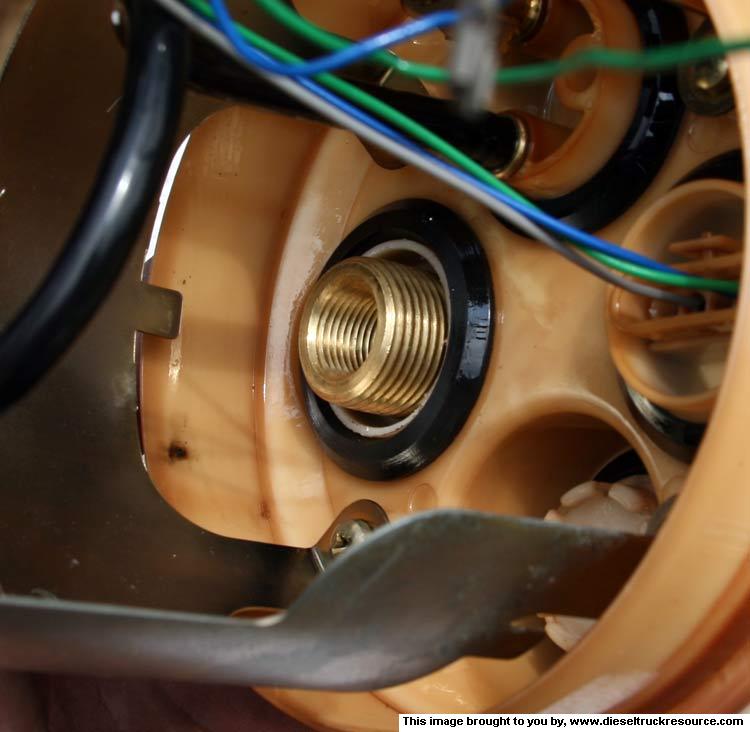
That way you can install the lock-washer and nut for an effective seal when snugged-up. ~
Speaking of seals, the bulkhead fitting itself has a rubber O-ring under its flange. Be sure to drill the hole in the bung plug small enough that the rubber grommet can seal against it. ~
- To complete the install of the new big line pick-up bulkhead fitting, I used Teflon tape to seal the threads of the new flexible pick-up tube on the bottom, and the 90* to AN6 adapter on the top. ~
- Now set the top assembly to the side for a moment.
We need to adapt the OEM fuel pick-up pipe to the new flexible 3/8" hose. ~
- I started by cutting off the OEM tube right where it wraps the hose-barb. Ooh! That's a little hole in there! ~
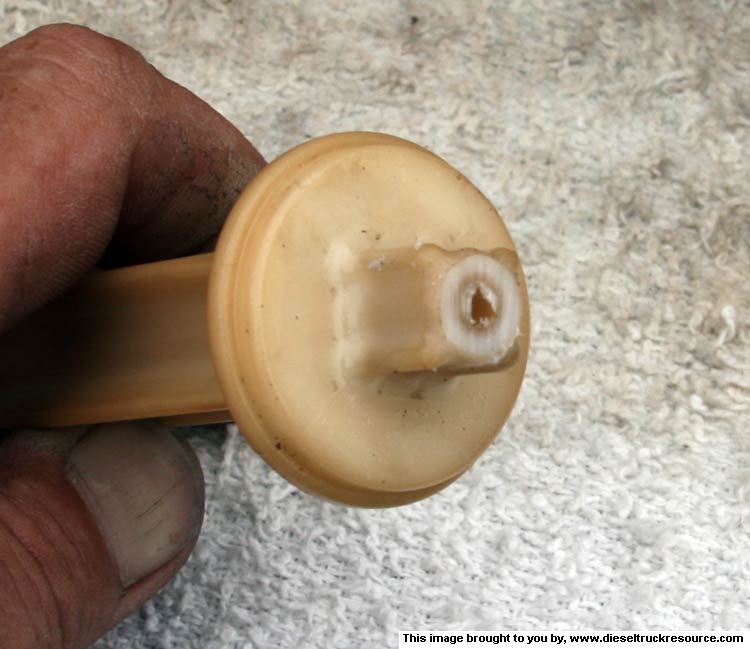
- To make that pipes inner diameter bigger so as to more closely match the big line, using my drill index, I enlarged the passage by twisting gradually larger drill bits in there by hand. I say by hand as if you break this with an out of control power drill, you're on your own. ~
If you shortened the bung plug enough, you should have ample threads showing on the bottom side. ~
That way you can install the lock-washer and nut for an effective seal when snugged-up. ~
Speaking of seals, the bulkhead fitting itself has a rubber O-ring under its flange. Be sure to drill the hole in the bung plug small enough that the rubber grommet can seal against it. ~
- To complete the install of the new big line pick-up bulkhead fitting, I used Teflon tape to seal the threads of the new flexible pick-up tube on the bottom, and the 90* to AN6 adapter on the top. ~
- Now set the top assembly to the side for a moment.
We need to adapt the OEM fuel pick-up pipe to the new flexible 3/8" hose. ~
- I started by cutting off the OEM tube right where it wraps the hose-barb. Ooh! That's a little hole in there! ~
- To make that pipes inner diameter bigger so as to more closely match the big line, using my drill index, I enlarged the passage by twisting gradually larger drill bits in there by hand. I say by hand as if you break this with an out of control power drill, you're on your own. ~
05-15-2007, 09:09 PM
#6
1st Generation Admin
Thread Starter
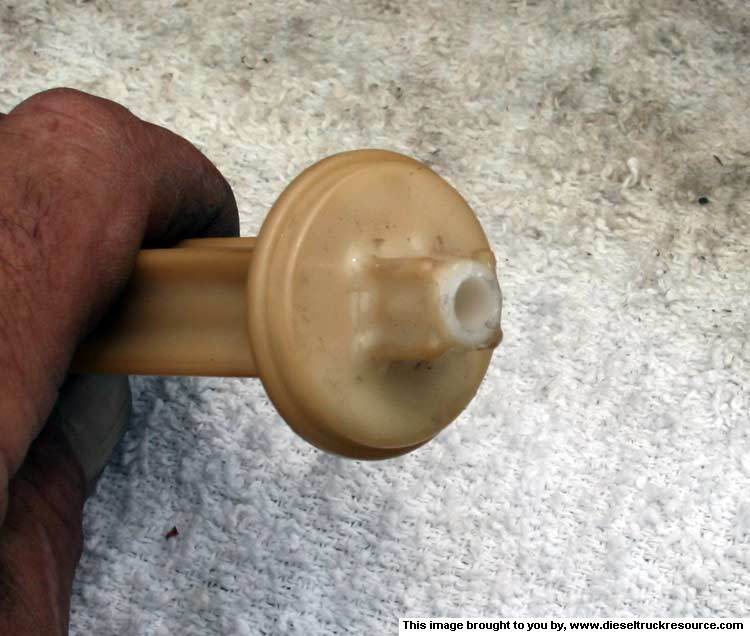
One thing you'll note is that the passage in the fuel pick-up pipe swage's out to a larger hole at the actual fuel pick-up end. Don't even try to make the passage that big as the hose end will be much too thin. Just open it up to about 1/4" (+/-). ~
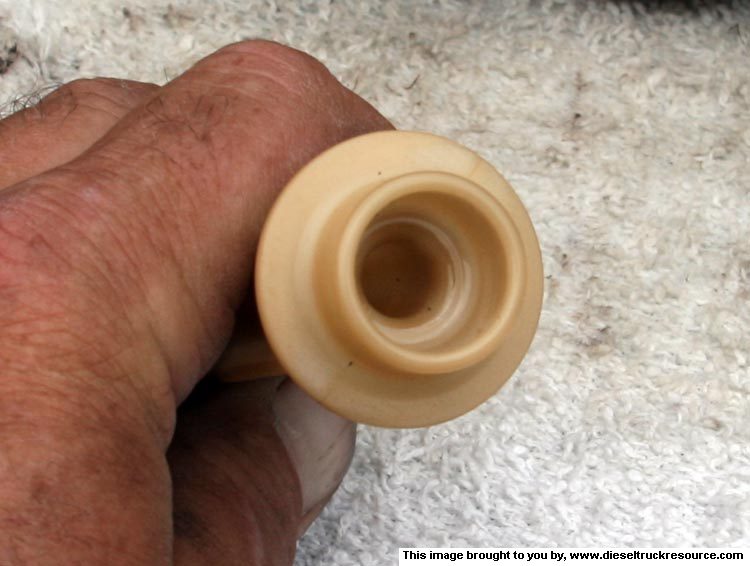
- So now we need to fix the pick-up pipe so it'll accept the flexible rubber hose securely. Adjacent to where you cut off the OEM hose barb, you'll notice the remaining stump had four ridges along the side. Using a file, I cut those so that in the end, they resemble the ridge around the end of a regular tube that would connect to hose of such. This way, when we slip on the hose with a small standard hose clamp, the remaining "barbs" will lock things in place. NOTE: Be sure to make that section where the clamp would sit fairly round and true as that will be the seal between the pick-up pipe and hose. Suck air there and you'll cuss me. ~
- Now we must cut the new flexible pick-up hose so that it mimics the OEM piece in its spring action. I simply looked at the reservoirs sliding mounts of the complete assembly to see how much movement must be accommodated. In my case it appears about 1/2". So I temporarily placed the OEM pick-up tube back in the top and positioned the pick-up pipe so it would be in its normal position. That had the new hose run right beside things so I could eye-ball where to cut. ~
- Having done so, we can now connect the new pick-up tube to the pick-up pipe. I used a standard stainless steel worm drive hose clamp. Don't forget to slip on the pick-up pipe basket mount thing first. ~
We can start to put things back together now. It's pretty much the reverse of disassembly.
- Start by placing the pick-up pipe and its basket back in the reservoir. Look at the sliding mounts to see which way it should go. Two screws on one side, one screw on the other. The return line tube goes in the hole to one side of the pick-up pipe basket.
If you cut your new flexible hose right, it should present with a small hump off to one side with the whole assembly in its maximum extended position. When you compress the whole assembly, the hose should flex off to the side as things move.
Here you can see the new tube in its installed position. You can just make out the tube kicking off to the side. ~
- Reinstall the four screws that hold the pick-up pipe basket in place. The screws DO NOT thread into the basket. They simply stick out just above the basket so as to not allow the basket to lift out.
- Reinstall the fuel level sender assembly with the two remaining screws.
- Reconnect the electrical connectors securing the wires in the little slot things. (Make sure the wires aren't wrapped around the tubes).
- Wipe the big rubber O-Ring of the fuel tank along with the opening in the tank. (The FSM recommends one replace both the O-Ring and collar each time the pick-up assembly is removed).
- With the fuel level float pointing toward the front of the tank, ease the assembly back into the tank seating it in the rubber O-Ring. Firmly secure the assembly with the collar . . . Hand Tight.
NOW! We can get to the big fuel line.
- Make sure the truck is still safe to crawl under.
- Ain't nothing to it. My heap is as such that there are mounts for all the bed wiring harness, fuel and brake lines. There are even extra mounting holes that conveniently fit the new big fuel line. I used those. ~
- Reinstall the fuel tank again using the floor jack and block of wood leaving a little space at the top so you can reconnect the fuel lines, etc.
- Reconnect the Fuel Sender Cable.
- Reconnect the Fuel Return Line.
- If you have a means of sealing the old Fuel Supply fitting, go for it. I didn't so I just reconnected the OEM line and plugged it at the lift=pump end.
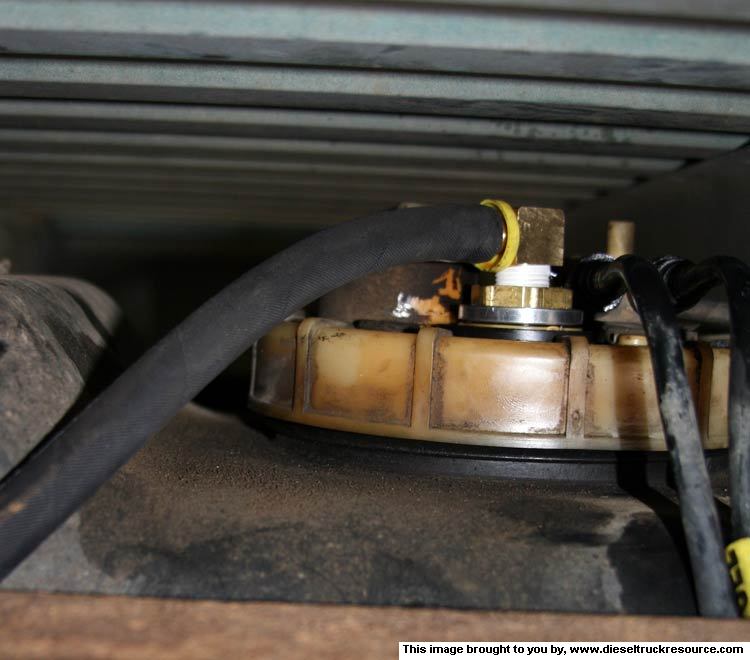
- Connect the new big fuel line to the new pick-up bulkhead fitting.
Yours should look something like this. ~
- Complete the reinstallation of the fuel tank.
- Reinstall the Tank Fill Vent tubing.
- Reinstall the Tank Fill Pipe.
- So now we need to fix the pick-up pipe so it'll accept the flexible rubber hose securely. Adjacent to where you cut off the OEM hose barb, you'll notice the remaining stump had four ridges along the side. Using a file, I cut those so that in the end, they resemble the ridge around the end of a regular tube that would connect to hose of such. This way, when we slip on the hose with a small standard hose clamp, the remaining "barbs" will lock things in place. NOTE: Be sure to make that section where the clamp would sit fairly round and true as that will be the seal between the pick-up pipe and hose. Suck air there and you'll cuss me. ~
- Now we must cut the new flexible pick-up hose so that it mimics the OEM piece in its spring action. I simply looked at the reservoirs sliding mounts of the complete assembly to see how much movement must be accommodated. In my case it appears about 1/2". So I temporarily placed the OEM pick-up tube back in the top and positioned the pick-up pipe so it would be in its normal position. That had the new hose run right beside things so I could eye-ball where to cut. ~
- Having done so, we can now connect the new pick-up tube to the pick-up pipe. I used a standard stainless steel worm drive hose clamp. Don't forget to slip on the pick-up pipe basket mount thing first. ~
We can start to put things back together now. It's pretty much the reverse of disassembly.
- Start by placing the pick-up pipe and its basket back in the reservoir. Look at the sliding mounts to see which way it should go. Two screws on one side, one screw on the other. The return line tube goes in the hole to one side of the pick-up pipe basket.
If you cut your new flexible hose right, it should present with a small hump off to one side with the whole assembly in its maximum extended position. When you compress the whole assembly, the hose should flex off to the side as things move.
Here you can see the new tube in its installed position. You can just make out the tube kicking off to the side. ~
- Reinstall the four screws that hold the pick-up pipe basket in place. The screws DO NOT thread into the basket. They simply stick out just above the basket so as to not allow the basket to lift out.
- Reinstall the fuel level sender assembly with the two remaining screws.
- Reconnect the electrical connectors securing the wires in the little slot things. (Make sure the wires aren't wrapped around the tubes).
- Wipe the big rubber O-Ring of the fuel tank along with the opening in the tank. (The FSM recommends one replace both the O-Ring and collar each time the pick-up assembly is removed).
- With the fuel level float pointing toward the front of the tank, ease the assembly back into the tank seating it in the rubber O-Ring. Firmly secure the assembly with the collar . . . Hand Tight.
NOW! We can get to the big fuel line.
- Make sure the truck is still safe to crawl under.
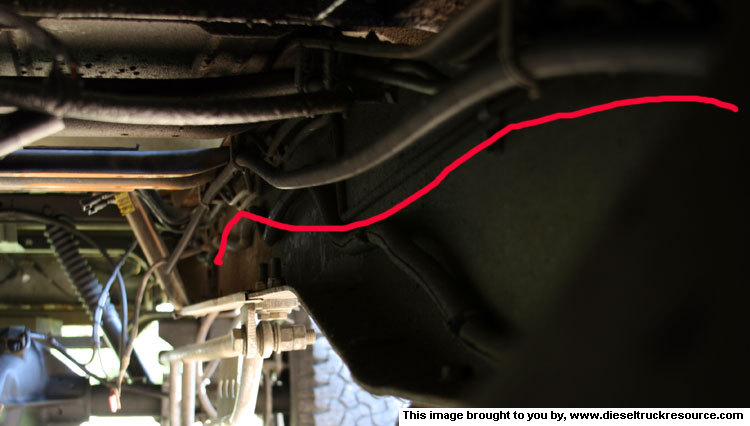
- Ain't nothing to it. My heap is as such that there are mounts for all the bed wiring harness, fuel and brake lines. There are even extra mounting holes that conveniently fit the new big fuel line. I used those. ~
- Reinstall the fuel tank again using the floor jack and block of wood leaving a little space at the top so you can reconnect the fuel lines, etc.
- Reconnect the Fuel Sender Cable.
- Reconnect the Fuel Return Line.
- If you have a means of sealing the old Fuel Supply fitting, go for it. I didn't so I just reconnected the OEM line and plugged it at the lift=pump end.
- Connect the new big fuel line to the new pick-up bulkhead fitting.
Yours should look something like this. ~
- Complete the reinstallation of the fuel tank.
- Reinstall the Tank Fill Vent tubing.
- Reinstall the Tank Fill Pipe.
05-15-2007, 09:11 PM
#7
1st Generation Admin
Thread Starter
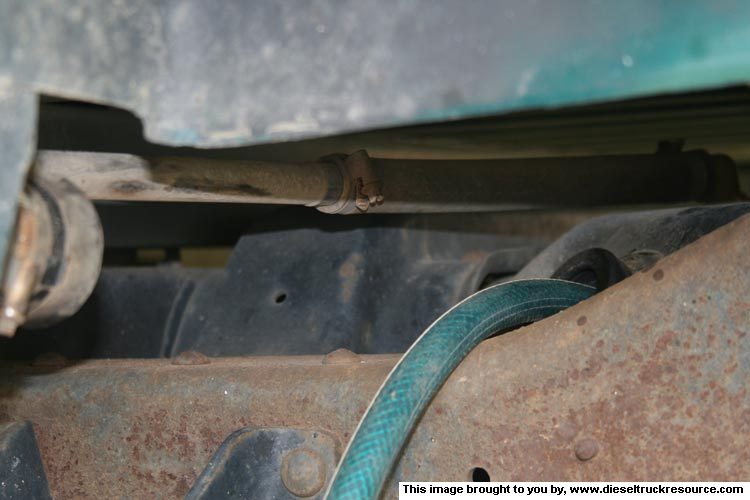
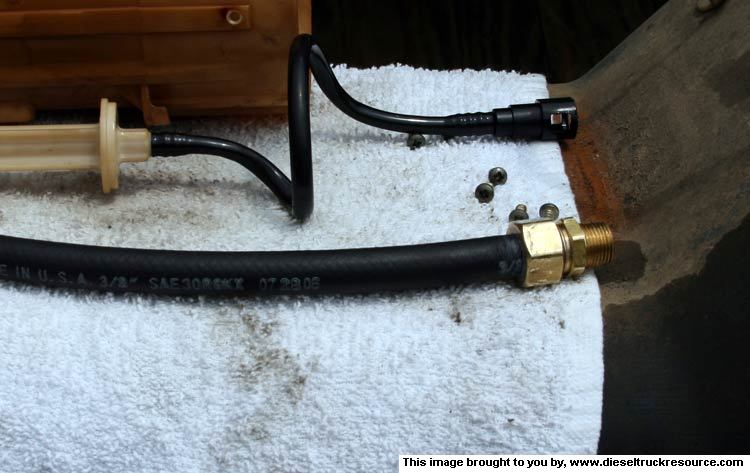
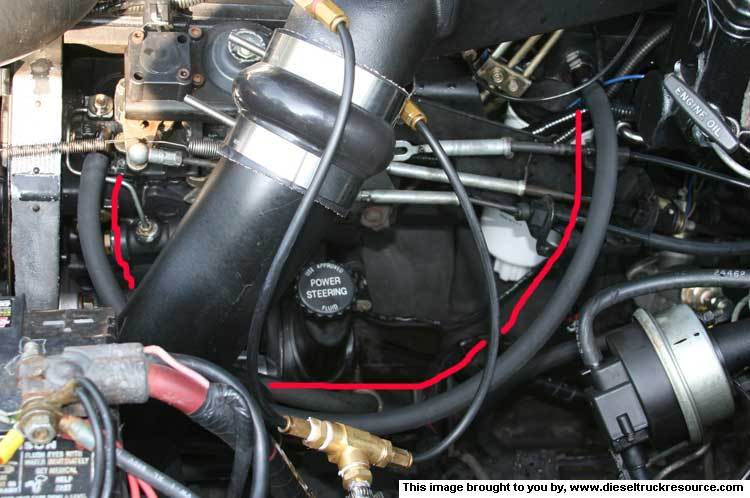
Here's where we connect the new big line to the lift-pump.
I was concerned about having the new line run from under the body directly to the pump. I though it might chafe against the transmission linkage, etc with the engine movement. So I ran the new line past the lift-pump, and then up and back to the pump. I made the connection with the typical AN6 90* ELL connector. It is connected to the pump with a AN6 to 1/4" MPT adapter. ~

(That old fuel line? I simply folded the end back on itself and cinched it with a black Tye-Rap. Just off to the right of the lift-pump, on the firewall where it runs into the trans tunnel, there's a couple of metal straps that apparently are used to hold wires and stuff. I secured the old fuel line there).
- Coming out of the lift-pump sorta stumped me as it seems to have an inverted flare fitting. I couldn't find an adapter that would convert it directly to an AN6 line. I run the piston type lift-pump. Its output tube is shaped different from the diaphragm type lift pump. Either way, if you convert the tubing to AN as I did, you'll need to cut the pipe just after it turns away from the block. Here again, I couldn't find an AN adapter that would fit the stupid pipe. I think it's metric. The AN converter I did get fits a 3/8" pipe. I ended up slipping a short piece of 3/8" OD copper tube over the end of the steel pump output tube and braised it sealed. That allowed me to use a regular 3/8" pipe to AN6 adapter. From there the big line ran to the fuel filter with an AN6 90* ELL via a AN6 x 12mm 1.5 adapter.
- Finally connect the fuel filter to the injection pump with an AN6 90* ELL and AN6 Straight connector and two more AN6 x 12mm 1.5 adapters. ~
- Put the fuel you removed back into the truck.
- If you've not changed your fuel filter lately, now's a good time. You might consider running one of the taller fuel filters that wannadiesel found. Here's a link ~ https://www.dieseltruckresource.com/...6&postcount=16
- With the installation of the big line from the filter to the IP, you've lost the neat little bleed bolt thing. I just loosen the AN fitting at the output of the filter to bleed any air. Works fine.
That's about it.
- Clean up any fuel spills.
- Double check all your work: Fuel tank secure? Big fuel line secure where it wont get a hole worried into it? Fill and Vent pipes leak free? Etc.
- Reconnect the battery.
- Drive safely.
I don't have a dyno to check for any real performance gains or otherwise. Heck, I don't even have a fuel pressure gauge!
A quick romp around Buies Creek doesn't present with much of a SOTP difference but my top EGT is up almost 100*F!
I'm burning more fuel.
I realize this is a long post but I wanted to show just how easy it is to get big line flow without losing part-tank constant fuel supply. I figure I'll appreciate it the next time I park in a hole in the woods.
The parts I used amount to:
- 1 20' piece of 3/8" ID "Socket-Less" hose (with four or five feet left over).
- 1 straight AN6 "Socket-Less" connector.
- 3 90* ELL AN6 "Socket-Less" connectors.
- 3 AN6 x 12mm 1.5 adapters.
- 1 AN6 to 1/4" MPT adapter.
- 1 AN6 to 3/8" tube adapter.
- 12" of regular 3/8" ID rubber fuel hose.
- 1 small stainless steel worm-drive hose clamp.
- 1 7/16" Flexible Pick-up Tube Assy as found at www.glacierdieselpower.com
A final note: Since we're using the OEM fuel pick-up and associated fuel screens, an add-on fuel strainer is not required.
I want to thank wannadiesel, J.R.s Dodge Diesel, and Monty for helping me manage my images in these forums.
I hope this proves helpful to those interested in doing such an upgrade.
I was concerned about having the new line run from under the body directly to the pump. I though it might chafe against the transmission linkage, etc with the engine movement. So I ran the new line past the lift-pump, and then up and back to the pump. I made the connection with the typical AN6 90* ELL connector. It is connected to the pump with a AN6 to 1/4" MPT adapter. ~
(That old fuel line? I simply folded the end back on itself and cinched it with a black Tye-Rap. Just off to the right of the lift-pump, on the firewall where it runs into the trans tunnel, there's a couple of metal straps that apparently are used to hold wires and stuff. I secured the old fuel line there).
- Coming out of the lift-pump sorta stumped me as it seems to have an inverted flare fitting. I couldn't find an adapter that would convert it directly to an AN6 line. I run the piston type lift-pump. Its output tube is shaped different from the diaphragm type lift pump. Either way, if you convert the tubing to AN as I did, you'll need to cut the pipe just after it turns away from the block. Here again, I couldn't find an AN adapter that would fit the stupid pipe. I think it's metric. The AN converter I did get fits a 3/8" pipe. I ended up slipping a short piece of 3/8" OD copper tube over the end of the steel pump output tube and braised it sealed. That allowed me to use a regular 3/8" pipe to AN6 adapter. From there the big line ran to the fuel filter with an AN6 90* ELL via a AN6 x 12mm 1.5 adapter.
- Finally connect the fuel filter to the injection pump with an AN6 90* ELL and AN6 Straight connector and two more AN6 x 12mm 1.5 adapters. ~
- Put the fuel you removed back into the truck.
- If you've not changed your fuel filter lately, now's a good time. You might consider running one of the taller fuel filters that wannadiesel found. Here's a link ~ https://www.dieseltruckresource.com/...6&postcount=16
- With the installation of the big line from the filter to the IP, you've lost the neat little bleed bolt thing. I just loosen the AN fitting at the output of the filter to bleed any air. Works fine.
That's about it.
- Clean up any fuel spills.
- Double check all your work: Fuel tank secure? Big fuel line secure where it wont get a hole worried into it? Fill and Vent pipes leak free? Etc.
- Reconnect the battery.
- Drive safely.
I don't have a dyno to check for any real performance gains or otherwise. Heck, I don't even have a fuel pressure gauge!
A quick romp around Buies Creek doesn't present with much of a SOTP difference but my top EGT is up almost 100*F!
I'm burning more fuel.
I realize this is a long post but I wanted to show just how easy it is to get big line flow without losing part-tank constant fuel supply. I figure I'll appreciate it the next time I park in a hole in the woods.
The parts I used amount to:
- 1 20' piece of 3/8" ID "Socket-Less" hose (with four or five feet left over).
- 1 straight AN6 "Socket-Less" connector.
- 3 90* ELL AN6 "Socket-Less" connectors.
- 3 AN6 x 12mm 1.5 adapters.
- 1 AN6 to 1/4" MPT adapter.
- 1 AN6 to 3/8" tube adapter.
- 12" of regular 3/8" ID rubber fuel hose.
- 1 small stainless steel worm-drive hose clamp.
- 1 7/16" Flexible Pick-up Tube Assy as found at www.glacierdieselpower.com
A final note: Since we're using the OEM fuel pick-up and associated fuel screens, an add-on fuel strainer is not required.
I want to thank wannadiesel, J.R.s Dodge Diesel, and Monty for helping me manage my images in these forums.
I hope this proves helpful to those interested in doing such an upgrade.
The following users liked this post:
deales (11-24-2020)
Trending Topics
 05-16-2007, 07:28 AM
#11
Registered User
Join Date: Sep 2004
Location: INWOOD, West 'BY GOD' Virginia
Posts: 785
Likes: 0
Received 0 Likes
on
0 Posts
Thank you for your supreme write ups. You give me the confidence to try some of your ideas myself ... on second though I will wait until someone can supervise
But thank you again,
Michael
Off to the sticky
... on second though I will wait until someone can supervise But thank you again,
Michael
Off to the sticky
05-16-2007, 05:40 PM
#14
Registered User
YOU DA MAN!! Great write-up! You are the author of "1st Generation Dodge Cummins Upgrades." So, when do you start publishing? And, can you sign mine please??
Jon
And, can you sign mine please?? Jon