Installing a Potentiometer in place of the TPS
 03-20-2007, 06:09 PM
#1
Registered User
Thread Starter
Installing a Potentiometer in place of the TPS
I did this over the weekend. What a difference! Thought I'd post some pics here and the parts I used. Hope someone finds this useful
I used a 5k linear pot that I purchased from Jameco Electronics. This is the part I used along with the ****.
Pot:
https://www.jameco.com/webapp/wcs/st...roductId=29196
****:
https://www.jameco.com/webapp/wcs/st...oductId=162499
Total for these parts was about $2.50. Shipping was more! (No, radio shack didn't have anything. At least not the one close to my home.)
The hardest part of the procurement process was trying to find some pins that would interface with the original TPS weatherpak style connecter. I finally found these from Radio Shack. Cost was around $3. It's a simple Serial type connector for computers. It also comes in a parallel style, but I didn't need that many pins!

Since my truck is a 2wd, I decided to mount the pot on the information center panel that's blank. This is where the 4wd transfer case info is displayed. This is the panel removed with the pot installed. Just had to drill one hole then a little "half" hole on the back for a pin that keeps the pot from rotating.

Here's the back of the pot with the wires soldered on. I shrink wrapped all the connections as well. The wire I used is a "repurposed" laptop computer power wire. It has 4 small conductors and is about 1/4" in diameter. I though it would be nice to have an extra wire just in case one decides to crap out sometime. This circuit carries very little current...it's only used to sense voltage...so conductor size isn't an issue.

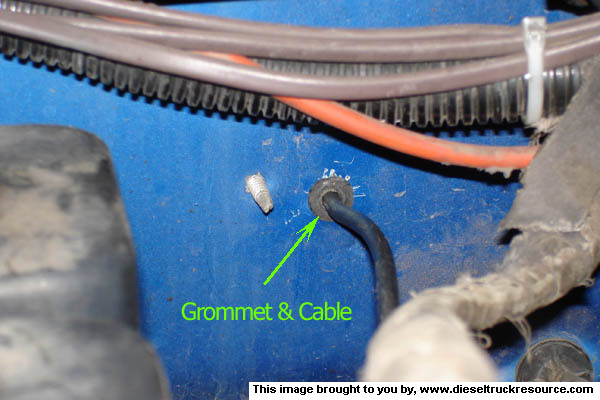
I brought the wire through the firewall just above the throttle cable. It's easy to access from the engine bay. It's just to the right (looking at the firewall) of the head...between the head and the brake booster. I used a rubber grommet to protect the wire from the metal. This is looking up from the driver's floor.

And from the engine compartment.
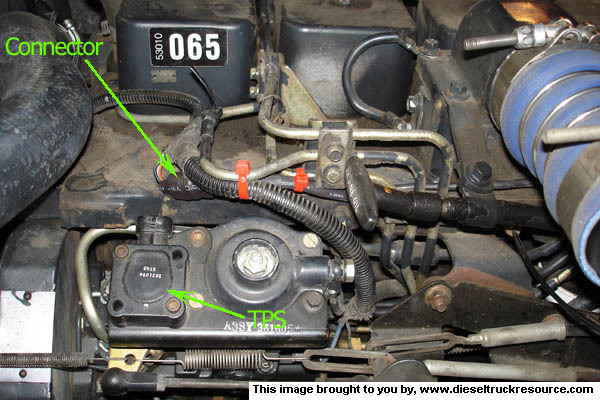
This is the new pins soldered onto the wires. The wire colors pretty closely matched the colors in the wiring harness. The red is the middle wire, or reference voltage. The white and black go on the sides. I just kept the orientation the same on the pots. The TPS is just a pot mounted upside down. So I flipped the harness connector, read the wire colors, and soldered the wires to the new pot in the same order (with the shaft sticking up). If you get the outside wires mixed up, it's not a big deal, the pot will just work backwards at that point. Just flip them and it will work fine.

I was a little worried how to properly space the pins to solidly fit the connector. As it turned out, after the shrink tube was applied, the spacing was perfect.

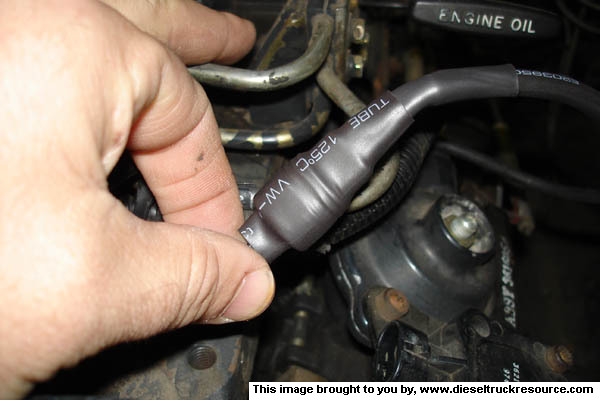
I then applied another layer of a larger size shrink tube to cover the wires and to hold the pins stable.
I then applied a third layer of an even larger shrink tube to cover the whole thing and to hold it together.
Here it is all tied up and ready to roll. I left the TPS in place just in case anything should happen to the pot. I can just disconnect the wire and plug in to the TPS.
And here's the final product on the dash.

As always..."I should have done this ages ago!" I love it. It will shift to O/D at 35mph when the **** is at about the 9 o'clock position. If I turn the **** to about the 11 o'clock position, the shift goes up to around 50 mph.
I used a 5k linear pot that I purchased from Jameco Electronics. This is the part I used along with the ****.
Pot:
https://www.jameco.com/webapp/wcs/st...roductId=29196
****:
https://www.jameco.com/webapp/wcs/st...oductId=162499
Total for these parts was about $2.50. Shipping was more! (No, radio shack didn't have anything. At least not the one close to my home.)
The hardest part of the procurement process was trying to find some pins that would interface with the original TPS weatherpak style connecter. I finally found these from Radio Shack. Cost was around $3. It's a simple Serial type connector for computers. It also comes in a parallel style, but I didn't need that many pins!
Since my truck is a 2wd, I decided to mount the pot on the information center panel that's blank. This is where the 4wd transfer case info is displayed. This is the panel removed with the pot installed. Just had to drill one hole then a little "half" hole on the back for a pin that keeps the pot from rotating.
Here's the back of the pot with the wires soldered on. I shrink wrapped all the connections as well. The wire I used is a "repurposed" laptop computer power wire. It has 4 small conductors and is about 1/4" in diameter. I though it would be nice to have an extra wire just in case one decides to crap out sometime. This circuit carries very little current...it's only used to sense voltage...so conductor size isn't an issue.
I brought the wire through the firewall just above the throttle cable. It's easy to access from the engine bay. It's just to the right (looking at the firewall) of the head...between the head and the brake booster. I used a rubber grommet to protect the wire from the metal. This is looking up from the driver's floor.
And from the engine compartment.
This is the new pins soldered onto the wires. The wire colors pretty closely matched the colors in the wiring harness. The red is the middle wire, or reference voltage. The white and black go on the sides. I just kept the orientation the same on the pots. The TPS is just a pot mounted upside down. So I flipped the harness connector, read the wire colors, and soldered the wires to the new pot in the same order (with the shaft sticking up). If you get the outside wires mixed up, it's not a big deal, the pot will just work backwards at that point. Just flip them and it will work fine.
I was a little worried how to properly space the pins to solidly fit the connector. As it turned out, after the shrink tube was applied, the spacing was perfect.
I then applied another layer of a larger size shrink tube to cover the wires and to hold the pins stable.
I then applied a third layer of an even larger shrink tube to cover the whole thing and to hold it together.
Here it is all tied up and ready to roll. I left the TPS in place just in case anything should happen to the pot. I can just disconnect the wire and plug in to the TPS.
And here's the final product on the dash.
As always..."I should have done this ages ago!" I love it. It will shift to O/D at 35mph when the **** is at about the 9 o'clock position. If I turn the **** to about the 11 o'clock position, the shift goes up to around 50 mph.

The following users liked this post:
hD fab (07-22-2023)
 09-08-2007, 08:37 PM
#3
Registered User

Join Date: Apr 2003
Posts: 425
Likes: 0
Received 0 Likes
on
0 Posts
WOW! I just logged back on - after a YEAR without internet access - and I was going to try and post pics, since I had to do this little trick to another truck, but I guess you beat me to it! VERY NICE WORK TUCKERDEE. Works great... don't it?
09-09-2007, 09:47 AM
#4
Registered User

Join Date: Apr 2006
Location: Bend, Oregon
Posts: 27
Likes: 0
Received 0 Likes
on
0 Posts
Potentiometer
Great pictures and writeup. I switched over several years age to a ten turn potentiometer and everything works great. The only thing you will not have is passing gear, I use the OD button to kick it out of Overdrive.
I took the whole TPS mess out and never plan to reinstall. With the TPS in place it will still wear out and eventually be useless anyway.
The best things about the switch to a pot is that it will not cost you 200 ever again and the TPS piece of junk will not die on the road in the middle of nowhere.
Jim
09-21-2007, 07:03 PM
#5
Registered User

Join Date: Dec 2004
Location: Connecticut
Posts: 27
Likes: 0
Received 0 Likes
on
0 Posts
TPS to Pot Fix
Has anyone tried to replace the TPS with a potentiometer (or how ever it's spelled) on a 1999 version?
This looks and sounds real interesting...as I sit here looking for help changing out the TPS with a new one.
This looks and sounds real interesting...as I sit here looking for help changing out the TPS with a new one.
 09-22-2007, 09:44 AM
#7
Registered User
Join Date: Jul 2007
Location: Arlington, Tx
Posts: 184
Likes: 0
Received 0 Likes
on
0 Posts
I did the same to my old truck after i sold to my friend, but i used a dremel to remove the connector portion of the tps and soldered the pot wires to the existing pins and plugged it right in. worked great but a lot more work and didn't look as clean.
Trending Topics
10-21-2007, 11:11 PM
#9
Registered User
Join Date: Dec 2003
Location: Garrard county, Kentucky
Posts: 3,077
Likes: 0
Received 0 Likes
on
0 Posts
I think my TPS in my 94 is about to go. This will work just the same in my truck as in a non lockup transmission, right? If so, ill definately be doing this soon, as i think my TPS is about shot.
Eric
Eric
10-22-2007, 10:31 AM
#10
DTR's Night Watchman & Poet Laureate
Great job and write up!!! I just got back last night from a 250 mile trip pulling my 12K trailer and pretty much lost OD tottally a few miles from home , made the whole drive with a "three speed" and got about 9-10 mpg...
it finally shifted in to OD going downhillat 70mph...but would drop back out the minute I let up on the pedal..
I am going to do this conversion this week, and this will sure help!!!
what woud be the problem with using the male connector from teh TPS, just cutting it off and splicing the new wire to it?
Can the OD off button still be used? I was plannign on using 14 0r 16 gauge auto wire.. willthat work?
, made the whole drive with a "three speed" and got about 9-10 mpg...it finally shifted in to OD going downhillat 70mph...but would drop back out the minute I let up on the pedal..
I am going to do this conversion this week, and this will sure help!!!
what woud be the problem with using the male connector from teh TPS, just cutting it off and splicing the new wire to it?
Can the OD off button still be used? I was plannign on using 14 0r 16 gauge auto wire.. willthat work?
10-22-2007, 11:32 AM
#11
Registered User
Thread Starter
I assume the the male connector from the TPS is molded all as one piece to the TPS. I suppose you could try it. Any sort of wire will work just fine. The current going throught these wires is so tiny. Yes, the O/D off button still works after doing this mod.
Good luck!
Good luck!
10-22-2007, 11:33 AM
#12
Registered User
Thread Starter
10-22-2007, 11:35 AM
#13
Registered User
Thread Starter
Yes, you can dial the shift point all the way up to around 50 mph in my experience. I also have a 2nd gen style shifter with the O/D button in the end. When I'm towing I tend to use it a lot. I just turn the O/D off at a stoplight. Then I engage it whenever I feel that it's appropriate. Usually around 45 or 50 mph. I let's me imagine that I'm driving a "4 speed"...sort of...anyway!
10-22-2007, 02:08 PM
#14
Registered User
Join Date: Dec 2003
Location: Garrard county, Kentucky
Posts: 3,077
Likes: 0
Received 0 Likes
on
0 Posts
Well my TPS had really been acting up, but I installed a potentiometer today, and it is working great now, and I can dial the shift to overdrive way up if i want(60mph or more), or down to about 35mph. It is working awesome so far though, and saved me about $200 for a new TPS. Here i thought my transmission was going out, and it was nothing more than the TPS going haywire. 
Eric
Eric
10-22-2007, 04:12 PM
#15
1st Generation Admin
