Basic Turbo Intake Tube Upgrade Guide
 09-09-2006, 06:34 PM
#1
1st Generation Admin
Thread Starter
This guide is intended for the novice gearhead who's just getting started with bombing their CTD. 
This is by no means the authoritative "How To" as it's pretty simple and can be varied quite a bit pending what materials you have available. Further, this doesn't address how you're mounting your BHAF be it loose, in a cold-air box, or using something like the Old Smokey Mount.
For the sake of simplifying this thread, I'm referencing parts available off the shelf from AIR FLOW SYSTEMS INC. (Link).
In a nut shell, you need the following parts ~

One BHAF, part number ~ B105006 (Link) (See alternate part numbers below)
Two 45 degree rubber elbows, part number ~ 45HL4 (Link)
Two linear feet of 4" tubing, part number ~ AL4 (Aluminum) (Link) NOTE: You can also use standard 4" exhaust tubing.
Five 4" T-Bolt clamps, part number ~ AF-400 (Link)
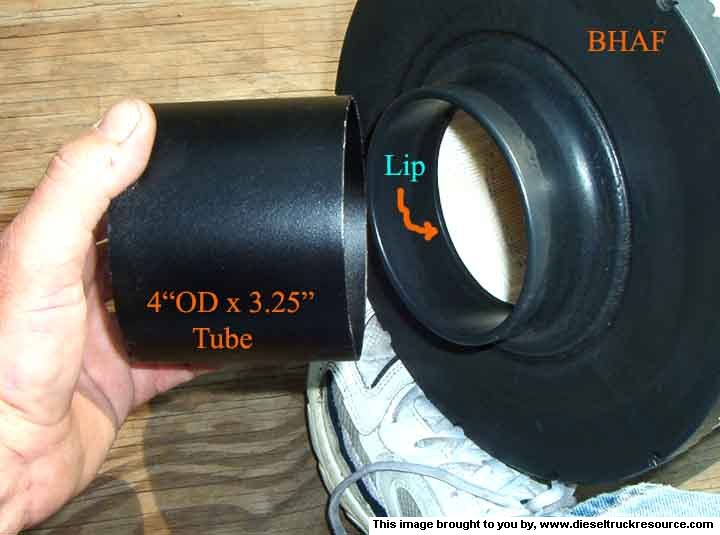
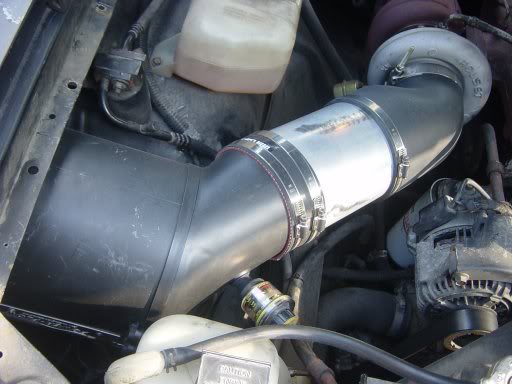
You'll need to cut the tubing into two pieces. One long one for the turbo, and one short one for the BHAF. My measurements were; 12" for the long one, and 3.25" for the short one. You'd do well to verify the measurements in your truck before cutting.
I cut mine so that there would be a minimum of 1/4" or so overlap past each clamp. This will help ensure the tube doesn't collapse when you tighten the clamp(s). If your tubes are a little longer, try to keep them short enough so as not to stick too far into the elbows and create sharp angles for the air to flow around.
Be sure to cut the tube ends square.
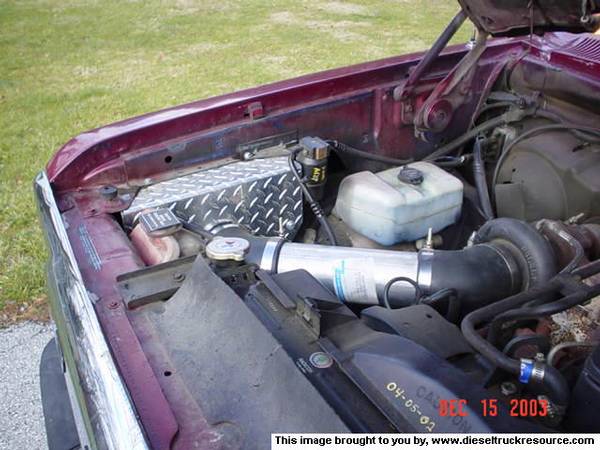
If you use chromed tubing . . . KEWL! If not, now is the time to paint or polish.
Since you cut the tube squarely, you can fit the short tube well against the lip inside the BHAF's connector. This is important as the BHAF connector is somewhat short and you'll want plenty of support for the clamping forces.
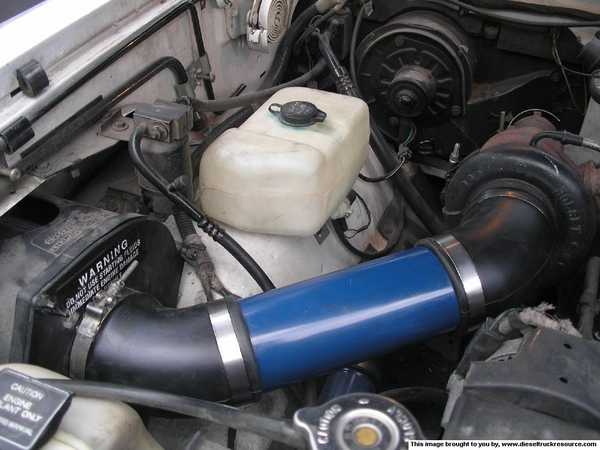
The assembly is straight forward but you'll come out ahead if you first visualize where each clamp is gonna go, and how you want it to look in the end. Put them on the rubber elbows loosely so that as you slip all the pieces together, the bolts will be oriented correctly.
Leave all the T-Bolt clamps loose till you get all the assembly positioned correctly. Finally, position the T-Bolt clamps so that there's about 1/4" of the rubber elbow sticking out. This will make things more secure.
If your BHAF is rigidly mounted, you might do well to tighten the clamps so that the tube assembly is sorta s t r e t c h e d. That should help give a little wiggle room for the engine torque movement.
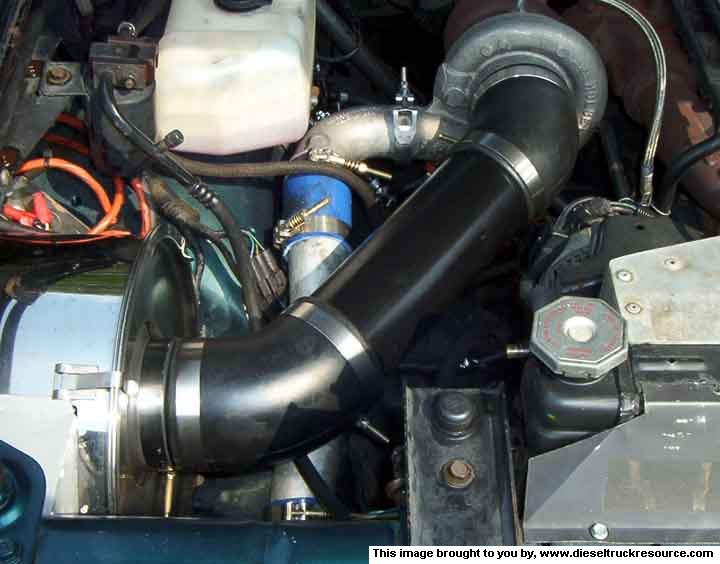
(Radiator reservoir removed for clarity).
Fellow DTR member installs ~
Falcon1's using OEM filter box ~
wannadiesel's using the 'Ol Smoky Mount ~
Useful links ~
bumpytruck's 'Ol Smoky Mount Template (Link) As Built (Link)
Mispillion Metal works 'Ol Smoky Mount Template (Link)
Ouchman's tightwad BHAF mount alternative
https://www.dieseltruckresource.com/...ad.php?t=97060
My Stock Pot Cold air Box (Link)
Ace's Stock Cold Air Intake Upgrade (Link)
Alternate BHAF part numbers ~
Fleetguard AH19037
NAPA 2790
WIX 42790
Baldwin PA2820
Hastings AF1012
Donaldson B105006
Donaldson ECB15006
Cummins 3912986
Cummins 3924541
Fleetguard AH19037
Baldwin PA-2806 (metal housing)
Baldwin PA2820
Here's hoping I've not missed anything and this proves helpful to all interested.
This is by no means the authoritative "How To" as it's pretty simple and can be varied quite a bit pending what materials you have available. Further, this doesn't address how you're mounting your BHAF be it loose, in a cold-air box, or using something like the Old Smokey Mount.
For the sake of simplifying this thread, I'm referencing parts available off the shelf from AIR FLOW SYSTEMS INC. (Link).
In a nut shell, you need the following parts ~
One BHAF, part number ~ B105006 (Link) (See alternate part numbers below)
Two 45 degree rubber elbows, part number ~ 45HL4 (Link)
Two linear feet of 4" tubing, part number ~ AL4 (Aluminum) (Link) NOTE: You can also use standard 4" exhaust tubing.
Five 4" T-Bolt clamps, part number ~ AF-400 (Link)
You'll need to cut the tubing into two pieces. One long one for the turbo, and one short one for the BHAF. My measurements were; 12" for the long one, and 3.25" for the short one. You'd do well to verify the measurements in your truck before cutting.
I cut mine so that there would be a minimum of 1/4" or so overlap past each clamp. This will help ensure the tube doesn't collapse when you tighten the clamp(s). If your tubes are a little longer, try to keep them short enough so as not to stick too far into the elbows and create sharp angles for the air to flow around.
Be sure to cut the tube ends square.
If you use chromed tubing . . . KEWL! If not, now is the time to paint or polish.
Since you cut the tube squarely, you can fit the short tube well against the lip inside the BHAF's connector. This is important as the BHAF connector is somewhat short and you'll want plenty of support for the clamping forces.
The assembly is straight forward but you'll come out ahead if you first visualize where each clamp is gonna go, and how you want it to look in the end. Put them on the rubber elbows loosely so that as you slip all the pieces together, the bolts will be oriented correctly.
Leave all the T-Bolt clamps loose till you get all the assembly positioned correctly. Finally, position the T-Bolt clamps so that there's about 1/4" of the rubber elbow sticking out. This will make things more secure.
If your BHAF is rigidly mounted, you might do well to tighten the clamps so that the tube assembly is sorta s t r e t c h e d. That should help give a little wiggle room for the engine torque movement.
(Radiator reservoir removed for clarity).
Fellow DTR member installs ~
Falcon1's using OEM filter box ~
wannadiesel's using the 'Ol Smoky Mount ~
Useful links ~
bumpytruck's 'Ol Smoky Mount Template (Link) As Built (Link)
Mispillion Metal works 'Ol Smoky Mount Template (Link)
Ouchman's tightwad BHAF mount alternative
https://www.dieseltruckresource.com/...ad.php?t=97060
My Stock Pot Cold air Box (Link)
Ace's Stock Cold Air Intake Upgrade (Link)
Alternate BHAF part numbers ~
Fleetguard AH19037
NAPA 2790
WIX 42790
Baldwin PA2820
Hastings AF1012
Donaldson B105006
Donaldson ECB15006
Cummins 3912986
Cummins 3924541
Fleetguard AH19037
Baldwin PA-2806 (metal housing)
Baldwin PA2820
Here's hoping I've not missed anything and this proves helpful to all interested.
 09-09-2006, 08:08 PM
#2
Registered User
Join Date: Feb 2003
Location: Florida Panhandle
Posts: 413
Likes: 0
Received 0 Likes
on
0 Posts
Nice. I bought all that stuff but hadn't yet figured out how to best connect to the BHAF.
When we get home from this trip we're on, I'll finish it off and show you what you started.
Thanks, DBF
When we get home from this trip we're on, I'll finish it off and show you what you started.
Thanks, DBF
09-09-2006, 08:13 PM
#3
1st Generation Admin
Thread Starter
Would someone chime in as to how they're connecting the rubber elbow to the OEM filter box? I can't remember, but it seems the short tube is used to support the single connection there. 
09-10-2006, 09:18 PM
#7
1st Generation Admin
Thread Starter
My comparison of the sound doesn't count.
In my case, I'm still running the silencer ring as I think there's a benefit to air flow albeit perhaps small. The cold air box certainly is open to passing what's left. While I was in there doing the tube, I whittled another three of four square inches from the bulkhead opening.
The turbo's barely audible in the background off idle to part throttle. The engine's just plain loud at full throttle. I think I can hear the turbo screaming along with it. I dunno. Somebody's gotta drive.
Keep in mind also I'm running the Big Honkin Muffler. So no low nuthin there. As a matter of fact, I'm fixing the move the muffler forward and install the resonator to compliment it.
Trending Topics

 09-17-2006, 08:24 PM
#10
Banned
Join Date: May 2006
Location: Florida
Posts: 3,660
Likes: 0
Received 0 Likes
on
0 Posts
This didn't work out exactly as planned for me. I could not get the 4" OD tubing inside the BHAF mounting lip.

I ended up doing it like Falcon1's and just putting the 4" rubber elbow over the BHAF lip. That was quite a task in itself though too! The lip is larger than the OD of the elbow so it took a crap load of stretching and wrestling to get it on there. Maybe we have slightly different BHAF's?
If I was to do it again, I think I would use all 5" stuff with a reducer at the turbo inlet. The 4" seems kinda small considering the length used. Even the stock tube is larger than 4" at the filter.
09-18-2006, 12:27 AM
#11
To guarantee your silicone or rubber fittings never slide or pop off, take your alum tubings to your local sheet metal shop and have them run a 1/4" wide external bead an 1 1/4" in from the ends. Your T- Bolt clamp would tighten just past the bead and stay there. The total time it would take a TRUE tin knocker would be about 8 minutes including set up of the beading machine.
Last edited by wannadiesel; 09-18-2006 at 05:36 PM. Reason: remove huge obnoxious quote
09-18-2006, 06:22 AM
#12
1st Generation Admin
Thread Starter
To guarantee your silicone or rubber fittings never slide or pop off, take your alum tubings to your local sheet metal shop and have them run a 1/4" wide external bead an 1 1/4" in from the ends. Your T- Bolt clamp would tighten just past the bead and stay there. The total time it would take a TRUE tin knocker would be about 8 minutes including set up of the beading machine.
With the way mine fit, you'd have to work very hard to get the pipes to slip off. I don't know this would be an issue following the guide but it certainly couldn't hurt.
09-18-2006, 10:38 PM
#13
Registered User

This is very good advice that should be heeded.
Had my cousin known this (and done it), he would have saved himself a bunch of time, trouble, and money.
He has a Ford/Cummins, remotely similar to mine.
A couple of weeks ago, the intake boot, nearest the turbo, slipped off the intake tube.
The turbo sucked in the rubber boot, and probably the clamp, destroying the turbo.
When he finally found a replacement turbo, and cranked it up, the engine was knocking.
Upon pulling the head, it was found that a piece of the rubber made its way into a cylinder and caused a hole in that piston.
The block had to be pulled, to be sent somewhere that could replace a liner.
All this over a simple rubber tube losing it's grip.
11-17-2009, 09:05 PM
#15

Here is another filter option if you can find a used setup at a good price.
Amsoil injen for a 2003+ 5.9 engine. All you need is a 4" to 5.5" reducing elbow 45 degree. About 8" of 5.5" air tube and clamps.
Amsoil injen for a 2003+ 5.9 engine. All you need is a 4" to 5.5" reducing elbow 45 degree. About 8" of 5.5" air tube and clamps.