DIY Rear Brakes, 04.5 3500 Dually
 06-28-2009, 09:53 PM
#1
Administrator / Free Time Specialist
Thread Starter
Join Date: Nov 2005
Location: Birmingham, Alabama
Posts: 7,707
Likes: 0
Received 14 Likes
on
8 Posts
DIY Rear Brakes, 04.5 3500 Dually
This article is meant to give you some insight into what to expect if you want to attempt a DIY rear brake job on an early 3rd gen dually. It is not the definitive "How-to" but it's what I did.
I found myself in need of pads and needed my rotors turned. Because the bleeders snapped off I also ended up replacing the calipers. I tried to locate a service manual or the large, bound Chilton manual but came up empty locally. Once I started into this, as an after-thought, I decided to snap a few pictures and try to help the next guy. Those of you with slow internet connections are not going to be happy. These are 7 meg pictures and may load slow, sorry. The reason for the large file size is the detail they produce. If you need a larger pic, go to my gallery and view it. Some of my pics were taken out of sequence so I'll try to fill in as many gaps as I can. My local dealer quoted me $350 plus parts and machining for a rear brake job. In my opinion, they'd earn their money but I didn't have the extra scratch so it's onto the stands in the driveway.
I don't think I'd recommend this project for a beginner. IMHO you should possess a little more than basic knowledge and hopefully would have at least seen this done on another vehicle before attempting it yourself......alone......without help. (yea right, who am I kidding).
OK, since you're going to try it anyway, let's at least talk about being safe before we work. On this project you'll want to start out on a solid work surface like concrete or asphalt. If you're going to be working on asphalt, you'll want something under your jack stands to keep them from sinking. Make sure your jack stands are rated for the weight you're working with and also remember jack stands are typically weight rated in pairs. They also don't work well when they're un-level, sinking, tilted or in any other position other than placed on their bottom on a flat, level, solid surface. I know my truck weighs 8500 lbs. What does your truck weigh?
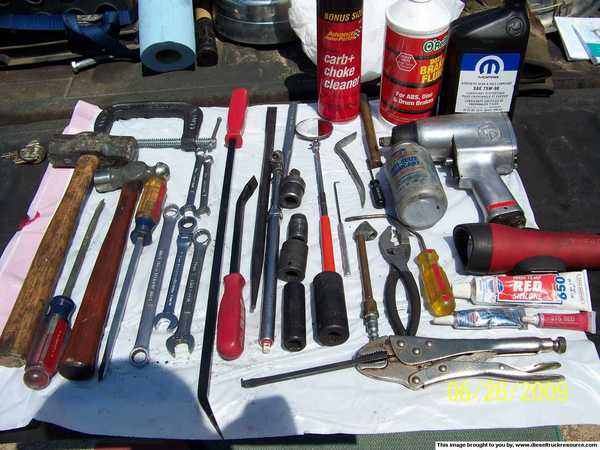
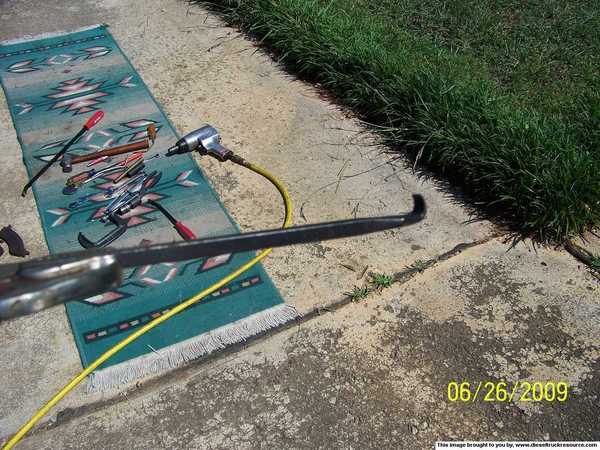
A little about what you'll need in the line of tools and supplies. Little more than basic hand tools will be all you need but a 1/2" impact is really necessary. There are allot of bolts and some are going to be tough. Here's a picture of the bulk of what I used. You will notice a couple of "not off the shelf" items. We'll get to those a little later. I'd make sure I had at least one can of brake cleaner or carb and choke cleaner.
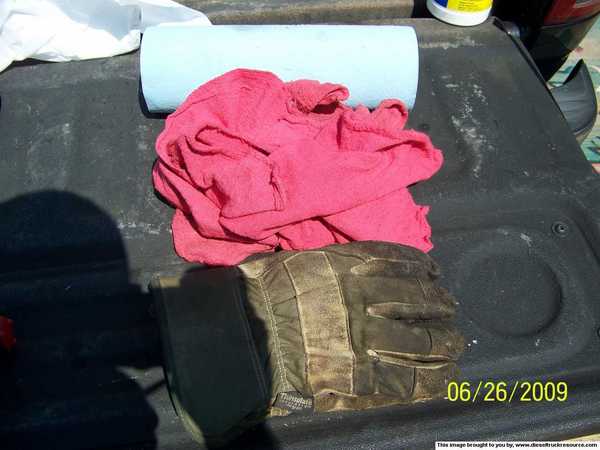
You'll also need an abundant (way more than you see here) supply of shop towels and rags. A pair of gloves is recommended.
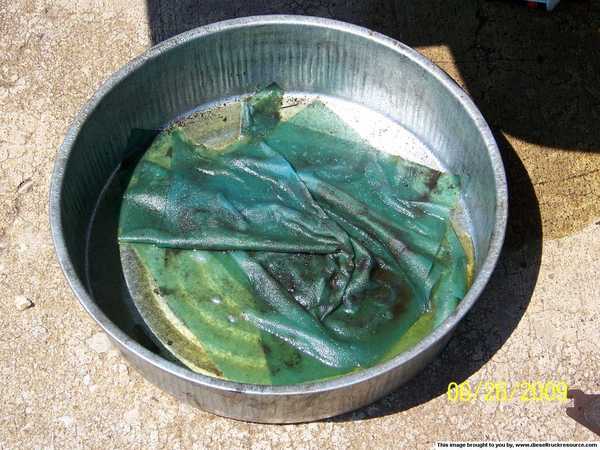
You'll also need a pan, two would be better, to catch the stray fluids you will encounter.
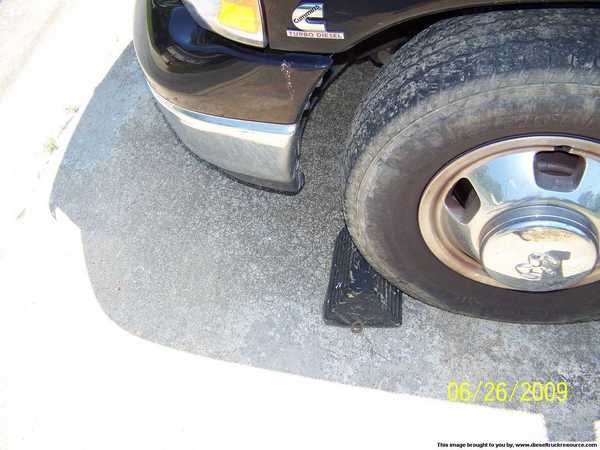
Back to safety, remember to chock your front wheels. Since you're going to be jacking the rear off the ground, it matters. You set your parking brake right? Stick shifts are in low or reverse and auto's are in park. Cool, let's make a mess!
I found myself in need of pads and needed my rotors turned. Because the bleeders snapped off I also ended up replacing the calipers. I tried to locate a service manual or the large, bound Chilton manual but came up empty locally. Once I started into this, as an after-thought, I decided to snap a few pictures and try to help the next guy. Those of you with slow internet connections are not going to be happy. These are 7 meg pictures and may load slow, sorry.
The reason for the large file size is the detail they produce. If you need a larger pic, go to my gallery and view it. Some of my pics were taken out of sequence so I'll try to fill in as many gaps as I can. My local dealer quoted me $350 plus parts and machining for a rear brake job. In my opinion, they'd earn their money but I didn't have the extra scratch so it's onto the stands in the driveway.I don't think I'd recommend this project for a beginner. IMHO you should possess a little more than basic knowledge and hopefully would have at least seen this done on another vehicle before attempting it yourself......alone......without help.
(yea right, who am I kidding).OK, since you're going to try it anyway, let's at least talk about being safe before we work. On this project you'll want to start out on a solid work surface like concrete or asphalt. If you're going to be working on asphalt, you'll want something under your jack stands to keep them from sinking. Make sure your jack stands are rated for the weight you're working with and also remember jack stands are typically weight rated in pairs. They also don't work well when they're un-level, sinking, tilted or in any other position other than placed on their bottom on a flat, level, solid surface. I know my truck weighs 8500 lbs. What does your truck weigh?
A little about what you'll need in the line of tools and supplies. Little more than basic hand tools will be all you need but a 1/2" impact is really necessary. There are allot of bolts and some are going to be tough. Here's a picture of the bulk of what I used. You will notice a couple of "not off the shelf" items. We'll get to those a little later. I'd make sure I had at least one can of brake cleaner or carb and choke cleaner.
You'll also need an abundant (way more than you see here) supply of shop towels and rags. A pair of gloves is recommended.
You'll also need a pan, two would be better, to catch the stray fluids you will encounter.
Back to safety, remember to chock your front wheels. Since you're going to be jacking the rear off the ground,
it matters. You set your parking brake right? Stick shifts are in low or reverse and auto's are in park. Cool, let's make a mess!
 06-28-2009, 09:54 PM
#2
Administrator / Free Time Specialist
Thread Starter
Join Date: Nov 2005
Location: Birmingham, Alabama
Posts: 7,707
Likes: 0
Received 14 Likes
on
8 Posts
You'll need to get your truck up in the air. A couple inches is enough and lower is usually more stable. I used a bottle jack because that's what I had. If you're doing it like me, jack one side and then the other. Notice the position of the jack stands. They're toward the outside of the axle and the axle is seated in the cup at the top of the stand. Both of these positions are important because they increase the stability of the truck while you are working under it.......without the wheels.

After you have the truck on the stands, climb out from under it and give it a good shake. If it wiggles around, moves back and forth or just doesn't feel stable, call a reputable towing service to put it back on the ground and get your check book out. You my friend are going to the dealer. OK, everybody knows how to set the stands, this is just old man humor.
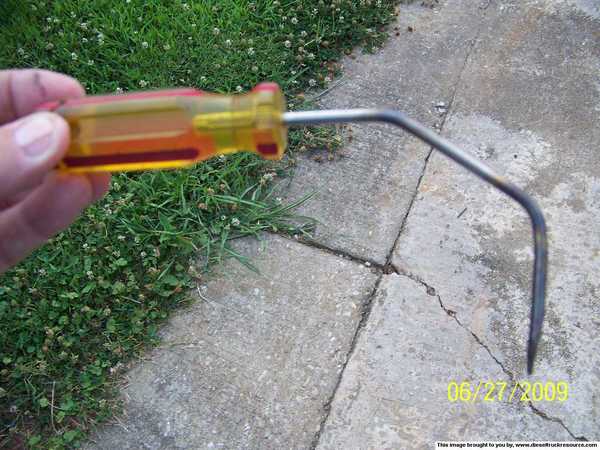
Now for the first of the "not off the shelf" tools. This is nothing more than an old screwdriver blade with the handle removed and the tip heated and bent 90*. I use it to remove the center caps. Clamp it tightly in a pair of vice grips.
There is a notch in the center cap.

Feel around until you find it and slip the tip of the blade into it and jerk hard, straight out. This would be a good time to mention that you may fall on your backside when the cap pops loose so take note of what's behind you and who's looking.
Next, using a wide screwdriver or a hubcap removal tool, carefully pry your beauty rings or simulators off. Once you've done that, grab your air wrench, a deep well socket and your PPE and get those lug nuts off. Be careful when you go to start pulling the wheels off. Like most things on our trucks they're heavy and dually wheels are prone to be a little lop-sided. The outer wheel should come off fairly easy but the inner can stick. If it does, the culprit is most likely the center hole but sometimes they rust onto the face of the hub. This happens allot when the truck has lived in an area where you see allot of rain, salty conditions like on the coasts or where there is allot of snow and chemicals are used to melt it off the highways. If you have this problem, the wheel can usually be removed with a few well placed strikes on the back of the rim with a sledge. You will have to alternate side to side every couple of swings. At this point we're going to assume that everything is cooperating and move on.
After you have the truck on the stands, climb out from under it and give it a good shake. If it wiggles around, moves back and forth or just doesn't feel stable, call a reputable towing service to put it back on the ground and get your check book out. You my friend are going to the dealer.
OK, everybody knows how to set the stands, this is just old man humor.Now for the first of the "not off the shelf" tools. This is nothing more than an old screwdriver blade with the handle removed and the tip heated and bent 90*. I use it to remove the center caps. Clamp it tightly in a pair of vice grips.
There is a notch in the center cap.
Feel around until you find it and slip the tip of the blade into it and jerk hard, straight out. This would be a good time to mention that you may fall on your backside when the cap pops loose so take note of what's behind you and who's looking.
Next, using a wide screwdriver or a hubcap removal tool, carefully pry your beauty rings or simulators off. Once you've done that, grab your air wrench, a deep well socket and your PPE and get those lug nuts off. Be careful when you go to start pulling the wheels off. Like most things on our trucks they're heavy and dually wheels are prone to be a little lop-sided. The outer wheel should come off fairly easy but the inner can stick. If it does, the culprit is most likely the center hole but sometimes they rust onto the face of the hub. This happens allot when the truck has lived in an area where you see allot of rain, salty conditions like on the coasts or where there is allot of snow and chemicals are used to melt it off the highways. If you have this problem, the wheel can usually be removed with a few well placed strikes on the back of the rim with a sledge. You will have to alternate side to side every couple of swings. At this point we're going to assume that everything is cooperating and move on.
06-28-2009, 09:55 PM
#3
Administrator / Free Time Specialist
Thread Starter
Join Date: Nov 2005
Location: Birmingham, Alabama
Posts: 7,707
Likes: 0
Received 14 Likes
on
8 Posts
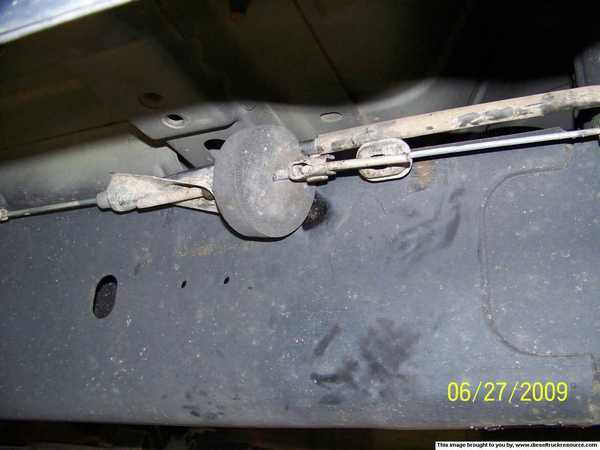
Next, you'll want to release the parking brake. You don't have to worry, you chocked the wheels...........remember. On the outside of the driver's side frame rail locate the parking brake cable adjuster and back it off a few turns. You don't need to unhook anything, just put a little slack in the cable.
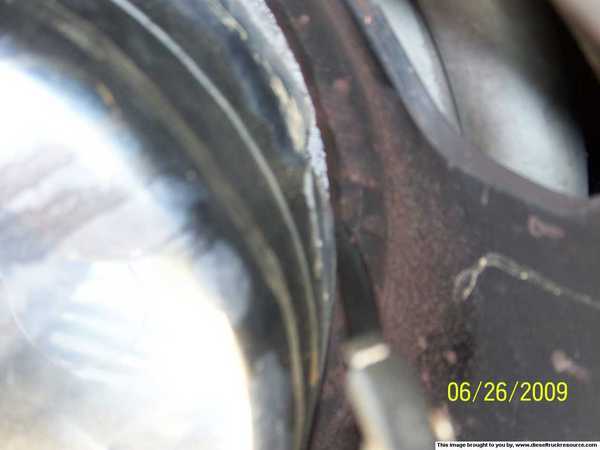
Now we're going to have a little fun. Crawl under the truck from the back. On the passenger's side, on the back of the backing plate, in the center near the very bottom but above the little shield there is a recessed area that is oval or oblong shaped. Inside of that there is a rubber plug. It looks like the type of plug you would see on a vehicle with drum brakes.

There's a good reason for that. You have drum brakes as well as disc brakes. The disc brakes are your primary or service brakes and the drum brakes are your emergency or parking brakes. Some of you may have adjusted your cable in the past trying to get your parking brake to hold better. Thats OK for a while but when it won't adjust any further you have to adjust your brakes here.
Go ahead and pry that little cap out and look in the hole with a good light. You'll see a star wheel but it's a little different. You can use a regular brake spoon to tighten or loosen this adjuster but just leave it alone for now, the real challenge is next door. What you are about to discover is that in order to reduce manufacturing costs and parts inventory, Dodge, like other manufacturers, use the same part but just turns it over to make lefts out of rights and rights out of lefts. The backing plate you just looked at has a twin and it's on the other side of the truck.............but it's upside down. That means the easily accessible, easy to adjust adjuster just turned into a booger bear pooch. You've now got around 4 inches or so of space to get some light, a mirror, a tool and you into. (Did I mention it's on top now?) Here's a pic of the general area. Starting at the top of the housing run your fingers up the backing plate. You'll feel another oval shaped hole with a rubber plug set deep into the backing plate. Go ahead and set up your light, grab your mirror and get the plug out.

And here is a pic of the adjuster with the rubber plug removed. The star wheel is to the left.

Here's the other custom tool I needed to work this adjuster. I had to tweak the final bend to get it to work.
The reason I had you start on the driver's side is because it's truly the toughest. If you can get the parking brake adjuster backed off you've got the hard part done. Once you finish backing it all the way off you can move on to the axle.
On the outside of the driver's side frame rail locate the parking brake cable adjuster and back it off a few turns. You don't need to unhook anything, just put a little slack in the cable.Now we're going to have a little fun. Crawl under the truck from the back. On the passenger's side, on the back of the backing plate, in the center near the very bottom but above the little shield there is a recessed area that is oval or oblong shaped. Inside of that there is a rubber plug. It looks like the type of plug you would see on a vehicle with drum brakes.
There's a good reason for that. You have drum brakes as well as disc brakes. The disc brakes are your primary or service brakes and the drum brakes are your emergency or parking brakes. Some of you may have adjusted your cable in the past trying to get your parking brake to hold better. Thats OK for a while but when it won't adjust any further you have to adjust your brakes here.
Go ahead and pry that little cap out and look in the hole with a good light. You'll see a star wheel but it's a little different. You can use a regular brake spoon to tighten or loosen this adjuster but just leave it alone for now, the real challenge is next door. What you are about to discover is that in order to reduce manufacturing costs and parts inventory, Dodge, like other manufacturers, use the same part but just turns it over to make lefts out of rights and rights out of lefts. The backing plate you just looked at has a twin and it's on the other side of the truck.............but it's upside down. That means the easily accessible, easy to adjust adjuster just turned into a booger bear pooch. You've now got around 4 inches or so of space to get some light, a mirror, a tool and you into. (Did I mention it's on top now?) Here's a pic of the general area. Starting at the top of the housing run your fingers up the backing plate. You'll feel another oval shaped hole with a rubber plug set deep into the backing plate. Go ahead and set up your light, grab your mirror and get the plug out.
And here is a pic of the adjuster with the rubber plug removed. The star wheel is to the left.
Here's the other custom tool I needed to work this adjuster. I had to tweak the final bend to get it to work.
The reason I had you start on the driver's side is because it's truly the toughest. If you can get the parking brake adjuster backed off you've got the hard part done. Once you finish backing it all the way off you can move on to the axle.
06-28-2009, 09:56 PM
#4
Administrator / Free Time Specialist
Thread Starter
Join Date: Nov 2005
Location: Birmingham, Alabama
Posts: 7,707
Likes: 0
Received 14 Likes
on
8 Posts
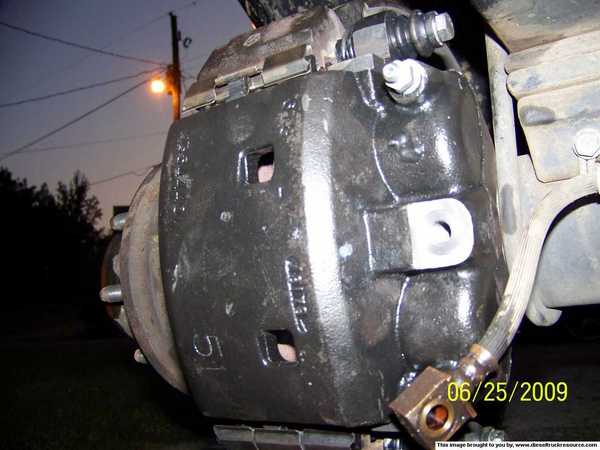
To pull the axle you need your impact gun again, a regular socket and your PPE. Here's what you're looking at.
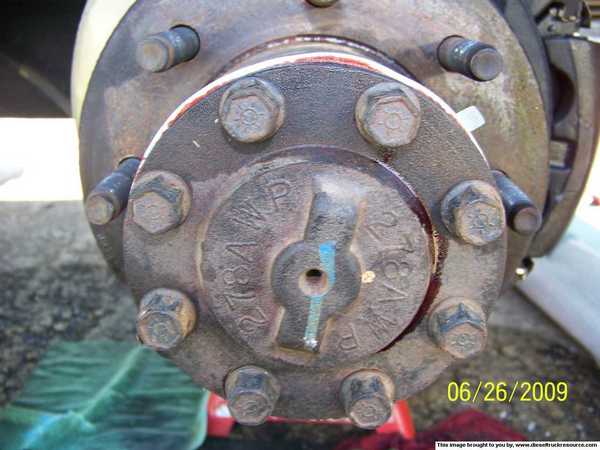
Go ahead and start taking out bolts but leave the last two. These bolts have a chemical thread locker on them and they can be a little tough to remove. Make sure you keep your socket pushed down all the way on the heads while you are removing them. You don't want to round one of these off.
Now would be a good time to put that pan you have under the axle.
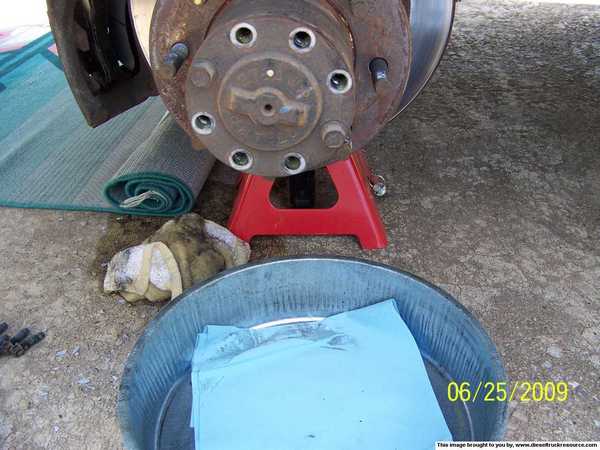
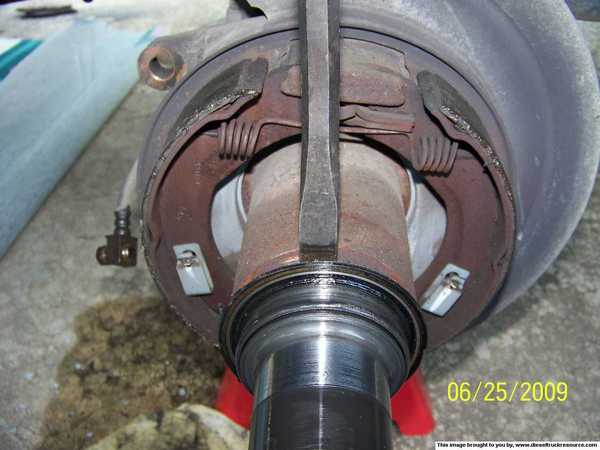
Good, the pan's ready, take out the last two bolts. Once you take out all the bolts, give the axle a light tap on the end cap with a hammer to break it lose. Usually they pop right lose on the first tap but it may take a bit more. Remember to hit in the middle of the end cap and toward the truck. DO NOT hit sideways on the cap. Once the cap breaks loose you'll get a little fluid running out of the tube. Oh crap, you broke it!!! No, just kidding, it's suppose to look this way.
Carefully slide the axle straight out of the tube and place it somewhere out of the way. Stand it up and keep it clean. Take a little care now to save some aggravation later.
Go ahead and start taking out bolts but leave the last two. These bolts have a chemical thread locker on them and they can be a little tough to remove. Make sure you keep your socket pushed down all the way on the heads while you are removing them. You don't want to round one of these off.
Now would be a good time to put that pan you have under the axle.
Good, the pan's ready, take out the last two bolts. Once you take out all the bolts, give the axle a light tap on the end cap with a hammer to break it lose. Usually they pop right lose on the first tap but it may take a bit more. Remember to hit in the middle of the end cap and toward the truck. DO NOT hit sideways on the cap. Once the cap breaks loose you'll get a little fluid running out of the tube. Oh crap, you broke it!!! No, just kidding, it's suppose to look this way.
Carefully slide the axle straight out of the tube and place it somewhere out of the way. Stand it up and keep it clean. Take a little care now to save some aggravation later.
06-28-2009, 11:00 PM
#5
Administrator / Free Time Specialist
Thread Starter
Join Date: Nov 2005
Location: Birmingham, Alabama
Posts: 7,707
Likes: 0
Received 14 Likes
on
8 Posts
Some of you may like to remove the brakes before pulling the axles, that's fine. It really doesn't matter. I was just using the time to let the dripping stop. If you were just going to hang another set of pads you wouldn't pull the axles. I'm going to be removing the rotors to have them turned so the axles have to come out. Initially, I was hoping just to hang pads so I took the calipers out of the mounting brackets. If you're going to do this, let's look at a little hose saver you can make really quick and on the cheap.
The last thing you want to do is leave that heavy caliper hang on the little flexible line that's connected to it. That's where these come in handy. All I did was bend two welding rods and like Dodge, same part but there's a left and a right. Pretty simple to use, just slip them between the springs and hang the caliper on the small hook using one of the vents.

You can see one of them at work in this picture.
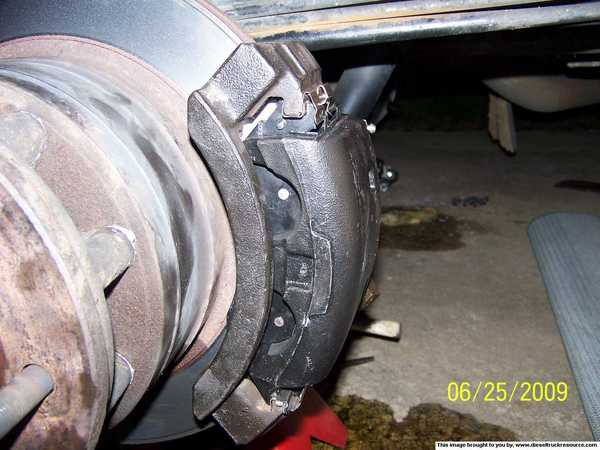
Unfortunately, I ended up having to pull and replace the calipers so I could have done it allot easier. FWIW, after wrestling the caliper out of the mounting bracket, I chose to just remove the mounting bracket as well. You don't have to pull the bracket to get the rotor off but it's allot easier to work with and re-install the caliper that way. If that's your choice as well and you are replacing the calipers or pulling the rotors, start by prying the pads back just a little and then break the mounting bolts loose. Before you remove the bolts completely, take the brake line loose from the caliper. That way you won't strain the flexible hose and you can get the whole assembly out of the way.
You'll want to put the caliper in a pan to work with it any further as it will be messy from this point on. In this picture I've already removed the slide pins that attach the caliper to the mounting bracket and started to pull the caliper loose from the mount. On the caliper you'll notice a single tang or tooth looking appendage sticking out from the bottom. Think of this as a latch.
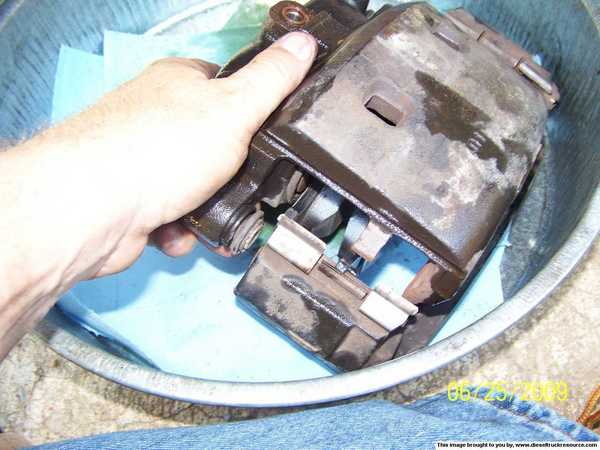
In this picture you can see both ends of the caliper. The single tang or latch, is at the top now. There are two tangs on the other end. Think of them as a hinge. When you reassemble these two parts later the hinge end goes into the mounting bracket first and then the latch end just snaps in. We'll talk about this again later as we re-assemble the brakes.
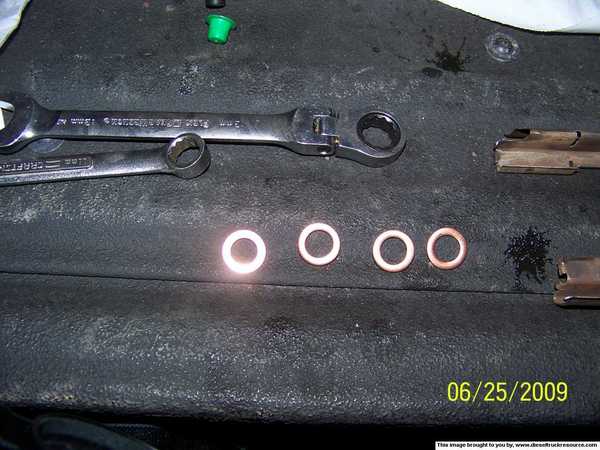
Like I said earlier, there is more than one way to take the brakes off the truck. You may also chose to pull the line loose and remove the caliper leaving the mounting bracket. Which ever way you chose, just take your time and mind how much strain you put on that flexible line. One other thing, if you remove the caliper from the truck and are going to re-use it, you will need to replace the copper washers that seal the banjo bolt to the hose and caliper. There are two washers per caliper. I discuss them later in the re-assembly. Once you have the calipers out of the way we'll proceed on to removing the rotor/hub assembly.
The last thing you want to do is leave that heavy caliper hang on the little flexible line that's connected to it. That's where these come in handy. All I did was bend two welding rods and like Dodge, same part but there's a left and a right. Pretty simple to use, just slip them between the springs and hang the caliper on the small hook using one of the vents.
You can see one of them at work in this picture.
Unfortunately, I ended up having to pull and replace the calipers so I could have done it allot easier. FWIW, after wrestling the caliper out of the mounting bracket, I chose to just remove the mounting bracket as well. You don't have to pull the bracket to get the rotor off but it's allot easier to work with and re-install the caliper that way. If that's your choice as well and you are replacing the calipers or pulling the rotors, start by prying the pads back just a little and then break the mounting bolts loose. Before you remove the bolts completely, take the brake line loose from the caliper. That way you won't strain the flexible hose and you can get the whole assembly out of the way.
You'll want to put the caliper in a pan to work with it any further as it will be messy from this point on. In this picture I've already removed the slide pins that attach the caliper to the mounting bracket and started to pull the caliper loose from the mount. On the caliper you'll notice a single tang or tooth looking appendage sticking out from the bottom. Think of this as a latch.
In this picture you can see both ends of the caliper. The single tang or latch, is at the top now. There are two tangs on the other end. Think of them as a hinge. When you reassemble these two parts later the hinge end goes into the mounting bracket first and then the latch end just snaps in. We'll talk about this again later as we re-assemble the brakes.
Like I said earlier, there is more than one way to take the brakes off the truck. You may also chose to pull the line loose and remove the caliper leaving the mounting bracket. Which ever way you chose, just take your time and mind how much strain you put on that flexible line. One other thing, if you remove the caliper from the truck and are going to re-use it, you will need to replace the copper washers that seal the banjo bolt to the hose and caliper. There are two washers per caliper. I discuss them later in the re-assembly. Once you have the calipers out of the way we'll proceed on to removing the rotor/hub assembly.
06-28-2009, 11:03 PM
#6
Administrator / Free Time Specialist
Thread Starter
Join Date: Nov 2005
Location: Birmingham, Alabama
Posts: 7,707
Likes: 0
Received 14 Likes
on
8 Posts
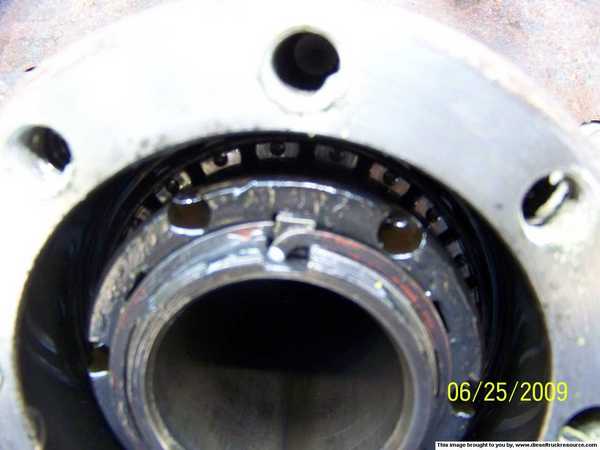
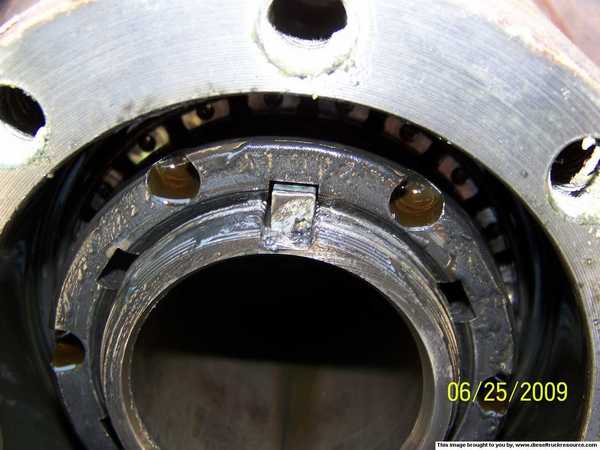
Sorry for the poor picture again. Your axle has been pulled from the tube and we're ready for the next step. At the top of the tube you can see the square key that keeps the bearing jam nut from backing off. Holding the key in place is a circular piece of spring steel (retainer) that locks into the threads of the axle tube. You can use a small screwdriver to pop the retainer off the tube. Take your time and do not bend this part. It will come off very easily.
You've got the retainer off, now use a small screwdriver or pliers to pull the square key.
You've got the retainer off, now use a small screwdriver or pliers to pull the square key.
With the retainer and key removed it's time to remove the nut. I didn't have the special tool to remove this nut so a punch and a 1.5 lb ball-peen hammer worked just as well for me. Before I started loosening the nut I tried tightening it. What I found was the nut was run down tight, then backed off to the first notch that would line up with the key way.

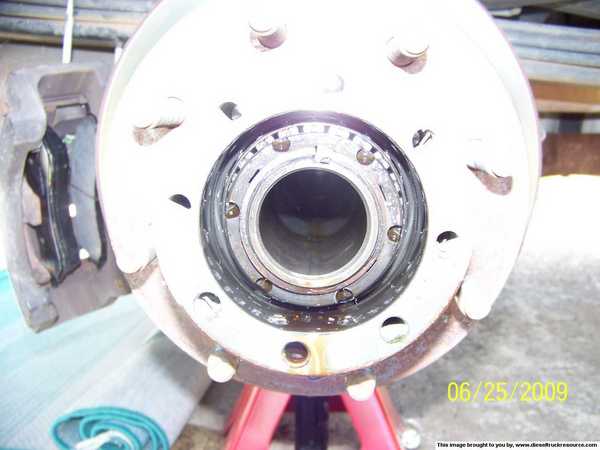
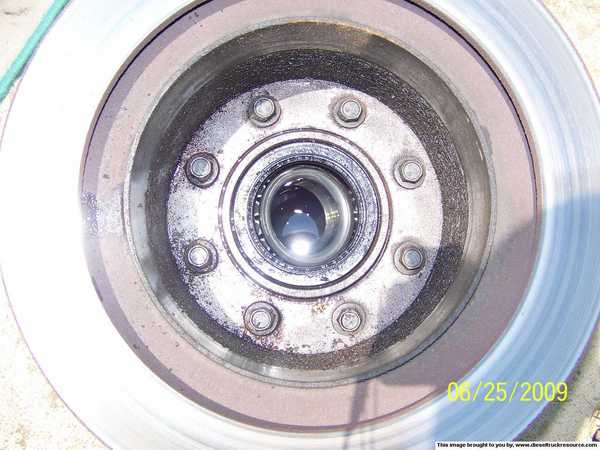
With the nut removed, this is what you should see, the outer wheel bearing.
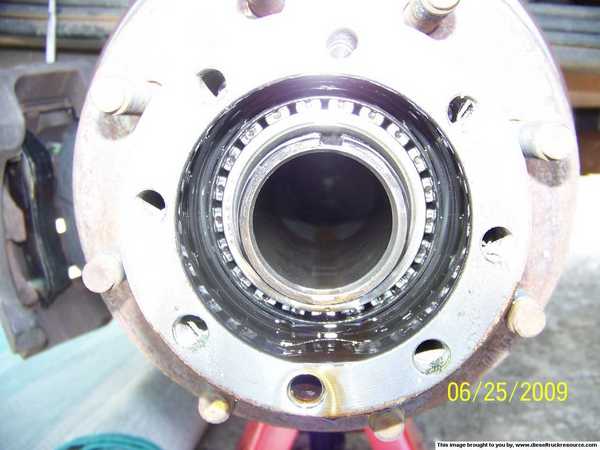
I was able to bump the rotor with my hand and get the bearing to pop out on the driver's side but the passenger's side wasn't as accommodating. If you try bumping the rotor be ready to catch the bearing as it may hop right out into your lap. It's a slippery little rascal so get ready. If it doesn't come out easily a pick or two may be needed to pull the bearing out of the axle tube. It should not be stuck, just slippery and hard to get hold of. Take care not to bend the cage surrounding the tapered rollers.
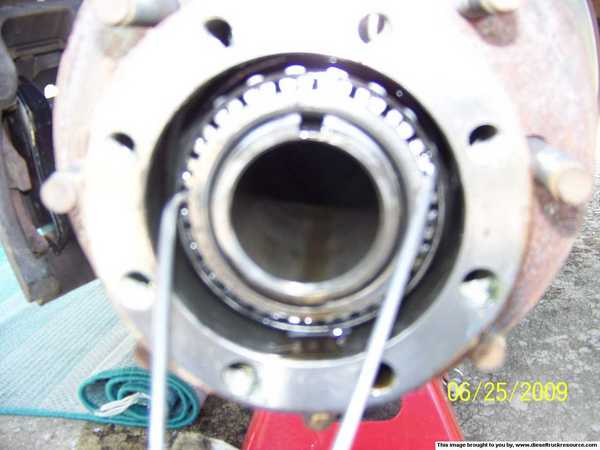
If you have a container or a clean rag laying nearby, it would be a good idea to put the bearing, key and retainer together and keep them clean. Dirt or grit in a bearing, even just a little, can kill your entire rear end if you install that dirty bearing. KEEP IT CLEAN!!!
OK, now for some heavy stuff. You've pulled the caliper and mounting bracket, backed off the parking brake, pulled the axle, removed the retainer, key and outer bearing jam nut and pulled the bearing. Now let's pull the rotor and hub assembly. Slide your pan back just a little because when you pull this assembly out you're going to want to set it in the pan with the hub down, rotor up. It's going to leak a good bit of oil so planning is important to minimize the mess.
This assembly is heavy so think about what you are doing and don't hurt your back. When you're ready, plant your feet and give a hard jerk straight out. The assembly should break free on the first or second pull because the only thing holding it is the inner wheel seal.
This is what you should see now. Unlike some older models where you have to knock the wheel studs out to separate the rotor from the hub so you can turn or replace the rotors, this truck is different. You have to remove these bolts instead, step away from the wheel studs! This photo is looking from the back of the rotor or the side nearest the truck toward the hub. A deep-well socket and 1/2" impact will spin these right out. They also have a chemical thread locker on them. Don't forget your PPE before you fire up that impact gun.
This photo is looking from the back of the rotor or the side nearest the truck toward the hub. A deep-well socket and 1/2" impact will spin these right out. They also have a chemical thread locker on them. Don't forget your PPE before you fire up that impact gun.
06-28-2009, 11:05 PM
#7
Administrator / Free Time Specialist
Thread Starter
Join Date: Nov 2005
Location: Birmingham, Alabama
Posts: 7,707
Likes: 0
Received 14 Likes
on
8 Posts
Once you have removed the bolts, give a little tap, underscore the word tap, upward on the edge of the rotor with a medium size (3lb) hammer. Remember to hold onto the rotor as it will separate pretty easily and the rotors are heavy.

Here's what it looks like in two pieces. If you are going to turn this rotor, now is a good time.

Next, let's answer that question you have about all those broken seal parts still stuck on the axle tube.

The best I can tell, the seal is made in three parts and separates by design. If it didn't, I don't think you could get the hub and rotor assembly off the axle tube.
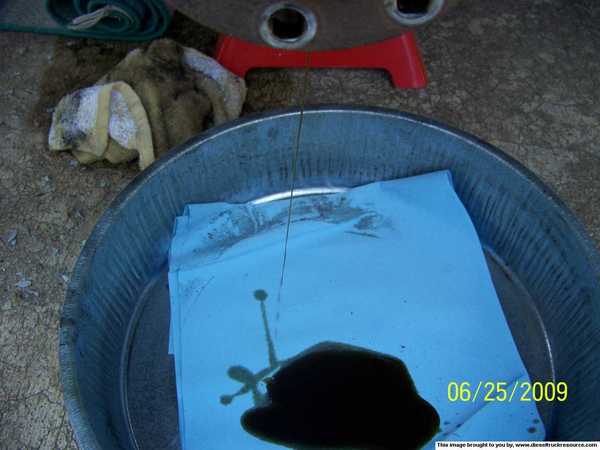
 In the photo below, the top two parts are what remained on the axle tube and the bottom part was still in the hub. If you would, notice what looks like grease on the seal components. This seal was weeping, or starting to leak. There was a film of heavy oil on the inside of the rotor, where the parking brake shoes are located. It wasn't going to be long before I was going to have to work on this axle because of the leak.
To get the seal off the axle tube, I used this little pry bar because the end was somewhat blunt and you want to take care not to scratch the axle tube. A burr on the tube could damage the new seal and you don't want to go through this again any time soon, trust me.


A couple light taps on the end of the bar got the hole thing moving.
Trending Topics
06-28-2009, 11:08 PM
#8
Administrator / Free Time Specialist
Thread Starter
Join Date: Nov 2005
Location: Birmingham, Alabama
Posts: 7,707
Likes: 0
Received 14 Likes
on
8 Posts
Then I used my hammer to gently persuade it the rest of the way off by tapping on one side and then the other. Once you get all the pieces off, grab a clean rag and wipe off the axle tube where the seal was.

To remove the seal from the hub I used the same bar as a moment ago. A couple light taps on the bar and the seal popped right out.

Once the seal was out, I used a clean shop towel to make sure there wasn't any trash that had gotten on the outer bearing. Wipe off the top of the hub and put the bearing back. When you're done cleaning, grab a new seal and let's install it.

I don't have the correct tool for installing this seal but I do have a little piece of brass and time. Take your time and don't bend this seal. It should go in pretty easily. Before you drive this seal in, you should note the machining inside the hub where the seal is to be installed. When you drive this seal down until it is flush it also bottoms out in the machined area in the hub. That's as far as you need to go.

A little bit about this type of seal. Since you are working on an oil bath axle, meaning the bearing gets it's lubrication from the oil contained within the differential as compared to a bearing which is packed with grease, the seal is a little different. You'll notice the seal is coated with a rubbery substance and has ridges on the surfaces where it contacts any of the machined, or mating surfaces, of the axle tube or hub. This is because the oil in the differential is more likely to leak past the seal than grease would.
So now we're all cleaned up and have a new seal installed. Let's mate that new or reconditioned rotor back up with the hub. I failed to get a picture of this but I put a light coat of anti-seize on the hub around the center hole and on the flat mating surfaces where the rotor contacts the hub.

Clean up the back of the rotor and we're ready to re-assemble this component.

Don't forget your chemical thread locker. I used the red because I always have but you may want to use the blue. Two or three drops on the lower half of each bolt is plenty. After you get all the bolts started, you can use your impact to run them down and then quickly torque to your specs.

At this point, if you need to change or degrease the parking brake shoes, now is the time. Mine were wet but in good shape so I chose to leave them there. When you finish with the shoes, grab some oil because we need to lube the surfaces where the seals will meet. On the axle tube, rub a little oil where the old seal was located. It's the largest machined shoulder on the axle tube. Also rub a little on the inside of the seal you just installed in the hub. This oil will make re-assembly much easier.
Grab that clean outer bearing, key and retainer. Set them out of the way but nearby, you're about to need them. Now you're ready to hang the hub and rotor back on the truck. Remember, this thing has allot of gravity attached to it so don't forget about your back. When you get ready, slide the assembly over the axle tube CAREFULLY!!! You just installed a brand new $25 seal, don't booger it up. As you slide the assembly on the axle tube it will self center. When it gets to the back you'll feel it contact the large shoulder, now push. The assembly should move a little when you strain on it but you're probably not there yet. What you've done is located the inner bearing on it's shoulder and started the seal. It's going to take another good push to finish seating the seal. If all has gone well you now have the assembly hanging there on the inner bearing.......and while you're inside looking for that cold beverage your brand new seal is getting the crap bent out of it. Stop thinking of yourself and get that outer bearing installed.....NOW!!!
To remove the seal from the hub I used the same bar as a moment ago. A couple light taps on the bar and the seal popped right out.
Once the seal was out, I used a clean shop towel to make sure there wasn't any trash that had gotten on the outer bearing. Wipe off the top of the hub and put the bearing back. When you're done cleaning, grab a new seal and let's install it.
I don't have the correct tool for installing this seal but I do have a little piece of brass and time. Take your time and don't bend this seal. It should go in pretty easily. Before you drive this seal in, you should note the machining inside the hub where the seal is to be installed. When you drive this seal down until it is flush it also bottoms out in the machined area in the hub. That's as far as you need to go.
A little bit about this type of seal. Since you are working on an oil bath axle, meaning the bearing gets it's lubrication from the oil contained within the differential as compared to a bearing which is packed with grease, the seal is a little different. You'll notice the seal is coated with a rubbery substance and has ridges on the surfaces where it contacts any of the machined, or mating surfaces, of the axle tube or hub. This is because the oil in the differential is more likely to leak past the seal than grease would.
So now we're all cleaned up and have a new seal installed. Let's mate that new or reconditioned rotor back up with the hub. I failed to get a picture of this but I put a light coat of anti-seize on the hub around the center hole and on the flat mating surfaces where the rotor contacts the hub.
Clean up the back of the rotor and we're ready to re-assemble this component.
Don't forget your chemical thread locker. I used the red because I always have but you may want to use the blue. Two or three drops on the lower half of each bolt is plenty. After you get all the bolts started, you can use your impact to run them down and then quickly torque to your specs.
At this point, if you need to change or degrease the parking brake shoes, now is the time. Mine were wet but in good shape so I chose to leave them there. When you finish with the shoes, grab some oil because we need to lube the surfaces where the seals will meet. On the axle tube, rub a little oil where the old seal was located. It's the largest machined shoulder on the axle tube. Also rub a little on the inside of the seal you just installed in the hub. This oil will make re-assembly much easier.
Grab that clean outer bearing, key and retainer. Set them out of the way but nearby, you're about to need them. Now you're ready to hang the hub and rotor back on the truck. Remember, this thing has allot of gravity attached to it so don't forget about your back. When you get ready, slide the assembly over the axle tube CAREFULLY!!! You just installed a brand new $25 seal, don't booger it up. As you slide the assembly on the axle tube it will self center. When it gets to the back you'll feel it contact the large shoulder, now push. The assembly should move a little when you strain on it but you're probably not there yet. What you've done is located the inner bearing on it's shoulder and started the seal. It's going to take another good push to finish seating the seal. If all has gone well you now have the assembly hanging there on the inner bearing.......and while you're inside looking for that cold beverage your brand new seal is getting the crap bent out of it. Stop thinking of yourself and get that outer bearing installed.....NOW!!!
06-28-2009, 11:10 PM
#9
Administrator / Free Time Specialist
Thread Starter
Join Date: Nov 2005
Location: Birmingham, Alabama
Posts: 7,707
Likes: 0
Received 14 Likes
on
8 Posts
Slide the bearing into hub, skinny end first. It should slide almost to the inner most threaded portion of the axle tube. If it doesn't, the inner seal isn't fully seated. Give another push on the rotor/hub assembly. Now you can slide the bearing in and put the nut on behind it. The smooth side of the nut goes against against the bearing. You should have around 1/2" of threads between you and the nut. Take the punch you used earlier and tighten the bearing. I know there is probably a procedure for tightening the nut but I don't have it. I put mine back like I found it. I tightened the nut until tight and then backed it off to the first notch in the nut that lined up with the key way. I'll try to get you the correct info on this. Re-install the key and retainer.
At this point you can do one of two things. You can complete the axle or hang the brakes. I chose to hang the brakes because if I had an issue and had to remove the hub/rotor assembly for any reason, I didn't have to pull the axles again. Since I had to replace my calipers, we'll be assembling everything off the vehicle and installing it as a complete unit. One of the first things you'll notice about the calipers is that the left and right look identical except for the location of the bleeder.

They both have the same part number.

I chose to lay out both calipers and mounting brackets on the tailgate at the same time. If you are unsure or have any reservations about how to disassemble and re-assemble these parts, do them one at a time so you have a complete assembly to look at for reference. Just remember, it's backwards or the opposite of the one you are working on.
In the photo below you will notice two tangs on the caliper. They look like little teeth. Think of those as a hinge. When you hang the caliper on the mounting bracket this is the end that will go in first.

Once it's seated, the other end basically snaps into place. The latch end has a single tang or tooth and it snaps into one of the stainless steel clips.

When you look at the new pads you can easily see a little metal tab on the end of two of the pads. This is the little noise maker that lets you know when your pads are nearly worn out. Note the location of this tab on your old pads and re-install the new ones just like the old ones. There should be two pads with tabs and two without. Make sure you don't put both pads with the tabs on the same wheel.

I had a little trouble finding the calipers. Only one store of one chain of parts stores had both the left and right units in stock locally. I got them both at O'Reilly and they came with the hardware kits and without the mounting brackets. Each hardware kit includes two new stainless steel slides, two new pins and two copper washers. Do not lose those washers and don't think they gave you two so you have an extra, you don't! It takes two for each wheel. Set these aside for now and don't lose them.
At this point you can do one of two things. You can complete the axle or hang the brakes. I chose to hang the brakes because if I had an issue and had to remove the hub/rotor assembly for any reason, I didn't have to pull the axles again. Since I had to replace my calipers, we'll be assembling everything off the vehicle and installing it as a complete unit. One of the first things you'll notice about the calipers is that the left and right look identical except for the location of the bleeder.
They both have the same part number.
I chose to lay out both calipers and mounting brackets on the tailgate at the same time. If you are unsure or have any reservations about how to disassemble and re-assemble these parts, do them one at a time so you have a complete assembly to look at for reference. Just remember, it's backwards or the opposite of the one you are working on.
In the photo below you will notice two tangs on the caliper. They look like little teeth. Think of those as a hinge. When you hang the caliper on the mounting bracket this is the end that will go in first.
Once it's seated, the other end basically snaps into place. The latch end has a single tang or tooth and it snaps into one of the stainless steel clips.
When you look at the new pads you can easily see a little metal tab on the end of two of the pads. This is the little noise maker that lets you know when your pads are nearly worn out. Note the location of this tab on your old pads and re-install the new ones just like the old ones. There should be two pads with tabs and two without. Make sure you don't put both pads with the tabs on the same wheel.
I had a little trouble finding the calipers. Only one store of one chain of parts stores had both the left and right units in stock locally. I got them both at O'Reilly and they came with the hardware kits and without the mounting brackets. Each hardware kit includes two new stainless steel slides, two new pins and two copper washers. Do not lose those washers and don't think they gave you two so you have an extra, you don't! It takes two for each wheel. Set these aside for now and don't lose them.
06-28-2009, 11:11 PM
#10
Administrator / Free Time Specialist
Thread Starter
Join Date: Nov 2005
Location: Birmingham, Alabama
Posts: 7,707
Likes: 0
Received 14 Likes
on
8 Posts
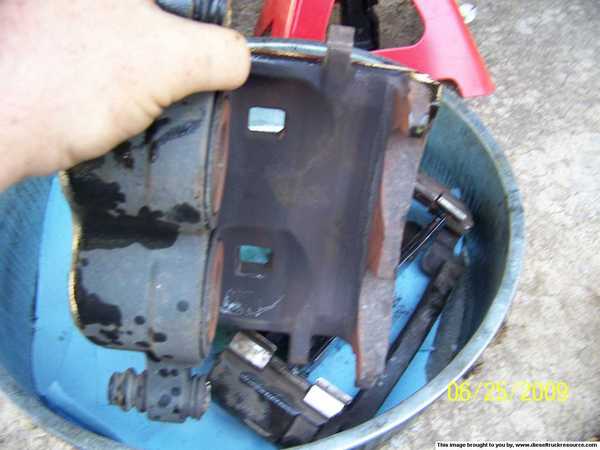
Here's a picture of one of the mounting brackets. You'll notice the the stainless steel clips on each end. The clips are different, both in length and style. They just snap over the ends of the bracket and are easy to remove and install, no tools needed. I would suggest cleaning the bracket before installing the new clips.

Go ahead and load the brake pads into the caliper now. Sorry, but I only have one pic and it's from the back. You'll notice the rubber boots on either side of the caliper. Try not to damage them while working with the caliper. Your new slide pins go in there. They are sealed and lubricated so water and dirt in there are bad.

So you've got the new pads in the caliper and checked (again) that you have the squeal tab in the correct location. Now lets put the caliper into the mounting bracket. Remember the end with two tangs/teeth goes in first. Once you have the hinge inserted into the bracket you just close the door and snap the other end into place. Then you install the two new pins that came with the caliper. I put just a little bit of caliper grease on the smooth part of the pins. This completes the assembly and you're almost ready to install it back onto the truck.
The primary reason I had to change my calipers was due to the fact that the bleeders broke off in both calipers. I tried to drill out one of them and use an easy-out to remove the broken bleeder but it broke as well. I felt replacement at this point was my best option. Before I installed my new calipers, I removed the bleeders and gave them a good smear of anti-seize. It made me feel better.

Next we'll hang the caliper and mounting bracket on the backing plate. Before you slip it over the rotor, reach in and pull the pads out as far as you can. This should give you enough clearance to get the assembly over the rotor and align the holes for the two mounting bolts. If you are installing new rotors, this may be a tight fit. As you work on this next step you'll probably realize that those two bolts are a pain to put back in from the outside. You may find it easier from under the truck. Once you have both bolts started, on with the PPE and let the impact do the rest.
Now we can get rid of that dripping brake line. Clean up the block at the end of the flexible line and make sure there are not any old copper washers still stuck on there.
Once you finish that grab two of the new washers and the banjo bolt. Install a new washer over the bolt, slide the bolt through the block, install another washer and screw the bolt into the boss on the caliper. BE CAREFUL HERE!!! The banjo bolt is hollow. It's center has been drilled out and it is not as strong as a regular solid bolt and can be easily broken.

Once you finish the brakes on the other side you have two choices. Depending on your available help you can put the axles back in or you can bleed the brakes. I chose to bleed the brakes since my help wouldn't be around if I did the axles next. Bleeding the brakes was as straight forward as any other vehicle. I started with the RR and when I didn't get any more air I moved to the LR. I went back and forth several times but the peddle was still a little spongy. I bled them both again, this time with the engine running. A couple more trips back and forth and the peddle was as good as new. Remember to top off your reservoir when you're done.
Now let's put those pesky axles back in. You'll need to remove the old seals first. You may need a scraper but mine just peeled off. After you clean the mating surface of the end cap up a little, you might want to apply a little RTV silicone or some type of sealer.

This is very helpful to hold the new seal in place while you install the axle.

Go ahead and slide the axle into the tube now but stop a little short so you can turn it and line it up. Then you can install your bolts with your chemical thread locker and torque them down.

Go ahead and load the brake pads into the caliper now. Sorry, but I only have one pic and it's from the back. You'll notice the rubber boots on either side of the caliper. Try not to damage them while working with the caliper. Your new slide pins go in there. They are sealed and lubricated so water and dirt in there are bad.
So you've got the new pads in the caliper and checked (again) that you have the squeal tab in the correct location. Now lets put the caliper into the mounting bracket. Remember the end with two tangs/teeth goes in first. Once you have the hinge inserted into the bracket you just close the door and snap the other end into place. Then you install the two new pins that came with the caliper. I put just a little bit of caliper grease on the smooth part of the pins. This completes the assembly and you're almost ready to install it back onto the truck.
The primary reason I had to change my calipers was due to the fact that the bleeders broke off in both calipers. I tried to drill out one of them and use an easy-out to remove the broken bleeder but it broke as well. I felt replacement at this point was my best option. Before I installed my new calipers, I removed the bleeders and gave them a good smear of anti-seize. It made me feel better.
Next we'll hang the caliper and mounting bracket on the backing plate. Before you slip it over the rotor, reach in and pull the pads out as far as you can. This should give you enough clearance to get the assembly over the rotor and align the holes for the two mounting bolts. If you are installing new rotors, this may be a tight fit. As you work on this next step you'll probably realize that those two bolts are a pain to put back in from the outside. You may find it easier from under the truck. Once you have both bolts started, on with the PPE and let the impact do the rest.
Now we can get rid of that dripping brake line. Clean up the block at the end of the flexible line and make sure there are not any old copper washers still stuck on there.
Once you finish that grab two of the new washers and the banjo bolt. Install a new washer over the bolt, slide the bolt through the block, install another washer and screw the bolt into the boss on the caliper. BE CAREFUL HERE!!! The banjo bolt is hollow. It's center has been drilled out and it is not as strong as a regular solid bolt and can be easily broken.
Once you finish the brakes on the other side you have two choices. Depending on your available help you can put the axles back in or you can bleed the brakes. I chose to bleed the brakes since my help wouldn't be around if I did the axles next. Bleeding the brakes was as straight forward as any other vehicle. I started with the RR and when I didn't get any more air I moved to the LR. I went back and forth several times but the peddle was still a little spongy. I bled them both again, this time with the engine running. A couple more trips back and forth and the peddle was as good as new. Remember to top off your reservoir when you're done.
Now let's put those pesky axles back in. You'll need to remove the old seals first. You may need a scraper but mine just peeled off. After you clean the mating surface of the end cap up a little, you might want to apply a little RTV silicone or some type of sealer.
This is very helpful to hold the new seal in place while you install the axle.
Go ahead and slide the axle into the tube now but stop a little short so you can turn it and line it up. Then you can install your bolts with your chemical thread locker and torque them down.
06-28-2009, 11:13 PM
#11
Administrator / Free Time Specialist
Thread Starter
Join Date: Nov 2005
Location: Birmingham, Alabama
Posts: 7,707
Likes: 0
Received 14 Likes
on
8 Posts
Bet you think we're almost done now. All that's left is to hang the wheels and ride, right? Sorry, we're still a long way from that but we're closer than we were. Let's recap a little, so far we have;Don't ask how I know... I suppose this step would be accomplished more efficiently if it were done right after the rotor/hub assembly was installed but this is where I did it. You can learn from my mistake.
Once you have the shoes adjusted up give the parking brake a push and see what you have. You'll probably have to get back under the truck and tighten the cable slack adjuster a little. Give it a few rounds and set the parking brake again. Once you start to see a little resistance in the peddle, go check your adjustments at the wheels again. I'll bet they moved and a couple more clicks on the adjusters will be required. Once you're happy with the wheel adjustments, go ahead and re-install the rubber plugs too. Now you do a final adjustment on the cable and you should be good. So you don't forget, go ahead and pump the service brakes a few times. When you pried the pads back you lost your rear brakes. A few pumps now will save you a few seconds terror later.
One or two more chores under the truck. Grab a 3/8" ratchet and that quart of rear end fluid and top off the rear end. The differential plug has a magnet in it, don't forget to clean it off while you have it out.

Drag the air hose under there with you (since it's already out) and check the spare. Mostly because I'm forgetful, I checked all my bolts one more time while I was under there. You'll probably find those little rubber caps that were on the original bleeders under there also. Go ahead and install them on the new bleeders to keep the crud out.

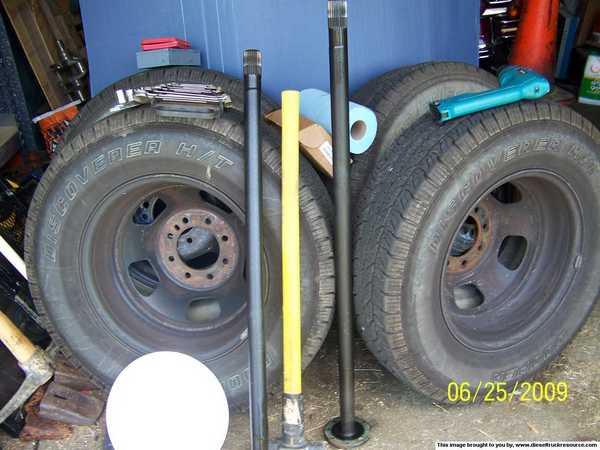
When you come out from under the truck, go ahead and check the other four while they're easy to get to. The bar is to help you lift them onto the hub.

Because the passenger's side was a little tough to remove on mine, I opted to paint the back of the hub and the shoulder of the hub on both wheels with anti-seize.

Now you can hang the inner wheel and put your Centramatics back on if you're so equipped.

Go ahead and hang the outer wheel and tighten the lugs to the proper torque.

Check and make sure you have applied the parking brake, the wheel chocks are still in place and as at the beginning, autos in park and sticks in first or reverse.

- Installed a new inner seal
- Installed new pads
- Replaced or reconditioned the rotors
- Accessed the parking shoes
- Installed new calipers
- Bled the brakes
- Installed the axles
Don't ask how I know... I suppose this step would be accomplished more efficiently if it were done right after the rotor/hub assembly was installed but this is where I did it. You can learn from my mistake.Once you have the shoes adjusted up give the parking brake a push and see what you have. You'll probably have to get back under the truck and tighten the cable slack adjuster a little. Give it a few rounds and set the parking brake again. Once you start to see a little resistance in the peddle, go check your adjustments at the wheels again. I'll bet they moved and a couple more clicks on the adjusters will be required. Once you're happy with the wheel adjustments, go ahead and re-install the rubber plugs too. Now you do a final adjustment on the cable and you should be good. So you don't forget, go ahead and pump the service brakes a few times. When you pried the pads back you lost your rear brakes. A few pumps now will save you a few seconds terror later.
One or two more chores under the truck. Grab a 3/8" ratchet and that quart of rear end fluid and top off the rear end. The differential plug has a magnet in it, don't forget to clean it off while you have it out.
Drag the air hose under there with you (since it's already out) and check the spare. Mostly because I'm forgetful, I checked all my bolts one more time while I was under there. You'll probably find those little rubber caps that were on the original bleeders under there also. Go ahead and install them on the new bleeders to keep the crud out.
When you come out from under the truck, go ahead and check the other four while they're easy to get to. The bar is to help you lift them onto the hub.
Because the passenger's side was a little tough to remove on mine, I opted to paint the back of the hub and the shoulder of the hub on both wheels with anti-seize.
Now you can hang the inner wheel and put your Centramatics back on if you're so equipped.
Go ahead and hang the outer wheel and tighten the lugs to the proper torque.
Check and make sure you have applied the parking brake, the wheel chocks are still in place and as at the beginning, autos in park and sticks in first or reverse.
06-28-2009, 11:15 PM
#12
Administrator / Free Time Specialist
Thread Starter
Join Date: Nov 2005
Location: Birmingham, Alabama
Posts: 7,707
Likes: 0
Received 14 Likes
on
8 Posts
Back under the truck one more time to get it off the jack stands. Be careful here and don't make a mistake on the last step!
Before you move the truck or even start it and put it in gear, go over the checklist one more time.
With any luck, in spite of my explanations, you have safely and correctly replaced, repaired or installed any or all of the parts we discussed here. Like I said in the beginning, this is not the definitive "How to" thread but it will keep you from moving blindly into a major project that you may not be ready for. If you're an experienced mechanic, I hope the pictures will be of some assistance if this is your first attempt at a brake system on a 3rd gen Dodge. If anybody has anything to add, please feel free. I didn't have any of the torque specs or procedures before starting this project. Any specs or technical data would be appreciated but unfortunately, copyright protected material cannot be posted unless you have written permission from the author/owner.
Before you move the truck or even start it and put it in gear, go over the checklist one more time.
- All the nuts, bolts and hoses are tight, no leaks
- Pump the brakes and make sure you have a full peddle
- Check the parking brake to make sure it's engaging properly
- Did you pick up all your tools
- Walk around the truck and make sure the area is clear before you move the truck
- OK, pull the chocks and good luck
With any luck, in spite of my explanations, you have safely and correctly replaced, repaired or installed any or all of the parts we discussed here. Like I said in the beginning, this is not the definitive "How to" thread but it will keep you from moving blindly into a major project that you may not be ready for. If you're an experienced mechanic, I hope the pictures will be of some assistance if this is your first attempt at a brake system on a 3rd gen Dodge. If anybody has anything to add, please feel free. I didn't have any of the torque specs or procedures before starting this project. Any specs or technical data would be appreciated but unfortunately, copyright protected material cannot be posted unless you have written permission from the author/owner.
The following users liked this post:
ronporterfield (03-14-2017)


