Replacing the Thermostat and Gasket
 04-11-2007, 05:26 PM
#1
DTR's Night Watchman & Poet Laureate
Thread Starter
Replacing the Thermostat and Gasket
Since there have been at least three threads about this topic recently, I thought I would do a write-up off changing mine out. I will add photos as soon as they are approved.
1) Disconnect the neg battery cables, and drain the coolant to below the level of the thermostat housing.
2) while coolant is draining, remove serpentine belt from alternator. Belt Idler takes a 3/8 inch ratchet.
3) loosen pivot bolt on alternator bracket(13 MM) and then remove alternator bracket bolt above thermostat housing( 10mm) swing alt. away from t-stat housing to allow access to lower bolt.
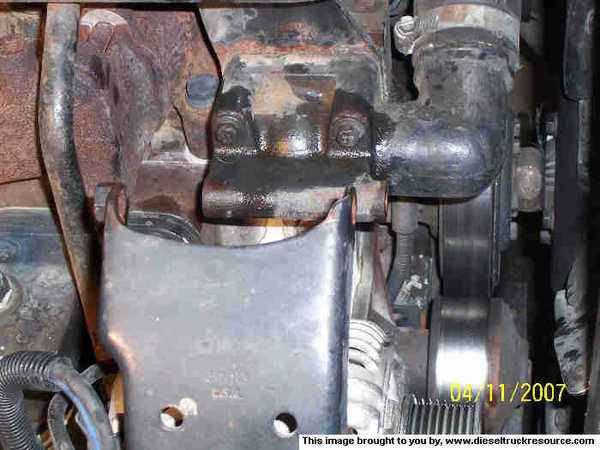
4) remove upper radiator hose from thermostat housing. Loosen hose clamp at radiator and swing hose up. This will keep it from dripping, and gets it out of the way.

5) Spray upper and lower housing bolts with PB Blaster or similar, let soak for awhile. Gently loosen bolts, two upper and one lower, all 10mm.
6) remove housing and lift ear along with old t-stat and gasket.

7) clean all mating surfaces. If silicon was used on housing, be certain to remove all of it from the mating surfaces and interior of housing. Old silicon in the housing can block your t-stat open.
8) position t-stat into housing. the "jingle-pins" should be at the 12 and 6 o'clock positions to prevent interference from the housing. This can cause air venting issues once the system is filled and or overheating, as the t-stat will not seat in the housing.

9) place the new gasket into the housing on to of the t-stat with the CHAMFER TOWARD THE T-STAT.

10) position the lift ear onto the housing without dislodging the gasket. The gasket should extend through the lift ear.
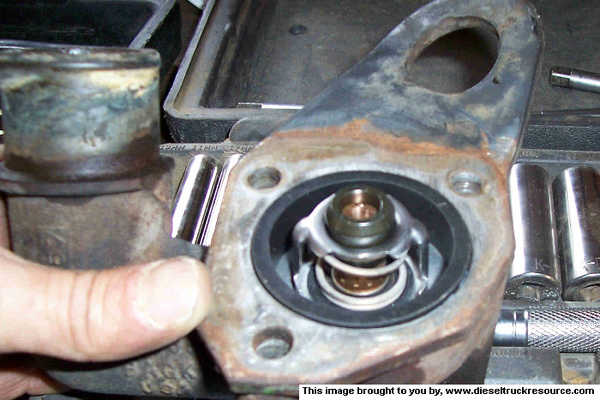
11) Carefully place the housing/lift ear in place and start the upper bolts. Per Cummins, silicon gasket maker is not required. Start the lower bolt, then tighten all three
12) reinstall alt and upper radiator hose. refill radiator.
13) start engine and let warm to operating temp, check coolant level and check for leaks.
its a good idea to replace the radiator cap when ever you replace the t-stat. our engines call for a 15psi sealed system cap.
I just did this today and start to finish it took me about 2 hours, so probably someone who is a competent mechanic could do it in a fourth that time
There has been some discussion about the difference between the OEM Cummins Thermostat and aftermarket ones. The aftemarket t-stat is on the left, the Cummins OEM is on the right:

When I was at the Cummins shop today, I asked the tech there about it. I was told that the aftermarket t-stats generally only have one "jingle-pin" ( the opening that allows coolant flow when the t-stat is closed). The Cummins has two.

The reasoning is that when the engine is at operating temp, the t-stat will close until the upper limit(180*) is reached and then reopen. the two jingle-pins allow sufficient coolant to flow to keep the engine from overheating, but allow it to retain enough heat to stay in designed operating range. This was per a service bulletin he had on file that I read.
1) Disconnect the neg battery cables, and drain the coolant to below the level of the thermostat housing.
2) while coolant is draining, remove serpentine belt from alternator. Belt Idler takes a 3/8 inch ratchet.
3) loosen pivot bolt on alternator bracket(13 MM) and then remove alternator bracket bolt above thermostat housing( 10mm) swing alt. away from t-stat housing to allow access to lower bolt.
4) remove upper radiator hose from thermostat housing. Loosen hose clamp at radiator and swing hose up. This will keep it from dripping, and gets it out of the way.
5) Spray upper and lower housing bolts with PB Blaster or similar, let soak for awhile. Gently loosen bolts, two upper and one lower, all 10mm.
6) remove housing and lift ear along with old t-stat and gasket.
7) clean all mating surfaces. If silicon was used on housing, be certain to remove all of it from the mating surfaces and interior of housing. Old silicon in the housing can block your t-stat open.
8) position t-stat into housing. the "jingle-pins" should be at the 12 and 6 o'clock positions to prevent interference from the housing. This can cause air venting issues once the system is filled and or overheating, as the t-stat will not seat in the housing.
9) place the new gasket into the housing on to of the t-stat with the CHAMFER TOWARD THE T-STAT.
10) position the lift ear onto the housing without dislodging the gasket. The gasket should extend through the lift ear.
11) Carefully place the housing/lift ear in place and start the upper bolts. Per Cummins, silicon gasket maker is not required. Start the lower bolt, then tighten all three
12) reinstall alt and upper radiator hose. refill radiator.
13) start engine and let warm to operating temp, check coolant level and check for leaks.
its a good idea to replace the radiator cap when ever you replace the t-stat. our engines call for a 15psi sealed system cap.
I just did this today and start to finish it took me about 2 hours, so probably someone who is a competent mechanic could do it in a fourth that time
There has been some discussion about the difference between the OEM Cummins Thermostat and aftermarket ones. The aftemarket t-stat is on the left, the Cummins OEM is on the right:
When I was at the Cummins shop today, I asked the tech there about it. I was told that the aftermarket t-stats generally only have one "jingle-pin" ( the opening that allows coolant flow when the t-stat is closed). The Cummins has two.
The reasoning is that when the engine is at operating temp, the t-stat will close until the upper limit(180*) is reached and then reopen. the two jingle-pins allow sufficient coolant to flow to keep the engine from overheating, but allow it to retain enough heat to stay in designed operating range. This was per a service bulletin he had on file that I read.

 04-13-2007, 07:57 AM
#4
DTR's Night Watchman & Poet Laureate
Thread Starter
I'll let you know.
09-05-2009, 03:13 PM
#6
Registered User
Join Date: Apr 2007
Location: East of Denver
Posts: 249
Likes: 0
Received 0 Likes
on
0 Posts
Rule #1 when working on a Cummins, if it is part of the engine, don't buy parts from NAPA, get it from the dealer.
09-05-2009, 03:36 PM
#7
Registered User

Join Date: Jun 2007
Location: exeter,ca
Posts: 409
Likes: 0
Received 0 Likes
on
0 Posts
The gasket is not as thick on the cummins t-stat like the aftermarket ones are. This solved all my heat problems on my 1990. Great write up..Can someone say "STICKY"....
Trending Topics
09-05-2009, 04:11 PM
#8
Registered User

Join Date: Apr 2005
Location: Colorado Springs, CO
Posts: 48
Likes: 0
Received 0 Likes
on
0 Posts
15 lb vs. 16 lb cap
I recently replaced my thermostat and cap. They gave me a 16 lb cap, what (if anything) does that do? For example, will it make the engine run hotter or cooler?
Thanks!
Thanks!
09-05-2009, 04:43 PM
#9
Registered User
Join Date: Apr 2007
Location: East of Denver
Posts: 249
Likes: 0
Received 0 Likes
on
0 Posts


 02-25-2012, 10:51 AM
#13
Registered User
Join Date: Sep 2010
Location: Alberta, Canada
Posts: 210
Likes: 0
Received 0 Likes
on
0 Posts
Just chiming in.
Watch you don't bend your fan blades. In case you do, hold a screwdriver, pen whatever on top or your rad and get a space between the item you are using and the fan blades. Slowly spin the fan with your hand and make sure the gap is the same for each blade. I keep running into this. Adjust blades as necessary with your hand until they are all true.
I also like to put anti seize on the bolts before I reinstall them. I just can't think what a pain it would be if one snapped and had to be removed.
Also the longer the breaker bar the better for the pulley.
I also like to "burb" the system once it's filled back up via the bung behind the rad on the block.
Good job Chrisreyn!!!!
02-26-2012, 12:36 AM
#14
Registered User
Join Date: Sep 2011
Location: Austin, TX
Posts: 176
Likes: 0
Received 0 Likes
on
0 Posts
I replaced my Tstat and gasket with cummins parts several months ago and no leaks whatsoever. This is the first time I've seen that type of a gasket for a thermostat housing and I was kind of skeptical  about whether that could work but it does.
about whether that could work but it does.


