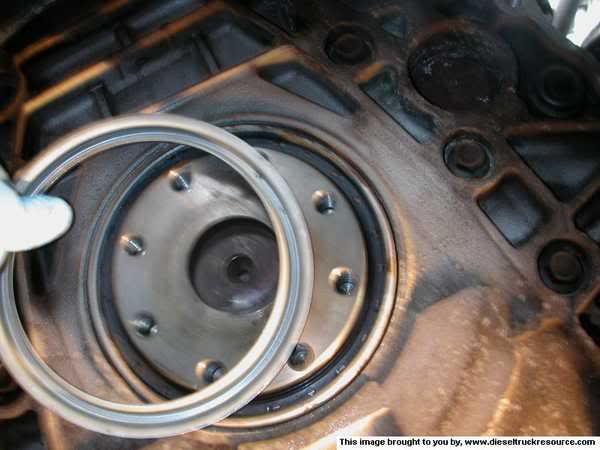
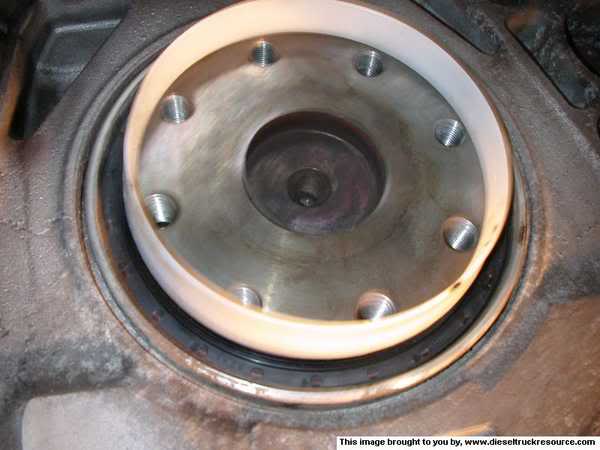
Rear cover that holds rear main seal
 08-03-2010, 07:49 PM
#1
Registered User
Thread Starter

Join Date: Oct 2003
Location: NC
Posts: 202
Likes: 0
Received 0 Likes
on
0 Posts
Rear cover that holds rear main seal
It's that piece that the u-shaped gasket in the following link is for:
http://cgi.ebay.com/ebaymotors/ws/eB...d=200502132657
I tried to replace my rear main seal, and when I drilled holes in the old seal to put pulling screws in I scored up the old piece bad enough to where I might have caused myself a major oil leak.
So, I wanted to r&r this cover and at the same time put another rear main seal into the "new" piece. Is there any special alignment I will have to perform if I go at it this way, or would I be better off to leave the current one on my truck and try to doctor it up with Permatex #2. It seems like it would be easier to replace the seal by removing the part first. It would also allow me to assess whether I ruined it with my drill bit.
Thanks if anyone can offer advice - Ted
 08-03-2010, 07:56 PM
#2
Cummins Guru
Seal housing available thru Chrysler or Cummins. Get the gastket also does not come with the housing. Not very expensive. Use some gray mopar silicone on lower edge of pan when installing. Will need to pull the adapter housing which bolts to rear of block to remove. There is also a square o-ring at the rear of block for the cam shaft need to replace that also.
INSTALLATION
CAUTION: The seal lip and the sealing surface on the crankshaft must be free from all oil residue to prevent seal leaks. The crankshaft and seal surfaces must be completely dry when the seal is installed. Use a soap and water solution on outside diameter of seal to ease assembly.
Clean the crankshaft journal with a suitable solvent and dry with a clean shop towel or compressed air. Wipe the inside bore of the crankshaft seal retainer with a clean shop towel.
Inspect the crankshaft journal for gouges, nicks, or other imperfections. If the seal groove in the crankshaft is excessively deep, install the new seal 1/8� deeper into the retainer bore, or obtain a crankshaft wear sleeve that is available in the aftermarket.
Install the seal pilot and new seal, provided in the replacement kit, onto the crankshaft.
Remove the seal pilot.
Install the installation tool over crankshaft.
1 - SEAL PILOT TOOL
2 - INSTALLATION TOOL
3 - SEAL
4 - RETAINER
Using a ball peen hammer, strike the tool (2) at the 12, 3, 6, and 9 o'clock positions until the alignment tool bottoms out on the retainer.
NOTE: Always install a new clamping ring, never reuse the old clamping ring.
Install the flywheel or converter drive plate, and clamping ring. Tighten the bolts to 137 N�m (101 ft. lbs.) torque.
Install the clutch cover and disc (if equipped) (Refer to 6 - CLUTCH/CLUTCH DISC - INSTALLATION).
Install the transmission and transfer case (if equipped).
Lower vehicle.
Connect battery negative cables.
Check engine oil level and adjust, if necessary.
Start engine and check for oil leaks.
08-03-2010, 09:38 PM
#3
Registered User
Thread Starter
Join Date: Oct 2003
Location: NC
Posts: 202
Likes: 0
Received 0 Likes
on
0 Posts
Thanks BigIron70 - in the parts list you gave :
1 - SEAL PILOT TOOL
2 - INSTALLATION TOOL
3 - SEAL
4 - RETAINER
I believe the seal pilot tool is the metal ring that came with the new seal I bought (and messed up), the seal is self-explanatory, and the retainer would be the part that holds the seal, which I also messed up by drilling into it . I am not sure what the "installation tool" is.
I have the same picture that you included in the PDF version of the Factory Service Manual, and I was also a bit confused by "Installation Tool" there as well.
I was able to find some used covers, for example: http://www.google.com/products?um=1&...ed=0CCwQzAMwAg
However, maybe it's because I'm not a mechanic, or just dense , but I can't follow what the FSM is telling me past "unbolt the oil pan and remove the housing bolts". There is some "sleeve" which I have no clue about and then the mystical "installation tool".
Unfortunately I've already made a mess for myself by messing the rear housing up, and I'm afraid if I take it off to replace it I'm going to make things worse. It's just crazy that I'm getting hung up on this goofy seal when I successfully did everything else to get it torn down this far when my clutch went out on me. I'm mortified of putting it all back together (due to my job schedule and busy life preventing me from working on this truck, it has been off the road now for going on one month) and having it leak after all that work!
Ted
1 - SEAL PILOT TOOL
2 - INSTALLATION TOOL
3 - SEAL
4 - RETAINER
I believe the seal pilot tool is the metal ring that came with the new seal I bought (and messed up), the seal is self-explanatory, and the retainer would be the part that holds the seal, which I also messed up by drilling into it
. I am not sure what the "installation tool" is.I have the same picture that you included in the PDF version of the Factory Service Manual, and I was also a bit confused by "Installation Tool" there as well.
I was able to find some used covers, for example: http://www.google.com/products?um=1&...ed=0CCwQzAMwAg
However, maybe it's because I'm not a mechanic, or just dense
, but I can't follow what the FSM is telling me past "unbolt the oil pan and remove the housing bolts". There is some "sleeve" which I have no clue about and then the mystical "installation tool". Unfortunately I've already made a mess for myself by messing the rear housing up, and I'm afraid if I take it off to replace it I'm going to make things worse. It's just crazy that I'm getting hung up on this goofy seal when I successfully did everything else to get it torn down this far when my clutch went out on me. I'm mortified of putting it all back together (due to my job schedule and busy life preventing me from working on this truck, it has been off the road now for going on one month) and having it leak after all that work!
Ted
08-03-2010, 10:48 PM
#4
Cummins Guru
The sleeve allows the seal to slide over the end of of crankshaft, You put the seal over it the wider part of the sleeve goes toward the crankshaft. Once the housing is bolted back onto the block you can take the seal with the sleeve install on it. Push the seal with sleeve onto the rear of crankshaft then take installer tool and tap it in holding tool tightly against the seal. Once the seal is in you can remove plastic sleeve. The tool is just a metal ring that is used to install seal to to the proper debth in housing. They usually come with the new seal. Use no oil on the seal a little soapy water can be used on seal so it will go into housing a little easier but is usually not necessary if you work the seal into housing evenly like explained Using a ball peen hammer, strike the tool (2) at the 12, 3, 6, and 9 o'clock positions until the alignment tool bottoms out on the retainer.
NOTE: Always install a new clamping ring, never reuse the old clamping ring.
NOTE: Always install a new clamping ring, never reuse the old clamping ring.
08-04-2010, 11:33 AM
#5
Registered User
Thread Starter
Join Date: Oct 2003
Location: NC
Posts: 202
Likes: 0
Received 0 Likes
on
0 Posts
Ok, I think I was mistakenly believing that in addition to using the plastic sleeve that comes installed in the new seal to get the seal itself lined up on the end of the crankshaft , and then using the metal ring to drive the seal into its final position, that there was some other special alignment tool I would need to use to reinstall the rear main seal "cover". This didn't make sense to me since that part is held on by 6 bolts and as long as I use a new "U" shaped gasket I should be good to go. This was my dilemma, since the FSM seems to make reference to this mystery alignment tool being necessary should I decide to install the new seal with the cover removed from the engine. Just to be sure, if I do decide to remove the cover before installing another new seal, is there any other alignment tool I need to put the cover (not the seal) back on besides what is shown in the following pictures:
and
and

Thread
Thread Starter
Forum
Replies
Last Post