OEM Cab light Install
 01-04-2007, 09:35 PM
#1
Banned
Thread Starter
Join Date: Dec 2005
Location: Twin Falls, Idaho
Posts: 5,194
Likes: 0
Received 0 Likes
on
0 Posts
OEM Cab light Install
Well with a little help from T-Boe and everyone on here I installed my Cablights that Dodge aparently couldn't do... I have detailed notes along with pic's but I borrowed my dad's digital camera and don't have the right usb cord thingyy yet... I will get there...
Taking the Truck Apart...
This is really simple mind that the directions from Dodge are S#@T!!!!
1 - A-Pillar's Pop the little cap's covering the bolts on both sides. I just took my pocket knife wedged it in there and twisted very carefully... The Take a 10MM socket and and extension and run the bolts out.. Gently pull upward and outward and the A-pillar's are off..
2 - Sun-Visor's... This is really simiple. Take a Torq Bit (don't remember which one) and unscrew the three screws holding the sun-visor's up there.. If you have lighted Visor's you will have wiring that will be attached THere is plenty of slack there so just pull enough out so that you can set one end on the dash and let it relax there... Now for the little clips that the other end of the visor's attach too. DA## Dodge there is no explination how to remove these.. These little things took me the longest to figure out how to remove... Take a flat head screwdriver and seperate the two peiced the key to this removal is to pull the front peice DOWN!! The front being the peice towards the window not the seat. Once it pulls down just keep pulling and it will pop out..
3- Overhead Consule.. Really simple.. Pop the light covers off with a flatheaded screwdriver and it reveals two more torq screws remove those and walla... Then there is a black cartridge that is attached to the roof that the overhead attaches to remove the two phillips screws and set in with the a-pillar's.
THen pull on the front of the liner and it pops loose.. I took my mag light and stuffed it up there so it was about 10" below the original roof so I wouldn't drill throug it...
Earlier in the Day I stopped at a friend's and measured his lights exactly so that I would know where to put the template and this is what I came up with.
First I measured the center light from the edge of the glass to the edge of the light it's 4" that goes for the other two on each side of the center light and then the last two - farthest ones are 6" from the glass... Then starting from the driver's side the lights go in order 5-3/8 - 17-3/4 - 26 - 35 - 46-5/8 to the center of the lights measuring from the back of the lights from the edge of the door when shut..
With these measurements I was able to put the template onto the roof with confidence and securely tape it down all across the roof and window...
DRILLING!!
First I took the 1/4 bit and slowly started to drill out each hole in the template.. I didn't have a punch and didn't need to keep the template so I just drilled straight through it.. First hole a little scarryy.. 9 more nooo problems.. Then the big daddy... The 7/8 bit... Yeas sir!! Went pretty darn fast.. I couldn't believe how thin the roof was.... I just double checked making sure that the flashlight was still pushing down onthe liner... Another safety feature would be too wrap tape around the bit up 1/2" and make a sleeve so that it stopped on the tape when it hit the roof... Really No sweat... Then I was a little **** with silicone... Don't want water running in there... So I filled each 1/4 hole with clear silicone and pushed in the teflon catches...
Then from the inside I set the wiring up under the liner in it's position. Then i pushed the wiring up through the hole that I just got done drilling... Once all the wiring was being help up by the liner I took out the flashlight and let the liner rest in a natural position and went back to the roof..
Once you have installed the Teflon catch's for the light screws take a screwdriver and push down the tab's in the center. This will lock them in there.. I also had enough silicone on there that they weren't goona move or leak... After that I also made a bead of silicone around the 7/8 hole ensuring that the elements weren't goona come in...
Take the supplied bulb's and push them into their corisponding light capsule and were getting there... Attach the wiring to the cab lights with a slight push and twist.. From there set each light above the Teflon cap's. I left each screw out from each light about 1/4" so that I could make sure that they were going to hit the hole... From there run the screws into the teflon catch's and your attached... You can also add a small bead of silicone to the rubber under the cab-lights... I forgot to but only have one light that won't quite seat perfectly so I ran some silicone around each light...
Once the lights are screwed down go back to the inside...
Wiring!! - If I'm like most people this kinda stuff really pisses me off... After doing a ton of research on here I found out that I could just tap into the passenger a-pillar and be done... We'll I found the right wire and everything - I thought spliced into it went over to the driver's side "hit the switches" andddddd NOTHING.... What... I was smart enough to leave my tester at the shop so I couldn't figure out what was going on... From the female plug that everyone talks about I have a male plug also... Where does this wiring go??? After about an hour of talking with t-boe and not being to get these babies to light I went and dug the instructions out of the garbage and re-ran the wiring down the driver's side a-piller and hooked it to the positive on the battery.. WOLLLLLAA We have lightageeee.. So I followed the directions and found the wire from the factory fuse box tapped it and good to go..
From there I buttoned up the liner then the visor's, overhead consule and then the a-pillar's
This is a really simple install and now that i've done it I could probably do it in two hours... But I was being extremely **** and it took me four hours plus one hour of trying to get power so not to bad of a project for an afternoon..
The real test was the last two days.. It has rained bucket's here and no water.... I can't believe Dodge wanted so much to put these in...
If anyone has any ???? Please contact me or PM me I will gladly help and I will try to get the pic's up in the next day or so. I took pic's of almost every step.. If I can't upload them I'll have to get them printed and the scan them in...
Thanks to everyone on here!!! Yeah you T-Boe....
Shane
On a good note I FOUND MY DIGITAL CAMERA!!! It was under my daughter's bed in all of her crap!!! I was about to lose it.. I do have one pic of the lights on at night that I just took...
 01-05-2007, 08:44 AM
#2
Registered User
Join Date: Dec 2005
Location: DFW, TX
Posts: 2,627
Likes: 0
Received 0 Likes
on
0 Posts
Thanks for the good writeup!
As soon as I get some free time ill pick up the lights and give the install a go...
I thought some people were also tapping a wire at the light switch? green wire maybe? Or are you supposed to tap at the fuse box?(I already have 3 wires tapped in there for the edge and turbo timer )
)
As soon as I get some free time ill pick up the lights and give the install a go...
I thought some people were also tapping a wire at the light switch? green wire maybe? Or are you supposed to tap at the fuse box?(I already have 3 wires tapped in there for the edge and turbo timer
)
01-05-2007, 11:25 AM
#3
Registered User
Join Date: Nov 2006
Location: St Louis
Posts: 136
Likes: 0
Received 0 Likes
on
0 Posts
Two thumbs WAY up.... I appreciate the time it takes to do a write up.
I'll get some pics of my install, assuming that the drill doesn't slip down the roof
thanks again.
chuck
I'll get some pics of my install, assuming that the drill doesn't slip down the roof
thanks again.
chuck
01-05-2007, 11:45 AM
#4
Registered User
Join Date: Aug 2005
Location: IL
Posts: 782
Likes: 0
Received 0 Likes
on
0 Posts
I did this also, and it was as described. One problem I did have, was that the dang white plastic catch deals spun freely once the screws hit them. I had to hold the plastic with pliers from under the roof while trying to screw them down. That was fun. Has anyone else run into that problem?
01-05-2007, 02:37 PM
#5
Banned
Thread Starter
Join Date: Dec 2005
Location: Twin Falls, Idaho
Posts: 5,194
Likes: 0
Received 0 Likes
on
0 Posts
Thanks for the good writeup!
As soon as I get some free time ill pick up the lights and give the install a go...
I thought some people were also tapping a wire at the light switch? green wire maybe? Or are you supposed to tap at the fuse box?(I already have 3 wires tapped in there for the edge and turbo timer)
As soon as I get some free time ill pick up the lights and give the install a go...
I thought some people were also tapping a wire at the light switch? green wire maybe? Or are you supposed to tap at the fuse box?(I already have 3 wires tapped in there for the edge and turbo timer
)I also had one catch spin freely and that's the one that won't let my center light sit exactly smooth.. A person could probably drill the hole at 3/16 and make it a little snugger..
01-05-2007, 02:54 PM
#6
Registered User
Join Date: Aug 2005
Location: IL
Posts: 782
Likes: 0
Received 0 Likes
on
0 Posts
I read another article where a guy tapped into the switch and the panel in the cab but I didn't feel like taking my dash apart to get to it... If I remember it was yellow and black.. But you should be able to find it with a wire tester..
I also had one catch spin freely and that's the one that won't let my center light sit exactly smooth.. A person could probably drill the hole at 3/16 and make it a little snugger..
I also had one catch spin freely and that's the one that won't let my center light sit exactly smooth.. A person could probably drill the hole at 3/16 and make it a little snugger..
Trending Topics
 01-05-2007, 08:53 PM
#9
Registered User

Great write up, i'm doing mine in the morning and I went to Lowes today to find a 7/8 drill bit. They told me they didn't carry any metal bits that large. Where did you guys get your bits? and what brand/type? thanks for the help, and wish me luck.
Scott
Scott
01-05-2007, 09:06 PM
#10
Registered User
Join Date: Nov 2006
Location: St Louis
Posts: 136
Likes: 0
Received 0 Likes
on
0 Posts
I'm planning on using a hole saw type bit:
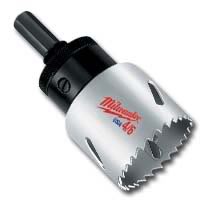
http://www.shopping.com/xPC-American...www.google.com
rather than a big steel twist type bit.
The hole saw has lots of small teeth that should cut a smoother hole than the twist type..I think???
anybody?
chuck
http://www.shopping.com/xPC-American...www.google.com
rather than a big steel twist type bit.
The hole saw has lots of small teeth that should cut a smoother hole than the twist type..I think???
anybody?
chuck
 01-06-2007, 09:51 AM
#14
Registered User
Join Date: Nov 2006
Location: Rock Springs, WY
Posts: 2,864
Likes: 0
Received 0 Likes
on
0 Posts
Beware! This project is not for the faint of heart! I felt like throwing up drilling 15 holes in the roof of a $40,000 truck with less than 3,000 miles on it. LOL
01-06-2007, 10:15 AM
#15
